# SenangUrus Business
A step-by-step instructions for using the **SenangUrus Business**. This manual is designed for new user to easily understand the system and navigate through the core features. Neatly sorted instructions, practical tips, and best practices to help you streamline daily operations and get the most out of **SenangUrus**.
# Getting Started
# Setup Your Business Details
1. After login, you will be redirected to the homepage.
[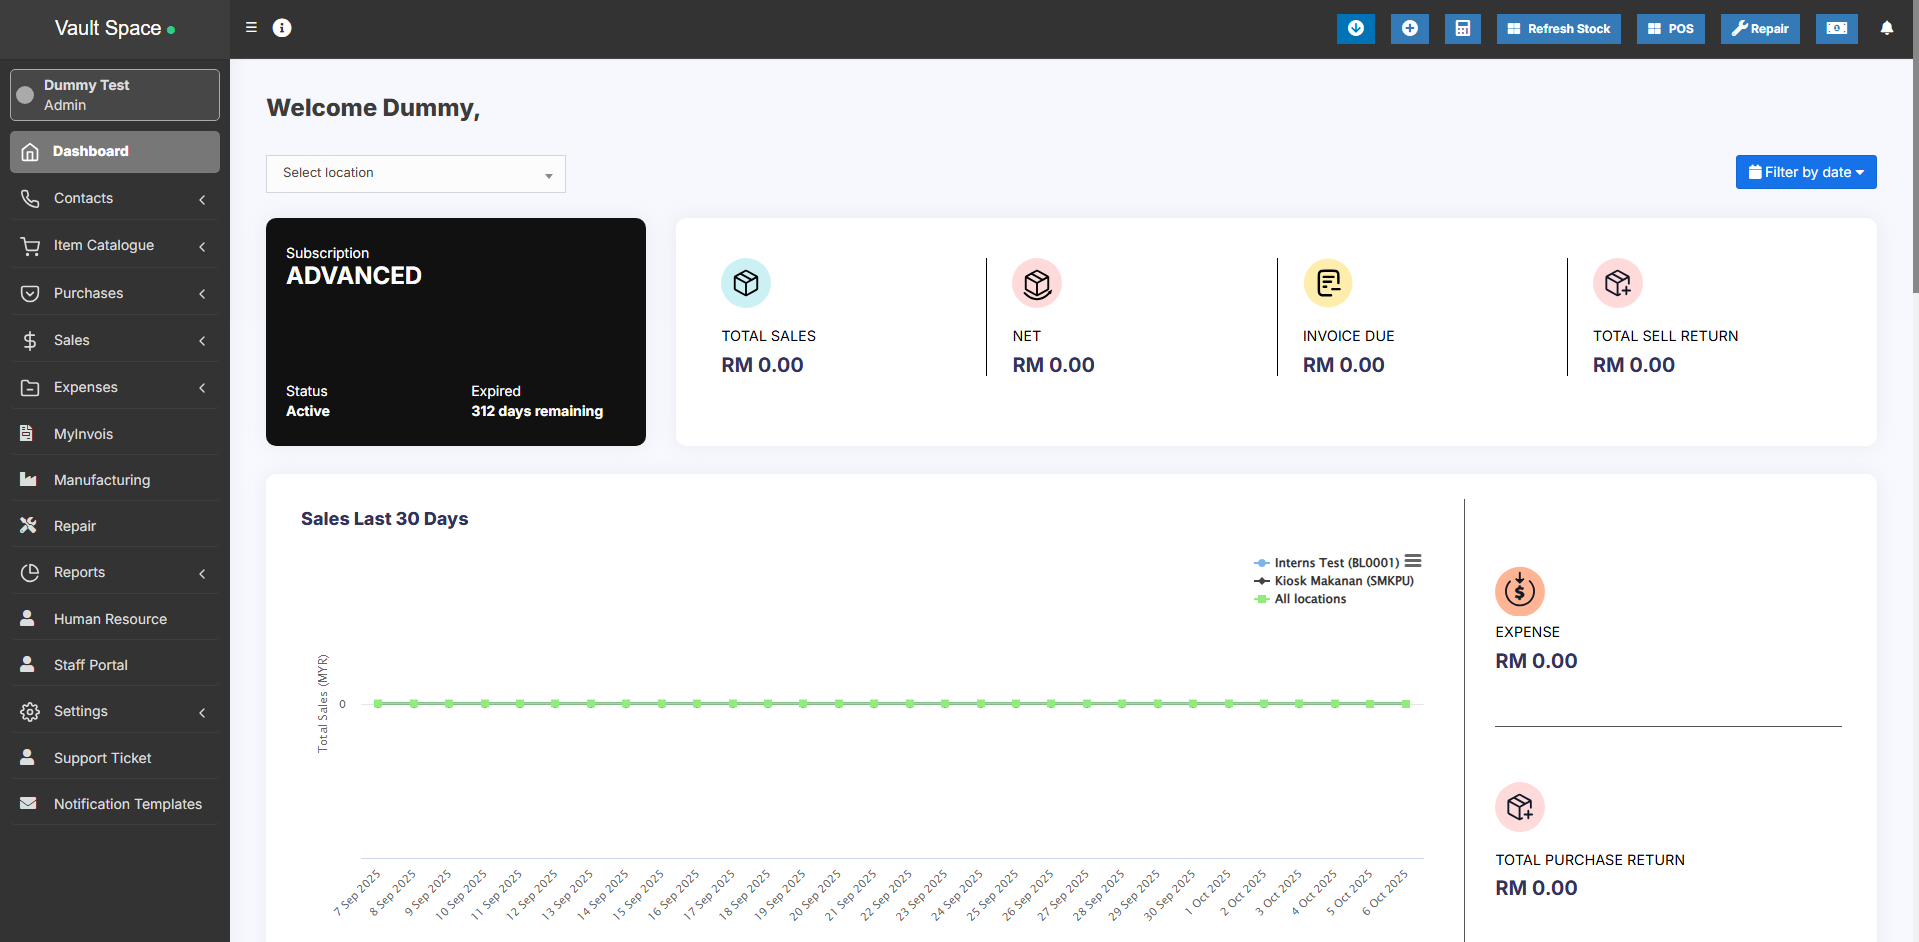](https://docs.senangurus.com/uploads/images/gallery/2025-10/URVimage.png)
The first thing you should do it setup your business details so that the system works according to you.
2. Setup your business by adding below mentioned details:
1. **Brand**: Add all the brands.
2. **Tax Rates**: Setup taxes and tax groups. ([Read More](https://docs.senangurus.com/books/senangurus-business/chapter/tax-settings))
3. **Units**: Add product units (pieces, meters, Litre etc) ([Read More](https://docs.senangurus.com/books/senangurus-business/page/product-units))
4. **Categories**: Add categories & Sub-Categories ([Read More](https://docs.senangurus.com/books/senangurus-business/page/product-category-categorizing-products))
5. **Business Settings**: Add some more details about your business. The more information you provide the better it will for you.
6. **Business Location**: (Only available in SenangUrus ERP-ADVANCE) Add Multiple business locations/ storefront/warehouse ([Read More](https://docs.senangurus.com/books/senangurus-business/page/setting-business-multiple-locations-or-ware-house-or-storefronts))
7. **Barcode Settings**: Setup the barcode sticker details for printing labels. ([Read More](https://docs.senangurus.com/books/senangurus-business/page/adding-a-new-label-or-barcode-settings))
8. **Invoice Settings**: Customise invoice number as per your need. You can customize the [invoice number/scheme](https://docs.senangurus.com/books/senangurus-business/page/setting-invoice-scheme) and also [invoice layouts](https://docs.senangurus.com/books/senangurus-business/page/invoice-layout).
# Business Management
# Registering your Business in Senangurus
# Registering a new business
Follow the steps below to register a new business in the system:
**Step 1: Click on the “Register Business” Button[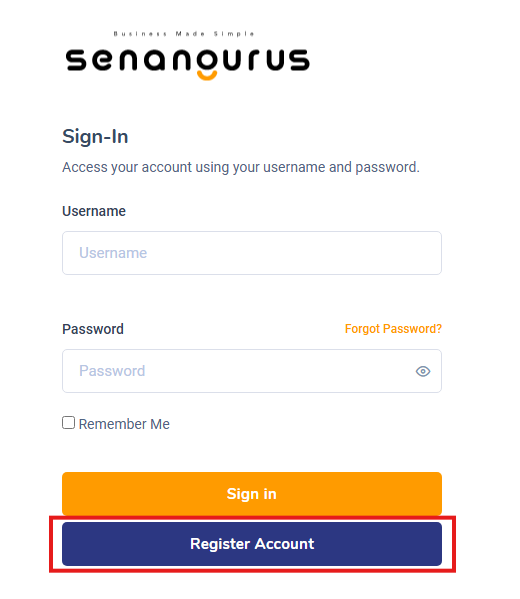](https://docs.senangurus.com/uploads/images/gallery/2025-10/image.png)**
- On the **Sign-in Page**, click the **Register Account** button to begin the registration process.
**Step 2: Choose your preferred pricing plans**
[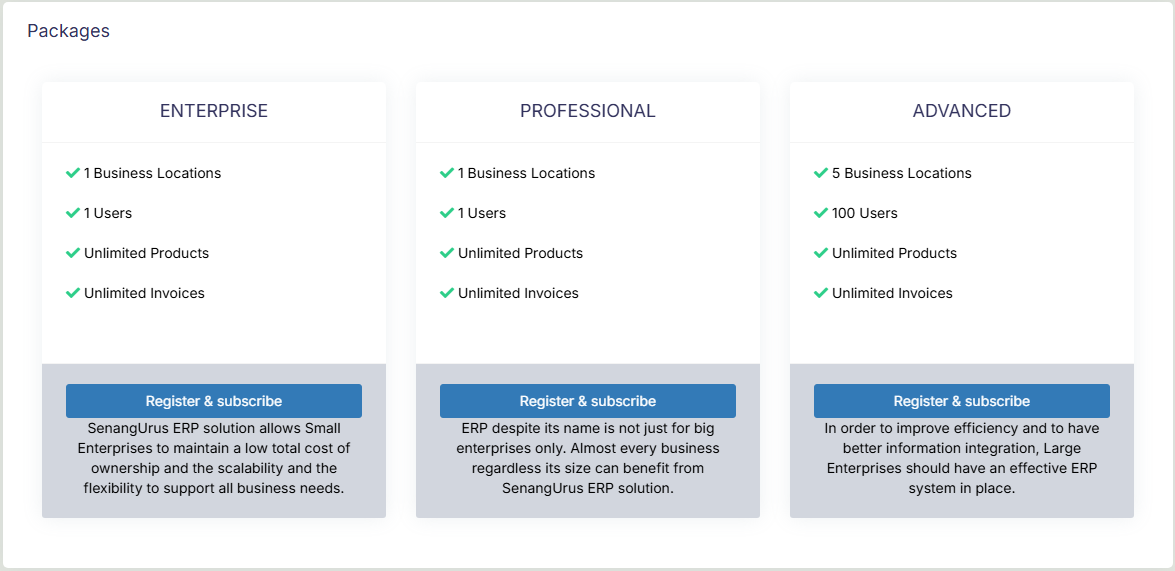](https://docs.senangurus.com/uploads/images/gallery/2025-10/zI0image.png)
- There are three to choose from (**Enterprise**, **Professional** & **Advanced**) with varying prices.
**Step 3: Enter Owner details & Business Details**
[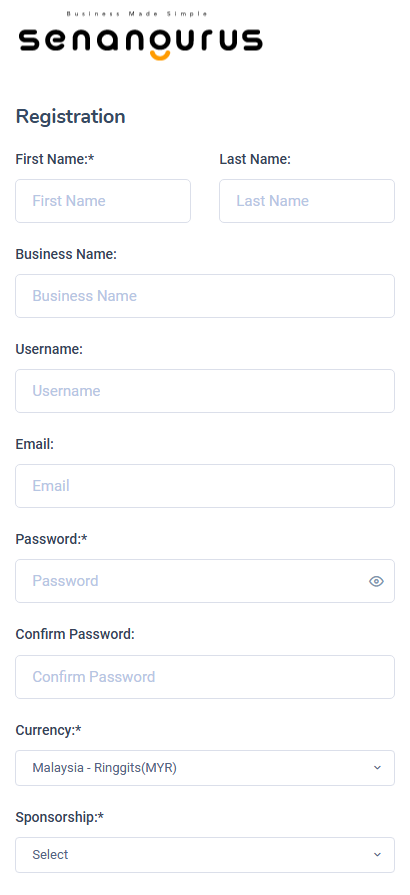](https://docs.senangurus.com/uploads/images/gallery/2025-10/Ynv5ncimage.png)
- Fill out the relevant fields: **Full Name**, **Business Name**, **Currency type**, and enter your **Username** & **Password**.
- The owner created during this registration will be **super admin** of the business. More super admin can be added from user management section.
**Username** and **Password** will be used for sign-in, make sure you remember them.
- Payment can be done either through **online** or **offline.**
**Step 5: Complete Registration**
- Click the **Register** button.
- After successful registration, you will be redirected to the **Login Screen**.
All registered details (**Business Information**, **Tax Info**, and **User Details)** can be updated anytime from the **Business Settings** section.
# Setting Business Multiple Locations or WareHouse or Storefronts
**SenangUrus ERP** comes with the option to handle multiple business locations or warehouse or Storefronts for your business.
A default location is added to the newly created business.
**Invoice Scheme:** Before creating a new location or storefront, you can define a new Invoice scheme or you can use existing invoice schemes. But having different invoice schemes for locations can help you to identify them.
Invoice Scheme is invoice number format. ([Read More](https://docs.senangurus.com/books/senangurus-business/page/setting-invoice-scheme))
**Invoice Layout:** If you wish to have a different invoice layout for the location then you should create an invoice layout before creating a new location. ([Read More](https://docs.senangurus.com/books/senangurus-business/page/invoice-layout))
**Default Selling Price Group:** Select the selling price group that will be used in this location. ([Read More](https://docs.senangurus.com/books/senangurus-business/page/selling-price-groups-sell-in-different-prices-wholesaleretail-or-for-different-prices-for-different-locations))
**Payment Options:** [Enable/disable payment methods](https://docs.senangurus.com/books/senangurus-business/page/adding-editing-payment-method-or-pay-via-options-custom-payments) and [set default payment methods](https://docs.senangurus.com/books/senangurus-business/page/setting-default-payment-accounts-for-payment-methods) to different payment account.
You can always change invoice scheme & Invoice Layout for a Business location anytime.
1. To create a new Business Location / Storefront or warehouse go to “**settings -> Business Locations -> Add**”
[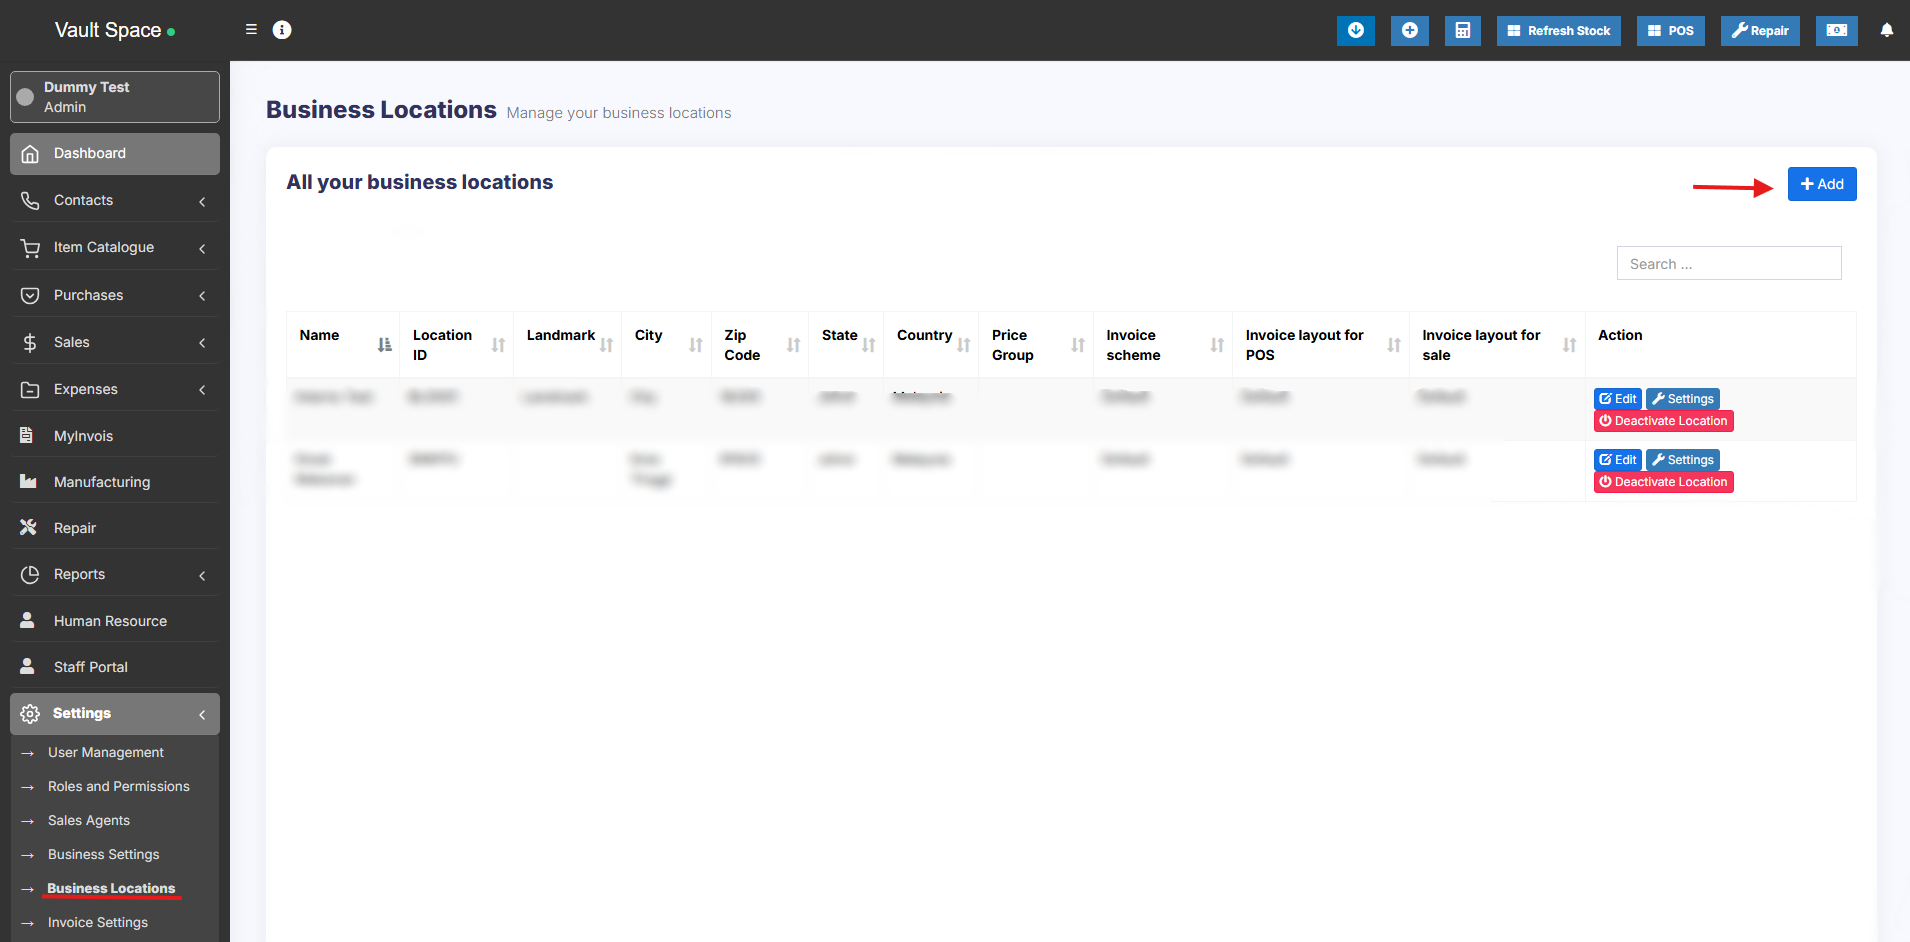](https://docs.senangurus.com/uploads/images/gallery/2025-10/screenshot-2025-10-07-011858.png)
2. Fill the **business details**.
[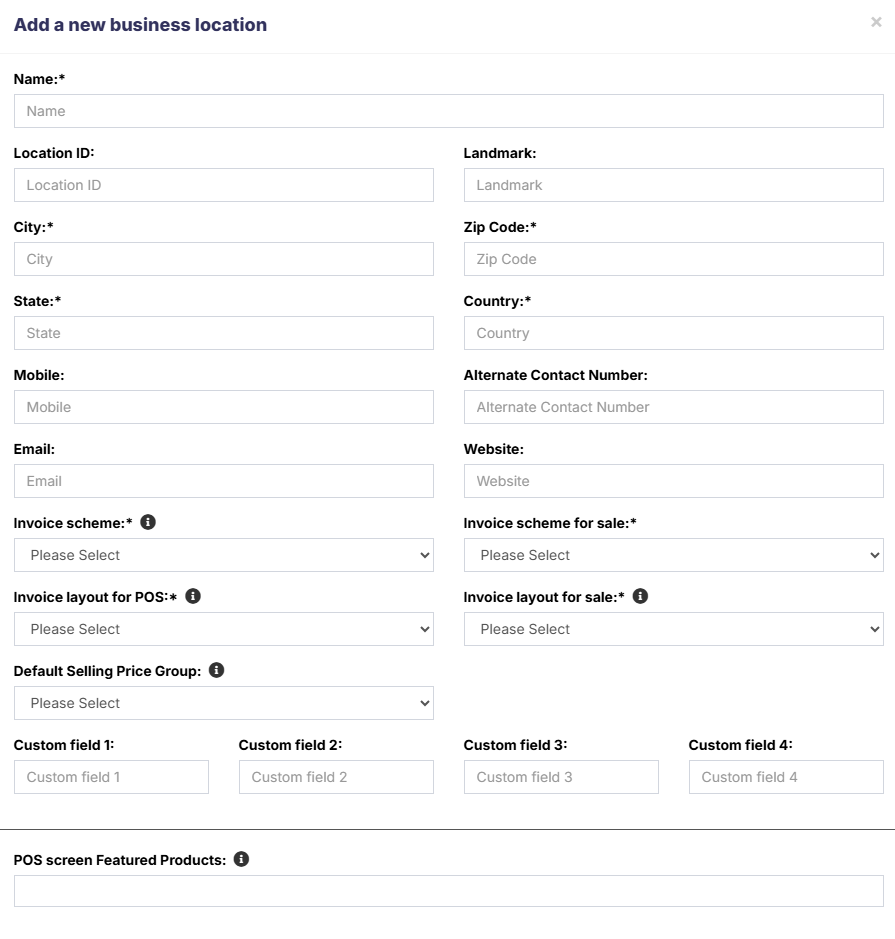](https://docs.senangurus.com/uploads/images/gallery/2025-10/vQNimage.png)
3. Choose an **Invoice scheme** & **Invoice Layout** for the location.
[](https://docs.senangurus.com/uploads/images/gallery/2025-10/Gxmimage.png)
When having multiple locations you will have to select the Location while adding purchases or in the pos screen.
- Inventory and transactions are managed separately for each location you create so that you can easily track and analyze them for each location.
**Disabling Business Location:**
[](https://docs.senangurus.com/uploads/images/gallery/2025-10/screenshot-2025-10-07-013508.png)
To disable a business location click on Disable button present in List Business Location.
- After a business location is disabled any users assigned to that business location must be assigned to other non-disabled business location. 1 business location non-disabled. If all business location is disabled then the application will throw errors.
- You must keep at least 1 business location non-disabled. If all business location is disabled then the application will throw errors.
# User Management
# Adding User & Assigning Location to a User
### Adding users
To add a new user , follow the steps given below
1. Go to **User Management -> Users ->Add New**
[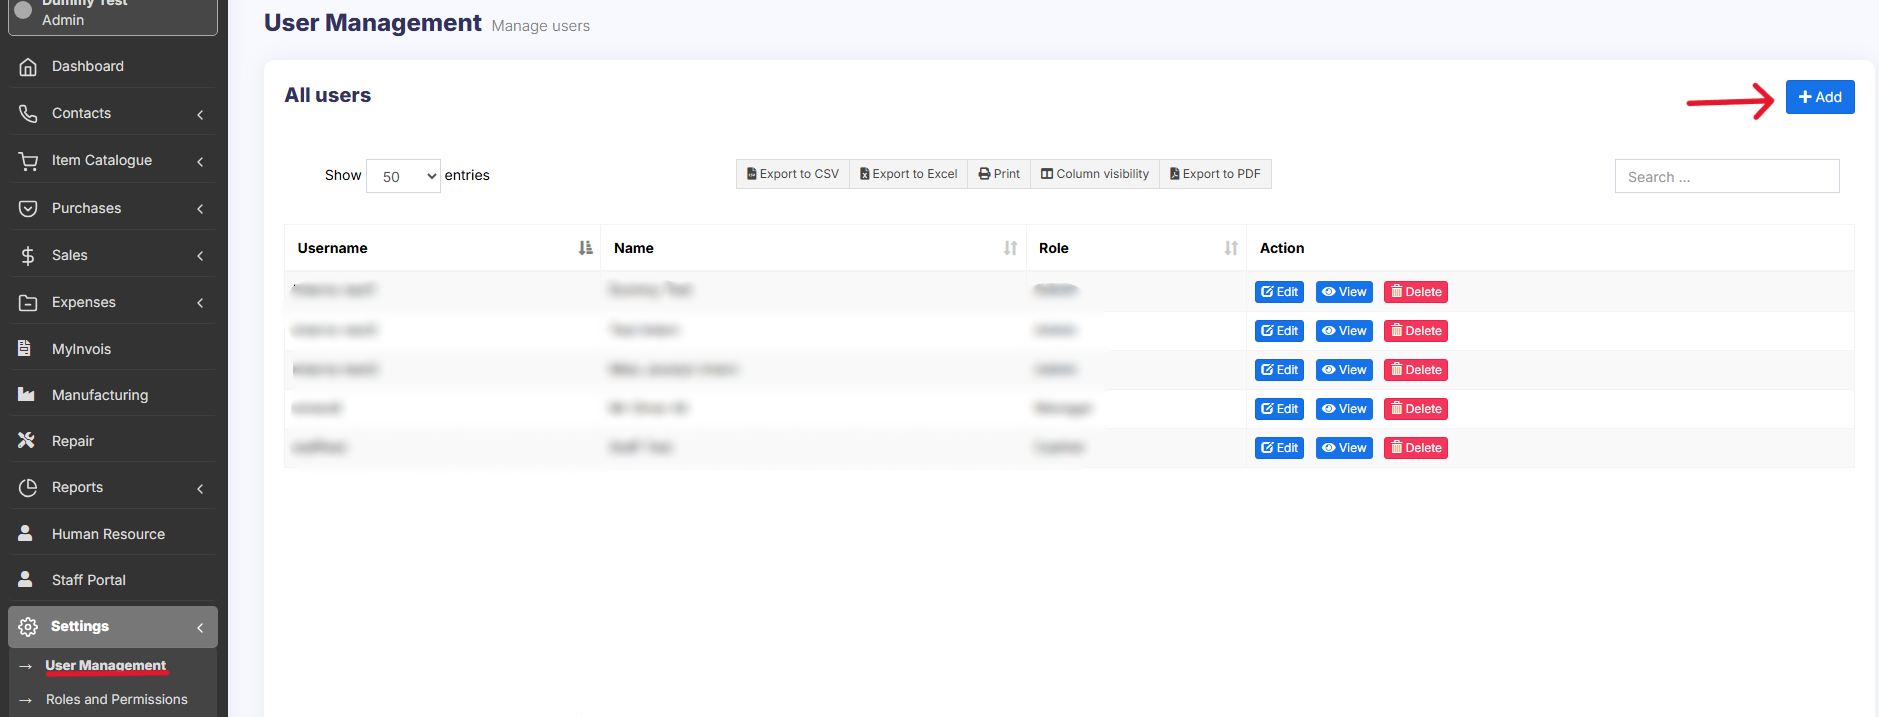](https://docs.senangurus.com/uploads/images/gallery/2025-10/screenshot-2025-10-06-162450.png)
2. Fill the user details, select user role, give a unique username.
[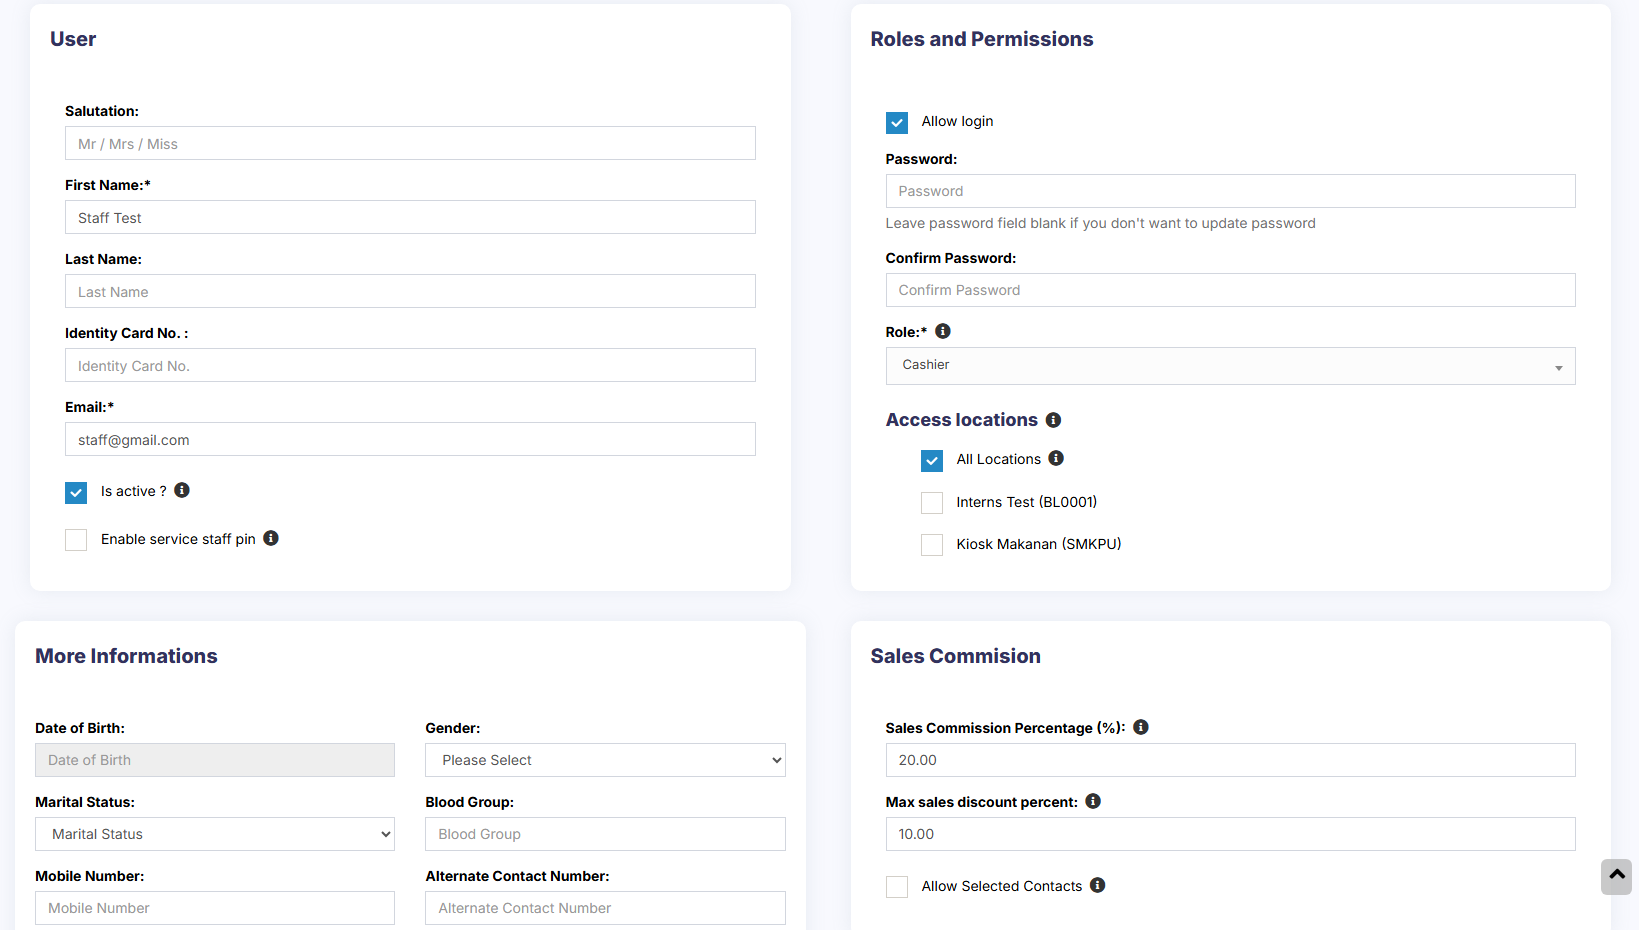](https://docs.senangurus.com/uploads/images/gallery/2025-10/0DCimage.png)
3. **Sales Commission Percentage (%)**: Provide the commission % for this user. This option gets applied if the commission agent feature is enabled. *(Not available in Senangurus-Enterprise)* [](https://docs.senangurus.com/uploads/images/gallery/2025-10/3JGimage.png)
4. **Is active?:** Activate/Deactivate the user.
[](https://docs.senangurus.com/uploads/images/gallery/2025-10/tuUimage.png)
5. You can **Edit**/**Delete** a user.
[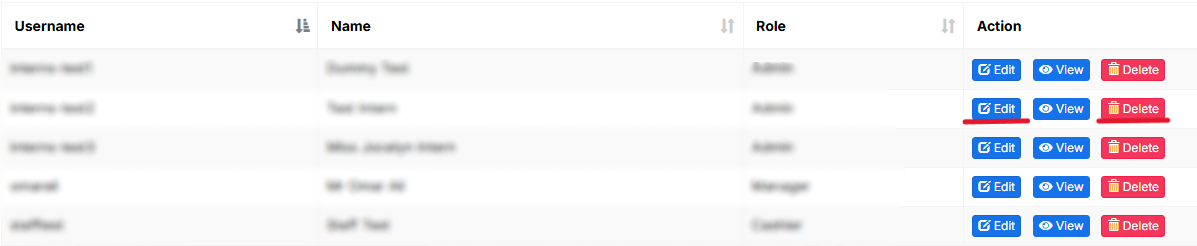](https://docs.senangurus.com/uploads/images/gallery/2025-10/screenshot-2025-10-06-170117.png)
### Assign locations
While adding the user, select the locations that the user can access. You can either select all locations or select one or more particular locations.
Refer to the image below:
[](https://docs.senangurus.com/uploads/images/gallery/2025-10/rGFscreenshot-2025-10-06-164847.png)
### Max sales discount
[](https://docs.senangurus.com/uploads/images/gallery/2025-10/xrTimage.png)
The maximum discount that an user can give during sales in the POS & sales screen. If you don’t want to have this restriction then simply keep this value blank.
### Disable login
You can provide login permission for an user or deny it. If you allow user to login, then you have to provide the username and password for that user.
Refer to the image below
[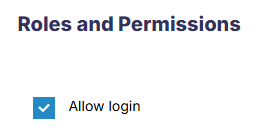](https://docs.senangurus.com/uploads/images/gallery/2025-10/s60image.png)
### Video Demonstration:
# Role Management
# Adding Roles
1. Every new business comes with some default roles – **Admin & Cashier.** [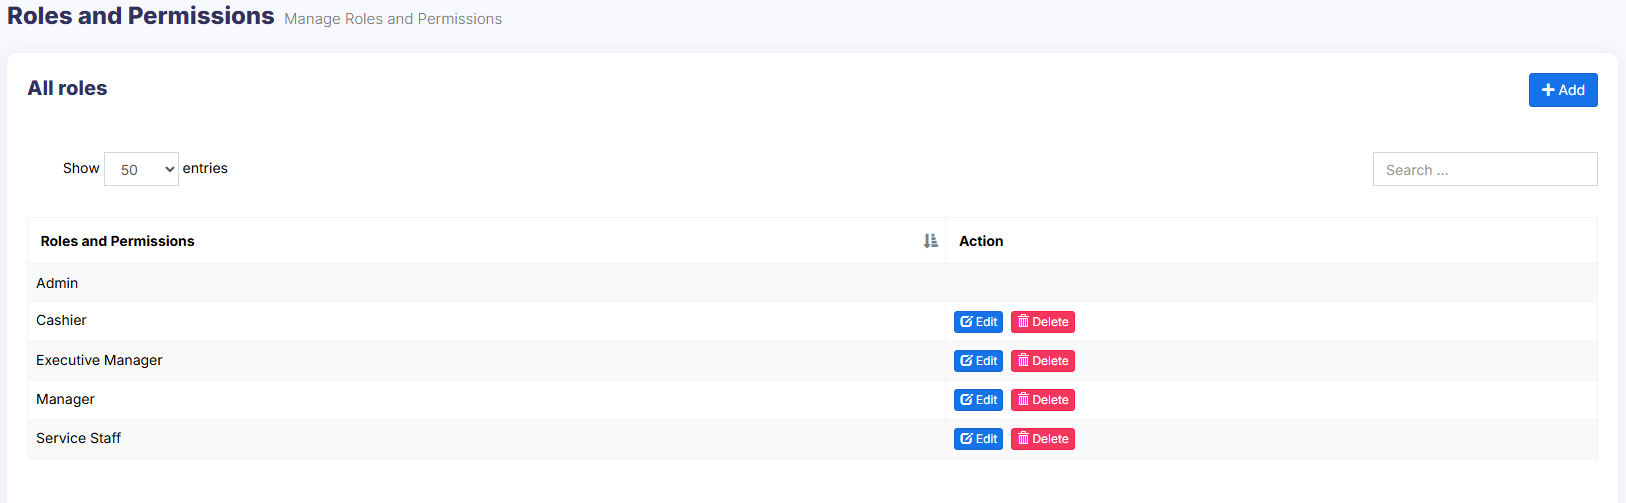](https://docs.senangurus.com/uploads/images/gallery/2025-10/JWIimage.png)
**Admin** have all permissions in the application.
**Cashier** have permission to only POS section.
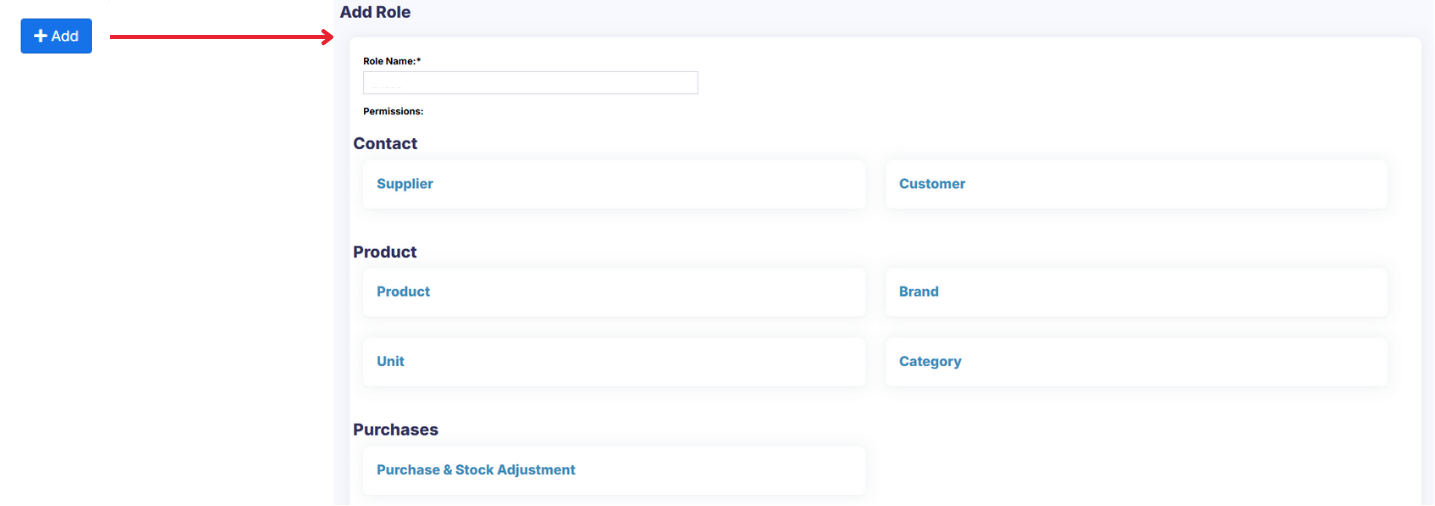
2. You can create a role by clicking on **Add** button -> Giving a **Role Name** and then selecting the appropriate permission for that role.
[](https://docs.senangurus.com/uploads/images/gallery/2025-10/3Xkdiscover-malaysia-one-homestay-at-a-time-1920-x-768-px.png)
3. Sometime you may need to give a user access to a/some particular location(s) only. In this case, select the locations from **Access locations** permission. Select **All Locations** to give permission to access all locations for your business.
[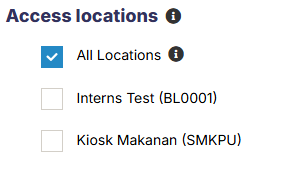](https://docs.senangurus.com/uploads/images/gallery/2025-10/heNscreenshot-2025-10-06-164847.png)
4. Roles permissions can be **Edited** & **Deleted**.
[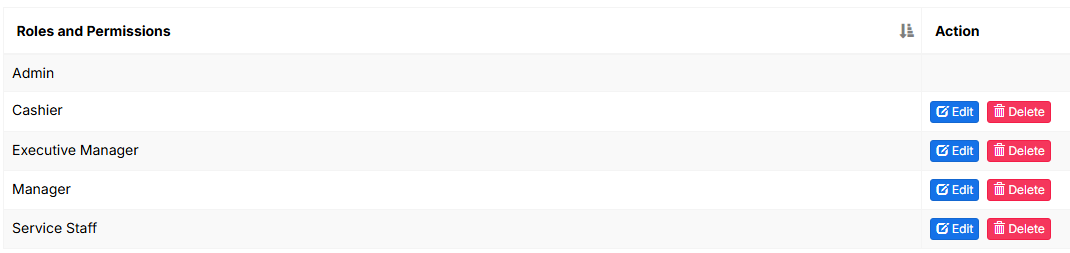](https://docs.senangurus.com/uploads/images/gallery/2025-10/FRGimage.png)
You must update the role of an existing user before deleting a role.
# Using Commission Agent feature
Commission Agent is useful for many businesses. Businesses pay sales agent/commission agent commission on every sale they bring.
# Enabling & Choosing Commission Agent Type:
By default Commission Agent is Disabled. You can enable it from **Settings -> Business Settings -> Sale -> Sales Commission Agent drop-down.**
[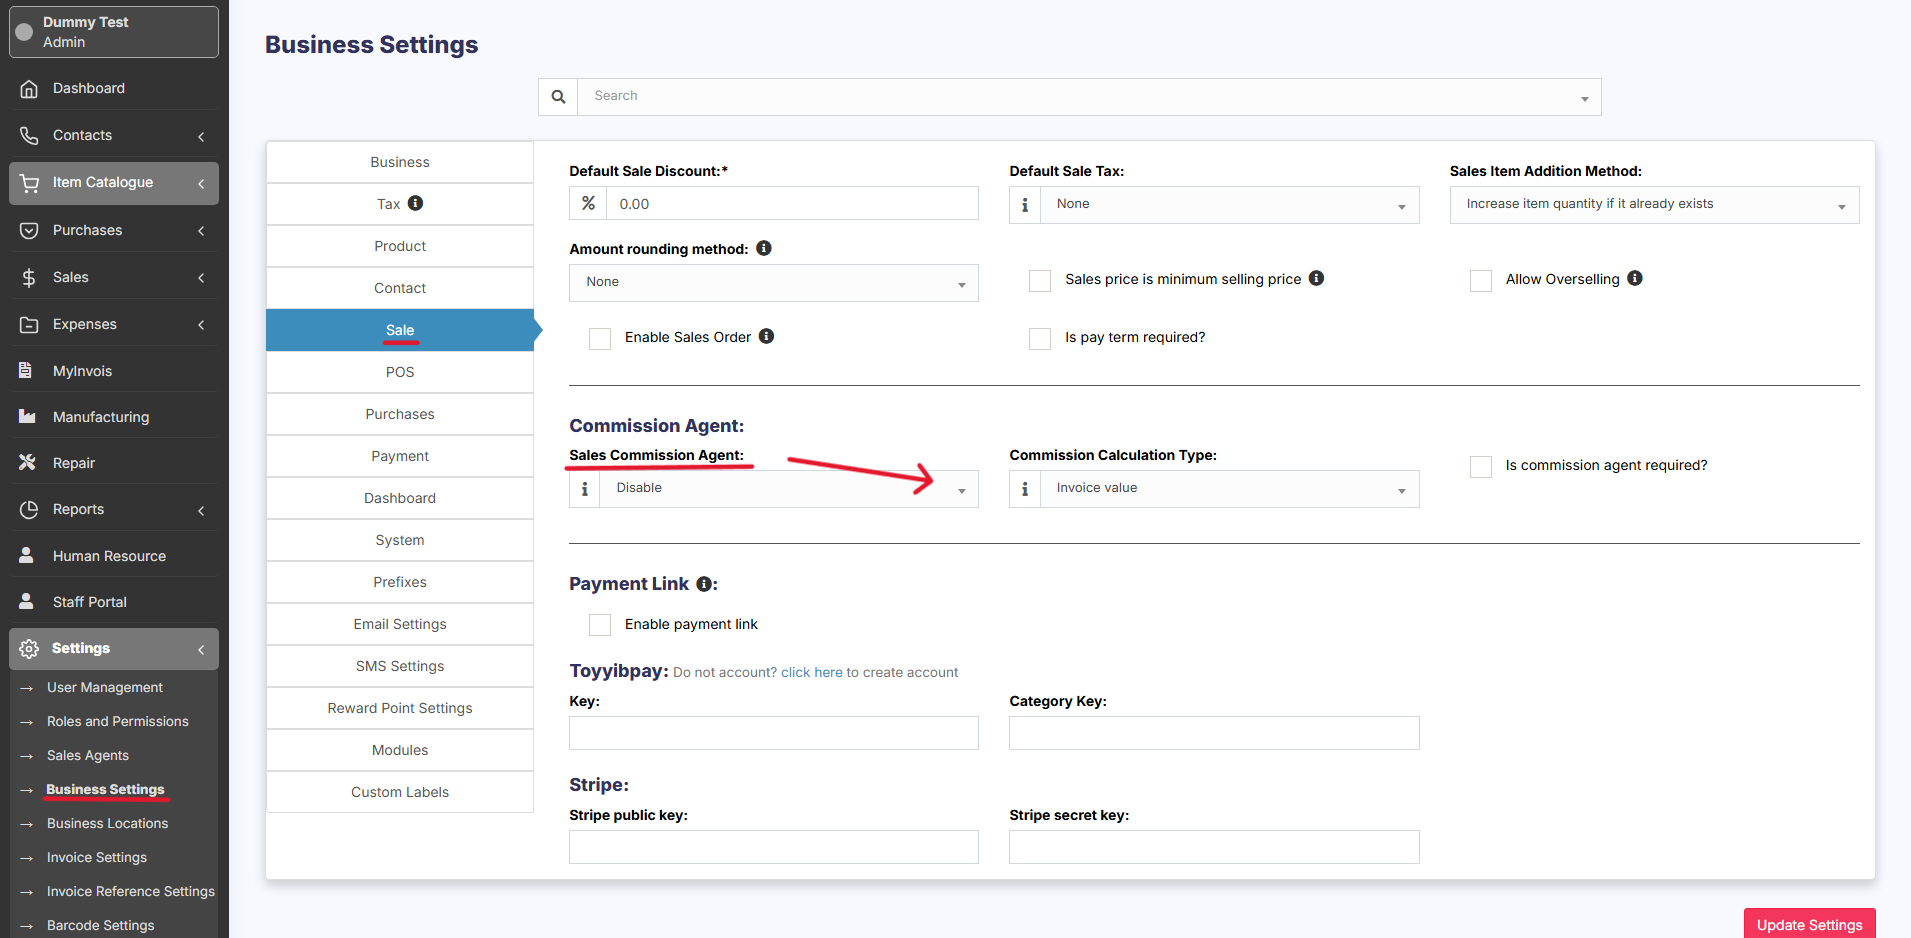](https://docs.senangurus.com/uploads/images/gallery/2025-10/screenshot-2025-10-07-015422.png)
You will see **3** different types:[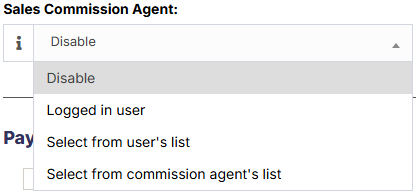](https://docs.senangurus.com/uploads/images/gallery/2025-10/jMMimage.png)
1. **Logged in User:** If this option is used then the Logged in User will be automatically considered as the commission agent for the sales added by him. Meaning the user adding the sales will get the commission for the sales.
2. **Select from User’s List:** If this option is enabled then in POS & Sales Screen you will see the list of “**users”** present in your business. The user adding the sales will select the commission agent from the list of users displayed.
3. **Select from Commission Agent List:** If this option is enabled then in POS & Sales Screen you will see the list of **“Sales Commission Agents”** present in your business. The user adding the sales will select the commission agent from the list of “Sales Commission Agents” displayed.
Select the option as per your business requirements.
You can add commission % while adding/editing the **User** or **Sales Commission Agent**
## Commission Calculation Type:
The commission for a user can be calculated based on two methods
1. **Invoice value:**
[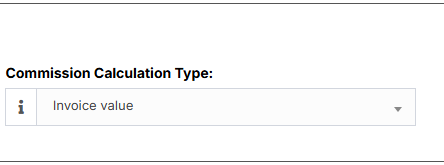](https://docs.senangurus.com/uploads/images/gallery/2025-10/A45image.png)
With this method, commissions are calculated based on the total invoice amount generated by the agent.
For instance, if an agent’s monthly invoice amount totals $5000 and the commission percentage is set at 10%, the user will receive $500 as commission.
2. **Payment Received:**
[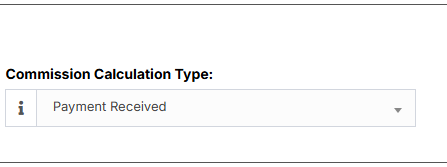](https://docs.senangurus.com/uploads/images/gallery/2025-10/GRcimage.png)
Alternatively, commissions can be calculated based on the actual payments received.
For instance: if the agent’s monthly invoice amount is $5000 with a 10% commission rate, but only $2000 is received within the month, the user will receive $200 as commission. If the remaining $3000 is received in the following month, the user will receive an additional $300 as commission.
## Calculating Commission Amount:
To See the commission amount, Go to **Reports -> Sales Representative Report.**
[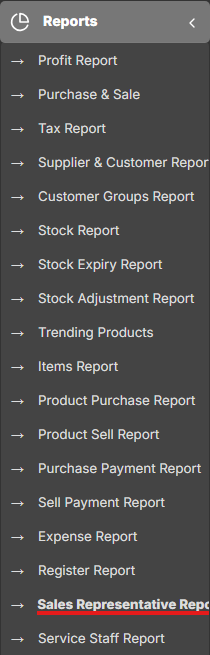](https://docs.senangurus.com/uploads/images/gallery/2025-10/mmOimage.png)
Select the User for which you want to see the commission amount.
[](https://docs.senangurus.com/uploads/images/gallery/2025-10/PH0image.png)
On selecting it will show you the detailed summary of Total Sale, Total Sale Commission & Total Expense. Also, the table below lists all the transactions.
[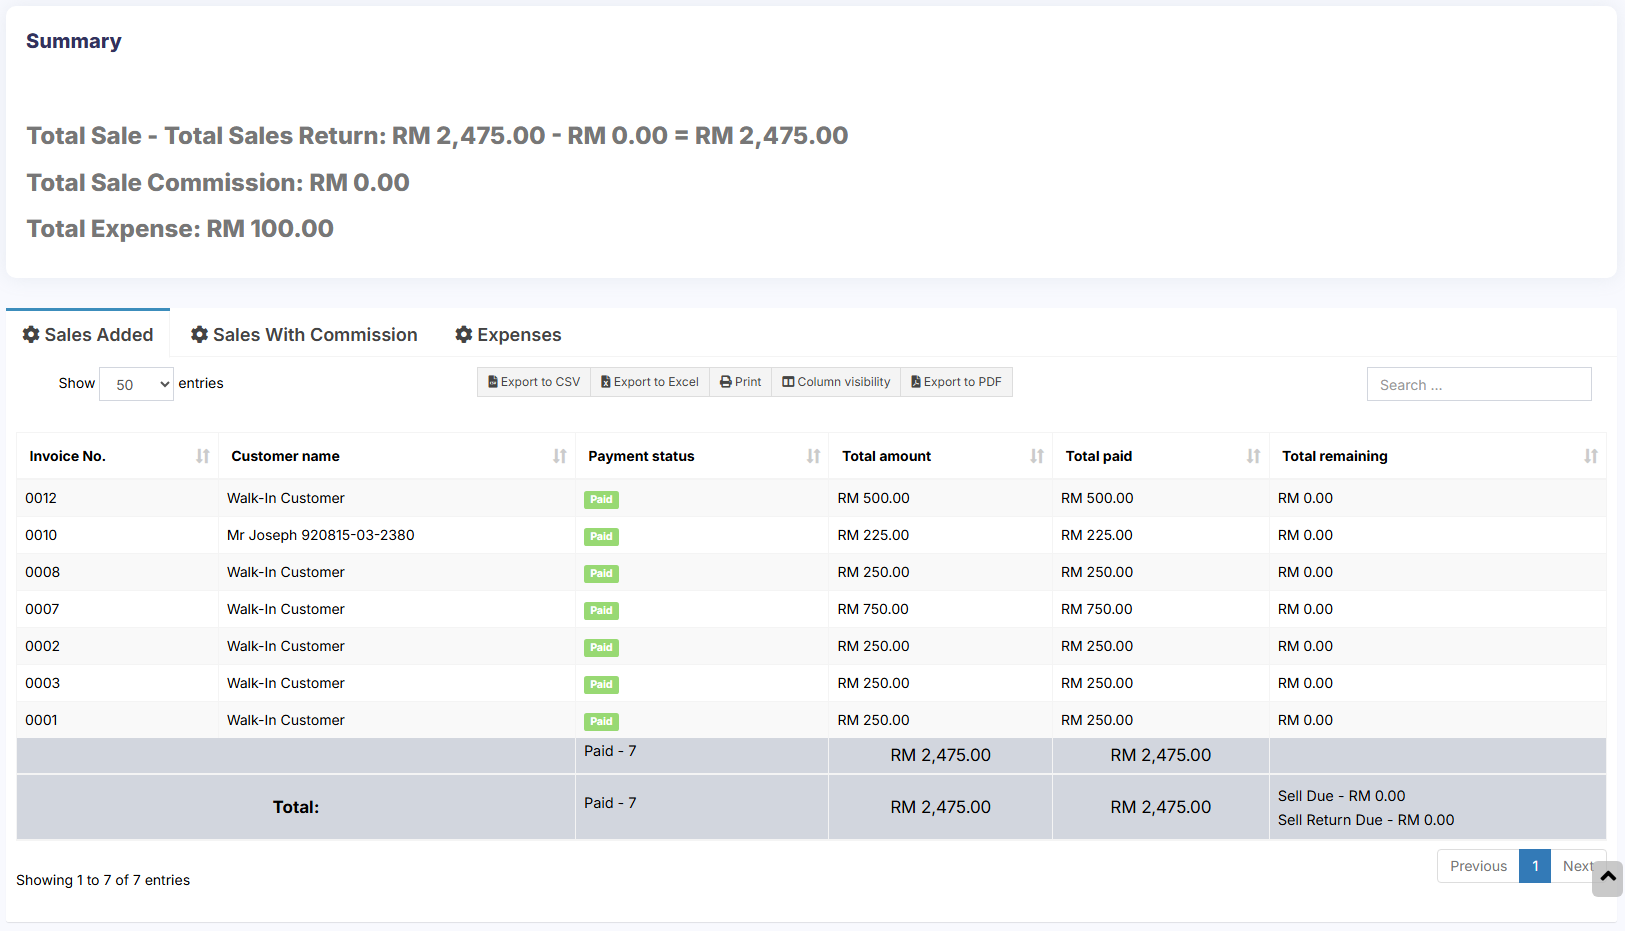](https://docs.senangurus.com/uploads/images/gallery/2025-10/swmimage.png)
Sales commission is calculated without shipping or tax. Sales commissions are from the sales of the items, not the overhead cost such as taxes, freight, shipping, handling, etc.
## Commission payment:
After getting the commission amount, **SenangUrus ERP** have 2 ways to make payment for the commission.
### Using expense
- Calculate the commission from the sales representative report and after paying the amount add it as an expense in Add Expense menu.
- In Add expense, select the Expense-For dropdown
### Using HRM module
- Use the HRM module.
- In the HR module, when creating payroll for a user, it will automatically include the sales commission.
- Sales commission will be shown as Payroll-Components so that the business owner and the user both know details of the commission.
# Adding superadmin user
### Creating Superadmin user:
1. Login to the server from Cpanel or DirectAdmin or Plesk or Filezilla (FTP) or similar panels.
2. Open **.env** file with the file editor. **.env** file is present inside the UltimatePOS directory
3. Inside the env file, you will find “**ADMINISTRATOR\_USERNAMES**” configuration. Add the username of the user which you want to make as superadmin.
Example if you want “user1” to be superadmin then add it like below:
**ADMINISTRATOR\_USERNAMES=”user1″** NOTE: user1 mentioned here is for example only and the username is case sensitive.
4. You have to add an already existing/signed up username here. To add multiple users as superadmin you can add them comma separated.
**ADMINISTRATOR\_USERNAMES=”user1,user2,user3″**
NOTE: If super admin user is added, that user can
- Access modules tab in side menubar
- Can enable backup – [To enable backup using superadmin user](https://docs.senangurus.com/books/senangurus-business/page/enabling-backups-backup-in-server-aws-s3)
# Installation Guide
# New Page
# Contact Management
# Customer & Supplier Ledger
To view customer or supplier ledger
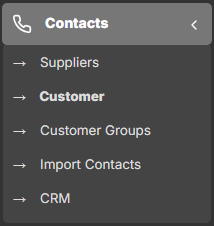
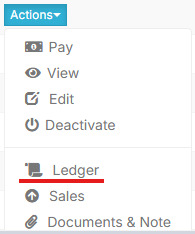
1. Go to **Contacts** -> **Supplier**/**Customer** and click on actions button.
[](https://docs.senangurus.com/uploads/images/gallery/2025-10/aTAimage.png)
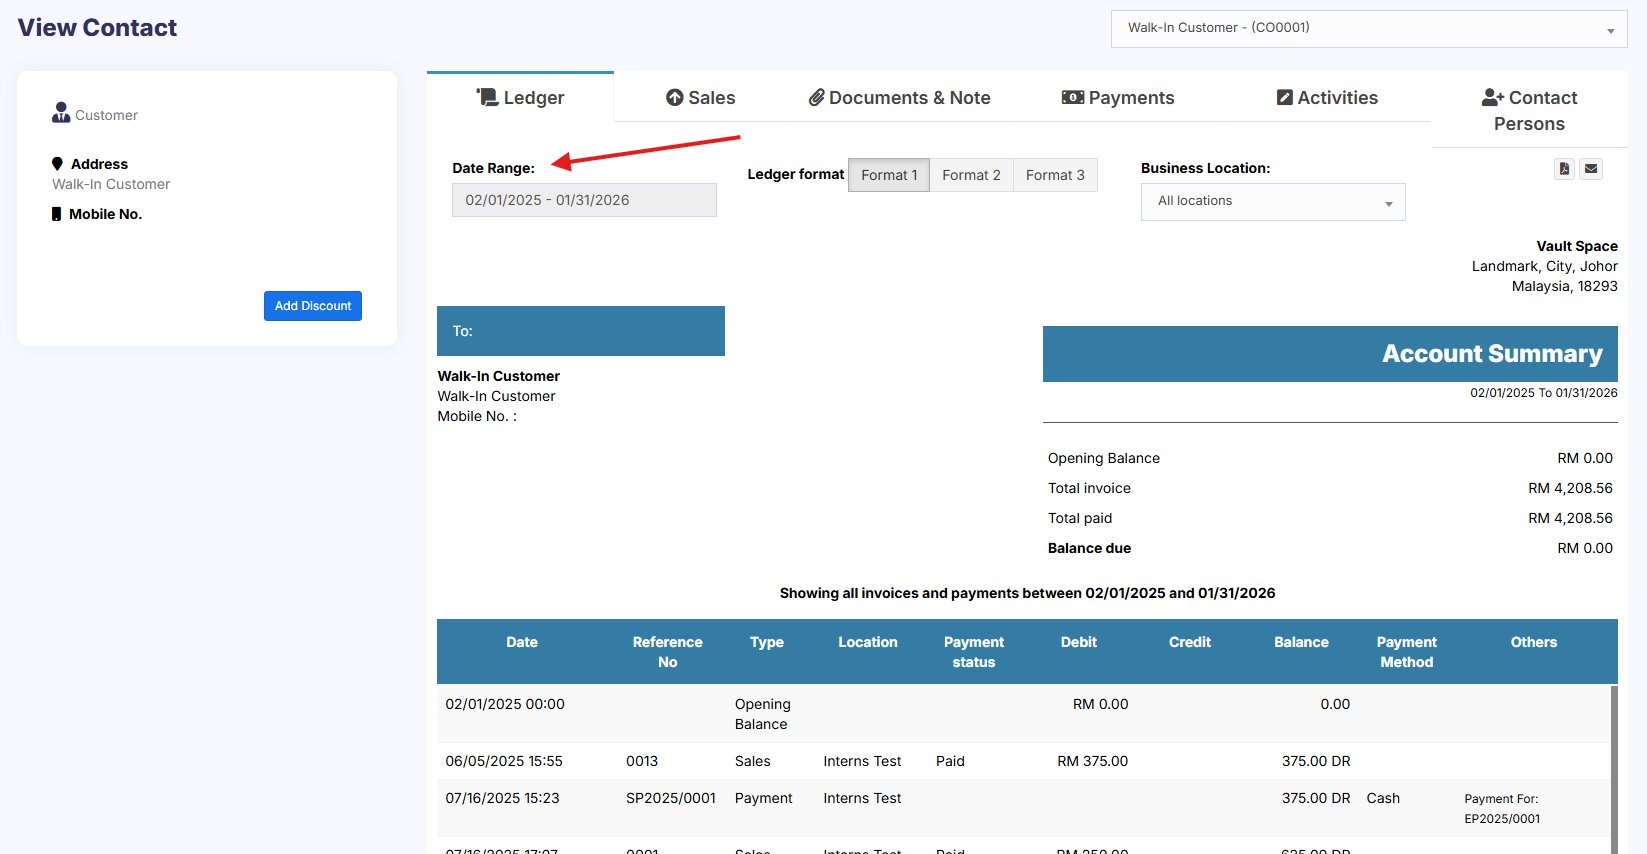
2. In that you will be able to see Ledger for the customer or supplier.
[](https://docs.senangurus.com/uploads/images/gallery/2025-10/XTBimage.png)
[](https://docs.senangurus.com/uploads/images/gallery/2025-10/f8Wimage.png)
3. You can select a date-range and use the checkbox filters to show/hide certain transaction type.
[](https://docs.senangurus.com/uploads/images/gallery/2025-10/iH6image.png)
## Adding Discount for Customer/Supplier on Balance due:
Discount for balance due amount can be added for customer/supplier.
Click the add discount button on the customer/supplier ledger screen
[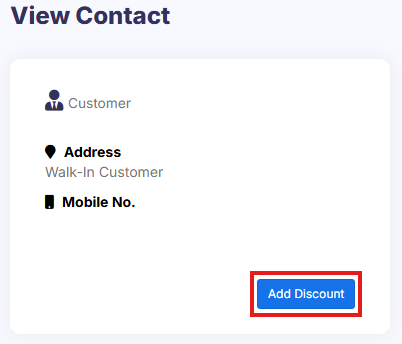](https://docs.senangurus.com/uploads/images/gallery/2025-10/fDXimage.png)
On clicking the button it shows a popup, enter the details and click save.
[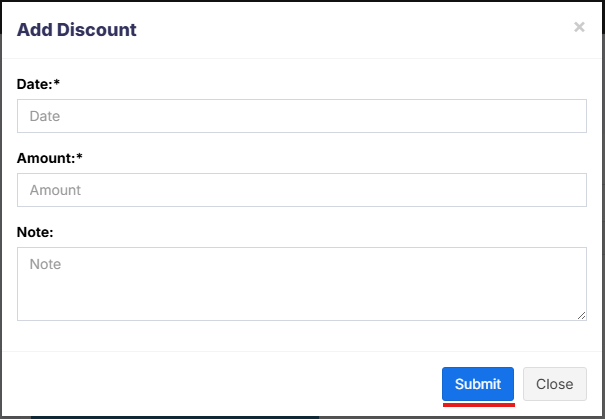](https://docs.senangurus.com/uploads/images/gallery/2025-10/NLyimage.png)
The discounted amount will be accounted for in their ledger.
#### **NOTES**
**1**: This discount can only be added by the admin and not by other users.
**2**: Also, the Ledger Discount is different from the Sale Discount.
While adding a Ledger Discount it will not be reflected in Sale Discount because the invoice details are not added for the ledger discount. And it is not possible to find to which invoice the discount is added.
### Video Demonstration:
# Adding opening balance & payment
### Opening balance:
Opening balance is the balance contact (customer or supplier) have at the beginning of using the software.
Suppose you’re shifting the data from another software to SenangUrus Business then the opening balance of the contact will be the balance amount which the contact has to pay/receive to/from you.
**Opening balance for customer** = Amount the customer has to pay
**Opening balance for supplier** = Amount you have to pay to the supplier.
### Adding Opening balance
You can add an opening balance when adding/editing the supplier or customer. In the add contact screen, you will find the opening balance field.
[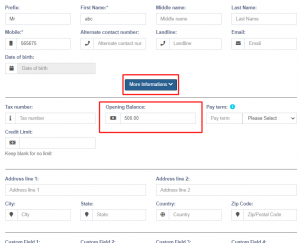](https://ultimatefosters.com/wp-content/uploads/2019/12/openingbal.png)
### View Opening balance payment
To view the opening balance of contact, go to List Supplier/customer, go to view, and on the view page, you will find the opening balance & opening balance due.
### Pay or receive payment of opening Balance
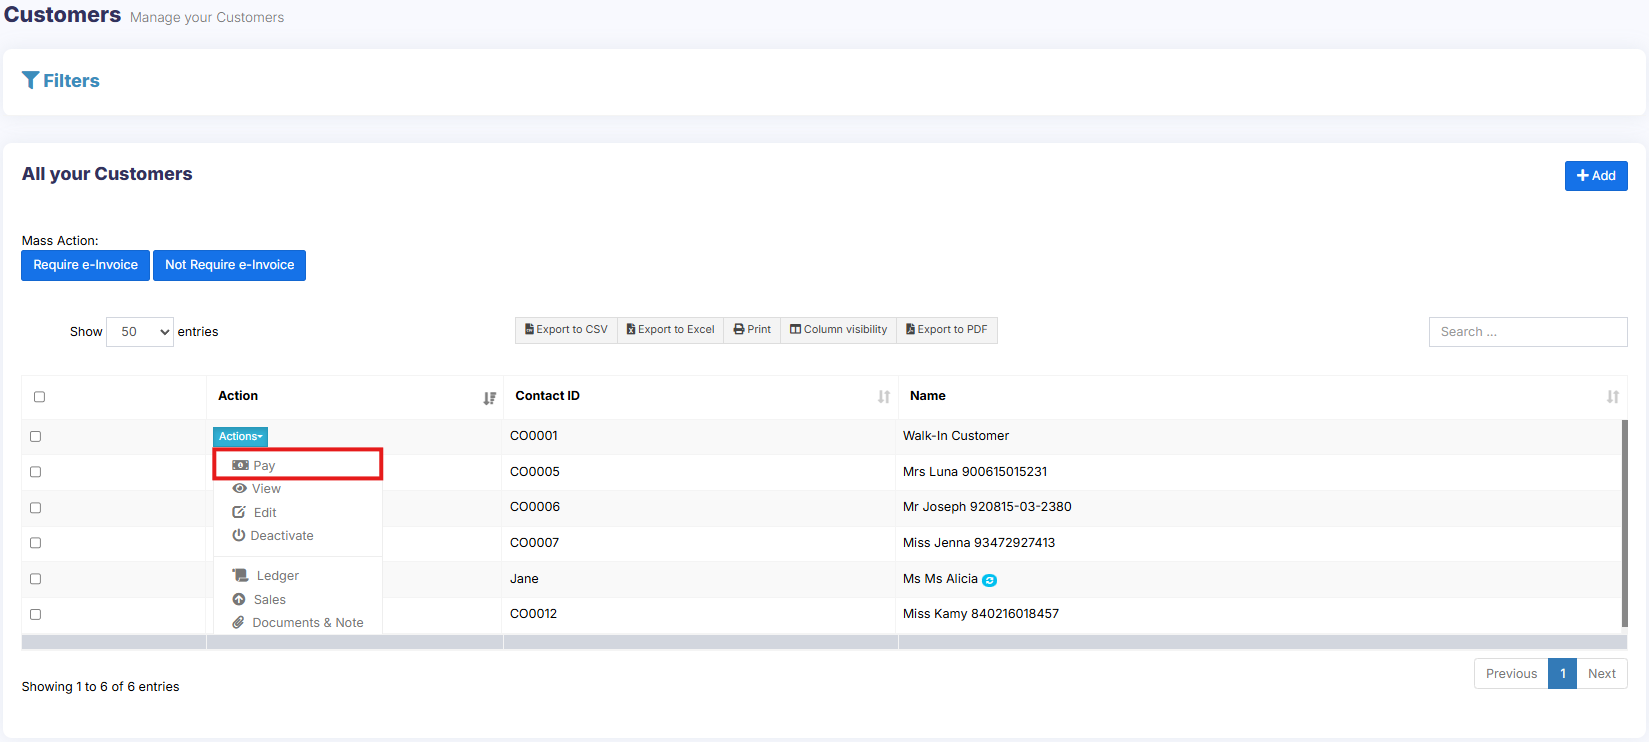
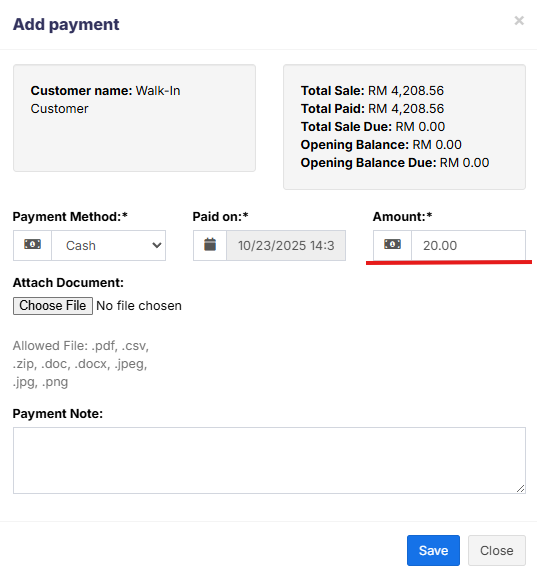
Adding payment of the opening balance is the same as any other payments. Go to list Customer/Supplier -> Actions -> Pay.
It will open a popup modal where you can enter the payment amount.
[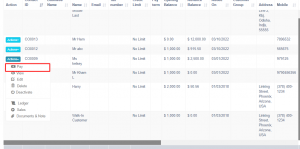](https://ultimatefosters.com/wp-content/uploads/2019/12/openbalpay1.png)
[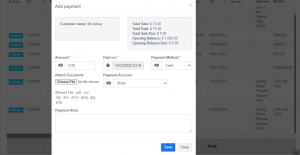](https://ultimatefosters.com/wp-content/uploads/2019/12/openbalpay2.png)
# Contacts Management (Supplier & Customers)
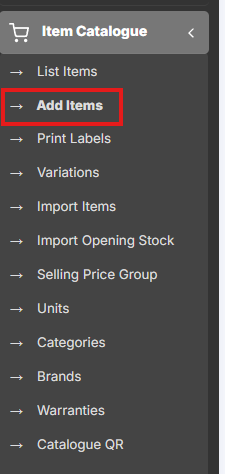
### Adding Suppliers & Customers
[](https://docs.senangurus.com/uploads/images/gallery/2025-10/screenshot-2025-10-23-141255.png)
[](https://docs.senangurus.com/uploads/images/gallery/2025-10/RXJimage.png)
1. Go to Contacts -> Suppliers or Customer
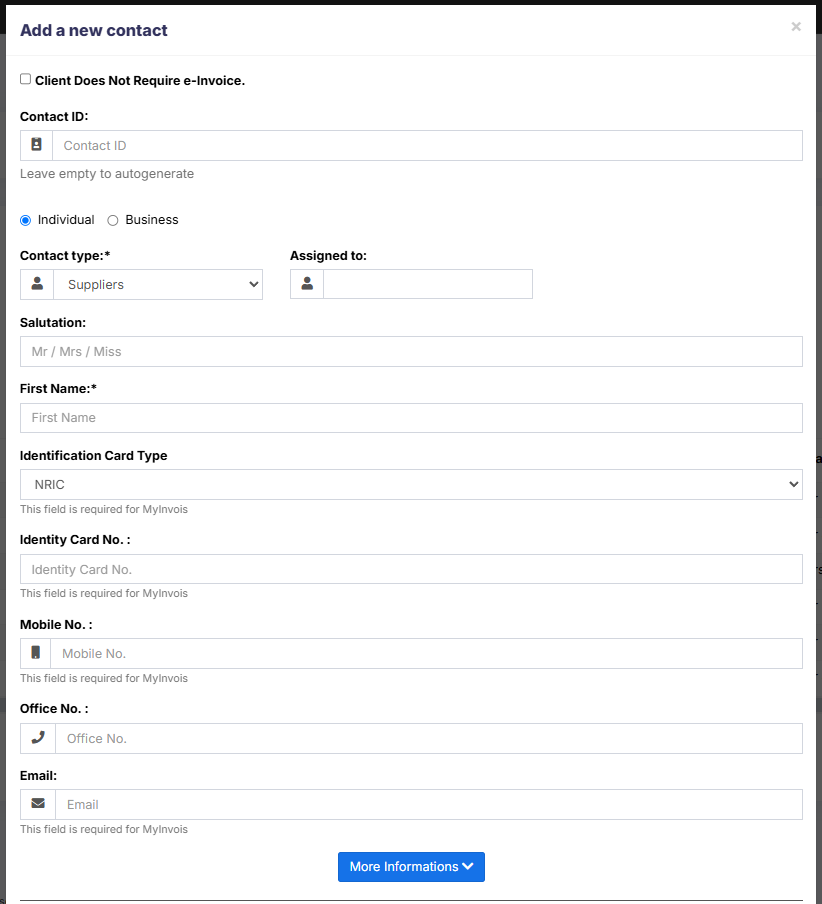
2. Click on add new contact. Select contact type – Supplier/Customer/Both
3. Based on the contact type selected – it will show the relevant fields. Fill the relevant details.
4. Click on More More Information button to see more field.
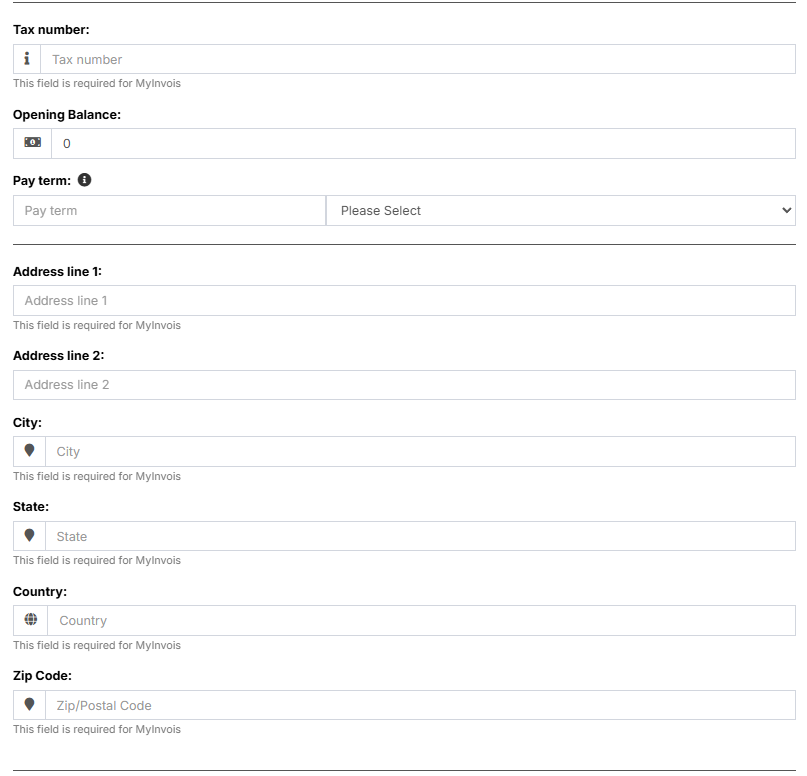
5. **Pay Terms**: This will help the system to notify you of any pending payments for suppliers & customers. You can specify pay term in either days or months.
6. **Customer Group:** [Read details here](https://docs.senangurus.com/books/senangurus-business/page/customer-groups).
7. **Credit Limit:** This is the maximum amount of credit that can be given to the customer. If in any sales the credit exceeds this amount then it won’t allow selling on credit.
8. **Opening Balance:** Opening balance of a customer or supplier before you start using SenangUrus Business. So if there is any previous balance you can add here.
9. **Advance balance:** Sometimes customer/supplier pay/takes money in advance. This will show the amount of advance balance paid or take by the customer/supplier respectively.
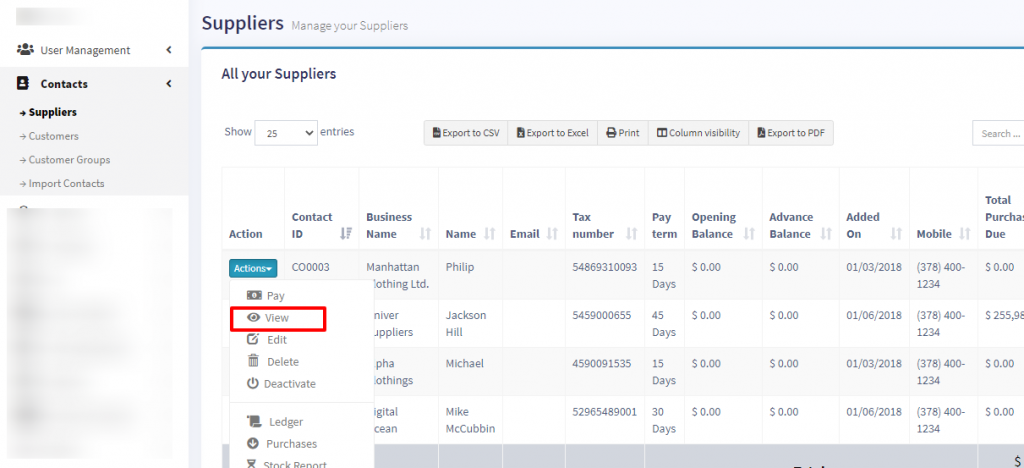
### Viewing Suppliers & Customers
1. To view details about a Supplier or Customer click on View button. It will show the complete details along with the relevant transactions (Purchases & Sales) for that contact.
2. **Pay Due amount:** You can use this button to pay the due amount for a customer or supplier. This will pay the overall due amount for all invoices.
### Assigning Contacts to Users
You can assign contacts(customers & suppliers) to a particular use by following the steps below.
1. In your pos\\config\\constants.php change the value of enable\_contact\_assign to true.
2. When adding the user check the label “assign to specific contact”.
3. Now when adding contact select the user to whom you want to assign.
### Changing default customer name
If you want to change the default customer name “walk-in-customer” to something else follow the steps below.
1. Go to the database contacts data table.
2. Change the first name field to anything required.
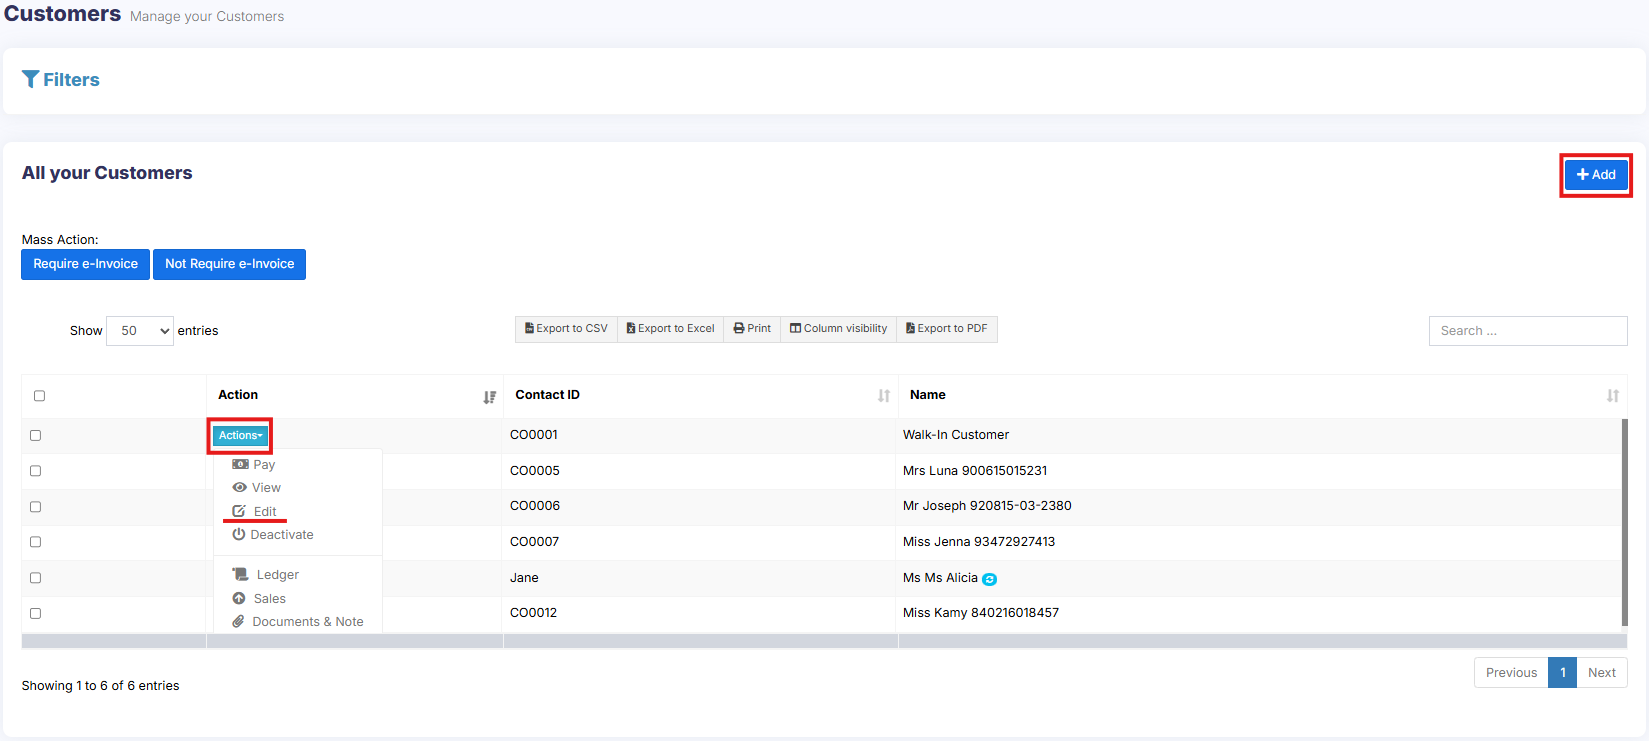
### Credit Limit for Customer
Credit limits can be added to customers.
When the credit limit is reached the partial or credit sale can’t be sone for those customers.
To set the credit limit Go to Contacts > Customers > Action > Edit > More Information > Credit Limit.
Set this field blank for not having any credit limit for customers.
**NOTE**: Do not set the credit limit as 0 for having no credit limit.
Credit Limit = 0 (the credit for the customer is 0)
Credit Limit = blank (no restriction for credit limit(infinite))
# Advanced balance
Advanced balance(to customers) is the sum of the amount that the business should pay for the customers.
Advanced balance(to suppliers) is the sum of the amount that the suppliers should pay for the business.
To add an advanced balance, Go to **Customers -> customers/suppliers** and click on the action button. Here you will find a pay option and click on it. Add payment pop up will be shown and add the required amount value and click on save button.
[](https://docs.senangurus.com/uploads/images/gallery/2025-10/customerpay.png)
[](https://docs.senangurus.com/uploads/images/gallery/2025-10/addpayment.png)
### **Making sales/purchases using an advanced balance:**
To make a purchase or sale using this advanced balance, add a sale or purchase.
Select the customer/supplier. While making the payment, select the **advance payment** in payment method option and save it.
**Note:** Payment from advance balance will only be used only if **advance payment** method is selected.
[](https://docs.senangurus.com/uploads/images/gallery/2025-10/addpaymentmethod.png)
# Opening Balance
Opening balance(to customers) is the sum of the amount that the customers have to pay for the business.
Opening balance(to suppliers) is the sum of the amount that the business has to pay for the suppliers.
### Adding an opening balance
To add an opening balance, Go to **Contacts->customers/suppliers.** Either select the add button or click on edit for an existing user. There you could find a more information button, click on that and add the opening balance amount to be added for that user.
[](https://docs.senangurus.com/uploads/images/gallery/2025-10/editcustomer.png)
[](https://docs.senangurus.com/uploads/images/gallery/2025-10/openingbalance.png)
# Loyalty Cards
### Enabling Reward Points:
Before diving into Loyalty Cards, make sure you’ve enabled the reward points feature. You can find detailed instructions in our documentation here.
### Creating Loyalty Cards for Customers:
Once your reward points are active, follow these straightforward steps to set up Loyalty Cards for your customers:
1. **Assign a Customer ID:** When adding a new customer, make sure to provide them with a unique Customer ID. This ID will serve as their key to unlocking exclusive benefits.
2. **Printing the Loyalty Card:** Using the assigned Customer ID, print the Loyalty Card. This card is your customer’s ticket to accumulating and redeeming reward points. You need to design & print the card externally (maybe use canva or other designing software to design the card for printing.)
3. **Using Loyalty Cards at the Point of Sale (POS):**
1. **Select Customer:** Begin by selecting the customer making the purchase. You can scan the QR/barcode code on their Loyalty Card or enter the customer’s mobile number or enter the customer’s name to associate the sale with their account.
2. **Complete the Sale:** The system will automatically link the sale to the customer’s Loyalty Card, ensuring they receive the deserved reward points.
That’s it! You’ve successfully integrated Loyalty Cards into your SenangUrus Business system. Your customers can now enjoy a personalized and rewarding shopping experience.
# Customer Groups
*(Not available in SenangUrus-Enterprise)*
### **Customer Groups:**
With customer Groups, you can classify a customer as Retail Customers, Wholesale Customer, Friends, Colleagues and whatever you will love to…
1\. To add a “Customer Group” go to Contacts -> Customer Groups & Click on “Add” button.
2\. It will show a popup asking for customer group name & Calculation Percentage.
Calculation percentage is used to calculate selling price.
**Example:**
– Suppose if the Selling Price set for a product Product1 is $200
– Customer Group Name = Friend
Calculation Percentage = -20
– **Note**: -20 (notice a minus sign) or you may set it 20 = +20%
– And you have created a customer with Harry with Customer Group assigned as Friend.
– Now go to pos or Sell screen. Select the customer Harry and add the product1.
– You will notice that the selling price set for the product1 will be 200-20% = $160
This is how customer Group works.
Customer Group does an internal calculation and applied the calculation percentage to the selling price. It will not show a separate discount on the invoice or the pos screen.
***This feature is highly useful when you have retail, wholesale or different customer categories.***
You can view report for different customer group from “Customer Groups Report” or in other terms if you have retail and wholesale customer group you can see which type of customer group is giving more sale.
# Products
# Products Management
### Adding Products
To add a new product to the system, follow the steps below:
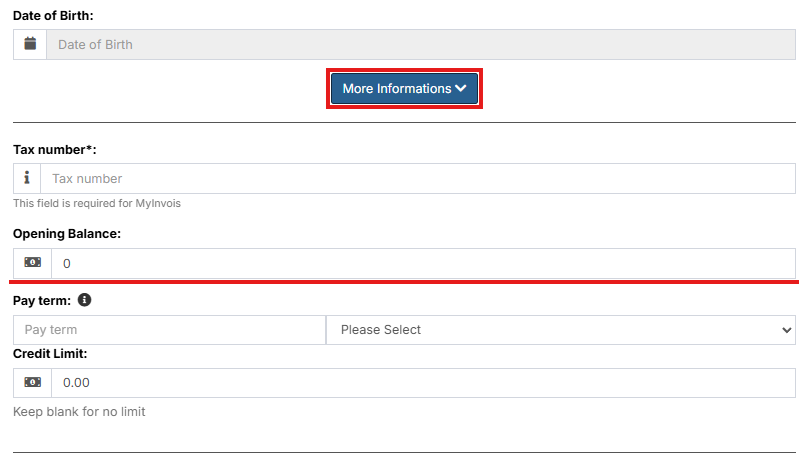
**Step 1: Navigate to Item Catalogue**
- Go to **Add Items**
[](https://docs.senangurus.com/uploads/images/gallery/2025-10/yiXimage.png)
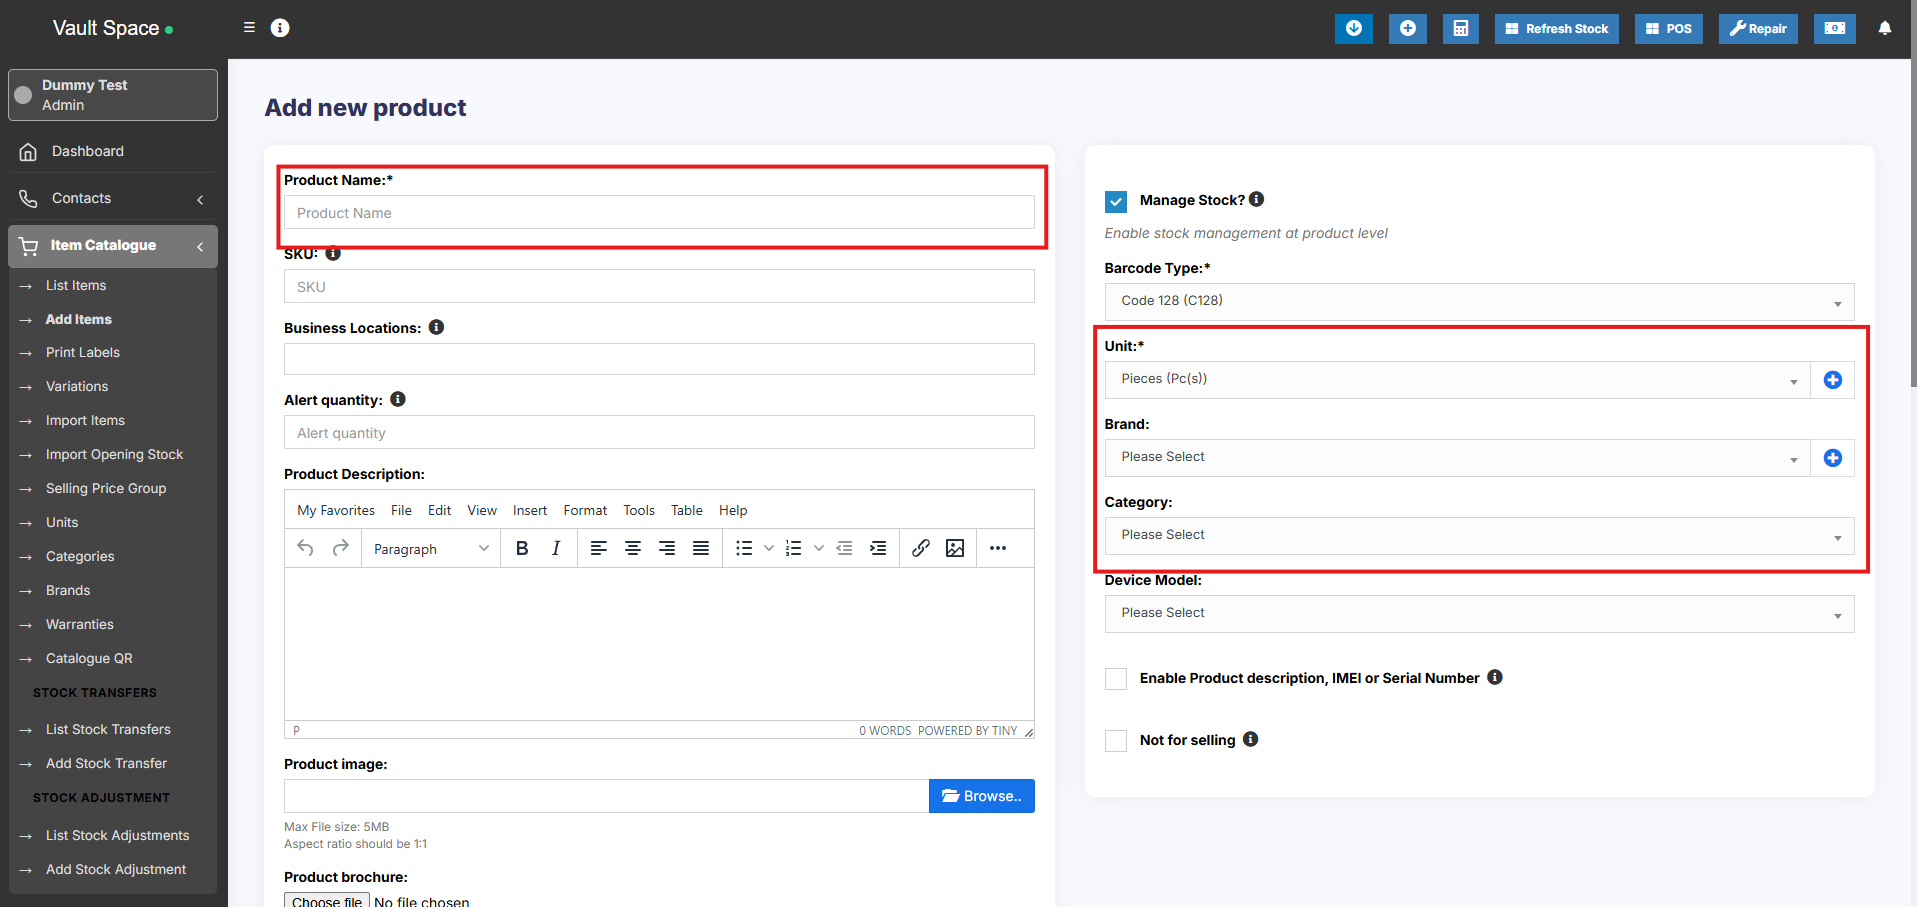
**Step 2: Enter Product Details**
Fill in the following fields:
- **Product Name**: Enter the name of the product.
- **Brand**: Select the brand if applicable.
- **Units**: Choose the appropriate unit (e.g., pcs, kg, litres).
- **Category**: Select the main category for the product.
- **Sub-category**: (Optional) Choose a sub-category if applicable.
[](https://docs.senangurus.com/uploads/images/gallery/2025-10/ZBtimage.png)
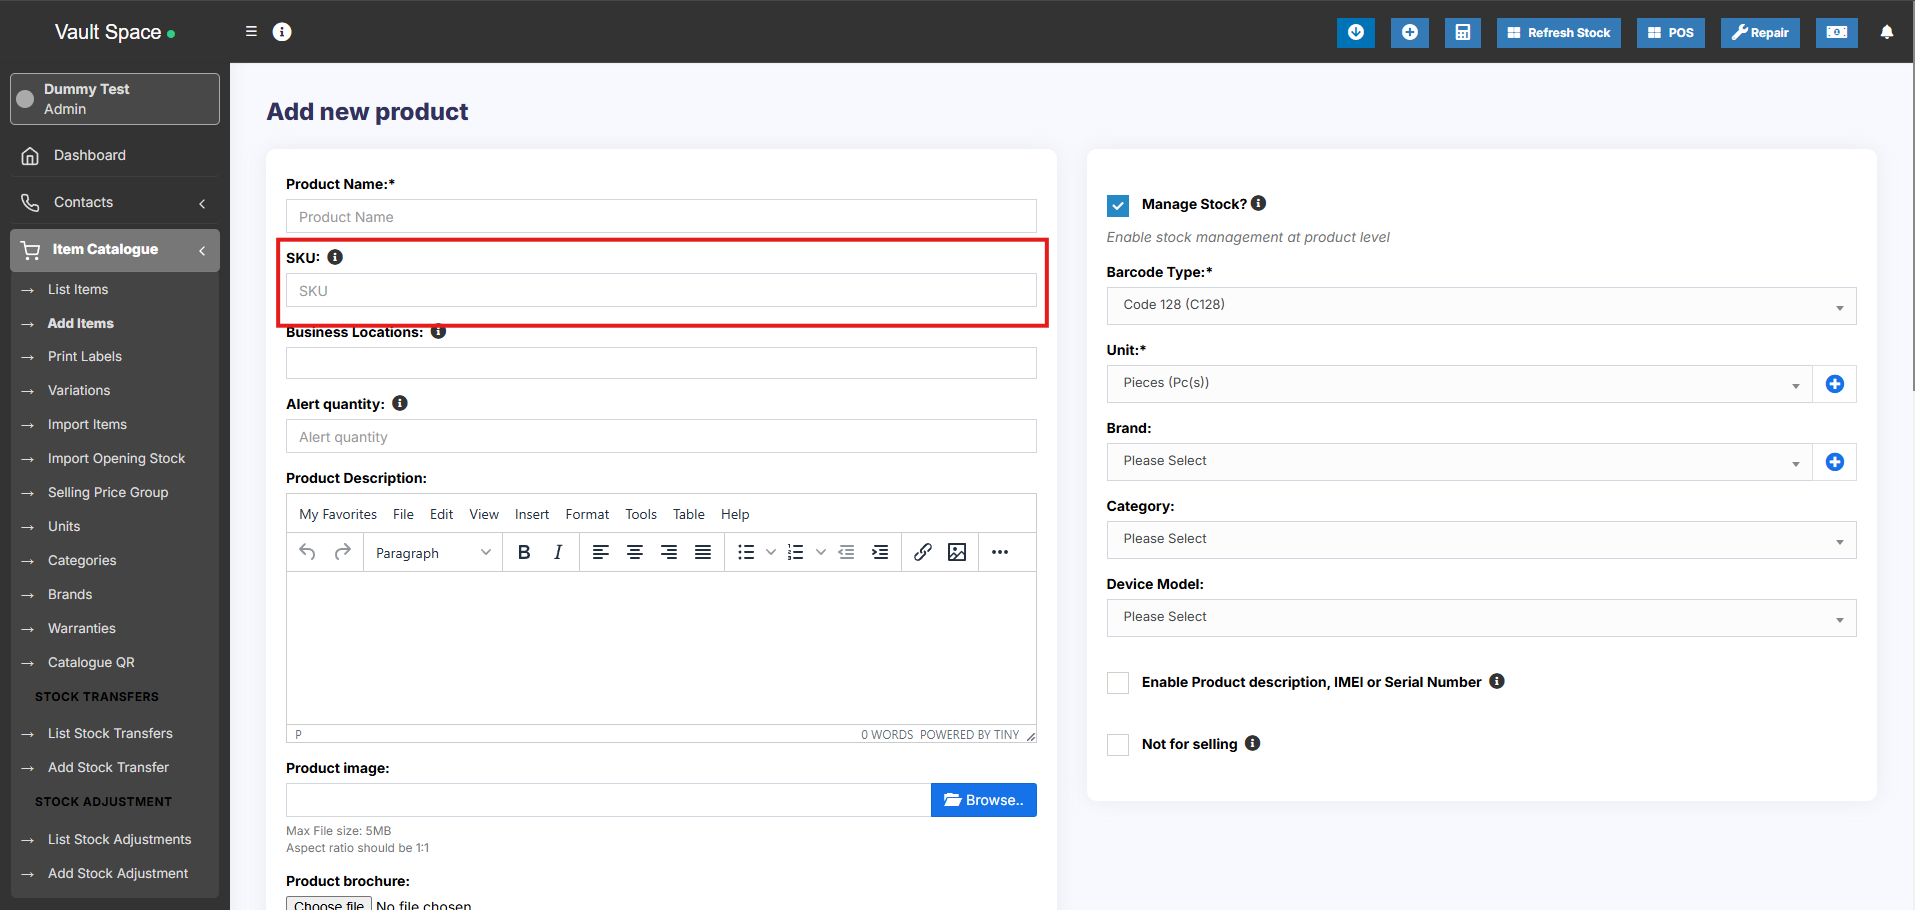
**Step 3: Set SKU (Stock Keeping Unit)**
- **SKU** is a unique identifier used for barcodes and product tracking.
- You can enter a custom SKU or leave it empty to **auto-generate** one.
- Optionally, add a **Prefix** to the auto-generated SKU for easy identification.
[](https://docs.senangurus.com/uploads/images/gallery/2025-10/4KLimage.png)
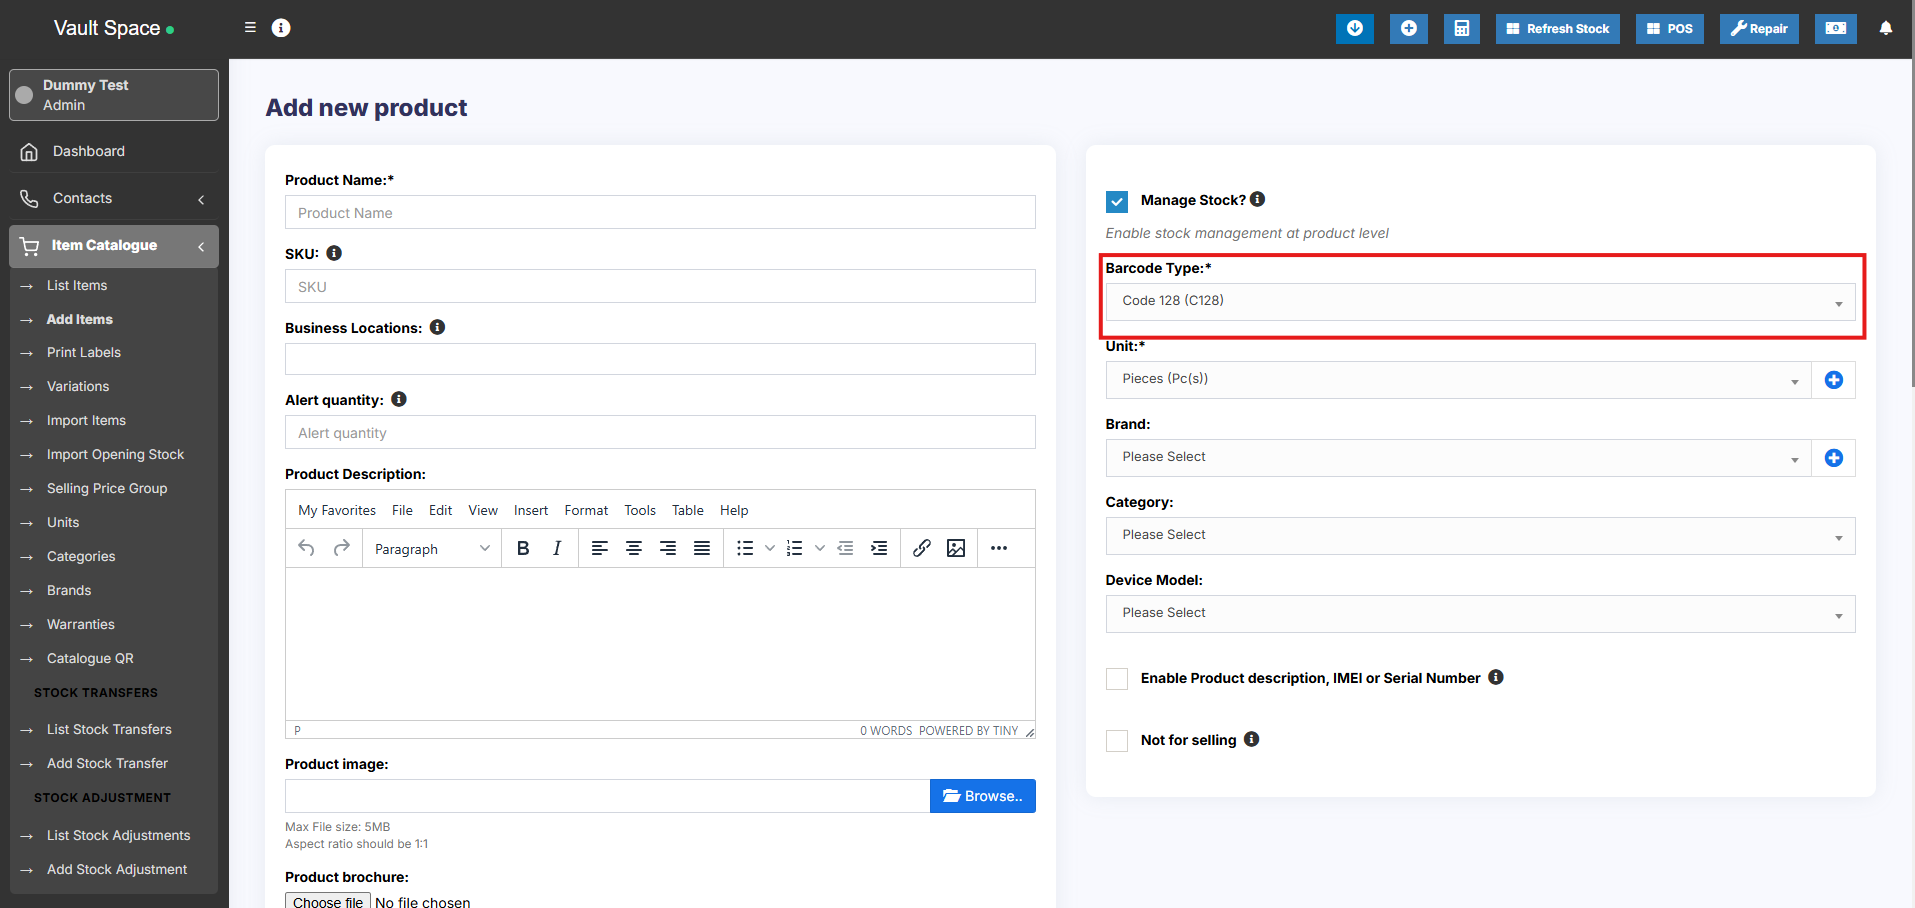
**Step 4: Select Barcode Type**
- Choose a **Barcode Type**. The default and recommended option is **C128**. (Change the barcode type only if your product already has an existing SKU/barcode format.)
[](https://docs.senangurus.com/uploads/images/gallery/2025-10/2Bcimage.png)
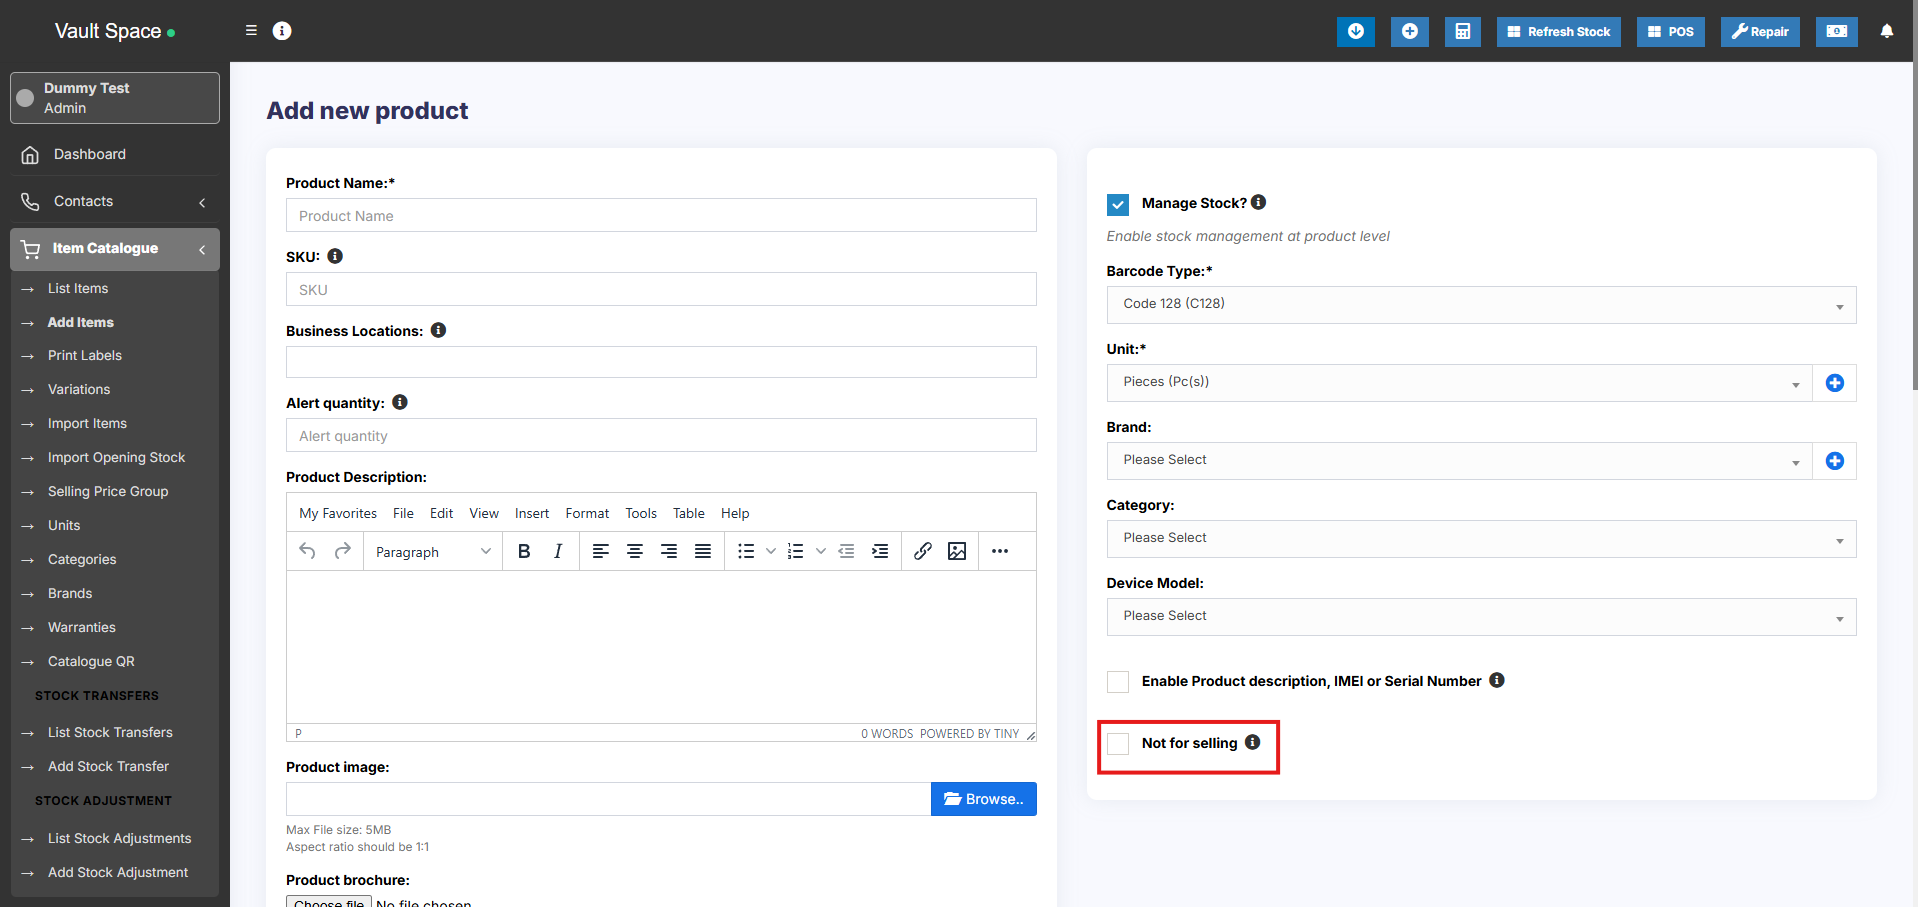
**Step 5: Not For Selling (Optional)**
- Enable **Not For Selling** if the product should not appear in the **POS or Sales Screen**. (This option is useful for ingredients in manufacturing or to temporarily disable a product from being sold).
[](https://docs.senangurus.com/uploads/images/gallery/2025-10/ollimage.png)
**Step 6: Set Alert Quantity**
- Define the **Alert Quantity** to get notifications when stock levels fall to or below this number.
[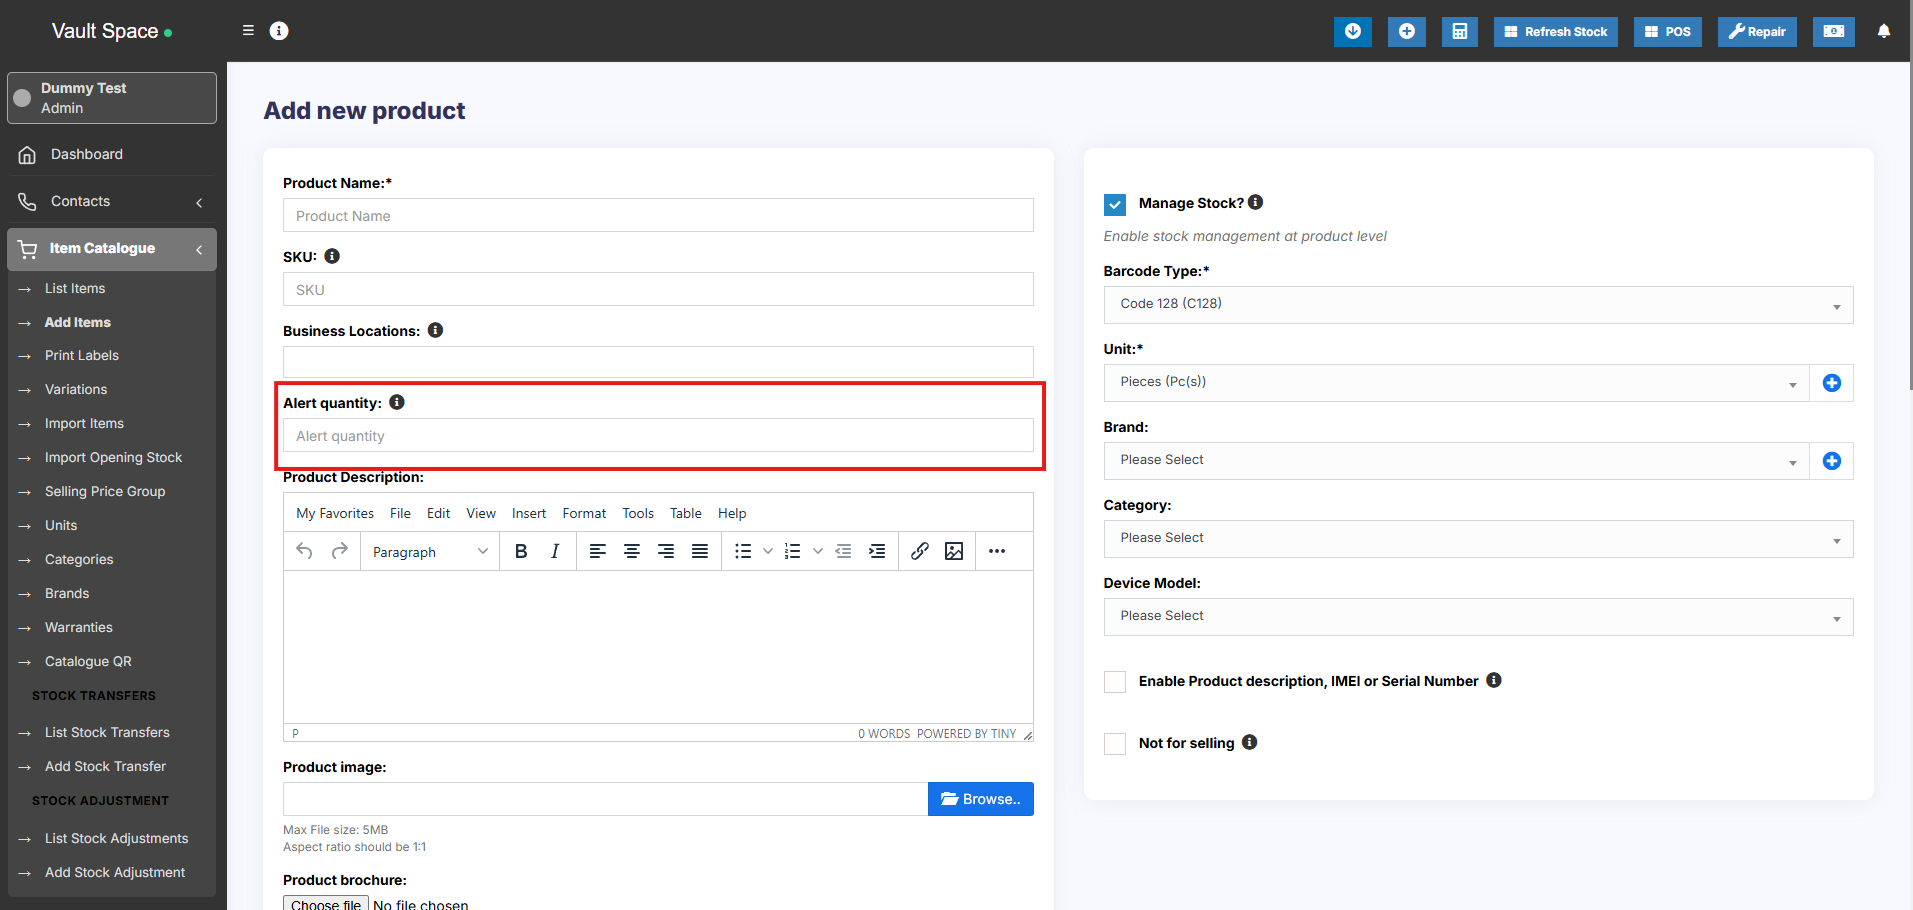](https://docs.senangurus.com/uploads/images/gallery/2025-10/9ssimage.png)
**Step 7: Manage Stock**
- Enable or disable **Stock Management** for the product.
[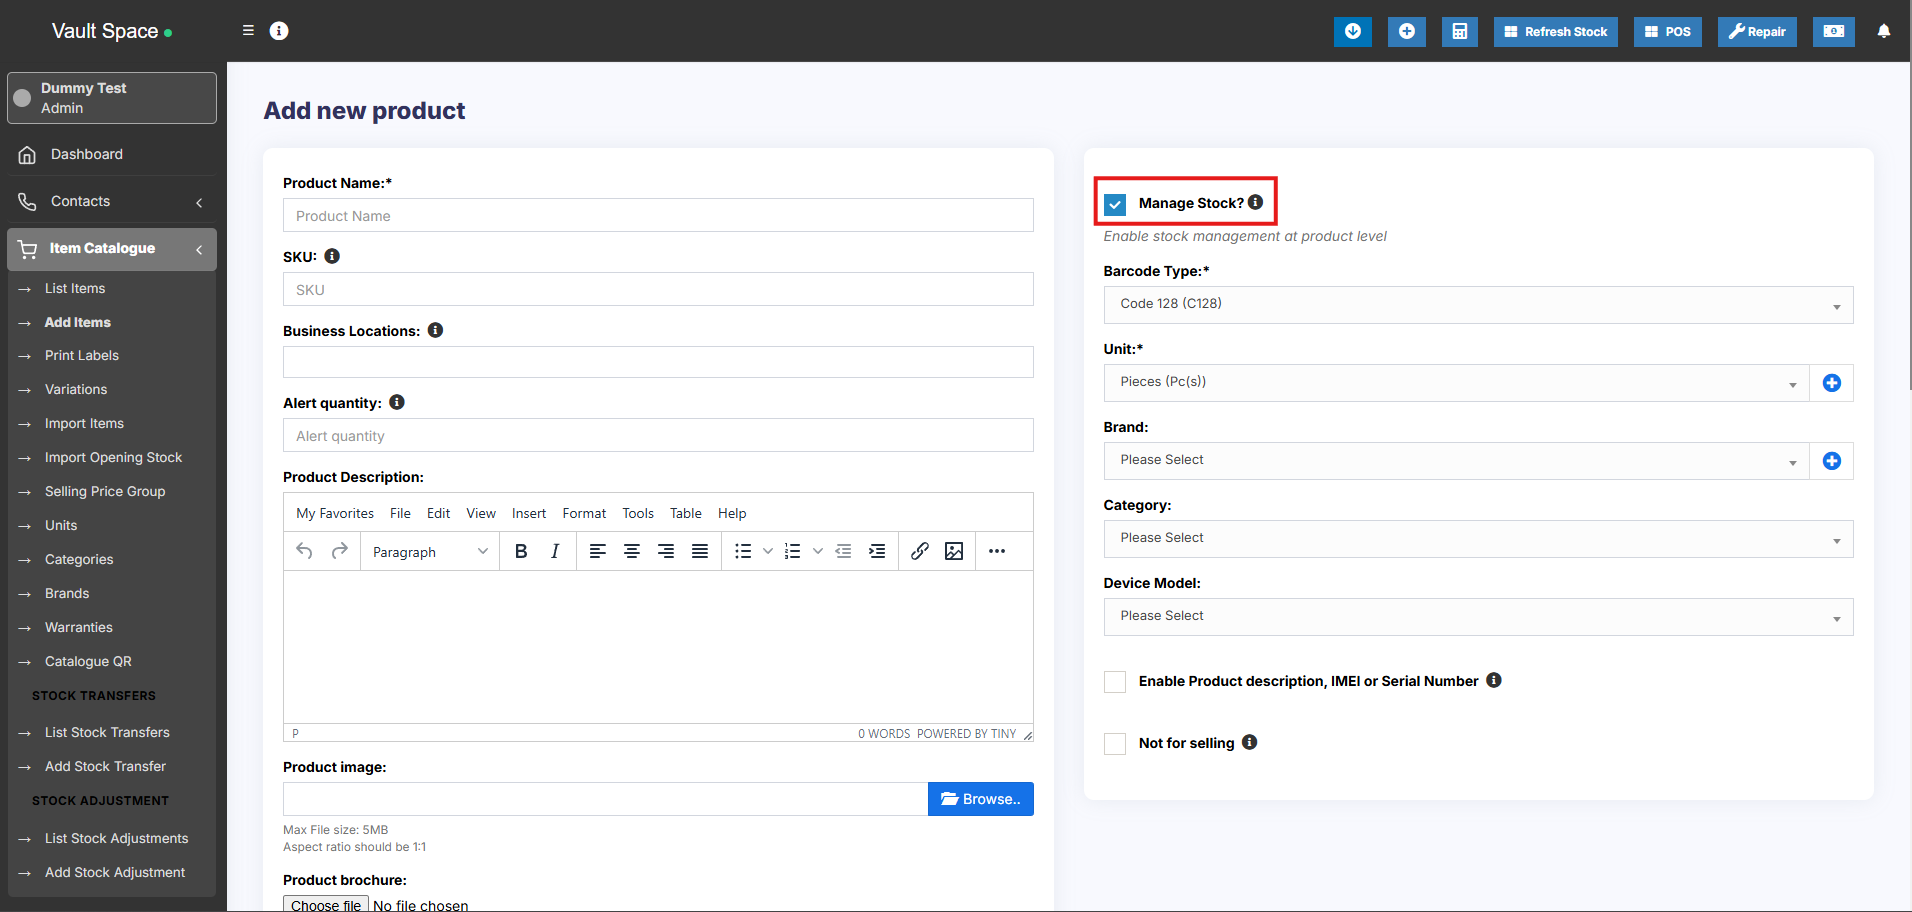](https://docs.senangurus.com/uploads/images/gallery/2025-10/FYtimage.png)
For services (e.g., **Repairing**, **Haircutting**, **Web Development**), stock management is not required.
When stock management is disabled, the product can be sold in unlimited quantities.
**Step 8: Select Business Location(s)**
- Choose the **Business Locations** where this product will be available for sale or purchase.
[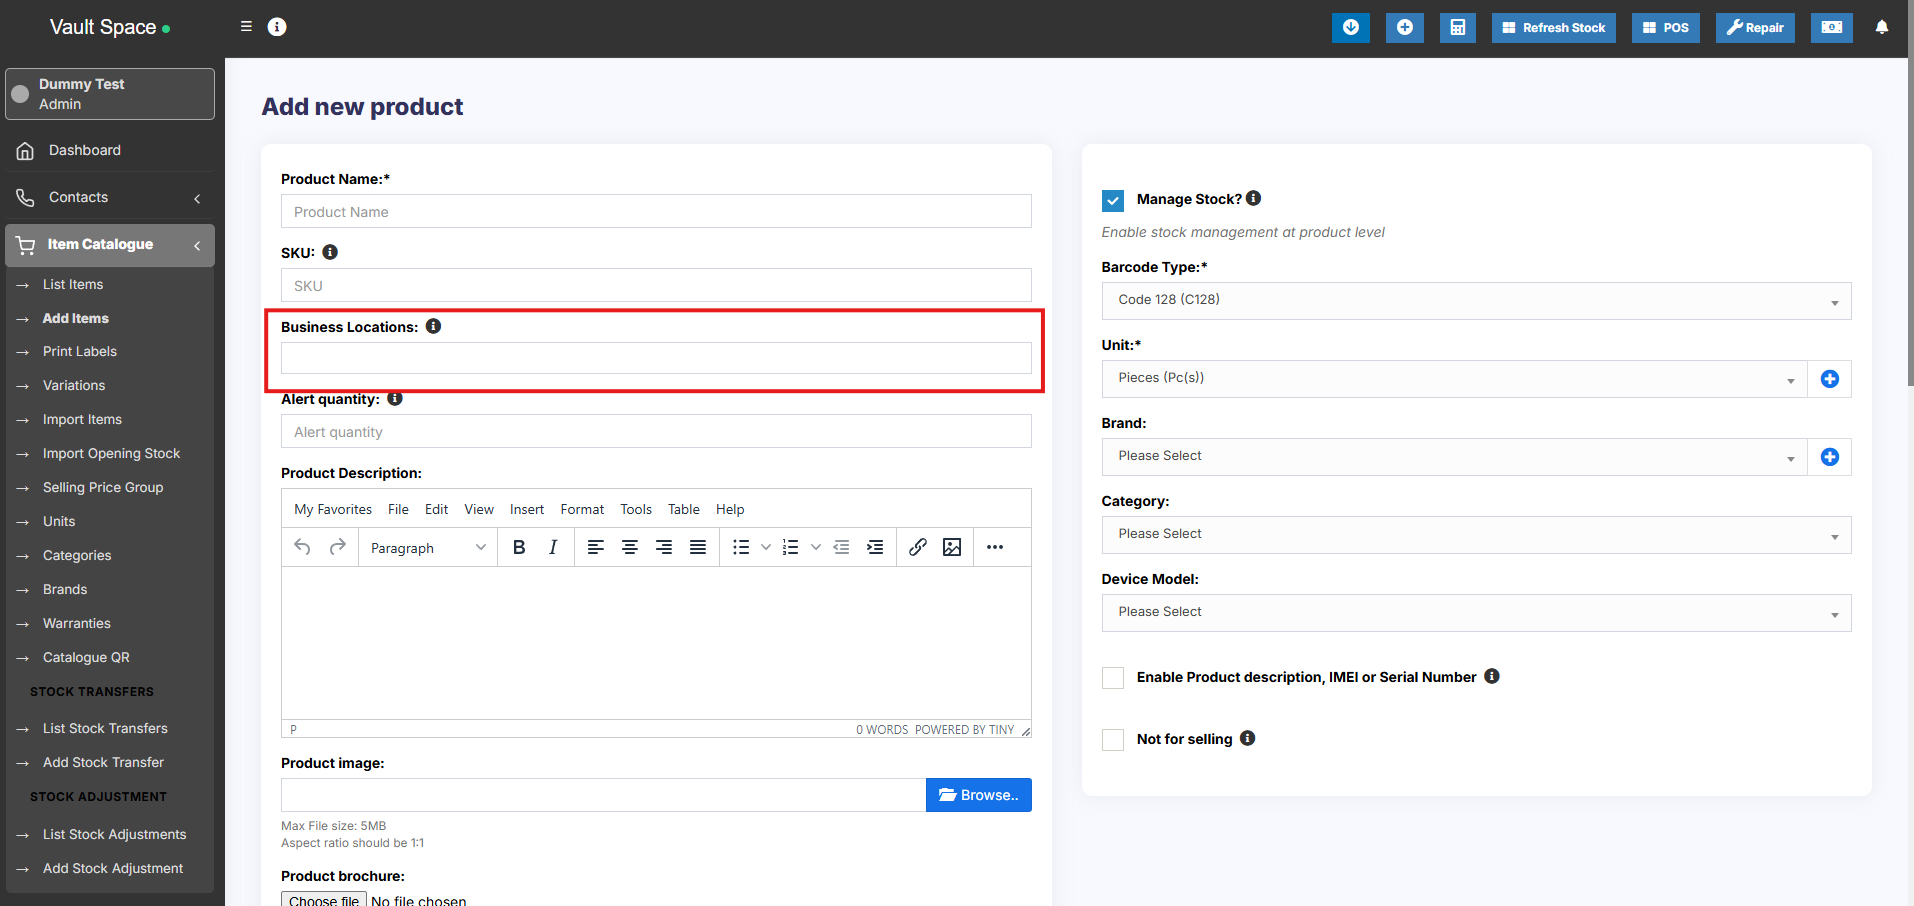](https://docs.senangurus.com/uploads/images/gallery/2025-10/39oimage.png)
**Step 9: Set Applicable Tax**
- Select the **Applicable Tax** (e.g., GST, VAT) for this product.
[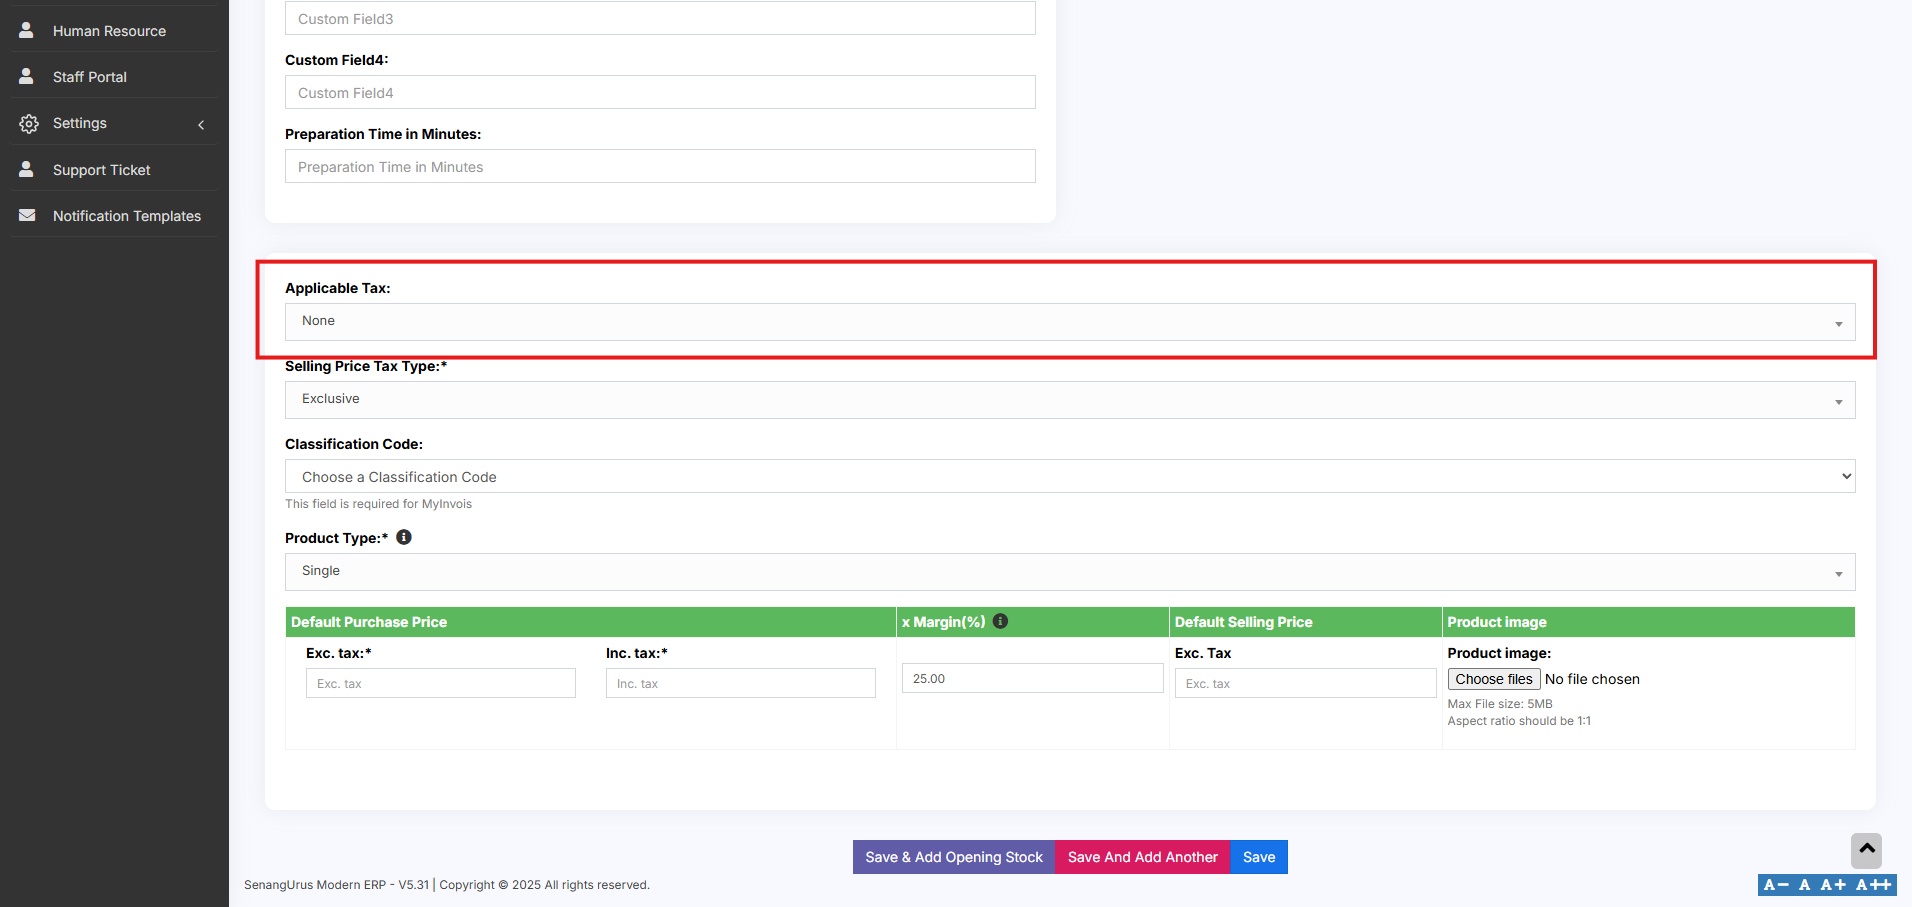](https://docs.senangurus.com/uploads/images/gallery/2025-10/yDWimage.png)
Make sure tax rates are configured in the system beforehand.
**Step 10: Choose Product Type**
- Select the appropriate **Product Type** (e.g., Single, Variable, Combo) based on your inventory structure.
[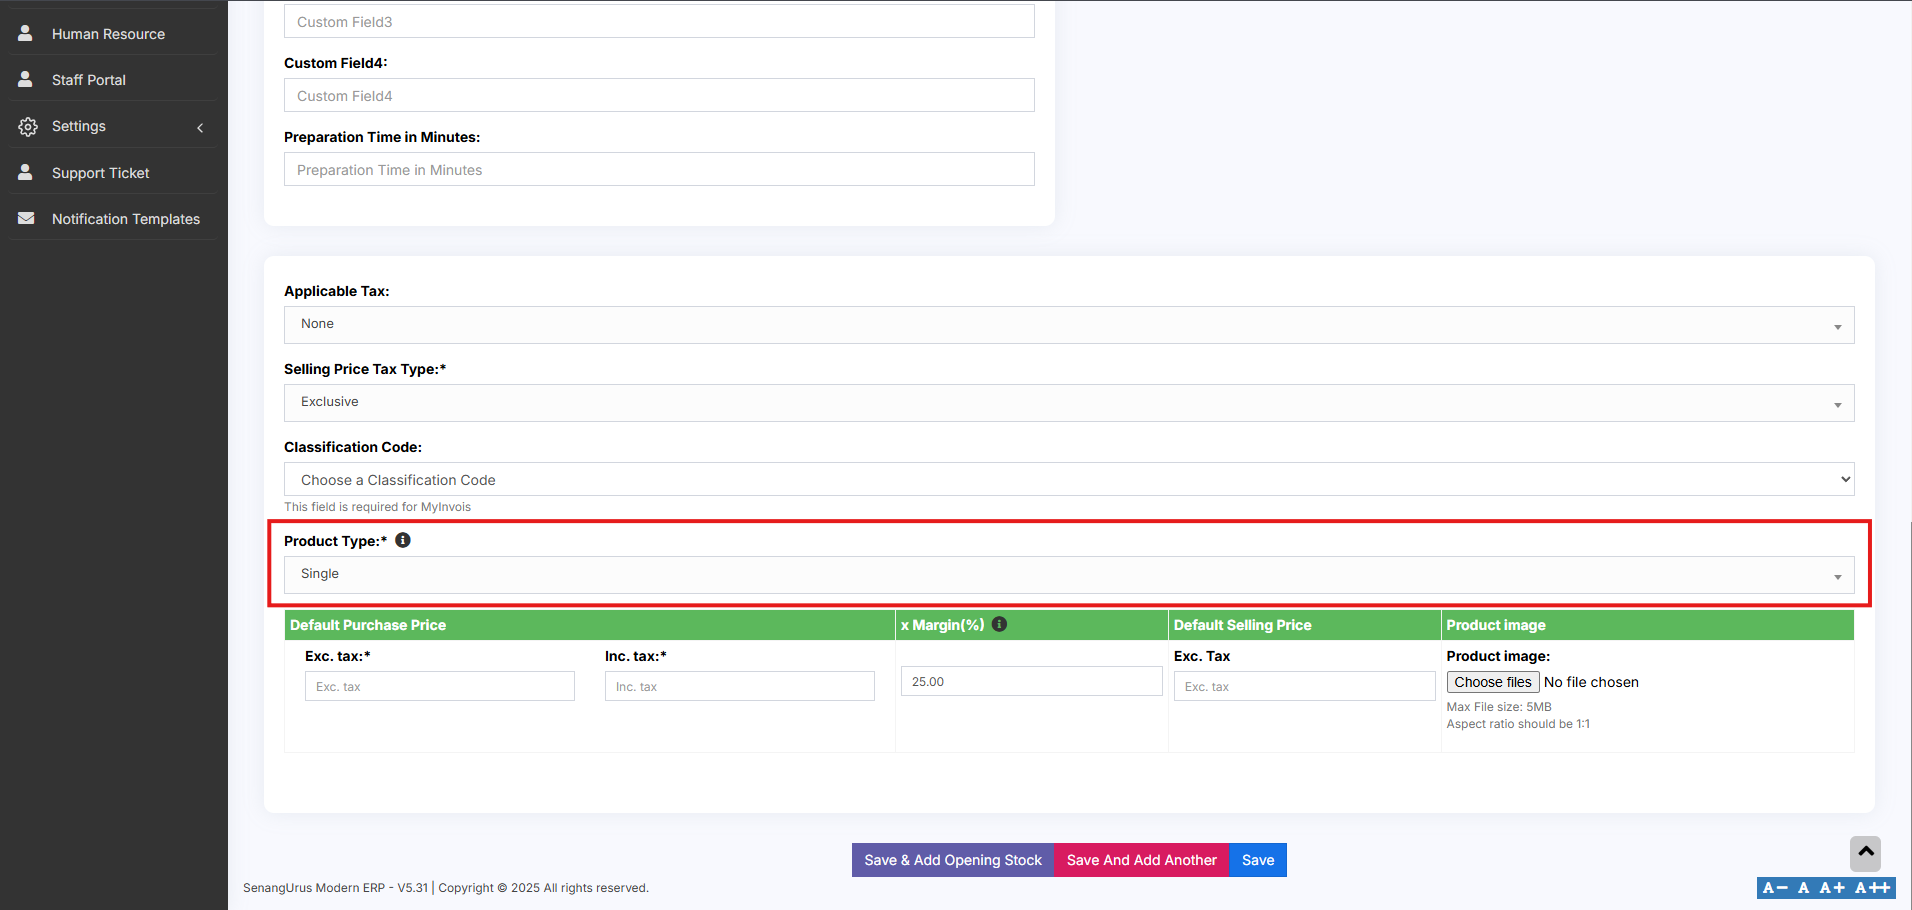](https://docs.senangurus.com/uploads/images/gallery/2025-10/6E7image.png)
Now click on the save button to add the product.
### **Single Product:**
The **Single Product** type is applicable for items that do **not have any variations** (e.g., size, color, weight).
Follow the steps for adding the product as mentioned above, then follow the steps given below
**Step 1: Select Product Type**
- Choose **Single** as the **Product Type**.
[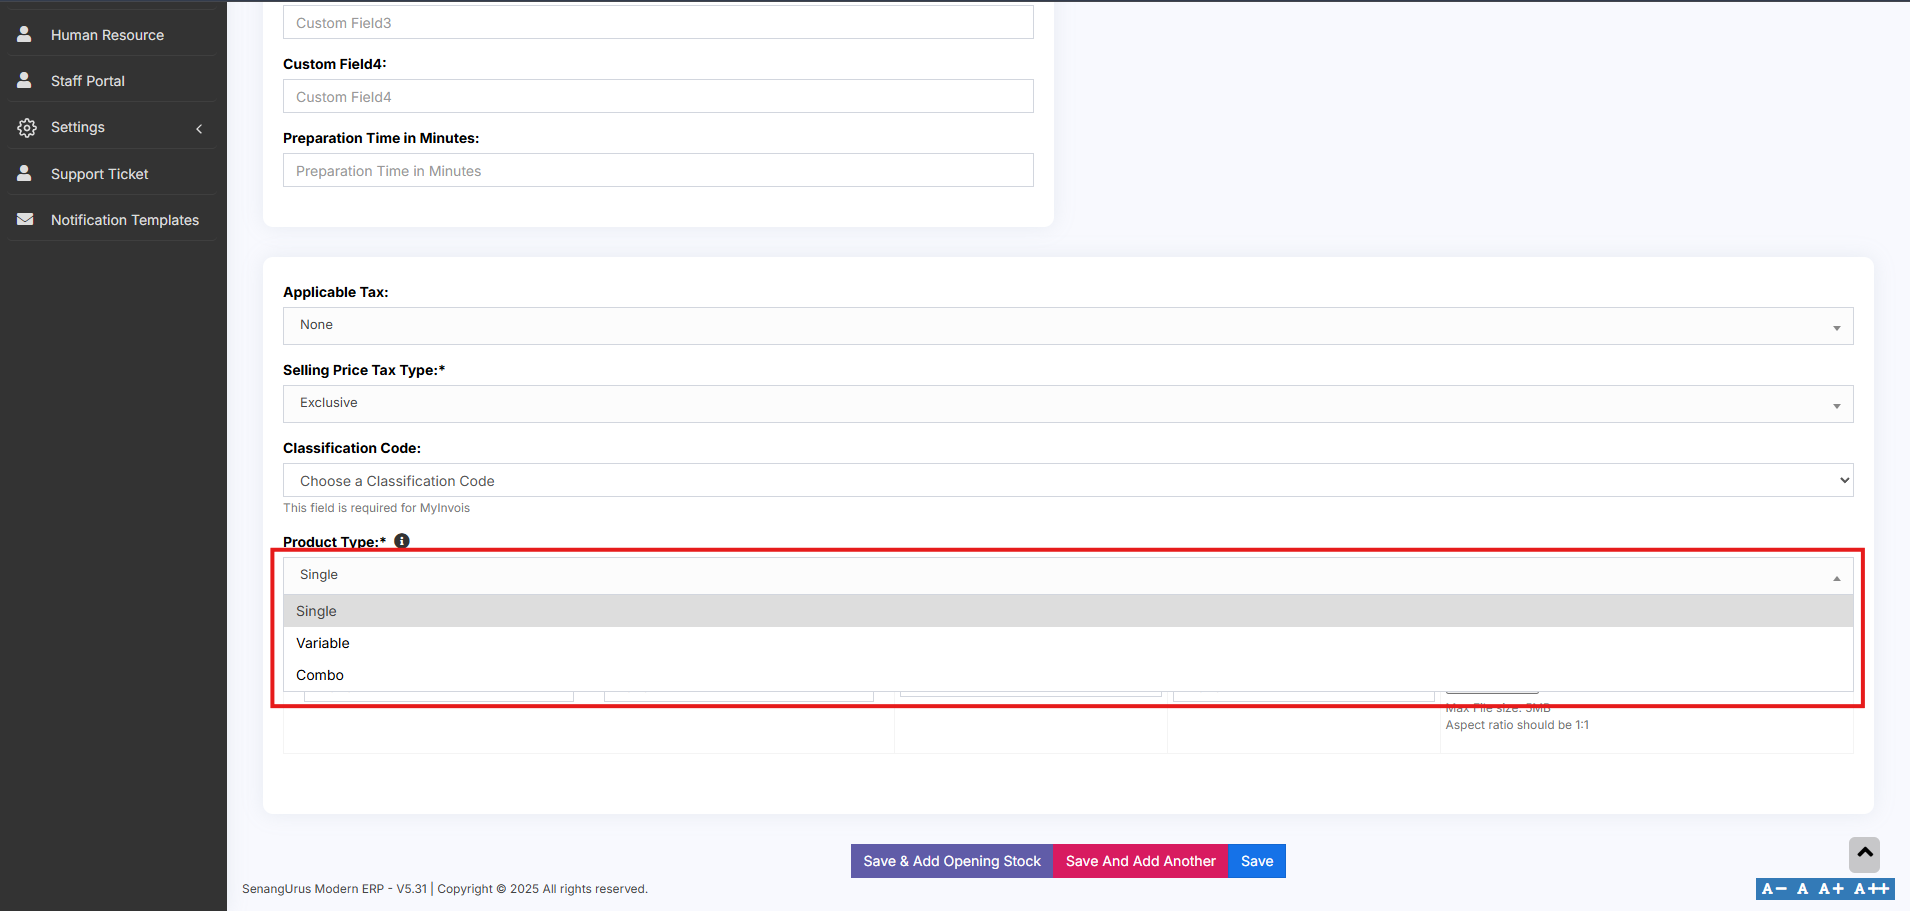](https://docs.senangurus.com/uploads/images/gallery/2025-10/72eimage.png)
**Step 2: Enter Pricing Details**
You will need to provide the following:
- **Default Product Price** – This can be entered **inclusive** or **exclusive** of tax based on your business preference.
- **Profit Margin %** – Enter the desired **Profit Margin** (e.g., 20%).
[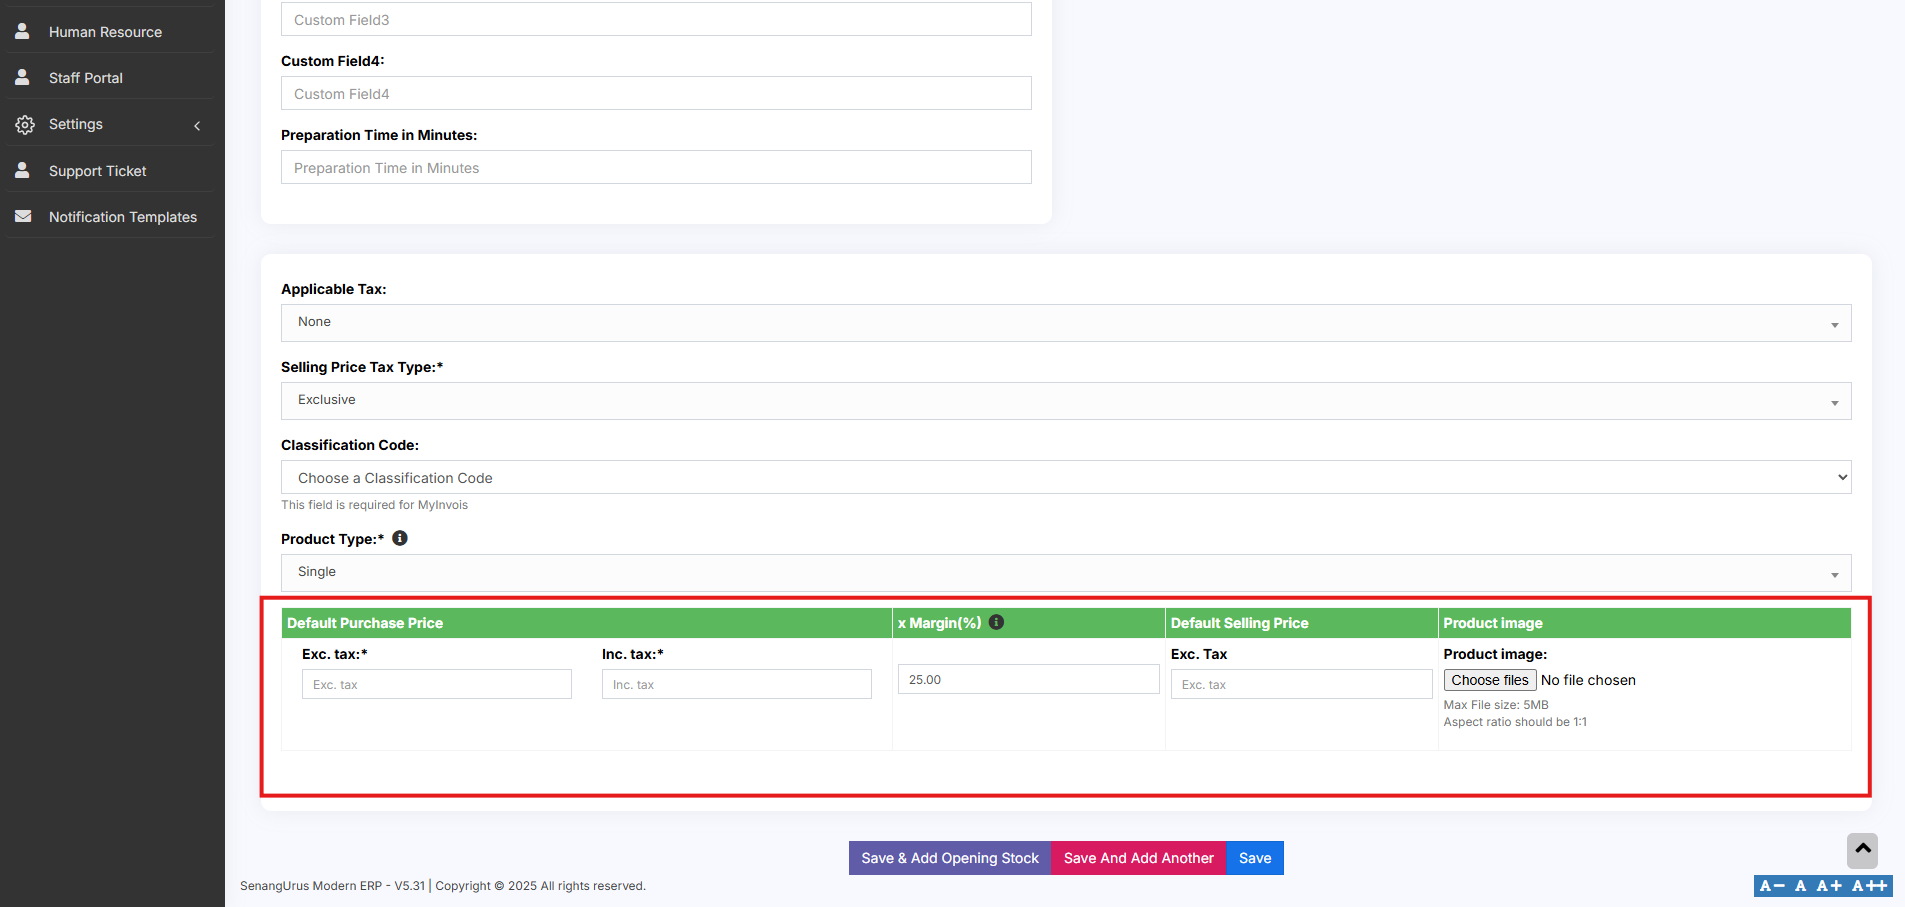](https://docs.senangurus.com/uploads/images/gallery/2025-10/DBwimage.png)
You can set a **default profit margin** in **Settings → Business Settings** to avoid entering it every time.
**Step 3: Auto Calculation of Selling Price**
- The system will **automatically calculate the Selling Price (excluding tax)** based on the profit margin and default cost price.
**Step 4: Manual Price Adjustment (Optional)**
- You can also **manually enter the Selling Price**.
- The system will then **auto-adjust the profit margin** based on the entered value.
This flexibility ensures that pricing can be either profit-driven or fixed-price as needed.
### **Variable Product:**
The **Variable Product** type is used for products that come with **variations**, such as **size**, **color**, **design**, **flavor**, etc.
[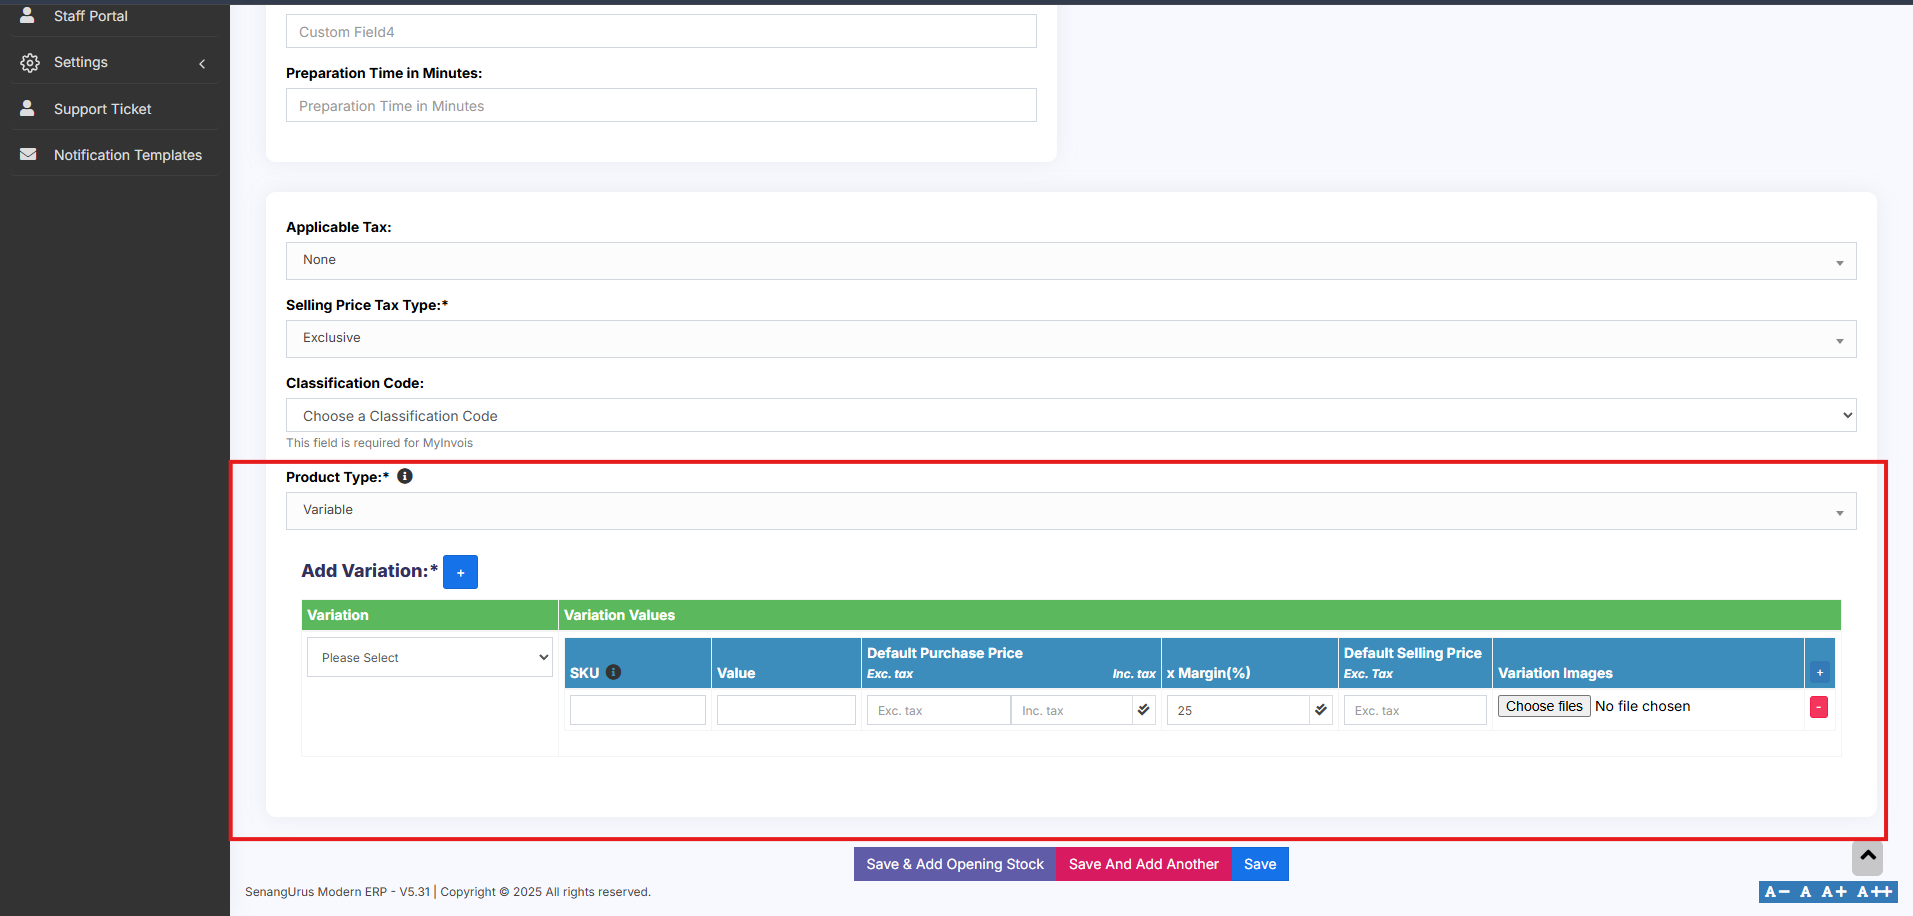](https://docs.senangurus.com/uploads/images/gallery/2025-10/zCAimage.png)
Follow the steps for adding the product as mentioned above, then follow the steps given below for adding variable type
**Step 1: Use for Products with Variations**
- Select **Variable** as the **Product Type** when a product has one or more attributes that vary.
**Step 2: Define Variation Templates**
- Create and manage **Variation Templates** from **Products → Variations**.
Templates save time by allowing you to reuse common sets of variations (like Small/Medium/Large or Red/Blue/Green).
**Step 3: Add Product Variations**
- Once you select **Variable Product**, additional fields will appear for entering variation-specific details.
- From the **dropdown**, choose the desired **Variation**.
- The system will **auto-populate** the variations values based on the selected variation.
**Step 4: Apply Purchase Price, Selling Price, or Profit Margin**
- Enter the **Purchase Price**, **Selling Price**, and **Profit Margin** for each variation.
> To apply the **same Purchase Price**, **Selling Price**, or **Profit Margin** across all variations, follow the steps below:
- Click on the **double tick icon** located next to the first variation entry.
- This will copy the entered values to all variations instantly.
For detailed steps on creating and managing variations, refer to the [adding variations](https://docs.senangurus.com/books/senangurus-business/page/variations) document.
### **Combo or Bundle Product**
Combo Products, also known as Bundle Products, are used to combine multiple individual products into a single product. For example, a **“Computer Set”** can be created as a bundle that includes:
- - 1 PC Monitor
- 1 PC CPU
- 1 PC Keyboard
- 1 PC Mouse
> When a customer buys the **Computer Set**, they receive all of the above components as part of one product.
**Stock Calculation for Combo products.**
- The available stock for a bundle depends on the **lowest available quantity** of any individual product in the combo.
- **Example:**
- PC Monitor: 5
- PC CPU: 4
- PC Keyboard: 10
- PC Mouse: 50
- Stock of **Computer Set** will be **4**, based on the product with the lowest quantity (CPU).
**Stock Management on Sale**
- When a **Combo Product** is sold, the stock of **each individual product** in the bundle is automatically **deducted**.
- This ensures accurate inventory tracking for all bundled items.
**Selling and Purchasing Rules for Combo products**
- **Individual Products** in the bundle can still be sold **separately**.
- **Combo Products cannot be purchased** directly from suppliers. Only the **individual products** within them can be purchased.
[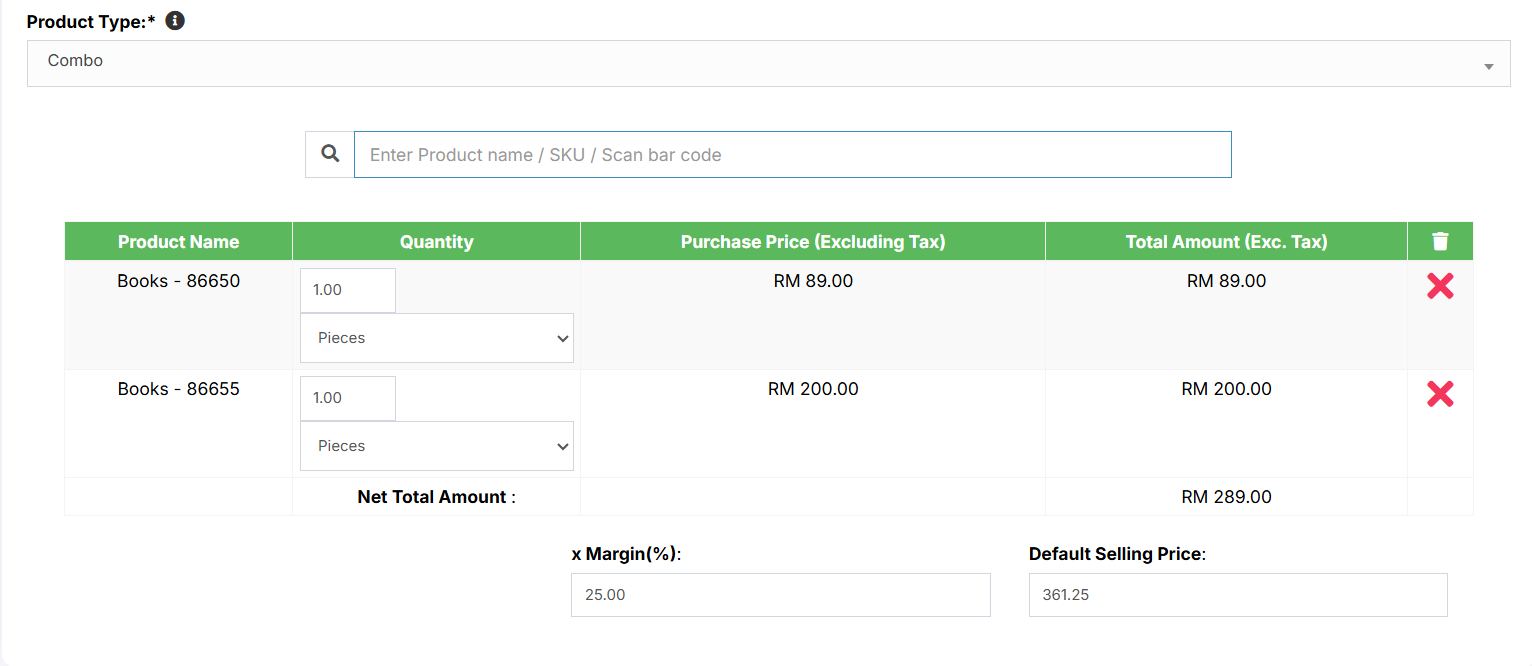](https://docs.senangurus.com/uploads/images/gallery/2025-10/fFpimage.png)
Adding a bundle product
### **Adding a Combo or Bundle Product**
Follow the steps for adding the product as mentioned above, then follow the steps given below
**Step 1: Select Product Type**
- Choose **Combo** as the **Product Type**.
**Step 2: Select Products for the combo**
- Select the required products that are to be sold as a combo and add the required quantity for each product. Now save it
# Adding Products with multiple variations:
If you have products with **multiple variations** (e.g., a shirt that has both **color** and **size**), there are a couple of effective ways to manage them in the system:
**Solution 1: Create a Combined Variation**
To create combined variation follow these steps
- Create a variation with a combined name such as **“Color-Size”**.
- Add combined variation values like:
- **Red-Small**
- **Red-Medium**
- **Red-Large**
- **Blue-Small**, etc.
- While adding the product (e.g., **Shirt**), select this **combined variation**.
This method is simple and works well when all combinations are fixed and known.
**Solution 2: Create Multiple Products**
To create multiple products follow these steps
- Create separate products for each main variation (e.g., **Shirt-Red**, **Shirt-Green**, **Shirt-Blue**).
- For each of these, add **size** as the second variation (e.g., Small, Medium, Large).
- Once you’ve added the first product (e.g., **Shirt-Red** with sizes), use the **Duplicate Product** action to create other color variants without re-entering all data.
This method provides flexibility when dealing with larger sets of unique combinations and allows better inventory control.
### Select Required variations:
When adding a **Variable Product**, you can choose **only the required variation values**. Follow the steps given below
1. On the **Add/Edit Product** screen, select the **Product Type** as **Variable**.
2. Select the **Variation Name** (e.g., **Color** or **Size**).
3. A **dropdown** will appear, allowing you to pick **specific variation values** applicable to that product.
[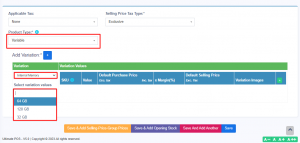](https://ultimatefosters.com/wp-content/uploads/2018/01/variationvalues.png)
This option is available only in POS version 5 and above.
### Changing **Default** SKU length for Products:
To change the length of auto-generated SKUs follow the steps:
- Open the file: `pos/app/Utils/ProductUtil.php`
- Search for the function: `generateProductSku`
- Modify the default value from **4** to your desired SKU length
### Assigning/remove locations of multiple products at once:
1. Go to List Products and select the required products.
2. You can find two button at the end of the list.
3. To Add products to a location, click on **Add to Location** button and select the location.
4. Similarly to remove products from a location, click in **Remove from Location** button and select location to be removed.
[](https://docs.senangurus.com/uploads/images/gallery/2025-10/assignproduct.png)
### Deactivating & Activating Product:
1. Go to List Products and select the required products.
2. You can find a button at the end of the list.
3. To Deactivate products, click on **Deactivate Selected** button to deactivate the selected products.
4. To later Activate the deactivated products in step 3, click on **Actions** button of the product deactivated and click on **Reactivate** option.
[](https://docs.senangurus.com/uploads/images/gallery/2025-10/deactivatingproduct.png)
### Using Product barcode:
**Question:**
How can we use the product’s barcode instead of creating and printing new for every product?
How can we use the brand’s barcode of the product instead of creating and printing new for every product?
**Answer:**
When creating a product, in the SKU field enter the barcode number of the product. This barcode will be used to identify the product in all screens like POS, Sales, purchases, reports, and others.
### How to add a product that already has a Barcode?
Adding products that already have a barcode, follow the same steps as adding any other products.
1. Go to add products
2. Fill in all the product details
3. **IMPORTANT:** in the SKU field scan or enter the barcode of the product.
### Adding product quantity or adding product stock
For systematically managing your business, product quantities can be added in 3 ways:
1. [Adding Opening stock](https://docs.senangurus.com/books/senangurus-business/page/opening-stock)
2. [Adding purchases](https://docs.senangurus.com/books/senangurus-business/chapter/purchases)
3. Manufacturing product: Useful for manufacturers, required [manufacturing module.](https://ultimatefosters.com/recommends/manufacturing-module-ultimatepos/ "Manufacturing module for UltimatePOS")
### How to Add Products from One Business to Another or Bulk Import Existing Products into a Newly Installed System
To transfer products between businesses or import existing products in bulk into a new POS system, follow these steps:
1. Use the **Download Excel** feature in the **List Products** section to export the product list.
2. Open the downloaded file and ensure that all data is correctly formatted.
3. Use the **Import Products** feature to upload the exported data into the POS system.
**Note:** When importing, make sure to copy and enter the data into each column provided in the downloaded Excel file according to the **Import Product Template.**
### Video Demonstration:
# Import/Export Products
### Import Products:
#### Steps:
1. Go to Products -> Import Products
2. Download the template file.
3. Fill all the information as per the displayed columns name & instructions. Don’t remove the heading from template file.
4. Import the file
[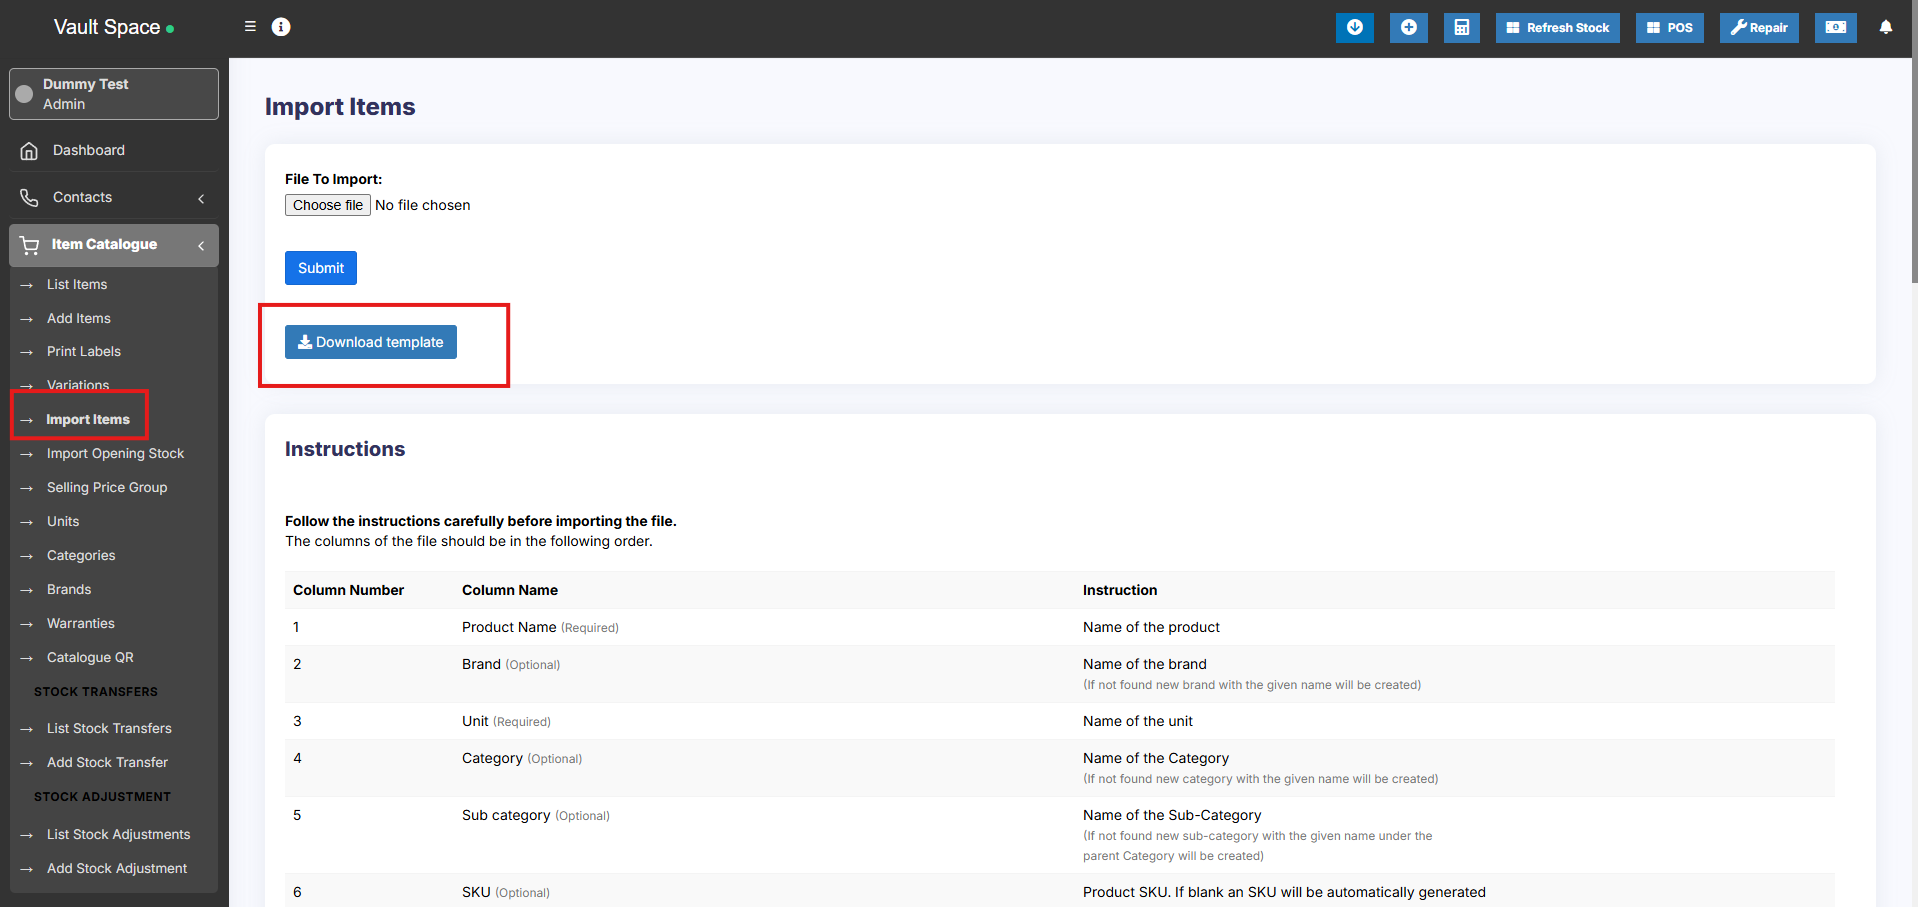](https://docs.senangurus.com/uploads/images/gallery/2025-10/G6bimage.png)
### Common Errors:
1. **Error:** UNIT not found
**Solution:** Make sure the unit you provided in excel file is already present in the system. Go to Products -> Units, add the unit & import the file again.
2. **Error:** The separation symbol could not be found the separation symbol could
**Solution:** Format your cells in excel as text in your excel for the expiry date field and give the date as specified(11-25-2018).
[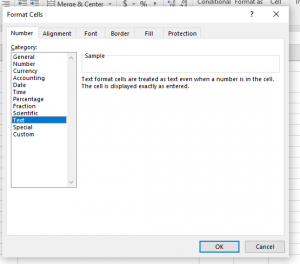](https://ultimatefosters.com/wp-content/uploads/2020/03/formatcells.png)
#### Not well-defined error:
Many times it can show some not well-defined errors like “non-numeric value encounter” or others
In this case, the best way is to split your import into multiple files.
For example, if you’re importing fil with 500 products, divide it into 2 files of 250 each and import it.
### Export Products:
The products can be exported in excel/pdf formats from the list products screen.
In version 4.7.8, a new export feature is added to export the product in the same template as the import product template.
In the list products screen, click the download excel button.
#### Removing Action Column in Export File:
While you export the products list in excel, cv or pdf, the actions button column might be added in the exported files. In order to avoid this, use the column visibility feature and hide the actions button.
[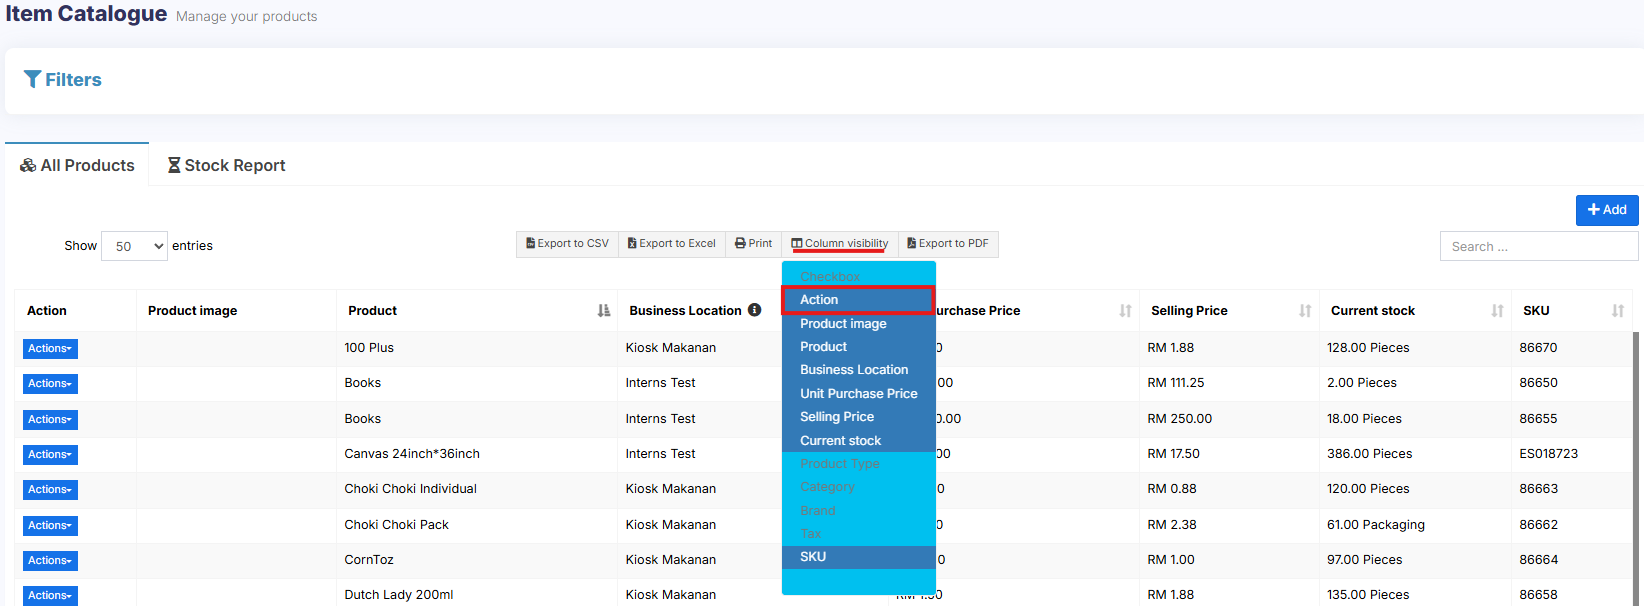](https://docs.senangurus.com/uploads/images/gallery/2025-10/removecolumn.png)
Check the document for making the visibility selection permanent
# Delete Product (Bulk delete)
### Deleting Products
Deleting of a product will remove the products from the database.
**NOTE:** This delete will not work if the product have some transactions related to it. Transaction can be Opening Stock, Purchase, Sales or Stock transfer of the product. It will show some error like:
- Product can’t be deleted because purchases related to this product exist
- Some products couldn’t be deleted because it has transaction related to it.
You can delete products either **individually** or in **bulk**. Follow the instructions below:
### Deleting individual product
1. Go to **List Items**
2. Locate the product you want to delete.
3. Click on the **Actions** dropdown beside the product.
4. Select the **Delete** option.
[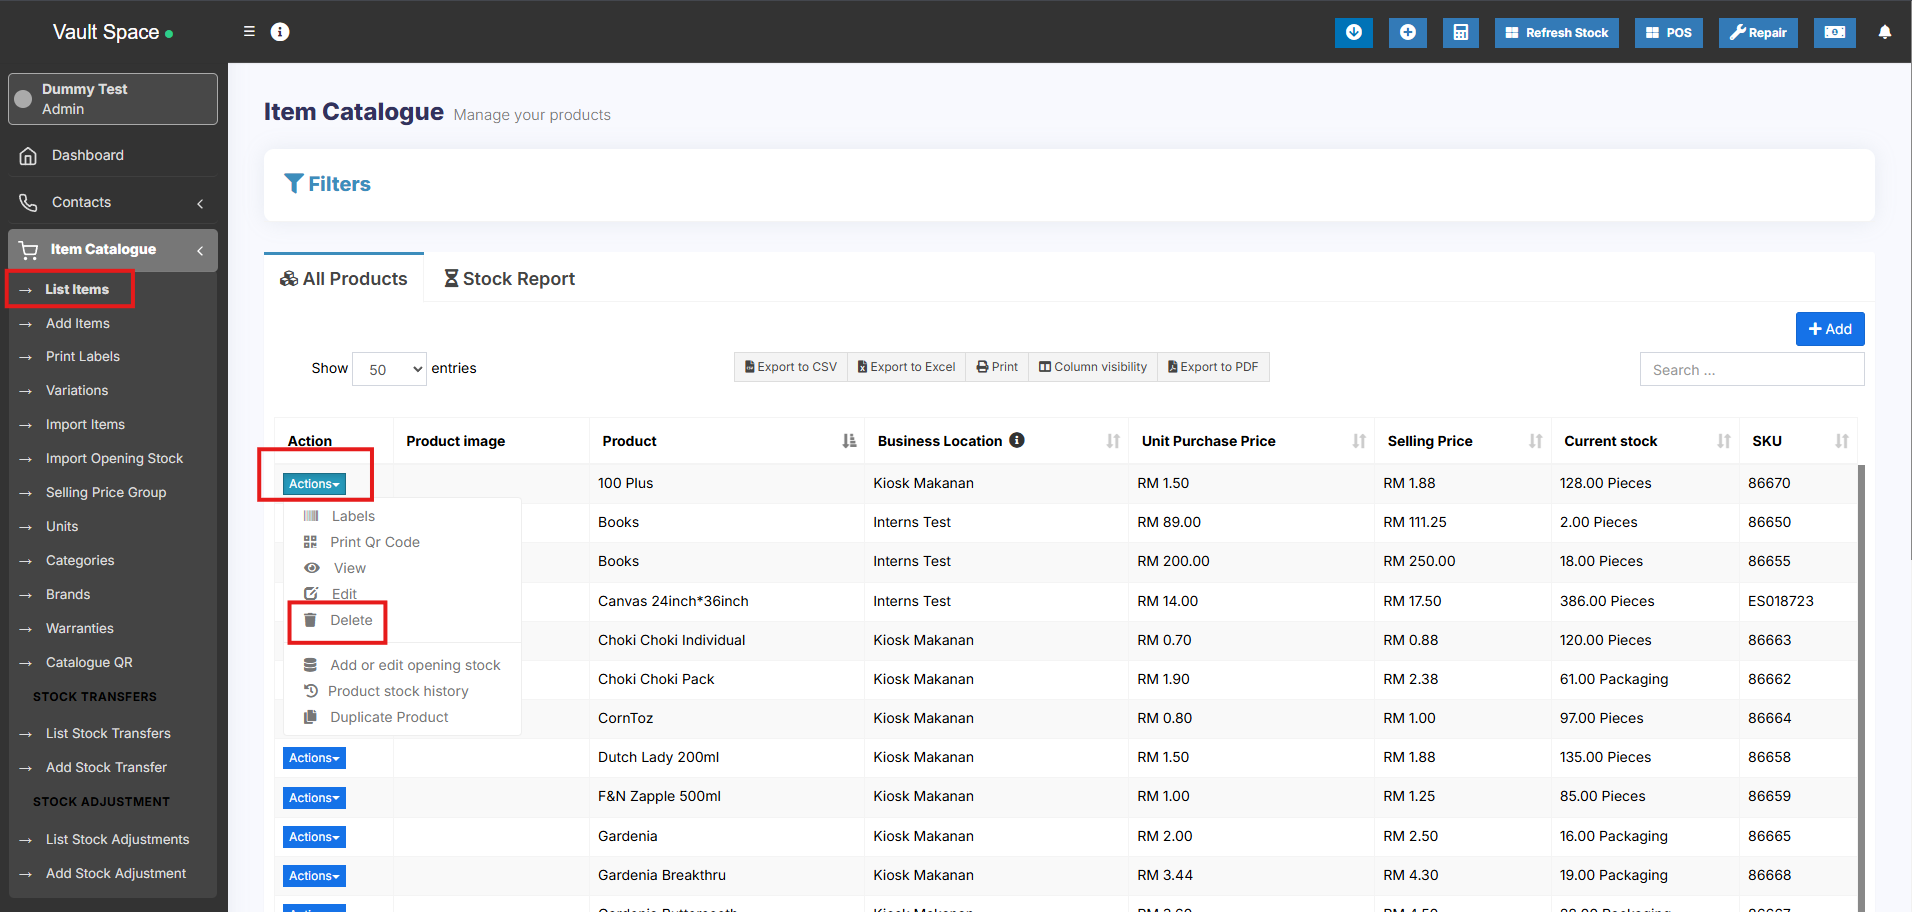](https://docs.senangurus.com/uploads/images/gallery/2025-10/i96image.png)
### Delete product Errors:
#### Some products couldn’t be deleted because it has transaction related to it:
When a product has any transactions it cannot be deleted.
Transactions can be either Sales, Purchase, or Adding opening stock.
The best way to avoid such products is by deactivation them.
# Variations
1. Variations can be added from the **Variations** menu.
2. These variations are used in variable products product.
Example of variation is, for example, Jeans can have multiple colors, so add variations called Colors and provide the value for it. As given in the image below.
[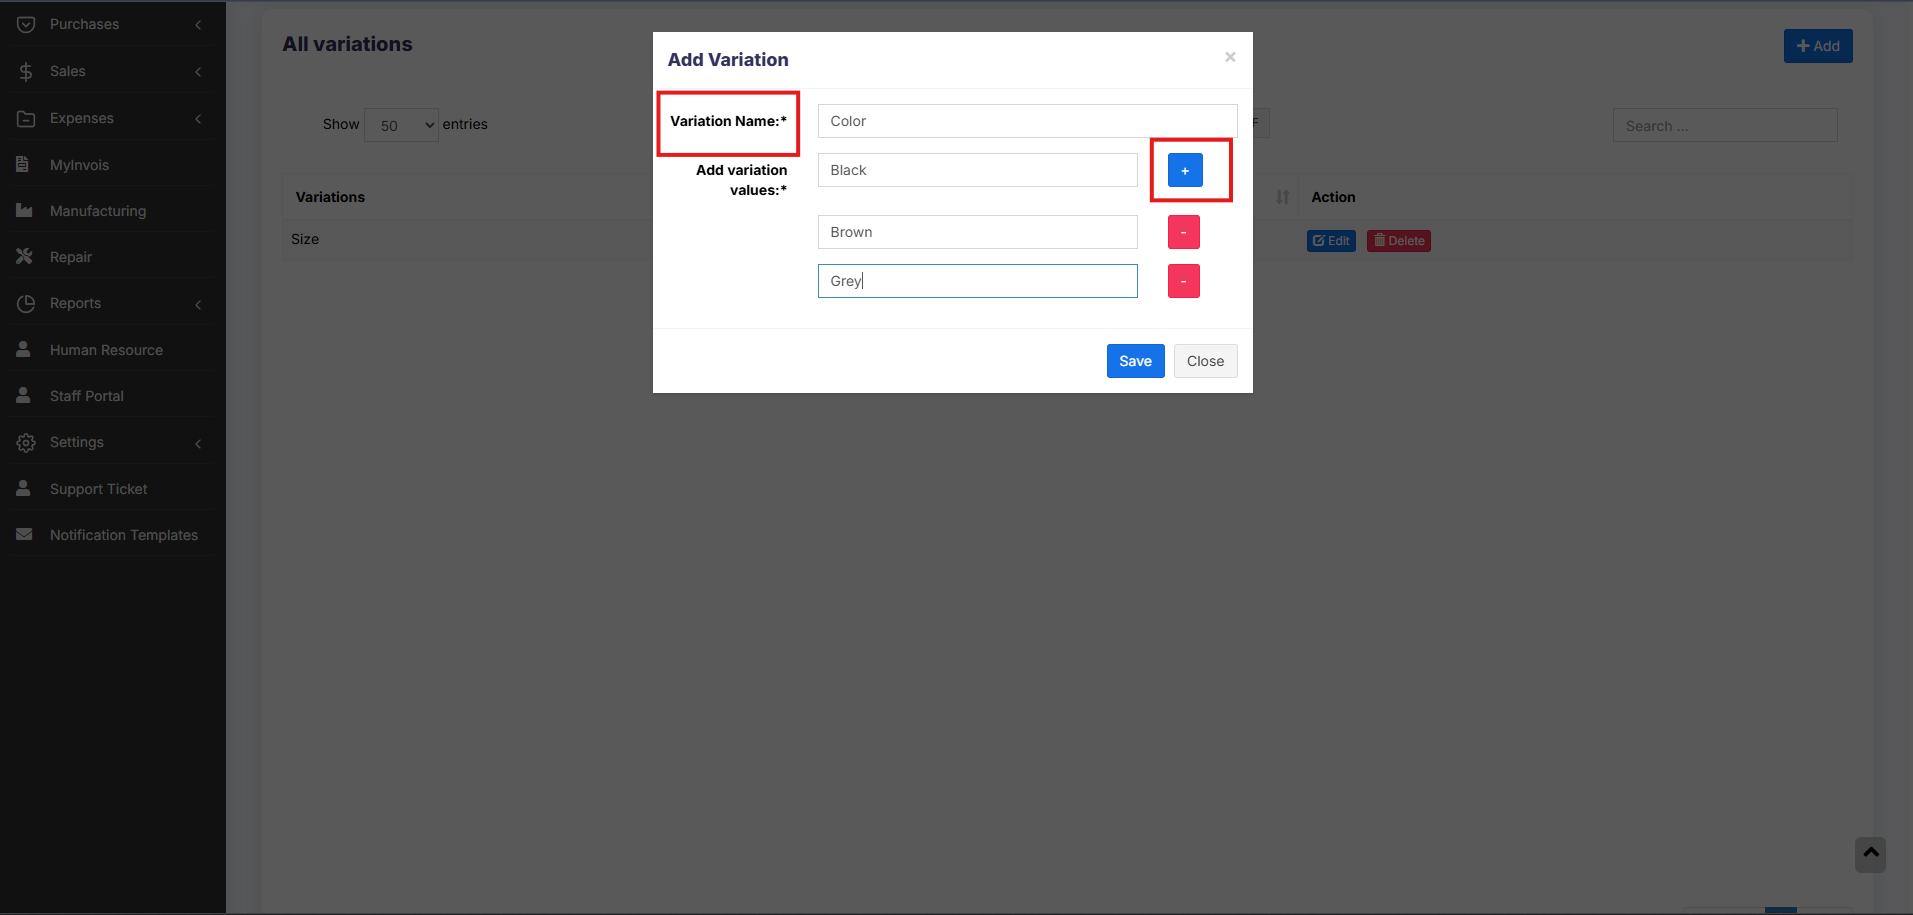](https://docs.senangurus.com/uploads/images/gallery/2025-10/IHwimage.png)
**NOTE**: Delete variation option will not be shown for variations that are already used in some products
### Adding Multiple Variations for Products
If a product has more than one variation, for example, A shirt with size ‘M’ and brand ‘POLO’ or A book with pages 30 and size long.
Add the variation name and type as a combined variation.
Eg: variation name : Size – Pages
variation values – Long -30, Long -120, Long – 200, Small -30, Small – 120 etc.
# Product Units
Different Products have different units. SenangUrus Business allows you to add different units for products.
### Adding Units
1. Go to Units
2. Give the unit name, a short name, and choose if want the unit to allow decimals.
Example:
**Name**: Meter
**Short name**: Mtr.
**Allow Decimal**: Yes.
[](https://docs.senangurus.com/uploads/images/gallery/2025-10/RPfimage.png)
Allowing decimal allows you to purchase/Sell the product in decimal and vice-versa.
### Multiple Units:
This can be useful if you purchase products in a different unit and sell it in a different unit.
For example: Purchase in dozens and sell in pieces.
Or purchase in boxes and sell in pieces.
**Steps:**
1. Add the lower unit from Add Unit Screen. For example pieces.
2. Add the higher unit as per the screenshot:
- Check “Add as multiple of another unit”
[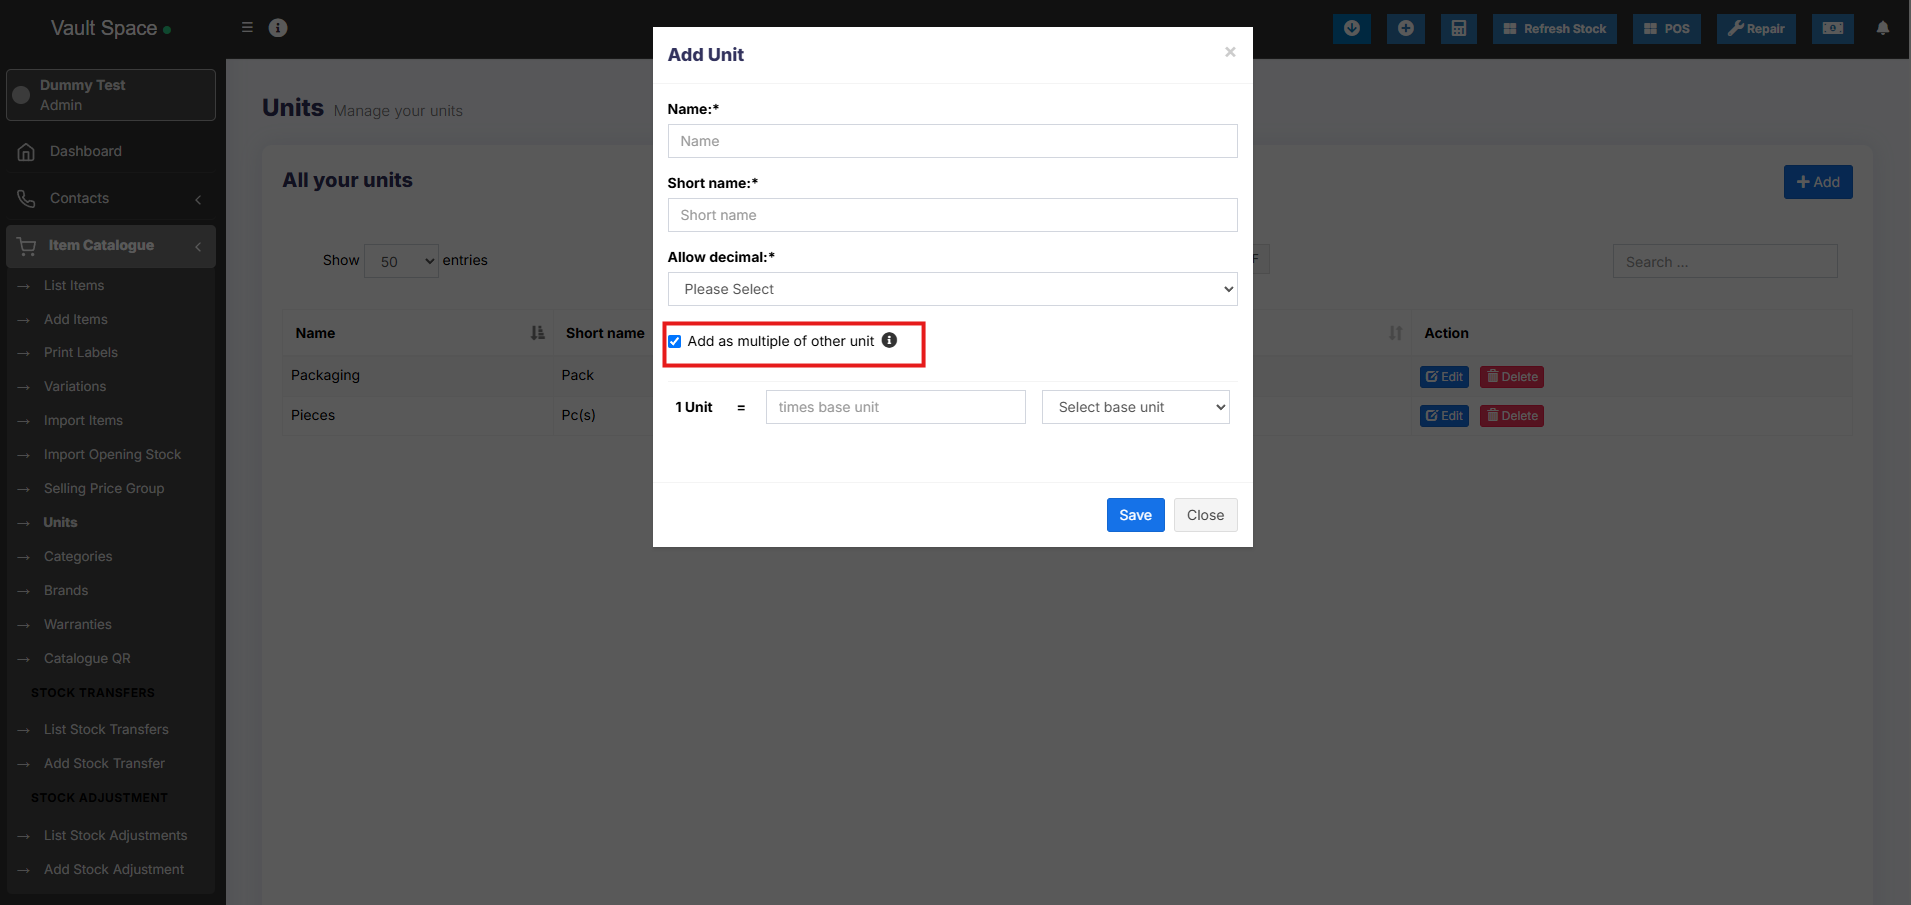](https://docs.senangurus.com/uploads/images/gallery/2025-10/sVCimage.png)
- Provide the conversion Details.
3. Use the unit in Add/Edit Product. While adding/editing purchase/ sale you can see the dropdown for units. Select the desired unit and it will change the unit purchase/sales price accordingly.
**NOTE**: You will not see the main Units (Dozen in this example) in the Add-Product Unit dropdown, select piece as the unit of product. All purchases/sales get saved in the lower unit (pieces in the above example). So after adding purchases/sales if you edit the conversion details, it will affect the purchases/sales quantity accordingly.
### Selecting relevant Sub Units for a product
For some products not all sub-units will be required. Suppose for example you sell Oranges only in Dozens or only in pieces then it will be useful.
Enable it from Business settings ->Products -> Enable relevant sub-units
Now when adding products select the Unit for the products and it will give option to select multiple applicable sub-units. Selecting the sub-units will allow you to do purchases or sales on this selected sub-units.
### Secondary Units:
Secondary units can be added to products. A secondary unit can be used if a particular product’s subunit may vary each time. For example, 1 piece of stone can be 10 kg or 20 kg, or 30 kg.
To enable this go to Settings-> Business Settings – > Products.
[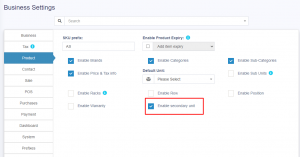](https://ultimatefosters.com/wp-content/uploads/2018/01/enablesecunit.png)
On enabling this, a secondary unit label will be shown in add/edit products screen.
[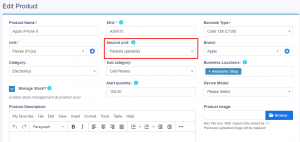](https://ultimatefosters.com/wp-content/uploads/2018/01/addeditsecunit.png)
Selecting this product in the purchase/sale/POS screen will also show the secondary unit label.
The details of secondary units for products are shown in the product stock history of that product.
**NOTE**: The secondary unit is not considered for calculation. It is only used for the user’s knowledge of tracking the products with varying subunits.
**NOTE**: Available only in version 4.7.8 and above.
# Product Category (Categorizing products)
Categorizing products helps you to easily manage and filter them in reports.
### Adding Category & Sub-Category
1. Go to Product -> Categories -> Add
2. Add Category name, category code(HSN code)
3. If the category is sub-category select “Add as sub taxonomy” and select the parent category.
[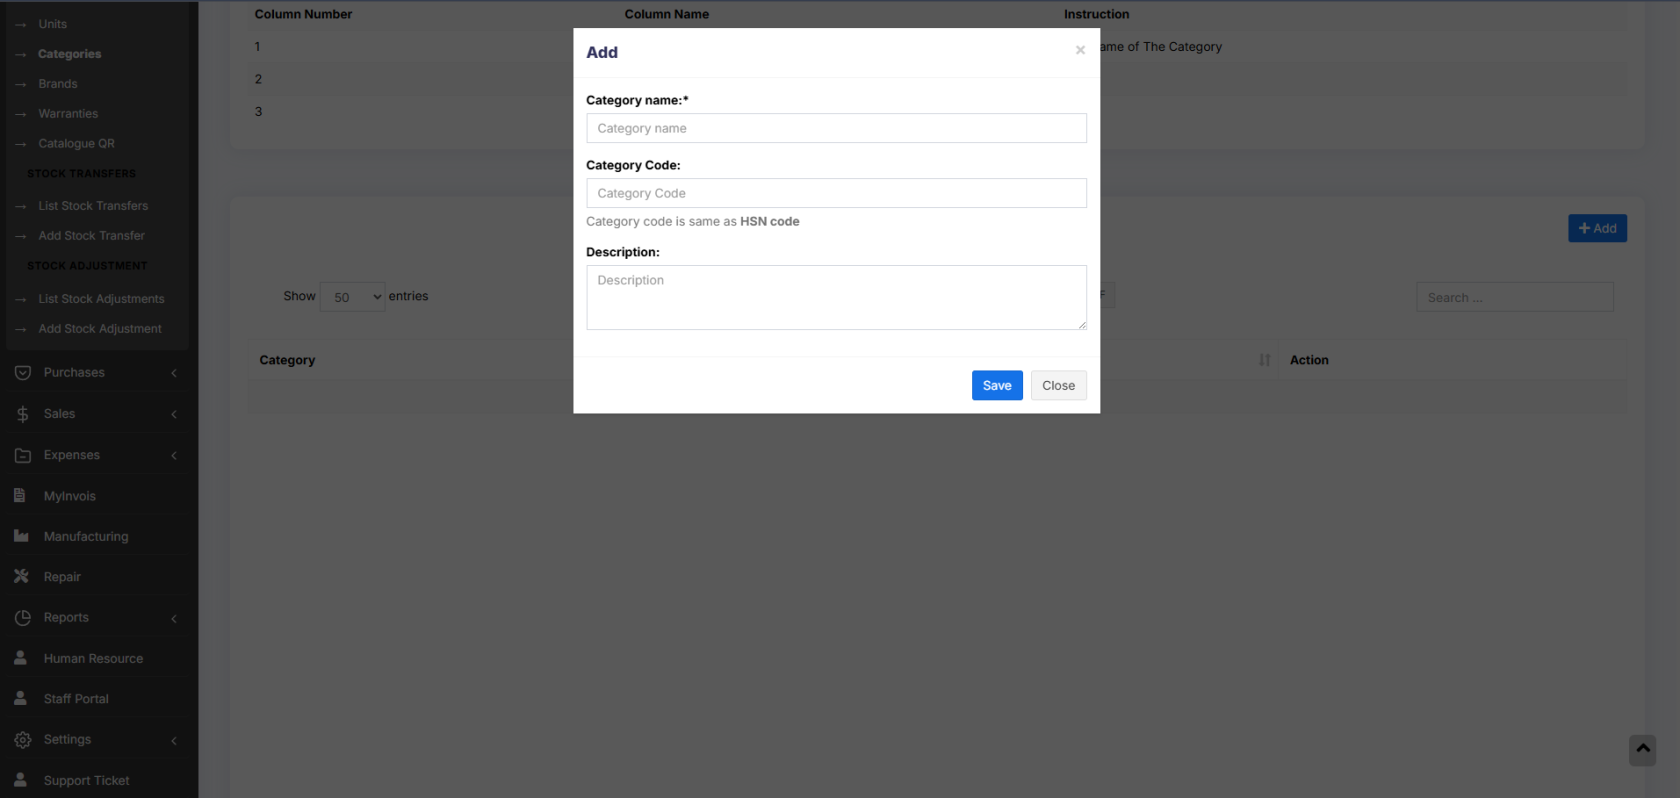](https://docs.senangurus.com/uploads/images/gallery/2025-10/yctimage.png)
# Product stock history
1. The **Product Stock History** feature allows you to view detailed records of all stock-related transactions for a specific product, including:
- **Sales**
- **Purchases**
- **Opening Stock**
- **Transferred Stock**
- **Stock Adjustments**
You can also **filter the history by date range** to analyze stock movement over a specific period.
### How to View Product Stock History
1. Go to **List Items**
2. Click on the **Actions** dropdown for the desired product
3. Select **Product Stock History**
[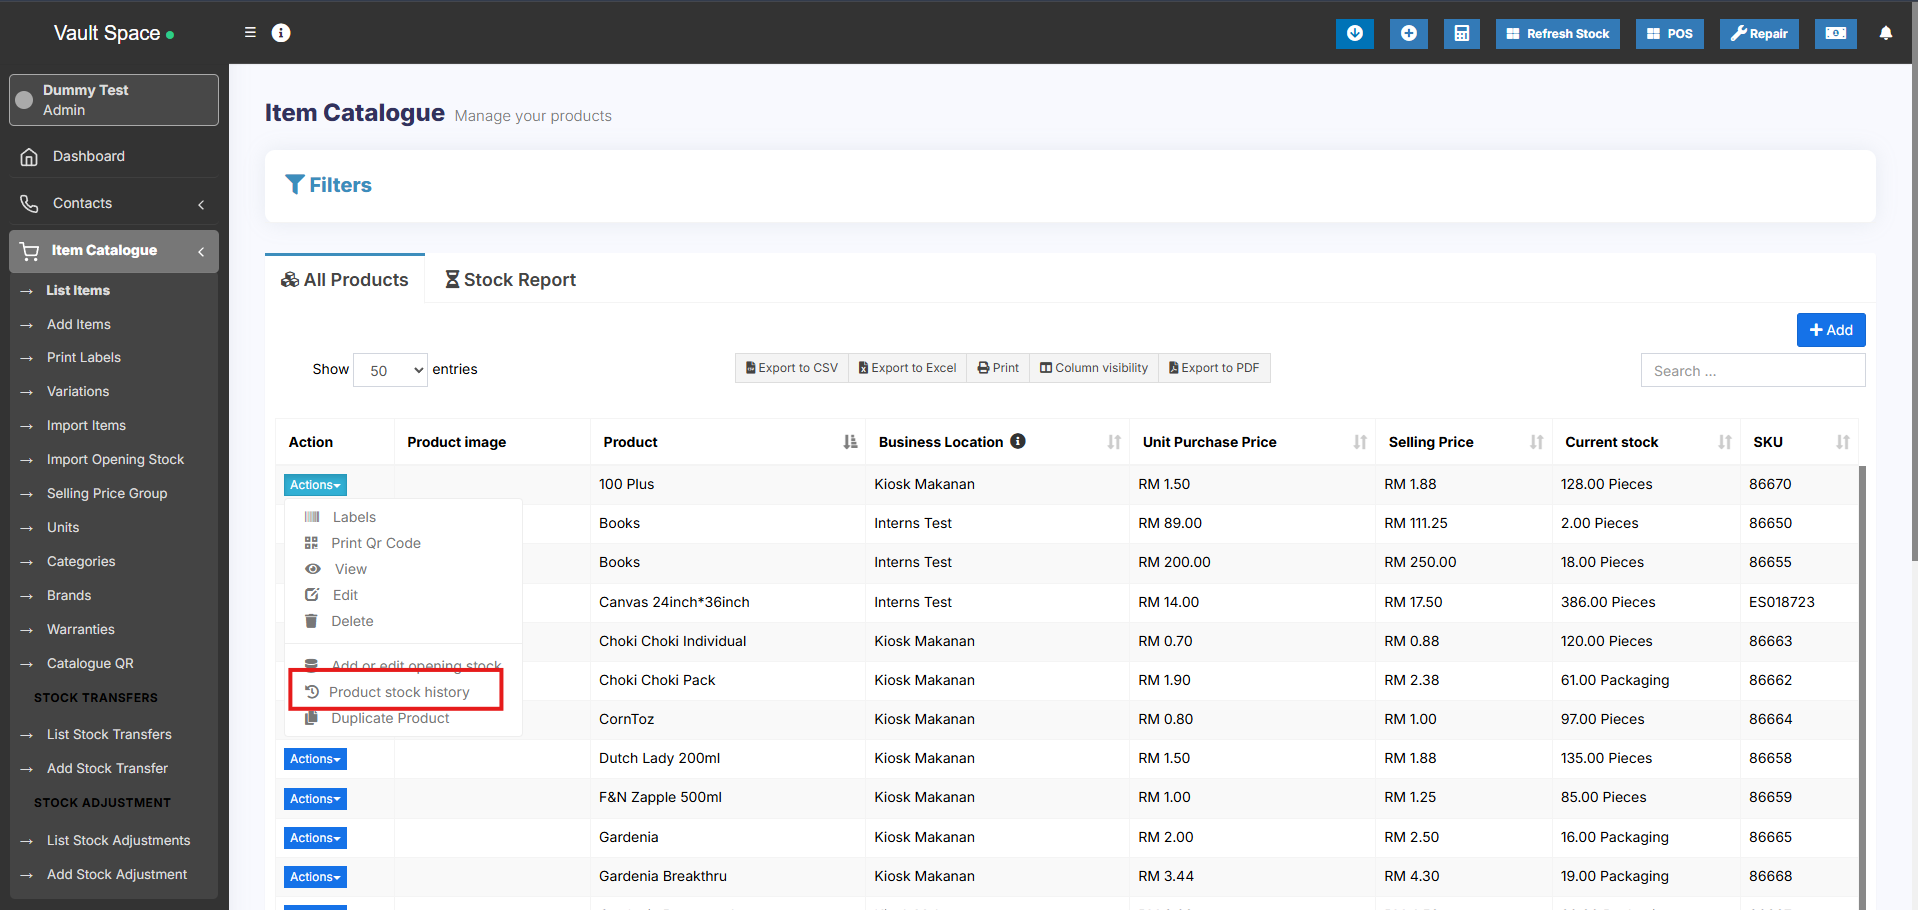](https://docs.senangurus.com/uploads/images/gallery/2025-10/BOQimage.png)
This helps in tracking product-level inventory changes and resolving stock-related discrepancies efficiently.
# Product expiry and related settings
### Enabling expiry for products
1.To enable expiry go to **Settings -> Business Settings -> Product section**. And check the “Enable Product Expiry” checkbox.
2. On enabling Product expiry, you can choose either “Add Item Expiry” or “Add manufacturing date & Expiry Period”
[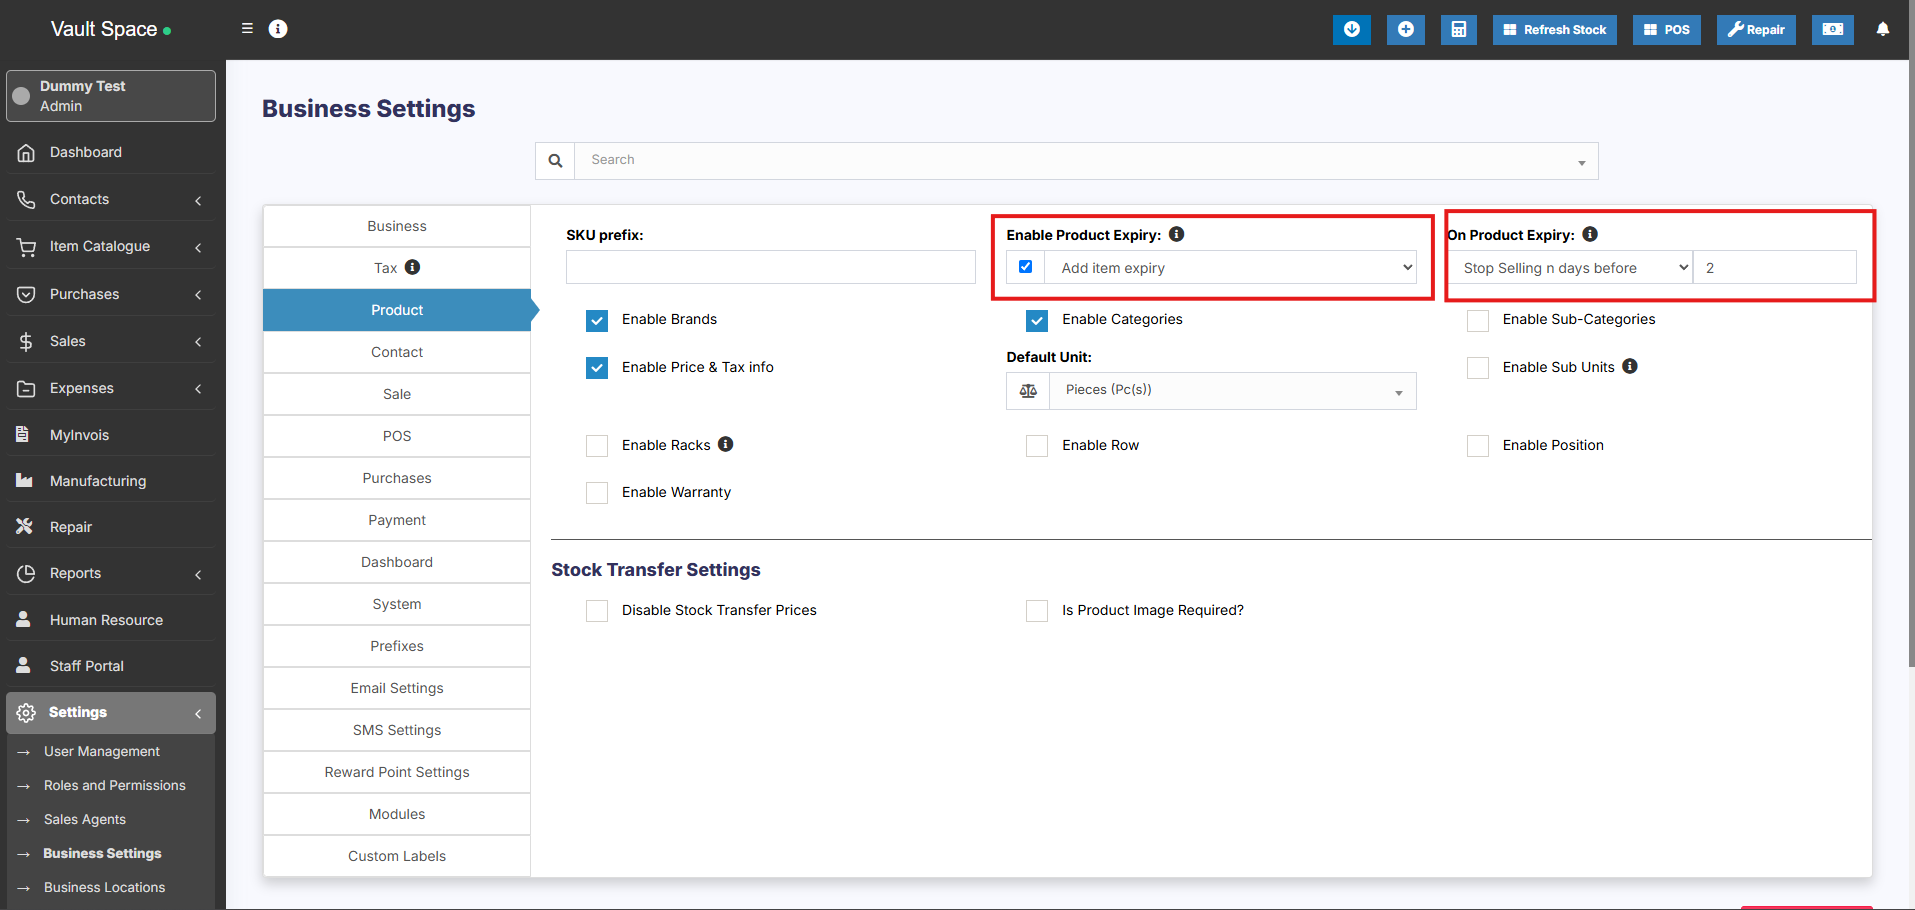](https://docs.senangurus.com/uploads/images/gallery/2025-10/Zc9image.png)
- **“Add Item expiry”** => Choose this option if you want to directly add the expiry of the item to the purchase screen.
- **“Add manufacturing date & Expiry date”** => Choose this option if you want to add the manufacturing date of the item and the expiry period. Based on the manufacturing date and expiry period it will auto-calculate the expiry date. And this expiry date can be edited. You will have to add expiry period for the product in the “Add or Edit Product” screen. And the manufacturing date in the “Add Purchase” screen.
3. “**On Product Expiry**” => With this option you can set what the system should do when a product expired.
- **“Keep Selling”** => Choose this option if you want the application to keep selling the product even after expiry.
- **“Stop Selling n days before”** => Choose this option to stop selling the item n days before the expiry. You will have to specify the value of n (which is the number of days before to stop selling)
4. “**Stock Accounting Method**” => This feature is used to set the way the product should be sold.
- **FIFO (First In First Out)** => In this the old stock should be sold first.
- **LIFO (Last In First Out)** => In this the most recent purchase stock should be sold.
For an Example:
1. Purchase 20 pcs of product A on 20 March 2018. Expiry date 10 April 2018
2. Purchase 20 pcs of the same product A on 23 March 2018. Expiry date 8 April 2018
3. Today I sold 22 pcs.
If the “Stock Accounting Method” is FIFO => Then the Product purchased on 20 March 2018 will be deduced with 20 pcs and after that product purchase on 23 March 2018 will be deduced with 2 pcs.
So in stock, we will have products from 23 March 2018 with 18 pcs.
If the “Stock Accounting Method” is LIFO => The opposite of the above will happen.
**NOTE:** You must set the required accounting method before selling the item for that accounting method to be used.
### Stock Expiry Report:
1. Go to Reports => Stock Expiry Reports.
2. Here you can filter stock “Category”, Brands, “Stock expiry date”
3. **Click on “Edit” to modify the stock left and expiry period.**
4. **If stock left is decreased the unit purchase price is adjusted accordingly.**
### Stock Expiry Alert:
– You can view stock expiry alert in Homepage bottom section. Here it shows a list of products expiring soon.
– You can set the number of days before which the expiry alter should be shown in the Homepage from “**Settings -> Business Settings -> Dashboard Section**” View Stock Expiry Alert For input field.
### Displaying product expiry date in the invoice
1. Make sure the product expiry feature is enabled as mentioned above.
2. Go to invoice layout and enable “Show Product expiry”
3. If the product expiry date is added when adding Purchase or Opening stock then when making sales it will display the product expiry dropdown. Select the expiry date which you want to sell. Then in the print invoice, it will show the expiry date.
# Lot number
*(Not available in SenangUrus-Enterprise)*
#### [What is Lot Number?](https://en.wikipedia.org/wiki/Lot_number)
### Enabling Lot Number
To **enable Lot Number tracking** in the system, follow the steps below:
1. Go to **Settings → Business Settings → Purchases**
2. Check the **Enable Lot Number** checkbox
3. Click **Update Settings** to save the changes
[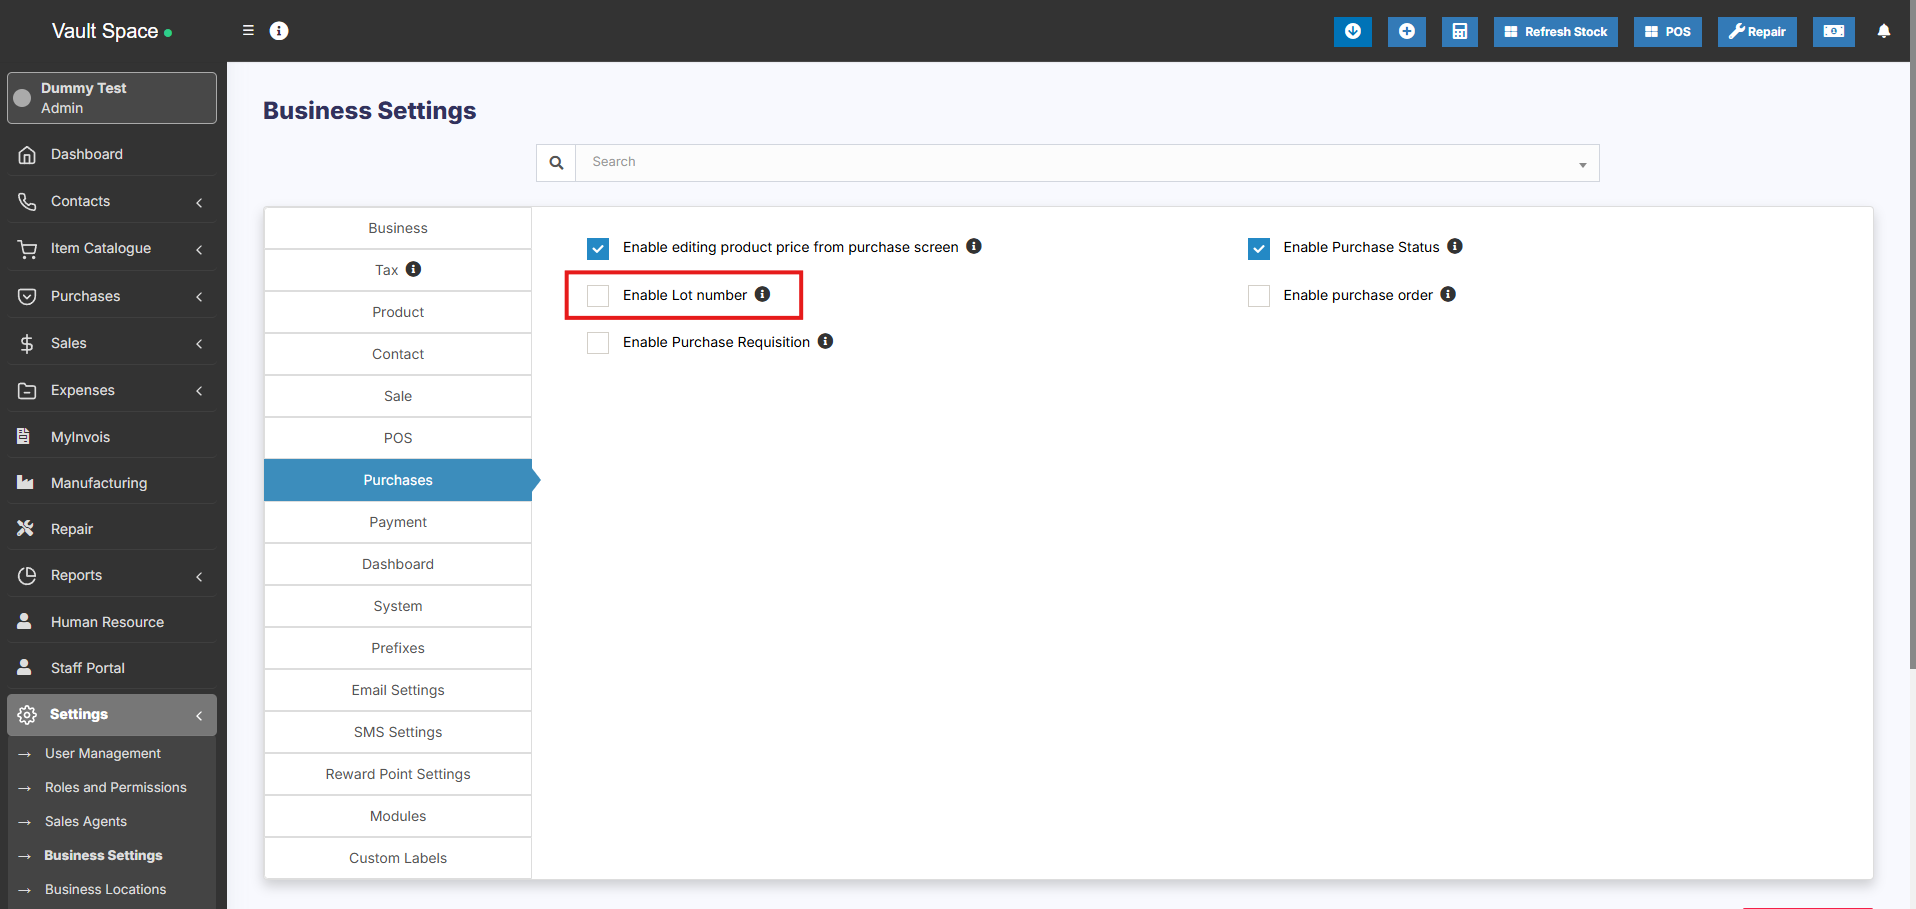](https://docs.senangurus.com/uploads/images/gallery/2025-10/JlTimage.png)
Once enabled, you’ll be able to assign **Lot Numbers** during both purchases and opening stock entries.
### Two Methods to Add Lot Numbers
#### Method 1: Adding Lot Number from Purchases
- When adding a **Purchase Entry**, the system will display a **Lot Number** field for each product.
- Enter the **Lot Number** manually during stock entry.
#### Method 2: Adding Lot Number from Opening Stock
- When adding **Opening Stock**, a **Lot Number** field will also be displayed for each item.
- Fill in the appropriate **Lot Number** for accurate tracking.
### Selling products from specific Lot
Refer to the [POS selling documentation](https://docs.senangurus.com/books/senangurus-business/page/pos-screen) Lot number description.
### Displaying product lot number in the invoice
1. Make sure the lot number feature is enabled as mentioned above.
2. Go to invoice layout and enable “Show lot number”
3. If the lot number is added when adding Purchase or Opening stock then when making sales it will display the lot number & product expiry dropdown. Select the lot number which you want to sell. Then in the print invoice, it will show the lot number.
# Selling Price Groups (Sell in different prices: wholesale/retail or for different prices for different locations)
With [SenangUrus Business](https://www.senangurus.com/) we aim to make it “One in All” POS/Stock Management Application.
*Selling price groups allow you to add different prices for a product.*
1. Sell at different prices: wholesale/retail
2. Different prices for different locations.
### Adding Selling Price Groups:
1. Go to **Selling Price Group**
2. Click on “Add” button to add a new price group. For example Retail price or Wholesale price or Bulk Purchase price or Location 1 price etc. as per your wish.
3. You can view a list of selling prices in “Selling Price Group” screen.
[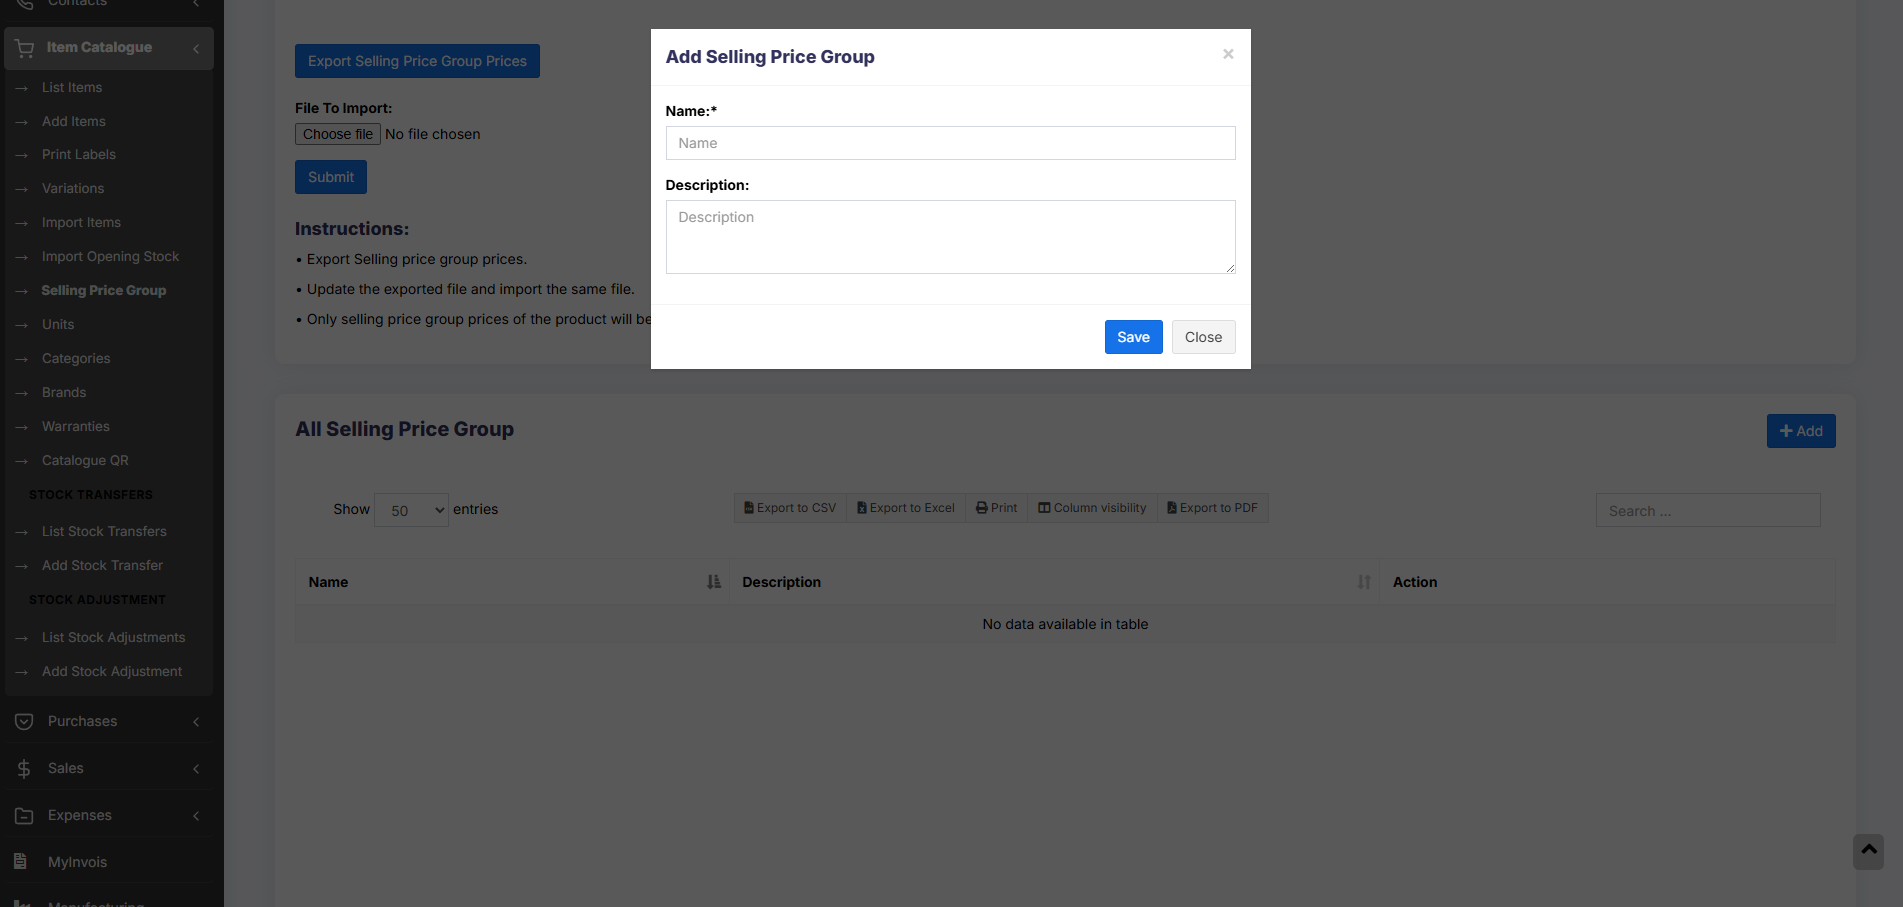](https://docs.senangurus.com/uploads/images/gallery/2025-10/Tdhimage.png)
### Adding Selling Price as either Fixed or Percentage:
The selling price can be given as a whole number (fixed) or in percentage.
**Fixed**: The value given will be the selling price for that group.
**Percentage:** The value given will be taken as a percentage, and that percentage of the actual selling price will be taken as the selling price for that group.
[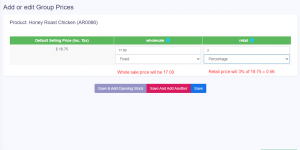](https://ultimatefosters.com/wp-content/uploads/2018/09/sellingprice.png)
### Adding price for different price groups:
[](https://docs.senangurus.com/uploads/images/gallery/2025-10/sellingprice.png)
1. In Add/Edit product screen in the bottom, you will find the button “Save & Add Selling-price-group price”. Click on that button. **Note**: this button will not be visible if there are no selling price groups.
2. In the next screen, you will see the list of the product name (if variable product then all variations), the default price & selling price groups price. Enter the prices for it.
3. Click on Save.
### Exporting & Importing selling price group:
1. Go to **Products -> Update Price**.
2. First, download the Excel file by clicking on the “Export Product Prices” button. There will be a separate column for group price.
3. In the downloaded file change the price for the selling price group of the products.
1. Only selling price group prices of the product will be updated, not the SKU or name.
2. Any blank price will be skipped.
4. Then import the file.
### Selling at a particular price group:
1. Go to POS.
2. In the top, you will see the list of selling price groups. Select the one as per your requirement.
Note: This will not be visible if there are no selling price groups or if a user is assigned only one particular price group only.
3. Select the price group & the selling prices for the product will be as per the price group.
### Assigning a user to a particular price group:
- Sometime you may want to assign a particular or few selected price group to a user. In that case, create a role with the desired permission & price group assigned.
- You must assign at least one price group for a role if that role has permission to sell.
### Assigning a customer to a particular price group:
- Customers can’t be directly assigned to the selling price group.
- You must assign the price group to the customer group that has the customer.
### Assigning a price group to a Business Location
- Helps selling same product at a different price in different business location.
- Go to Add/Edit Business Location and select the
### FAQ?
#### 1. How to hide the Selling Price Group in POS window to all cashiers
In add/edit roles you can set which all selling price groups will be visible to that role. So in the cashier role, you can uncheck/remove permission for all other selling price groups except the one you want to show or use for the cashier.
# Product Warranty
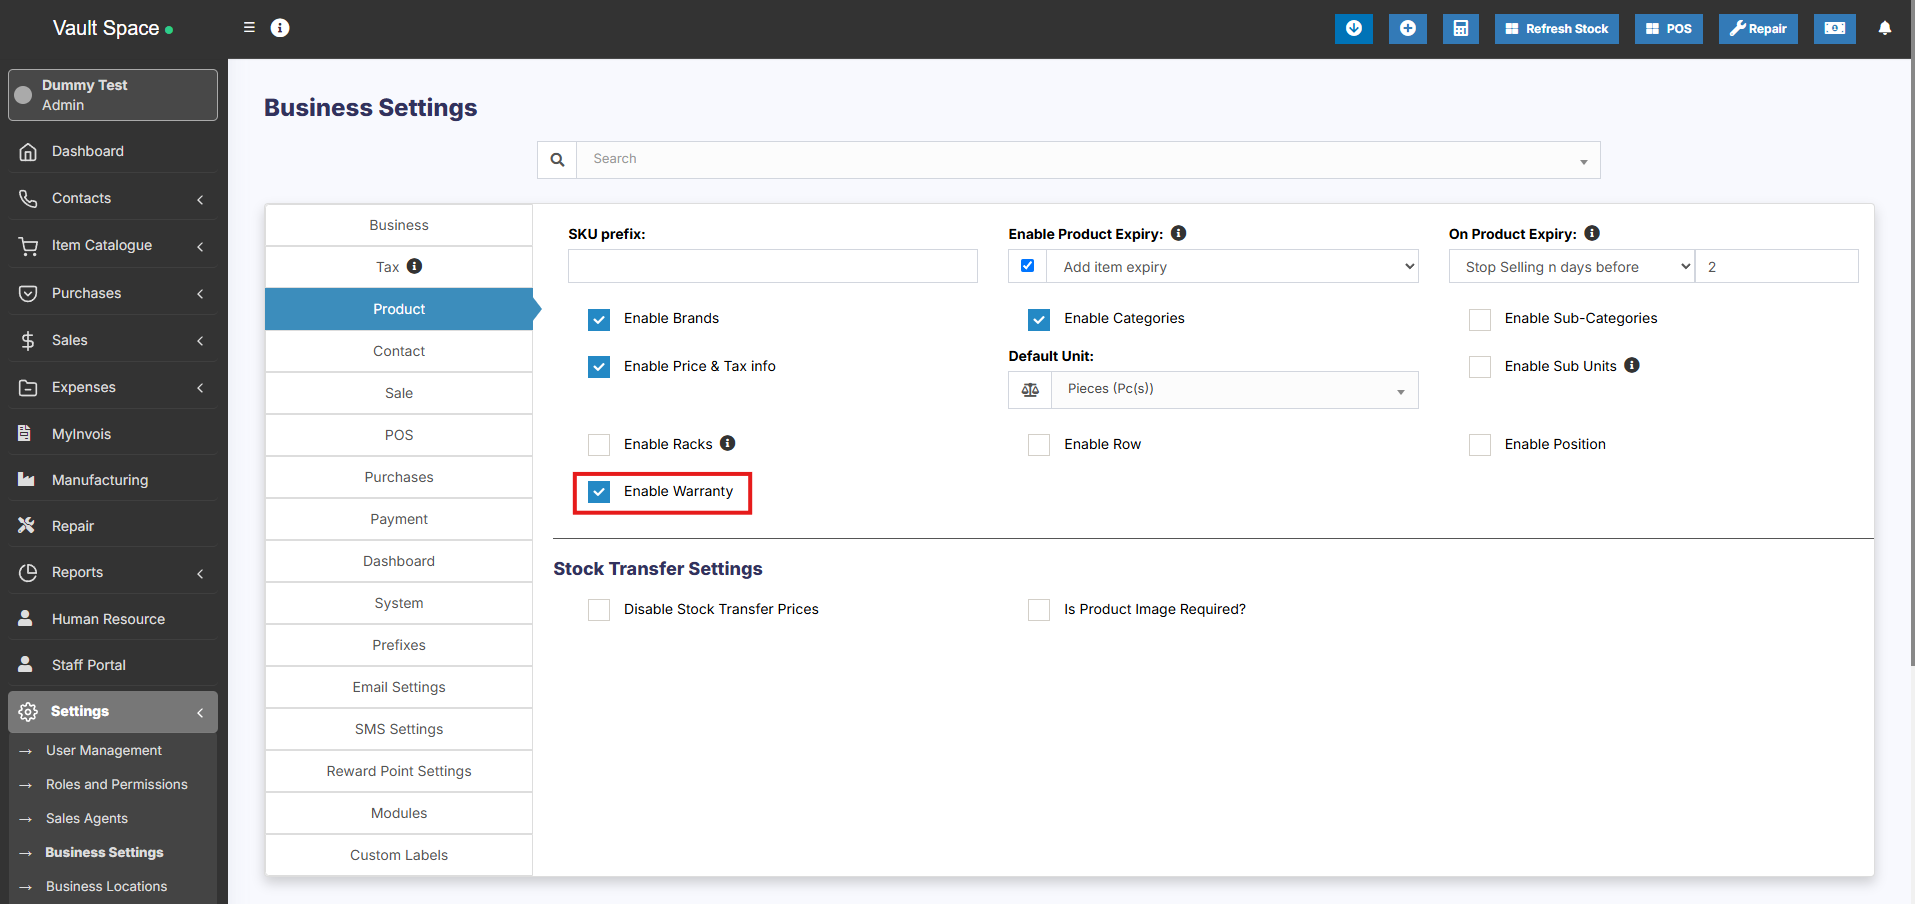
### Enabling Warranty:
To enable warranty in products go to **Settings -> Business Settings -> Products -> Enable Warranty**
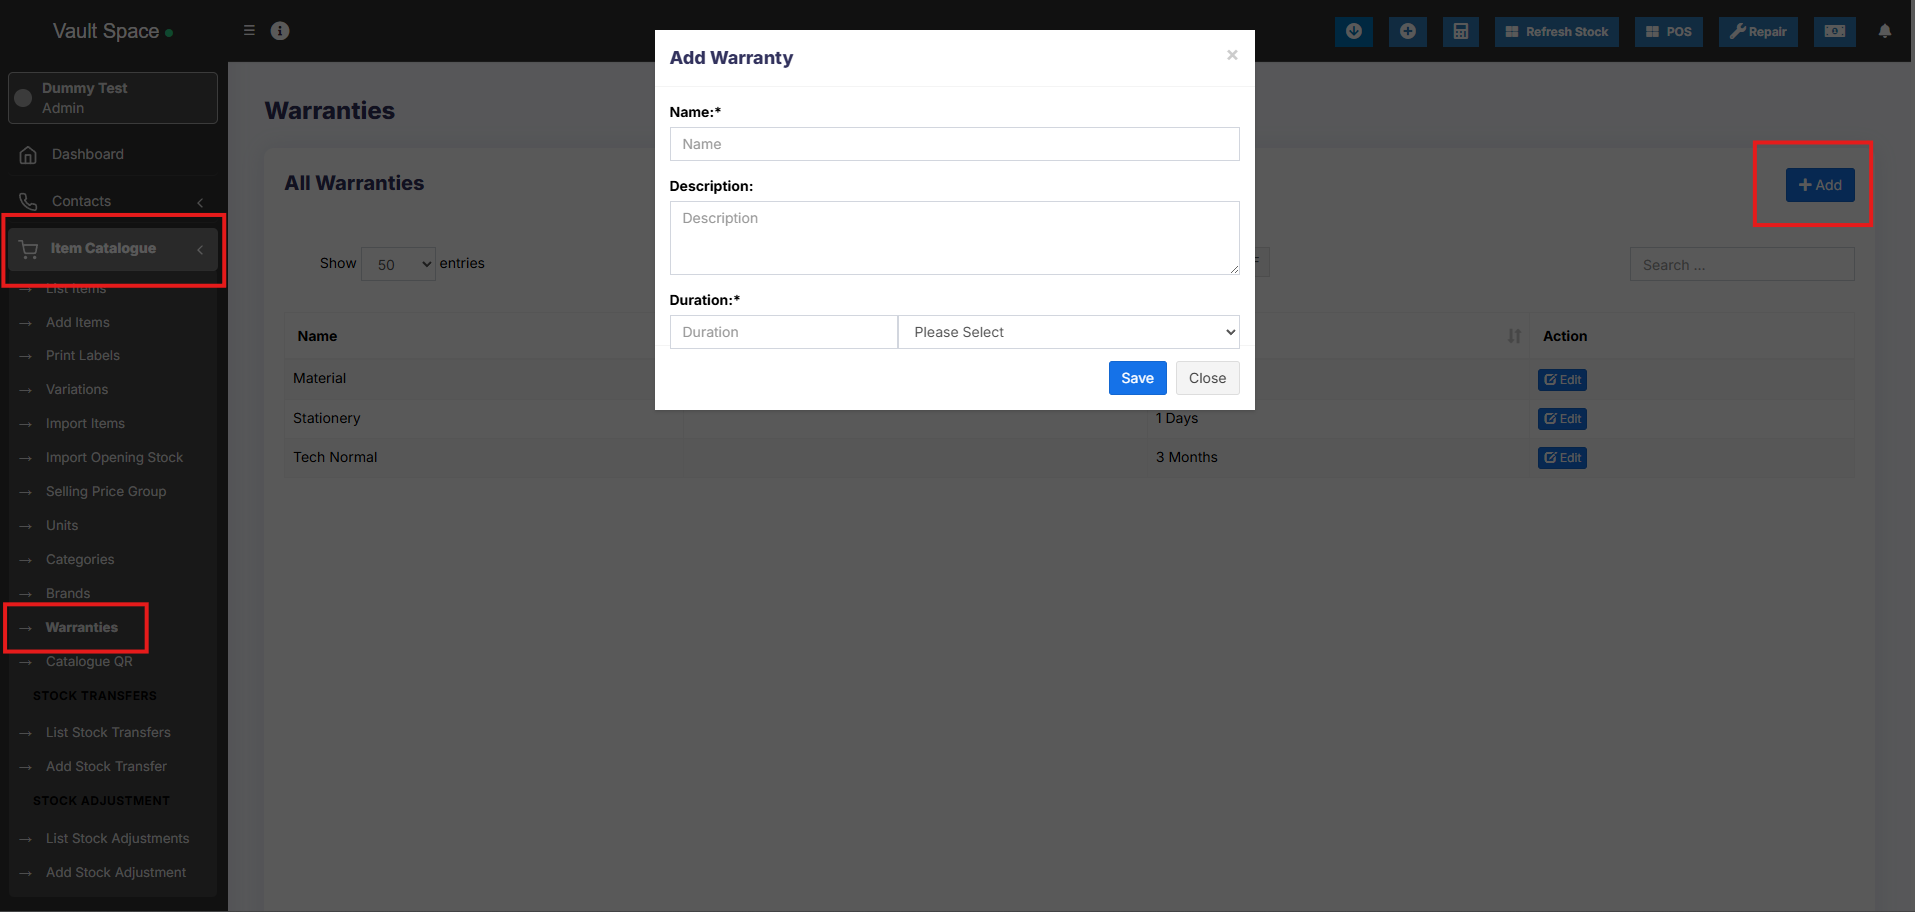
### Using Warranty
1. **Adding Warranty:** Add warranty types by going to **Products -> Warranty**.
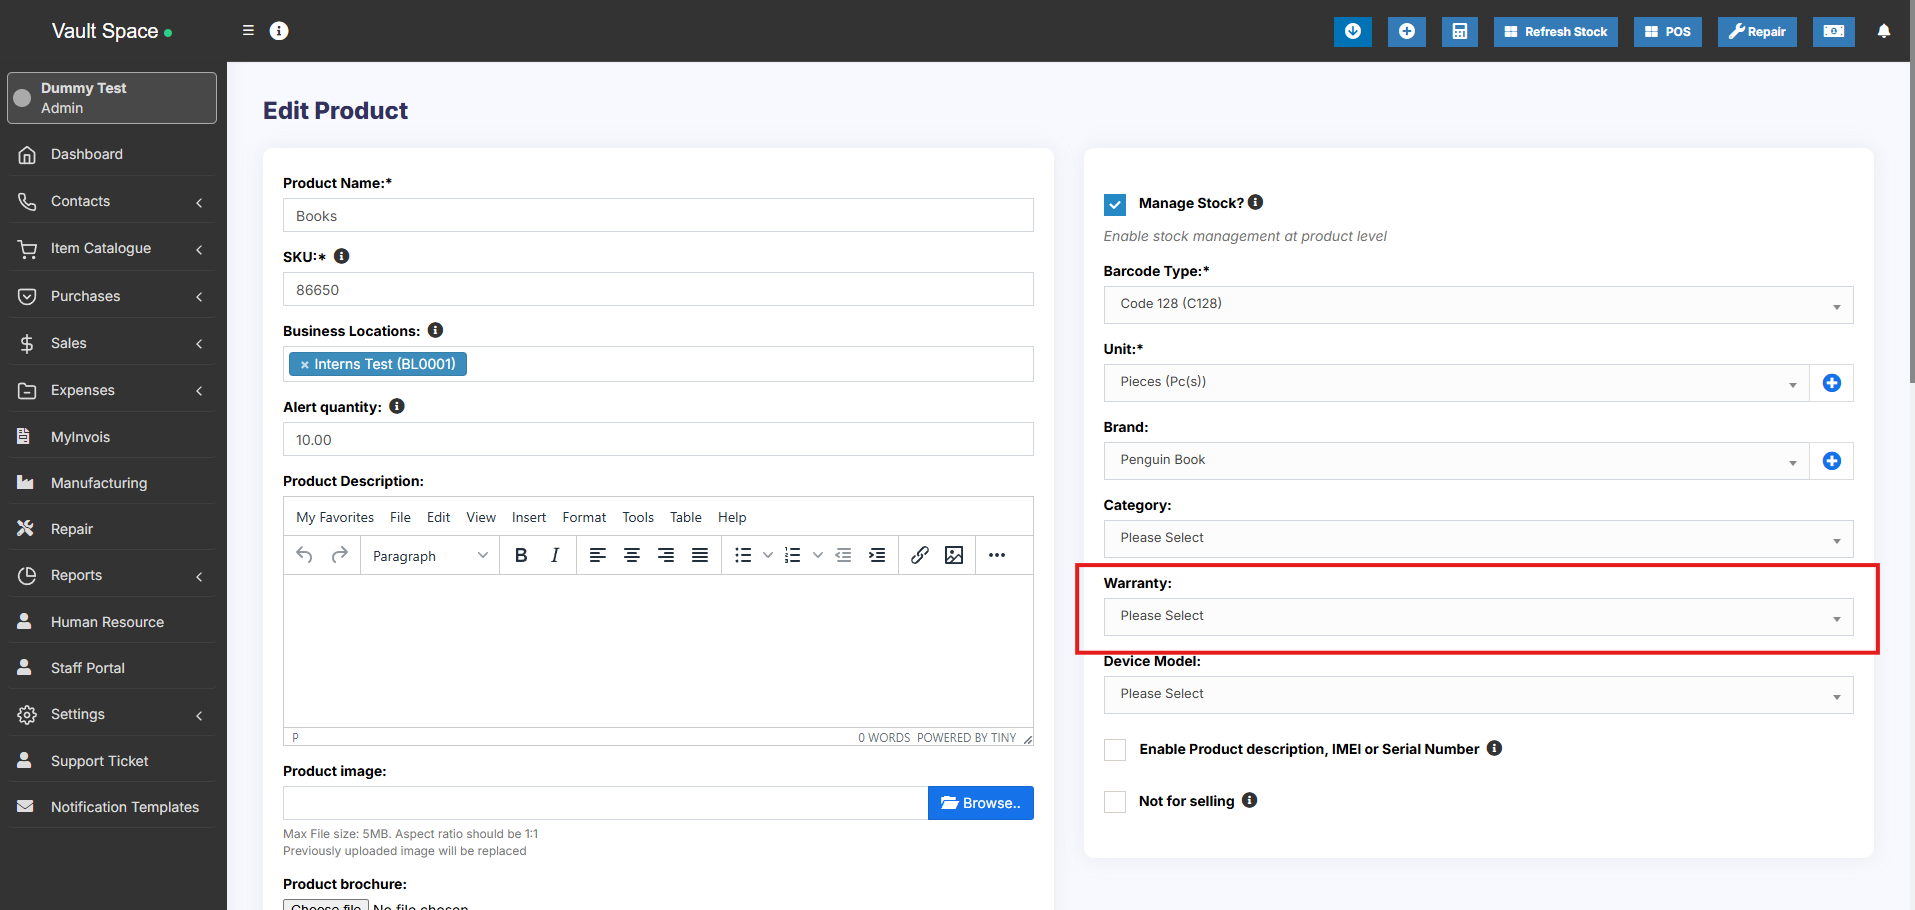
2. **Assigning warranty for products:** Go to Add/Edit product and select the warranty that is applicable for the product.
3. **Sell with warranty:** Any products which has warranty assigned when sold will use the transaction date as start of warranty. You can display warranty in receipts by enabling it from Invoice layout.
[](https://docs.senangurus.com/uploads/images/gallery/2025-10/eGrimage.png)
[](https://docs.senangurus.com/uploads/images/gallery/2025-10/6hMimage.png)
[](https://docs.senangurus.com/uploads/images/gallery/2025-10/XZbimage.png)
# Printing Labels
SenangUrus Business comes with an inbuilt feature to print customized labels for products.
You can go to print label screen from multiple places:
- From Products Sidebar menu *Products -> Print Labels.*
- Go to *Products -> View Products* and click on *Actions -> Labels.* This will add the selected product to print label list.
- Go to *Purchases -> List Purchases* and click on *Actions -> Labels.* This will add the products from the selected purchase to print label list.
## Printing Labels
1. Once you’re in print label screen, add the products for which you want to print labels by entering the name or barcode/sku id.
2. Adjust the quantity of each product’s label (*No. of labels*).
3. Select the information you want to display in labels by checking/unchecking the options under “*Information to show in labels*” heading.
4. Select the *Barcode Setting* according to your sticker. We have included some commonly used settings.
You can add new setting from *Settings -> Barcode Settings* menu.
5. Click on Preview to view the labels.
6. If everything looks good you can click on Print button to print it.
***Note:** You must set the Margins to ‘default’ in browser print window.*
7. If some information is getting half displayed because of sticker size, then it is advised to hide them or better to use a 20 Labels Per sheet settings.
## Error: Unsupported SKU id for the selected barcode type
This error means the SKU provided by you when creating the product doesn’t satisfy the encoding as per barcode type.
The solution can be edit the product and change the barcode type as “**Code 128**” save & try printing the label again.
# Duplicate Product
Duplicate Products helps you to easily create a new product with the same data as another product, this helps you save repetitive entering of data and ultimately saves time by making the product entry process faster.
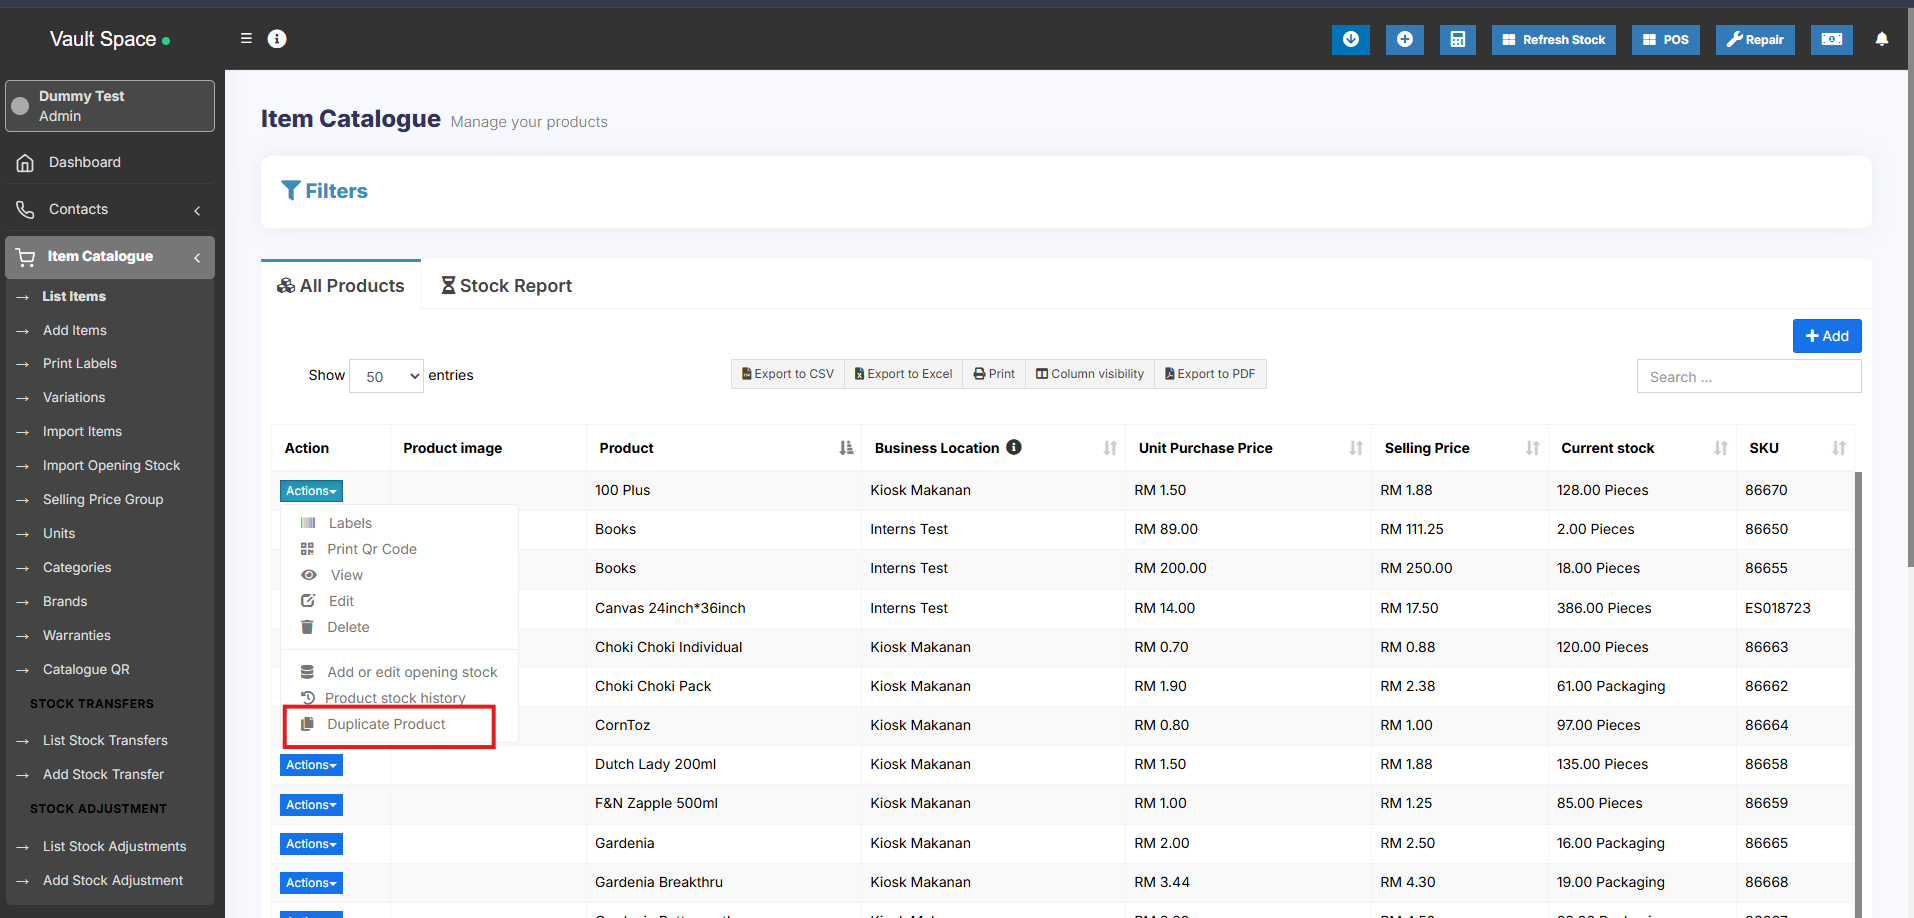
### Steps to Add a Duplicate Product
1. Go to **Products → List Products**
2. Click on the **Actions** dropdown button next to the product you want to duplicate
3. Select the **Duplicate Product** option
4. A **duplicate product** will be created with the same details, which you can then modify as needed
[](https://docs.senangurus.com/uploads/images/gallery/2025-10/FGAimage.png)
# Correcting product stock mis-match or incorrect stock in different reports
Mismatch between sold and purchased quantity
Mismatch in stock shows in Stock-Report and sales screen. Sales screen accepts products greater or less than as in stock reports.
This rarely happens because of some unknown reasons or if you try to manually update the stock in the database.
### Solution 1:
You must have the role of admin for this to work.
**Step 1:** Go to this URL *www.your-pos-website.com/reports/product-stock-details* **Step 2:** **IMPORTANT**: Select the business location and press search button. It will show the list of products for which there is a mismatch.
**Step 3:** **IMPORTANT**: Click on **Fix** button for each product.
Refer to the screenshot below
### Solution 2:
If the solution 1 didn’t work, follow this Solution 2.
**Step 1:** Go to List Products screen, click the **Actions** button of that particular product.
**Step 2:** Select the ‘**Product Stock History**‘ option. It will direct to **Product Stock History screen.**
**Step 3:** In the **Product Stock History,** select the particular location where the mismatch error occurs and the particular variation of the product (only if it is a variable product).
**Step 4:** This will automatically fix the mismatch issue for that product in that location.
# Bulk Edit Products
Bulk edit helps you to edit multiple products at once and saves your time.
To edit multiple products follow the steps:
1. Go to Products -> List Products
2. Select the products you want to edit by clicking on the checkbox present in each product row.
3. Scroll down you will find the **Bulk Edit** option, click on it and you can edit the selected products.
4. Also, in the bulk edit screen you can add any other products to edit them.
### How to Enable Bulk Edit Option
The **Bulk Edit** feature is disabled by default and needs to be enabled from the backend configuration.
Follow these steps to enable it:
1. Open the file: config/constants.php
2. Locate the following line: ‘enable\_product\_bulk\_edit’ => false,
3. Change it to: ‘enable\_product\_bulk\_edit’ => true,
4. Save the file.
Once enabled, the **Bulk Edit** option will be available in the **Product List** screen, allowing you to update multiple products at once.
# Rack, Row & Position of product
# Opening Stock
### To add opening stock:
1. Go to List Products
2. Actions > Add or Edit Opening Stock
[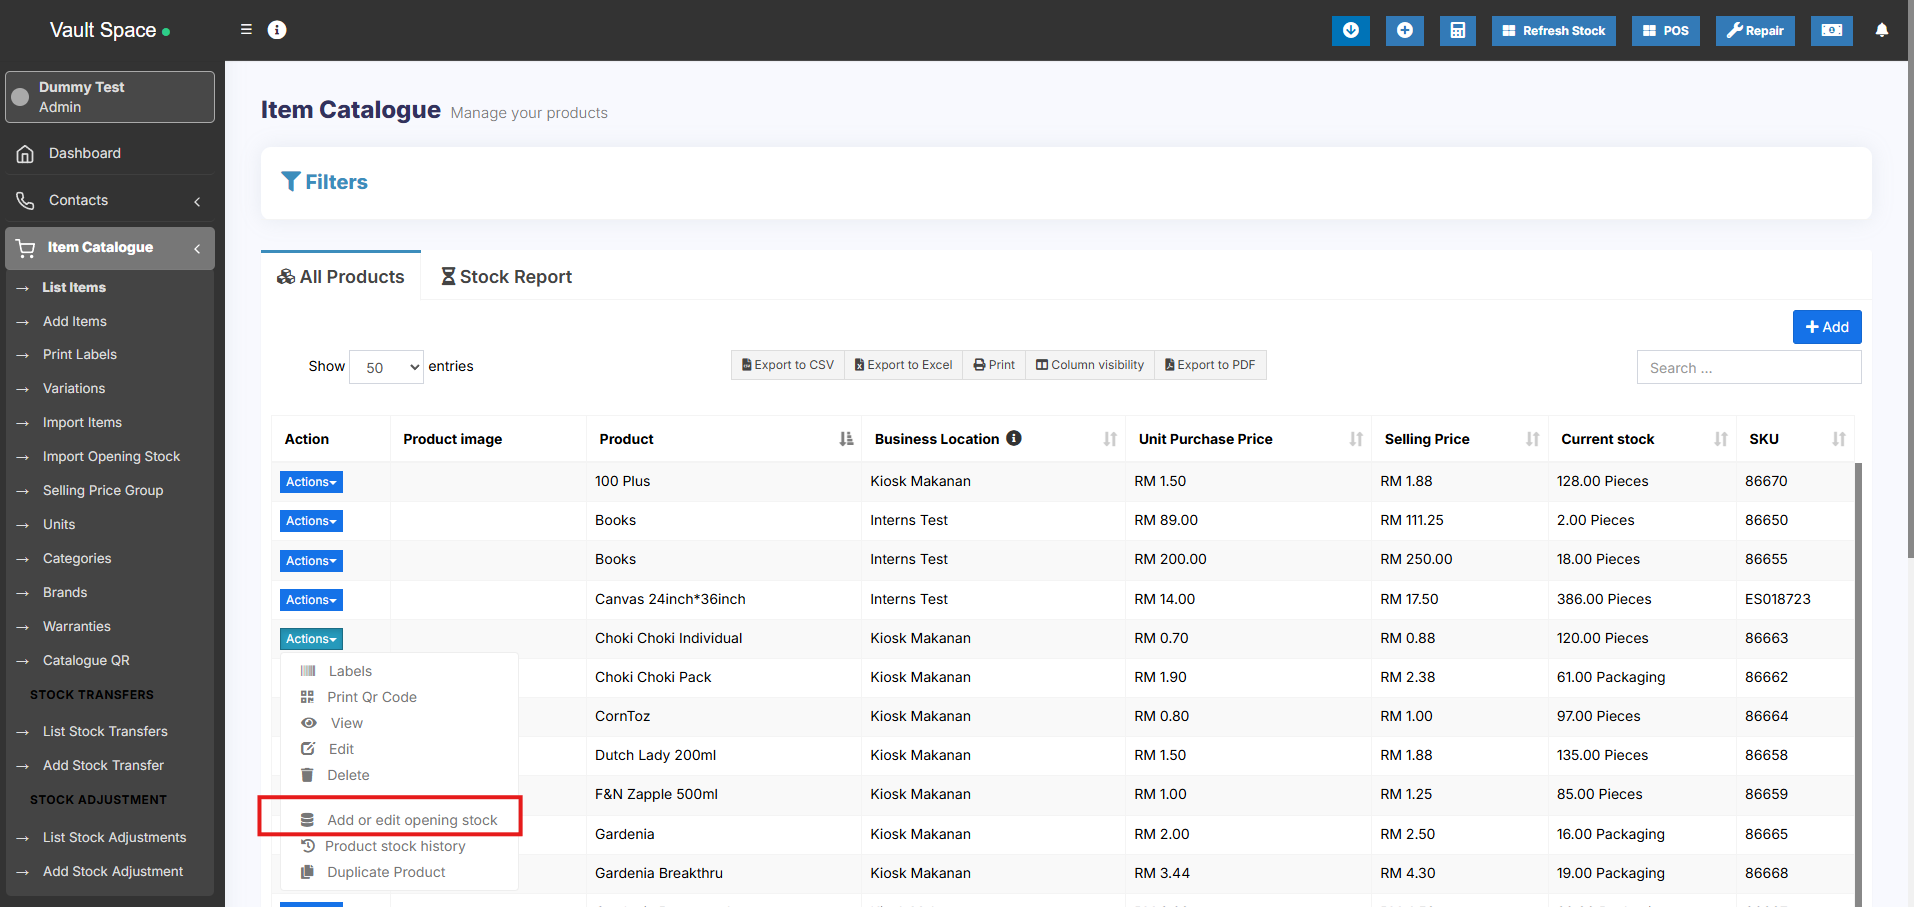](https://docs.senangurus.com/uploads/images/gallery/2025-10/IPRimage.png)
### Editing opening stock (or) Making opening stock 0:
NOTE: If you have already added an opening stock and have to edit it, follow the steps below.
1. Click the ‘+’ symbol.
2. A new row will be created
3. Add the new amount there
To make the opening stock to ‘0’, add a negative value in step 3
E.g.) If the existing opening stock is 10, add -10 to make the stock quantity to 0 or if you add a negative amount (-4) then the amount will be 6.
# Custom Labels for Products
### Custom Labels for Products:
20 custom fields can be added for the product, these custom fields can be used while adding a new product.
Custom fields can be anything related to the product like brand code, product code etc.
To add this **Go to Settings > Business Settings > Custom labels**
Provide the custom label name here.
[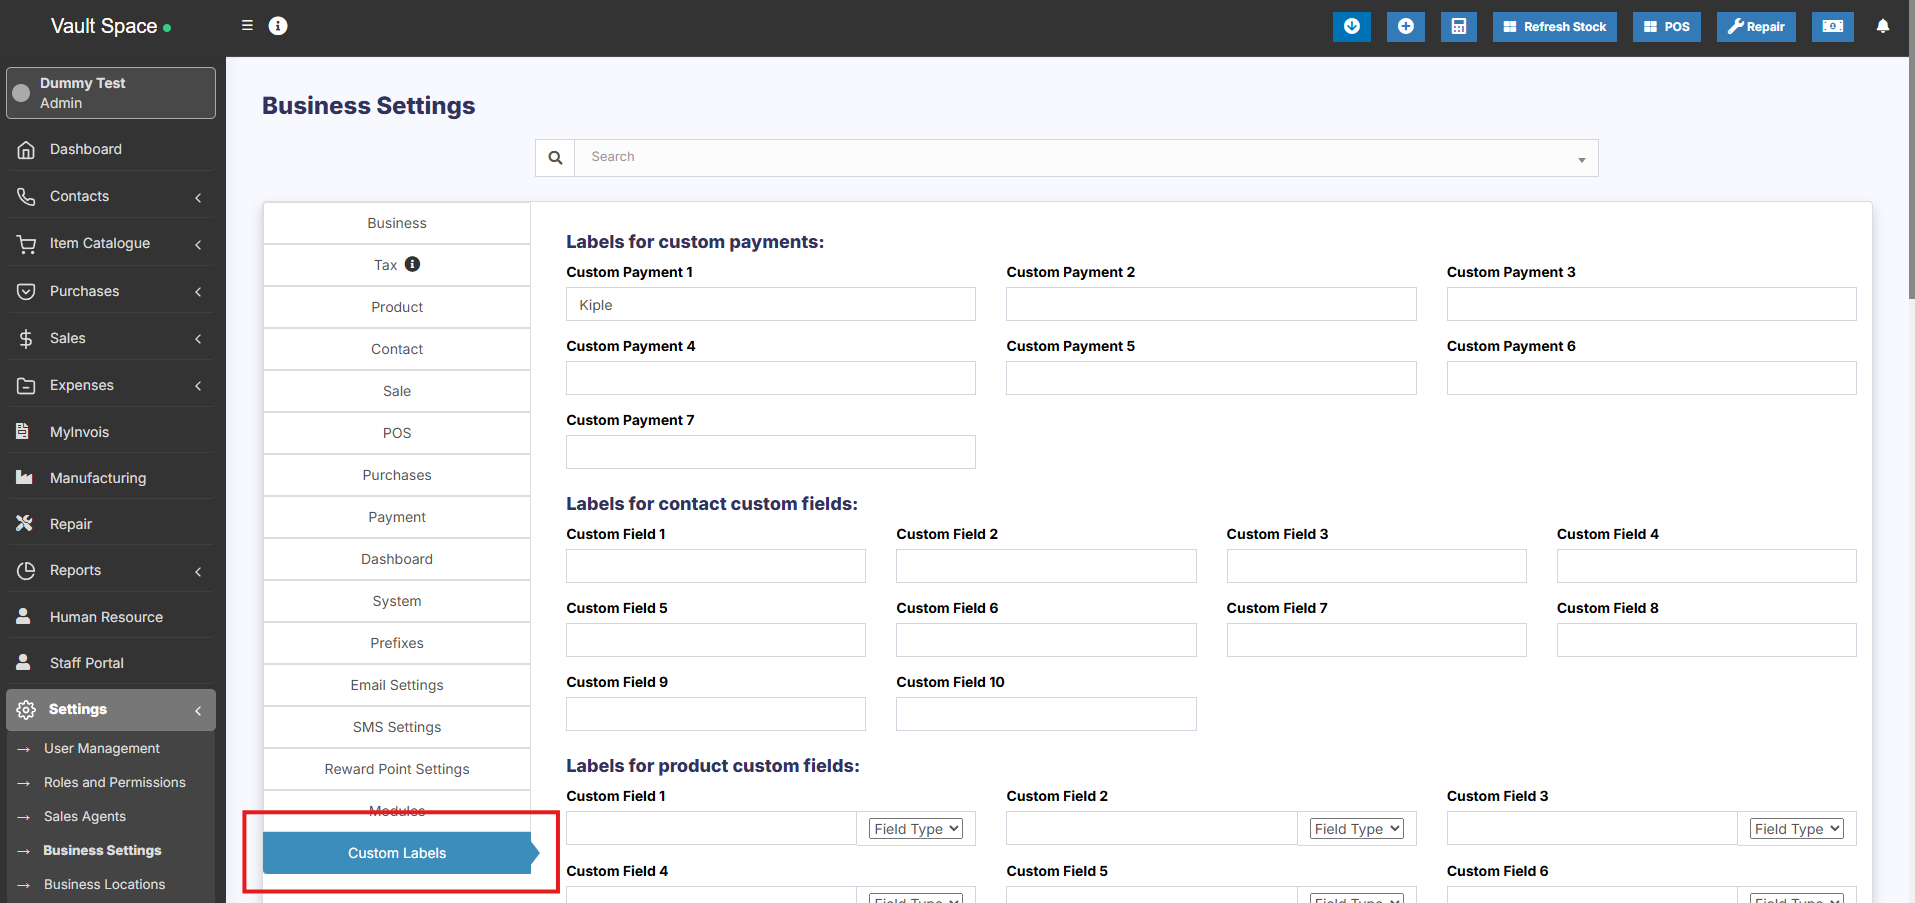](https://docs.senangurus.com/uploads/images/gallery/2025-10/zHHimage.png)
### Field Type for labels:
The data type can be specified for each custom field. Select text, date picker or dropdown types.
For dropdown add a line break after each option.
[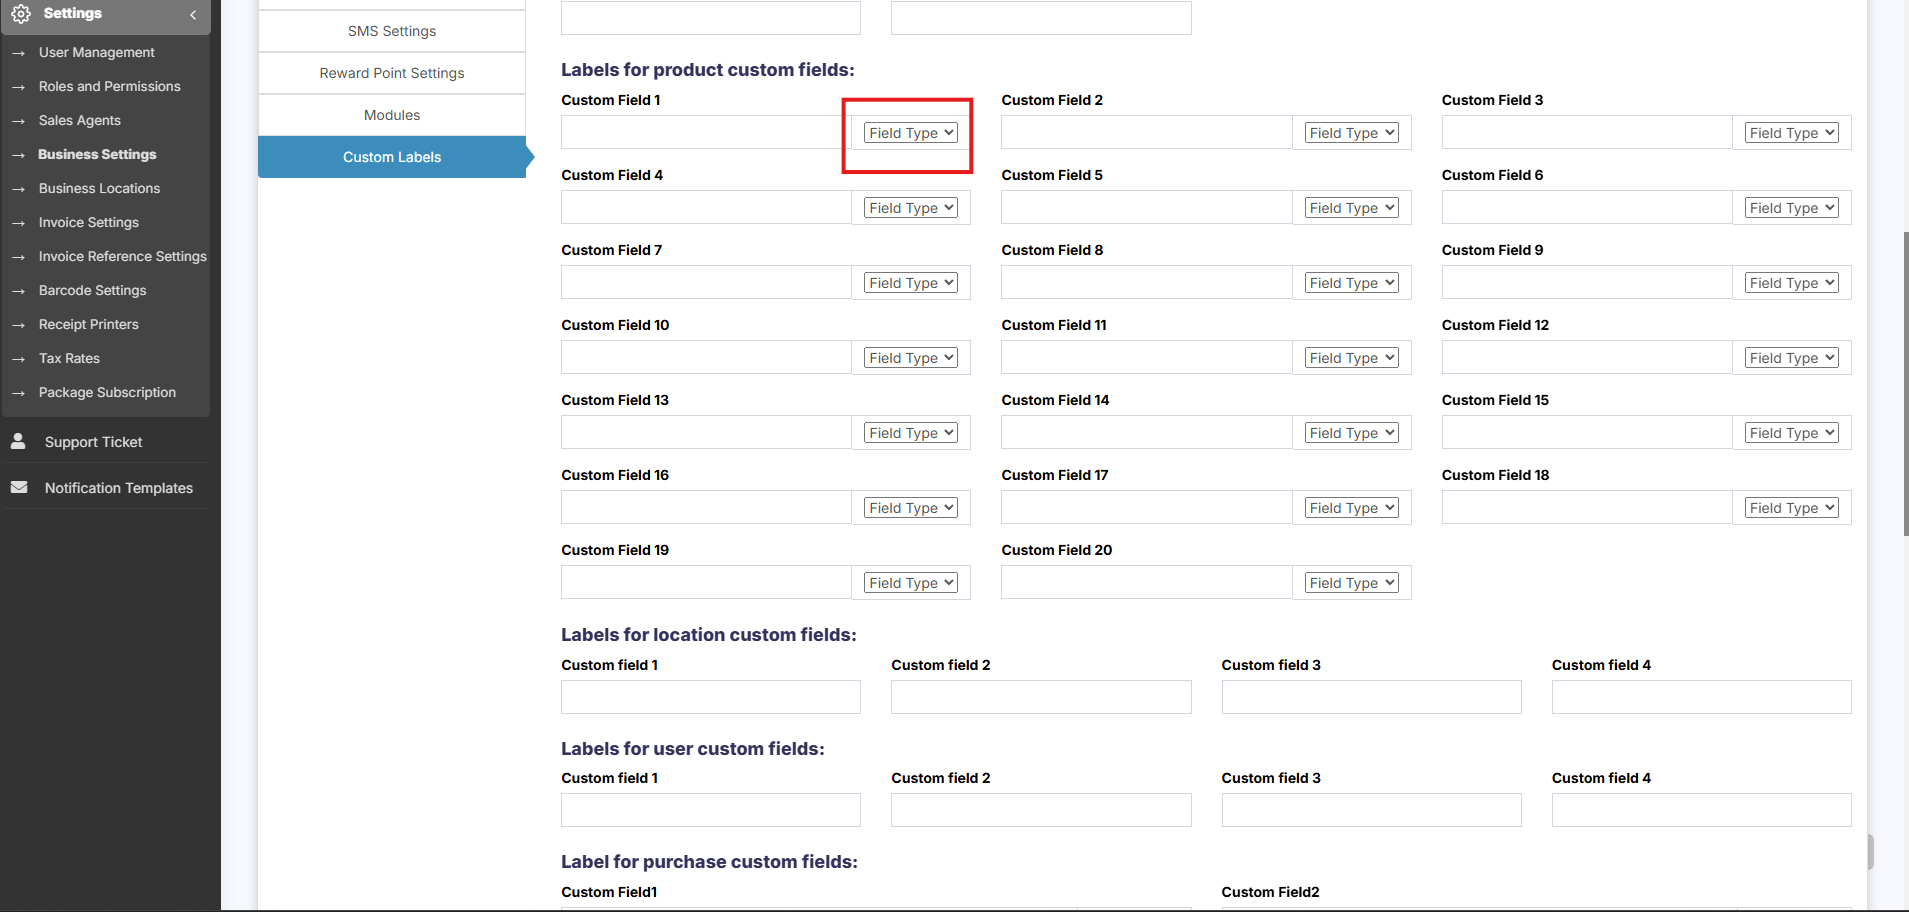](https://docs.senangurus.com/uploads/images/gallery/2025-10/1BBimage.png)
# Bulk Price Update
The **Bulk Price Update** feature allows you to update the prices of multiple products at once using an Excel file.
### Steps to Update Product Prices in Bulk
1. Go to **Products → Update Price**
2. Click to **Download the Excel File**
- The file will contain:
- **Product Names**
- **SKUs**
- **Current Selling Prices**
- **Selling Group Prices** (if any)
3. Open the Excel file and **update the prices** for the required products
4. Save the file and **upload it back** into the system
5. Click **Submit** to apply the changes
**Do not change** the product names, SKUs, or any of the **column headers** in the Excel file.
Any modification to these fields may result in errors or skipped entries during the update process.
# Purchases
# Purchase Management
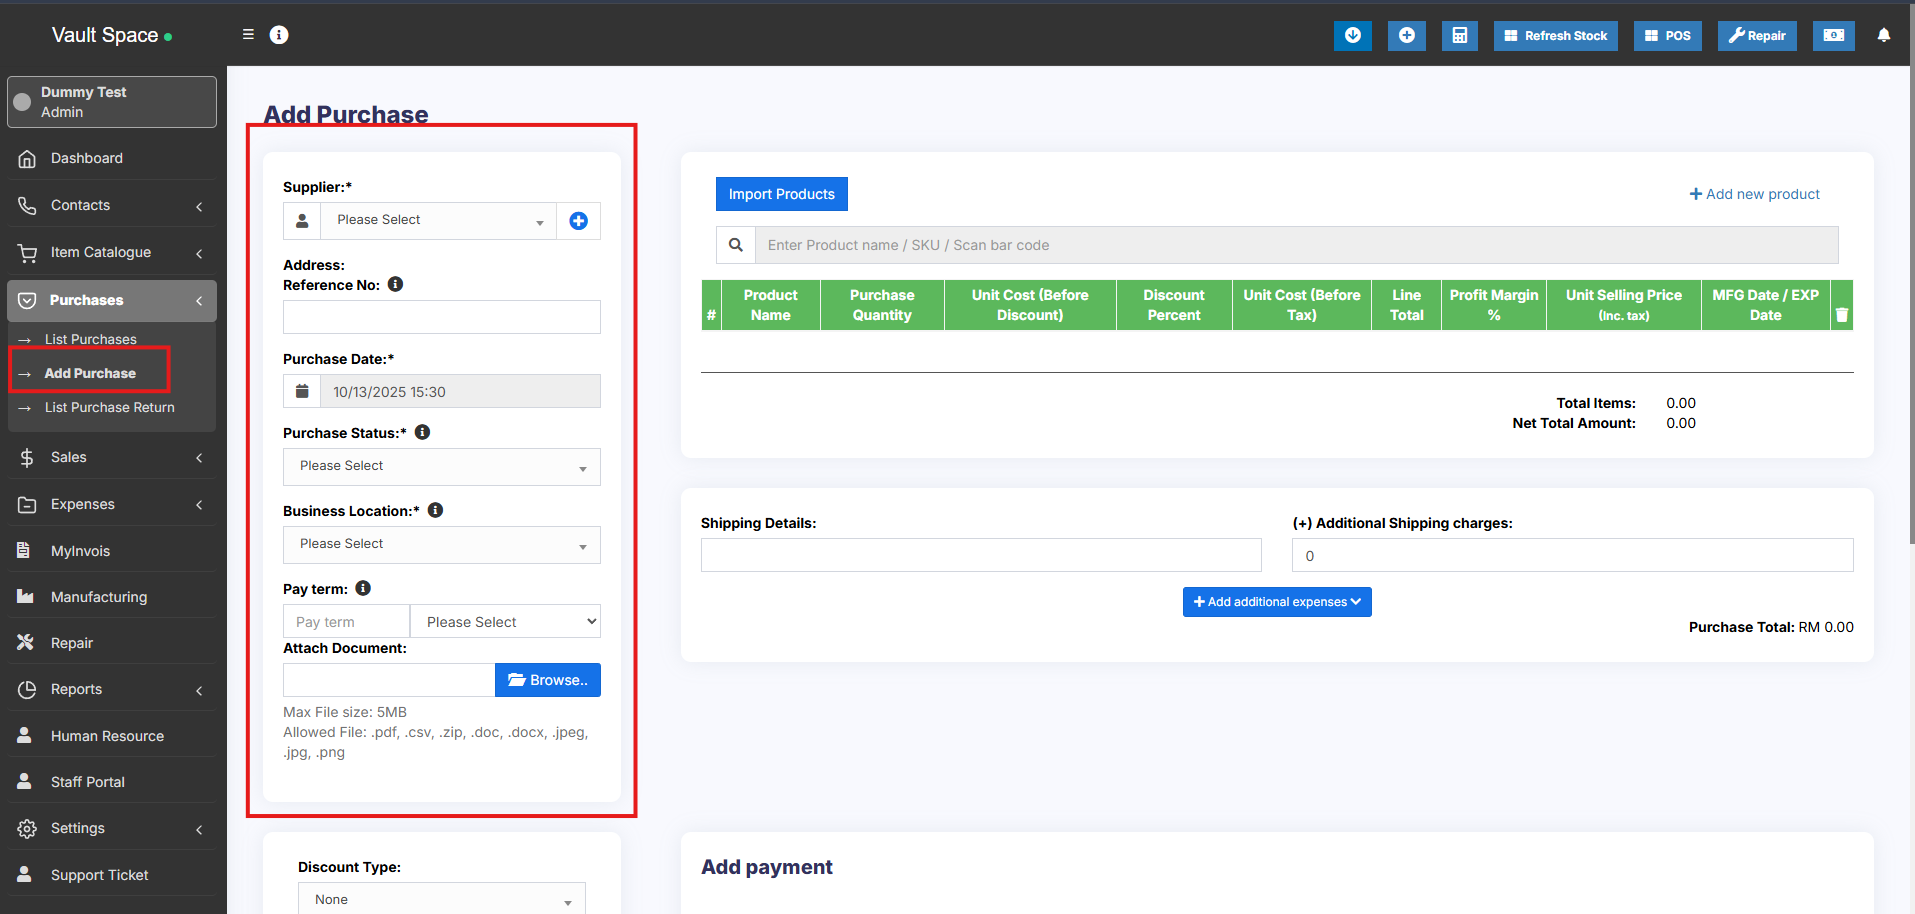
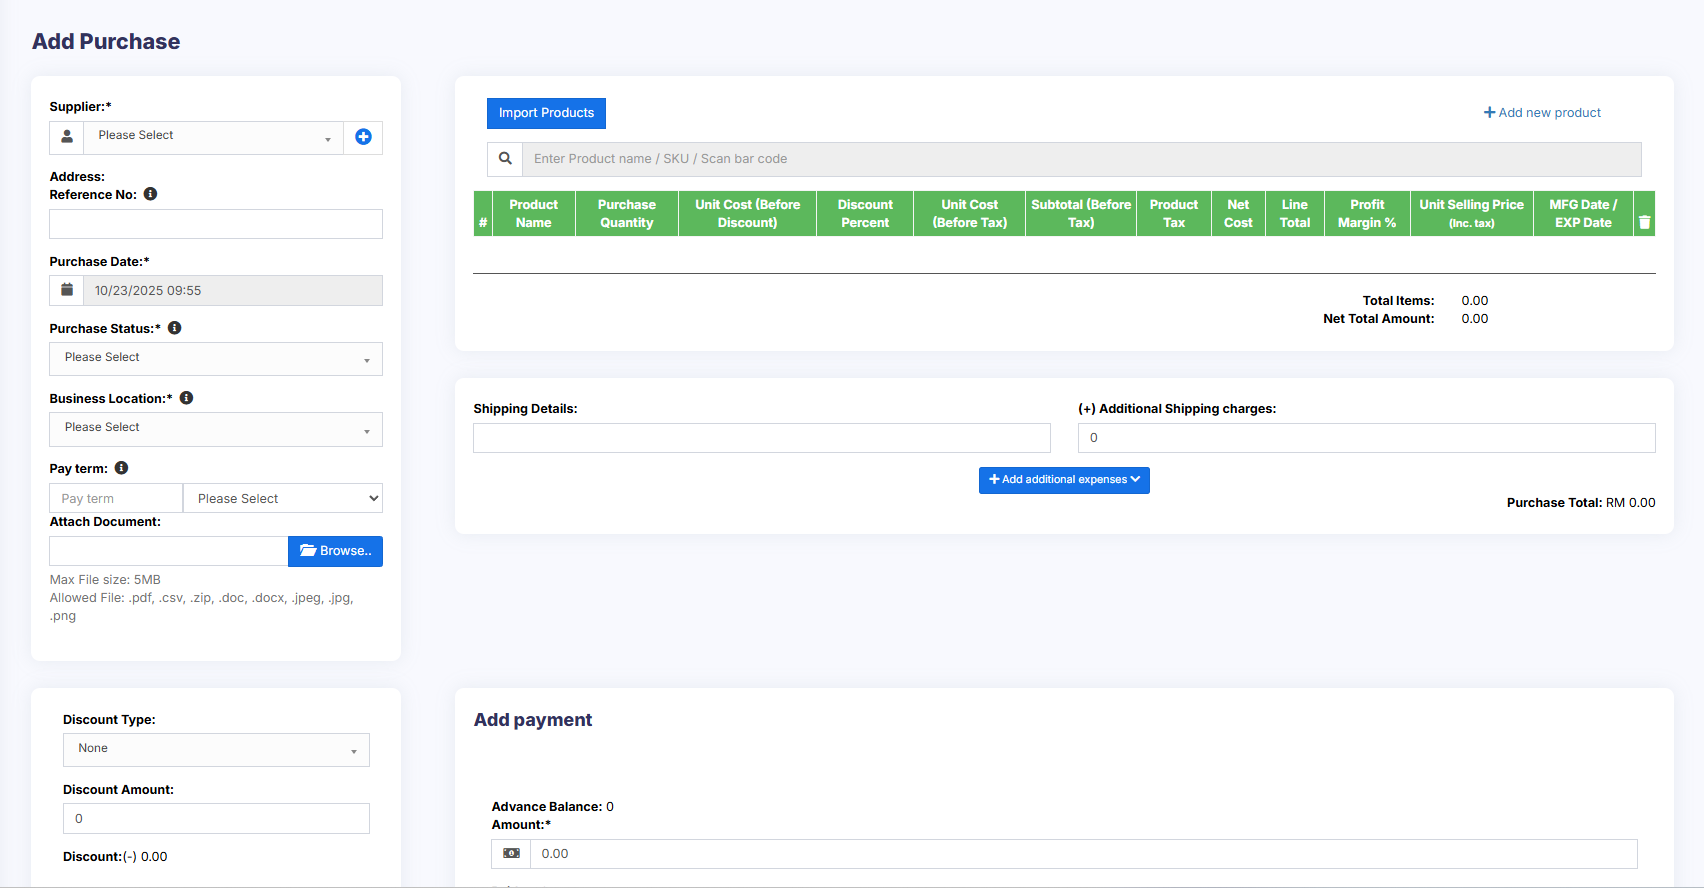
### Adding Purchase
1. Go to – Purchases -> Add Purchases
2. Type Supplier Name or Business name in the Supplier field. If the supplier doesn’t exist you must add them from Contacts -> Suppliers -> Add
3. Enter Purchase reference number, Purchase date & Order Status.
4. **Select Business Location**: Select a location where you want to add the purchase. You can add a new Location from Settings -> Business Locations.
5. Type product name or scan the product barcode number. It will show related matched products, select a product to add it to the purchase list.
6. On adding a new product you can enter purchase quantity, purchase price, and tax information.
7. **To add a discount**: Select the discount type (fixed or percentage) and enter the amount. ultimatePOS will auto-calculate the amount after discount.
8. Enter purchase tax, Shipping Details, Additional Shipping charges, Payment status, & Additional notes.
[](https://docs.senangurus.com/uploads/images/gallery/2025-10/qYuimage.png)
[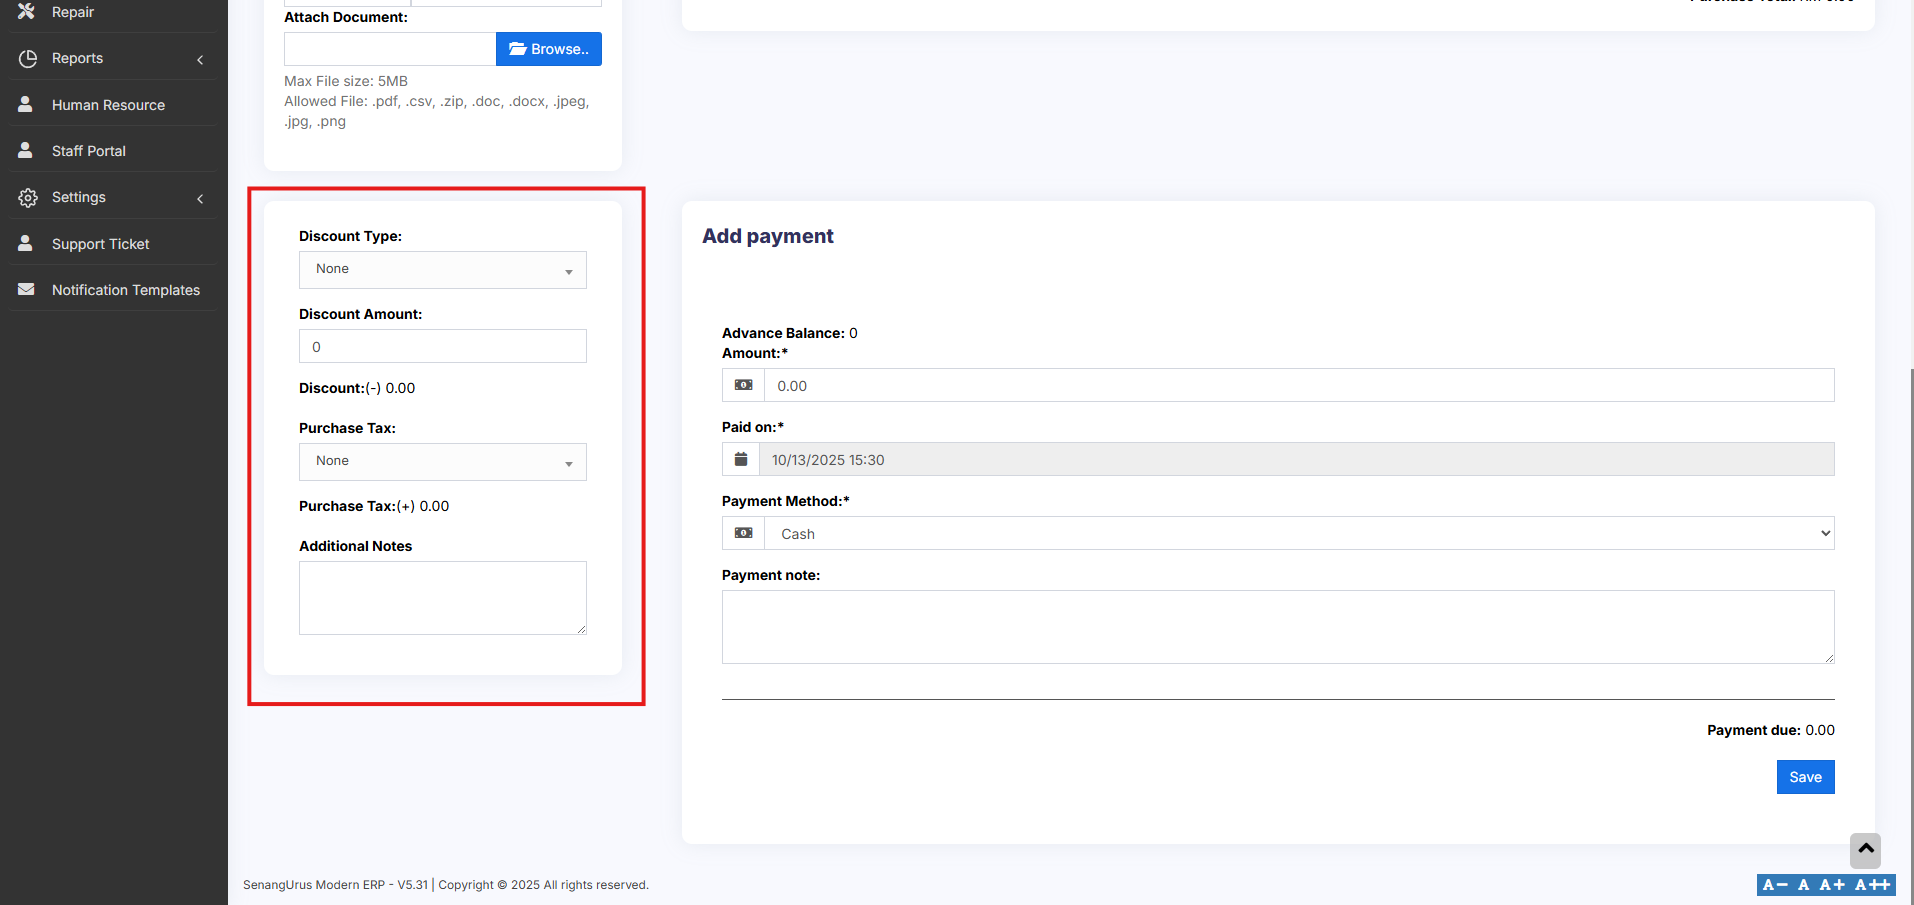](https://docs.senangurus.com/uploads/images/gallery/2025-10/gIzimage.png)
You can view the list of purchases from Purchases -> List Purchases.
[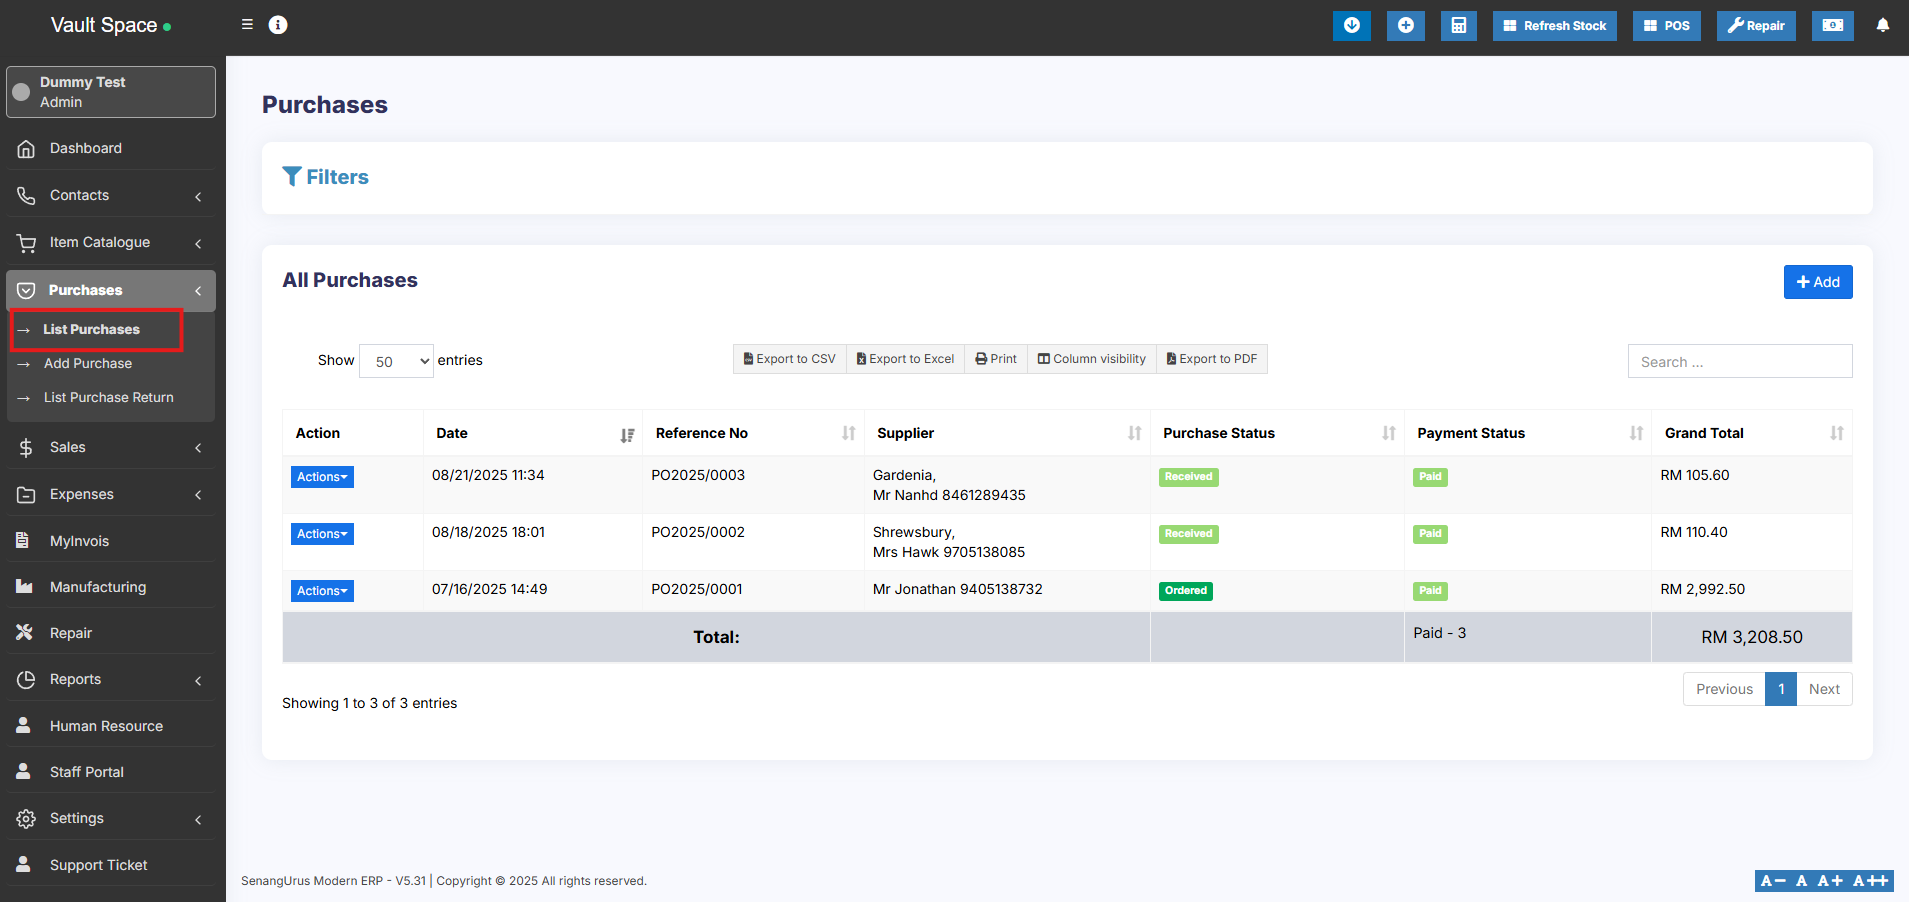](https://docs.senangurus.com/uploads/images/gallery/2025-10/IHfimage.png)
You can Print Labels for your purchase by Clicking “Print Labels” in List Purchases screen.
See details on printing Labels [here](https://docs.senangurus.com/books/senangurus-business/page/printing-labels).
### No matching product found
This error will be displayed in 3 conditions:
1. **Reason 1:** There are no products matching the name or SKU which you have entered. Check it once in the list products.
2. **Reason 2:** Check the business location selected in add purchase have that product. So if the business location is Location-1, then in add/edit product the product must be assigned to that location. Check More here in [Add/Edit Products](https://docs.senangurus.com/books/senangurus-business/page/products-management)
3. **Reason 3:** Make sure the product has **Stock-Management ENABLED** in Add/edit product. If stock management is not enabled in products then it won’t show in the add/edit purchase.
### Difference between Default Purchase Price and Current Purchase Price:
Sometimes, the purchase price shown in **View Product** may differ from the value in reports where *current stock by purchase price* is calculated.
This difference occurs because the **Default Purchase Price** and the **Current Purchase Price** are not always the same.
#### **Default Purchase Price**
- The purchase price entered when the product is first added.
- Displayed in the **View Product** page.
- Remains the same unless updated manually.
#### **Current Purchase Price**
- The most recent purchase price based on your latest purchase entry.
- Can vary over time depending on market changes or supplier costs.
- Used in the **Current Stock Value by Purchase Price** report for calculation.
**Example:**
- Last month’s steel purchase price(when product is first added to the system) : **$120**
- This month’s steel purchase price: **$125**
- **View Product** shows: **$120** (default purchase price)
- **Stock Value Report** shows: **$125** (current purchase price)
# Purchase Payments
Purchase payment meaning paying to the supplier for the Purchases.
[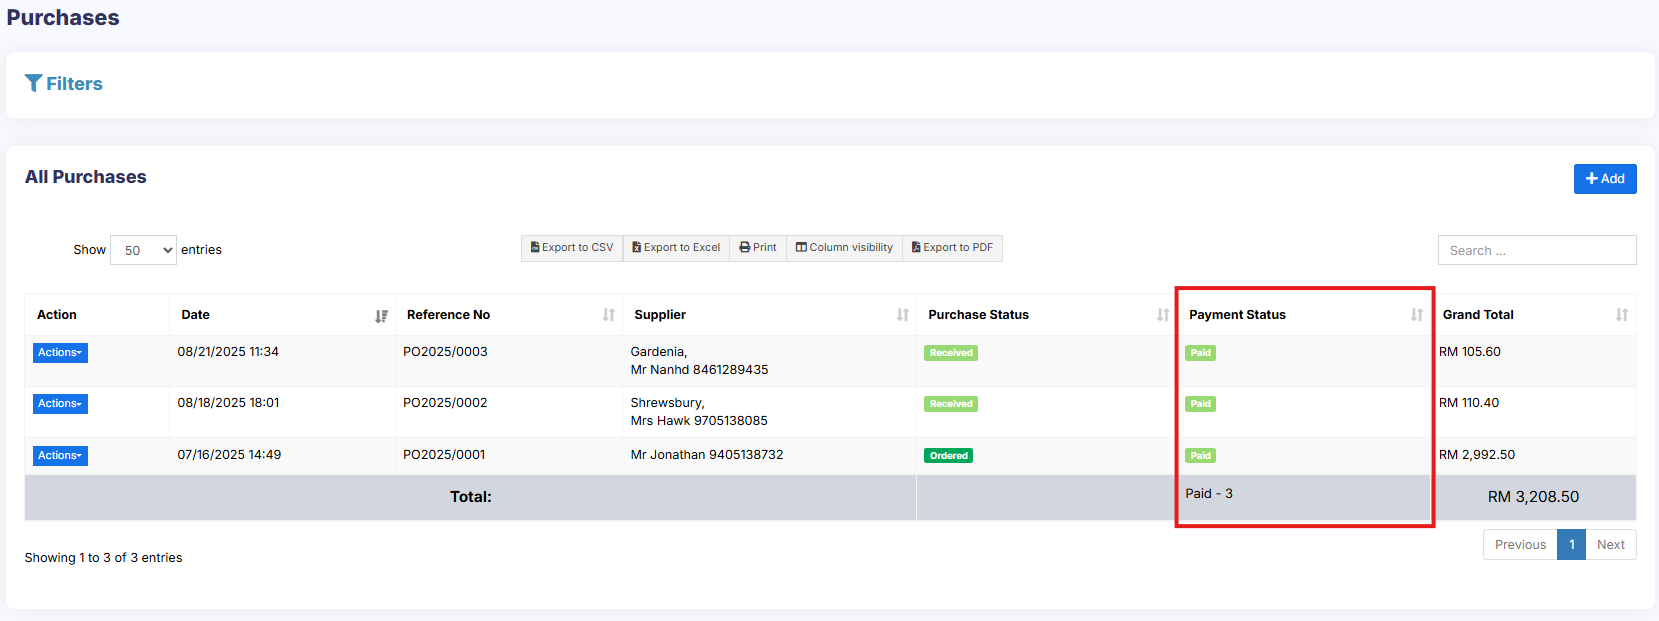](https://docs.senangurus.com/uploads/images/gallery/2025-10/paymentstats.png)
1. **Paid:** The PO is 100% paid.
2. **Due:** The PO is 100% not paid.
3. **Partial:** Partial amount of the PO has been paid.
4. **Overdue:** PO is 100% not paid & past the due date.
5. **Partial Overdue:** Partial amount of the PO has been unpaid & past the due date.
### Adding Payments
#### Adding payment when adding purchase:
In the add purchase screen, you can add the payment for the purchase.
[](https://docs.senangurus.com/uploads/images/gallery/2025-10/ZFfimage.png)
#### Adding payment from the List Purchase screen
In list purchase click the actions for any PO and it will display the list of actions for it. This option is not displayed if there is no payment due.
### Adding payments from Contact
From list contacts screen, you can add payment for a supplier for all or multiple purchases at once.
When you make a payment for a supplier, the system will automatically mark the purchase invoices as paid in the order of their payment terms – starting from the oldest due invoice to the latest.
Go to contact -> Suppliers. Click on actions for the supplier, and it will show “Pay “, click on it, and pay the amount.
[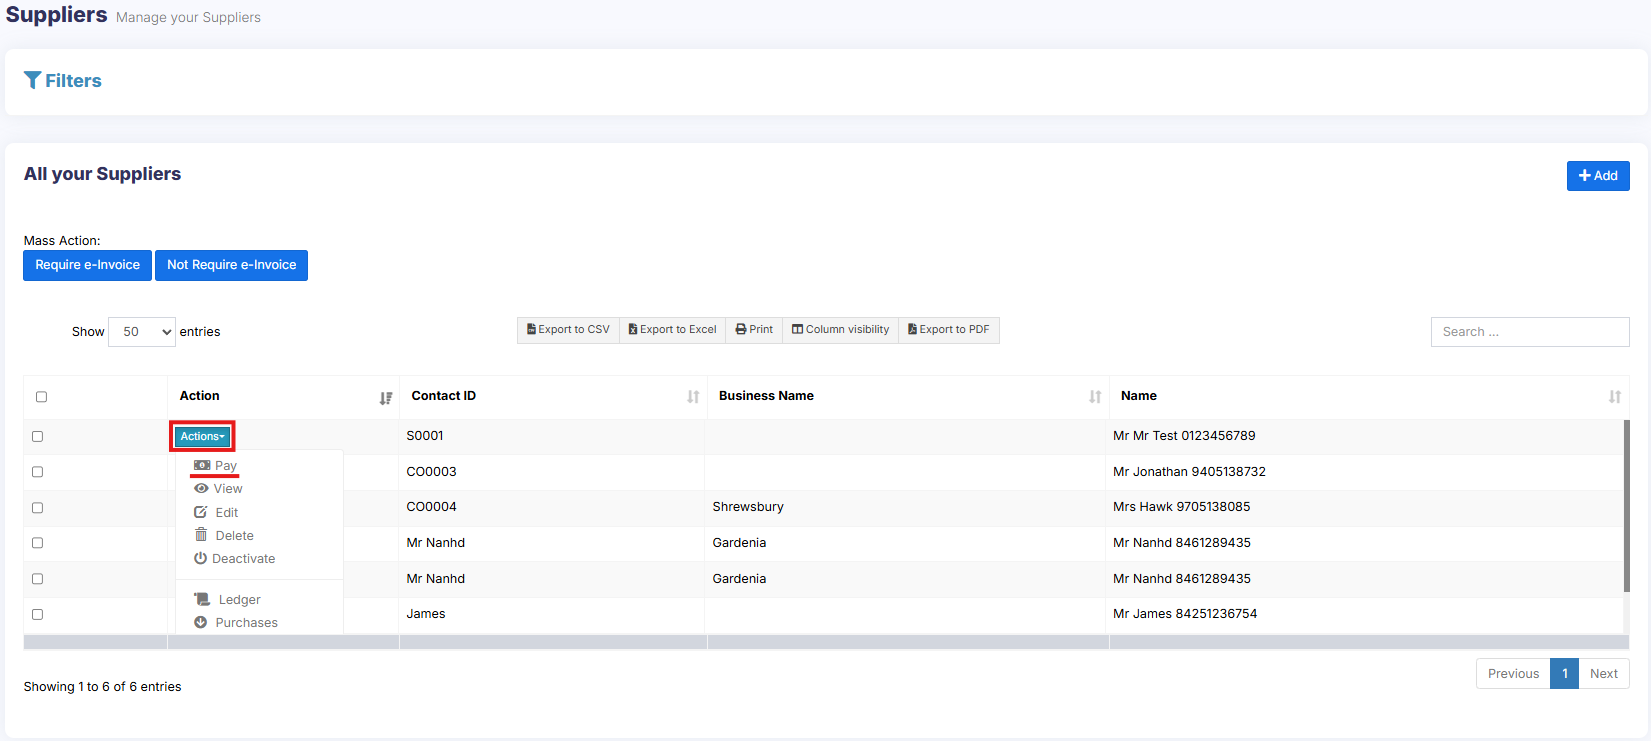](https://docs.senangurus.com/uploads/images/gallery/2025-10/purchasepay.png)
### Adding/Editing Payment Method or Pay-Via
Follow [Add/Edit Pay-Via / payment method](https://docs.senangurus.com/books/senangurus-business/page/adding-editing-payment-method-or-pay-via-options-custom-payments).
# Purchase Invoice
### Purchase Invoice:
An invoice for purchase can be generated at every purchase.
To print a purchase invoice, Go to List Purchase > Actions > Print.
[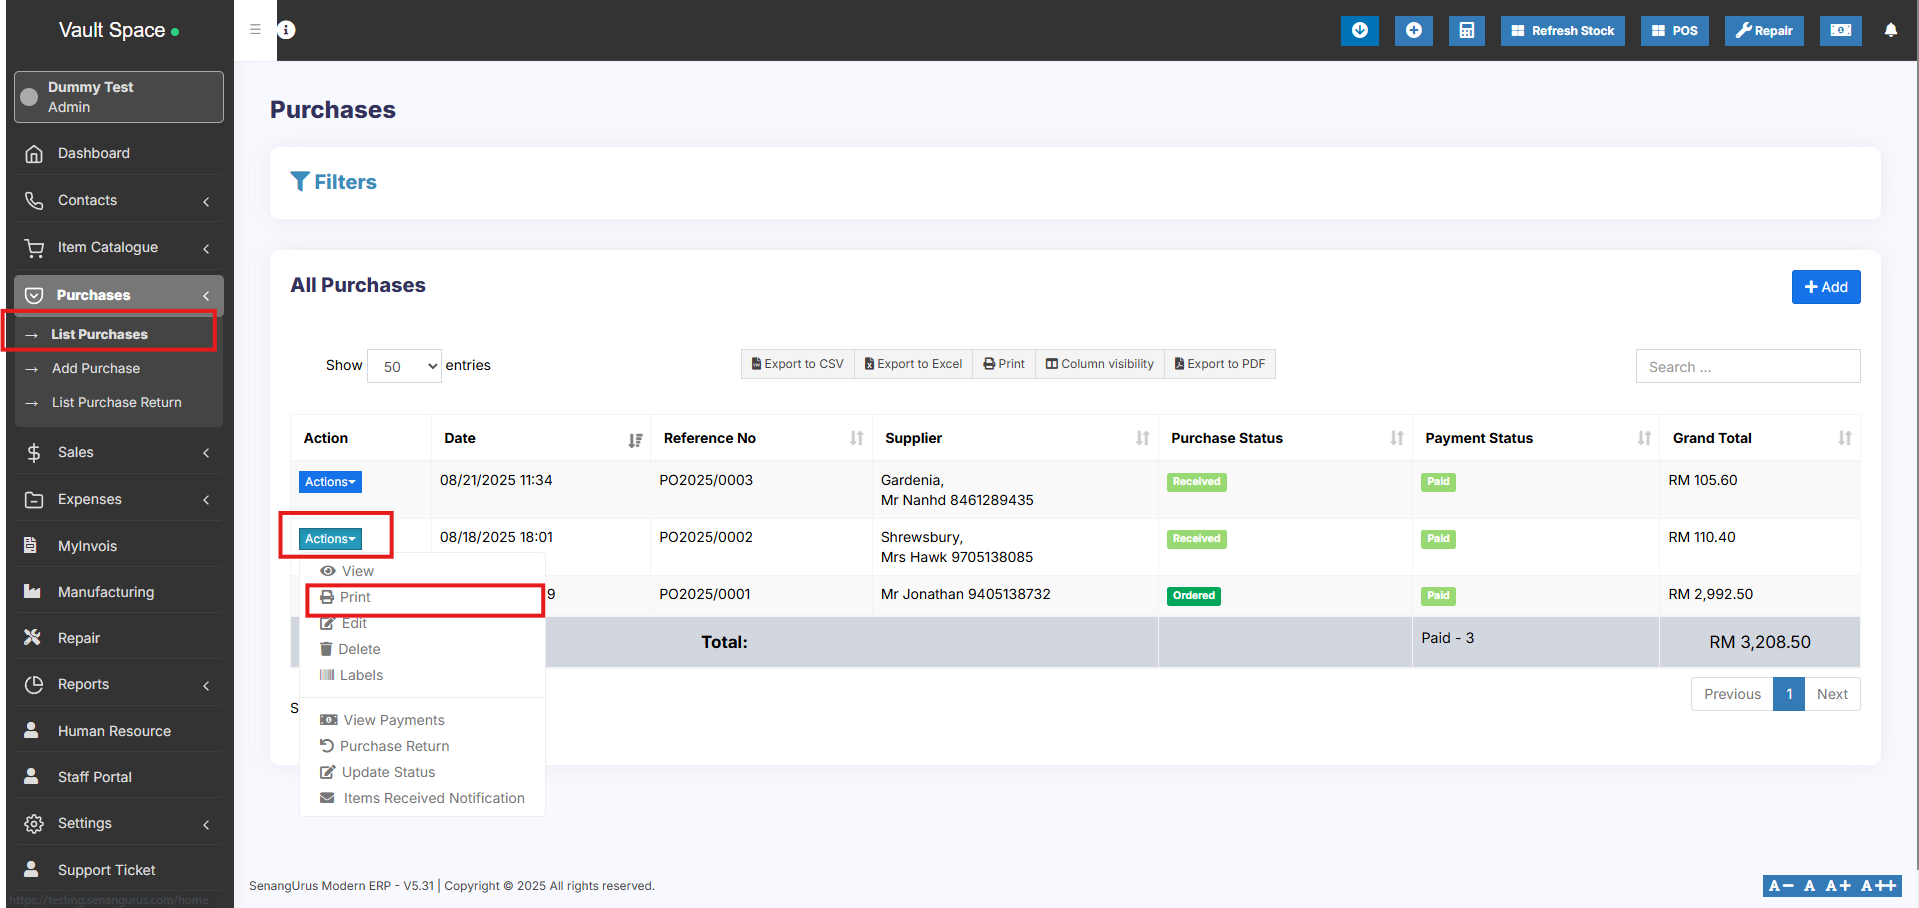](https://docs.senangurus.com/uploads/images/gallery/2025-10/hTHimage.png)
### Barcode for Purchase Invoice:
The barcode is automatically generated in the purchase invoice based on the purchase invoice number.
# Purchase Requisition
## What is Purchase Requisition(PR)
The purchase requisition is a document that an employee creates to request a purchase of some products when the stock reaches a low level.
Only products less than the alert quantity will be shown while creating the purchase requisition.
## Enabling Purchase Requisition
Go to Settings -> Business Settings -> Purchase and enable the purchase requisition check box.
The purchase requisition tab will be shown in the sidebar.
Click on add button and provide the required details. Refer to the screenshot below.
[](https://docs.senangurus.com/uploads/images/gallery/2025-10/8PHimage.png)
**NOTE:** At least one purchase entry must be recorded for a product in order for it to appear on the Purchase Requisition screen. If no purchase has been added for the product you are trying to include, it will not be displayed in the Purchase Requisition screen.
## Converting Purchase Requisition to Purchase Order
Once PR is added it’s converted to Purchase Order.
To convert it into a purchase order, follow the steps below.
Go to Purchase order -> Add. \[Purchase order document - [https://docs.senangurus.com/books/senangurus-business/page/purchase-order](https://docs.senangurus.com/books/senangurus-business/page/purchase-order)\]
Here when you select the corresponding supplier the PR id will be shown.
Select the required PR id.
[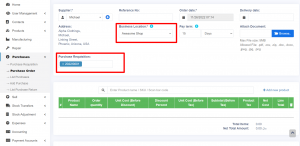](https://ultimatefosters.com/wp-content/uploads/2022/11/pr22.png)
## Partial Purchase
If the ordered quantity in the PR is reduced while converting it into a purchase order, then the status will automatically change from ordered to partial.
# Purchase Order
### What is a Purchase Order?
A purchase order is a document given by the buyer (usually you) to the supplier to request a purchase of goods.
A purchase order contains the buyer invoicing details, delivery details, products, quantities, pricing, tax, discounts, payment terms, payment details, shipping charges if any, and other notes.
The supplier will issue a sales order against the purchase order you have provided.
A purchase order has multiple statuses: Ordered, Partial, Completed.
### Enabling Purchase Order
To enable purchase Order, follow the below steps:
1. Go to Settings -> Business Settings
2. Purchase tab -> Enable Purchase Order
3. Save it.
[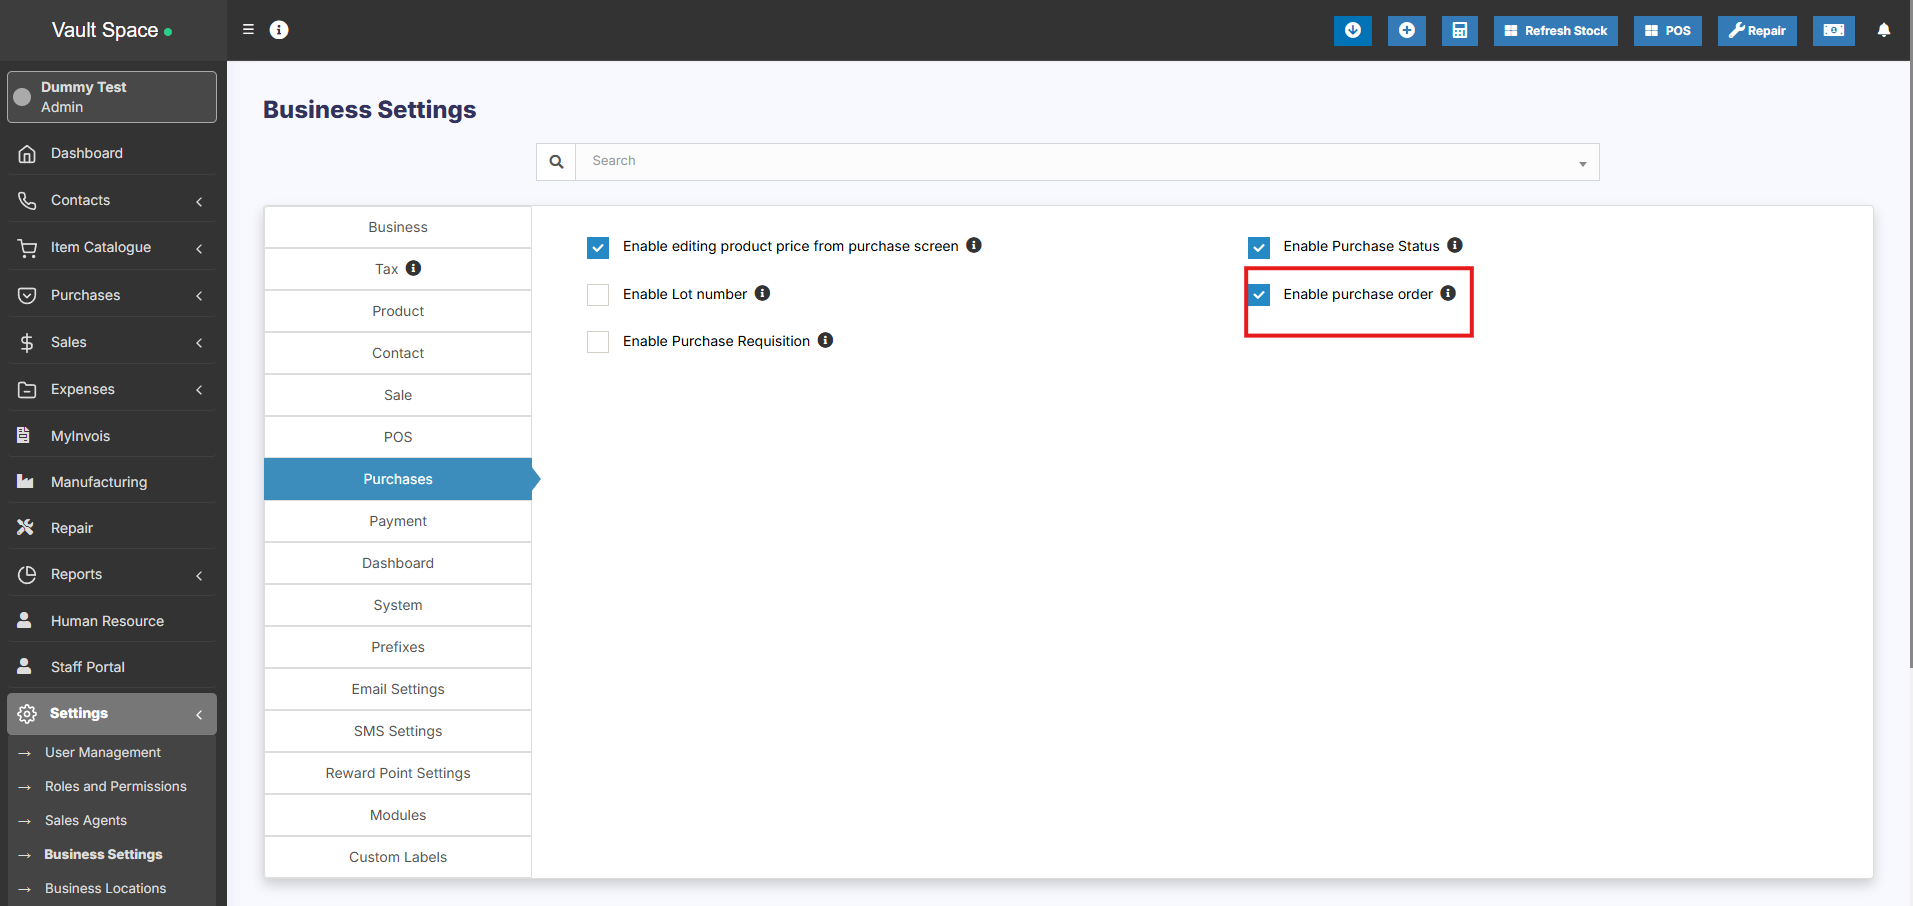](https://docs.senangurus.com/uploads/images/gallery/2025-10/ebVimage.png)
### Using Purchase Order in SenangUrus Business
#### Creating purchase order
After Enabling Purchase order, inside Purchase you’ll find the Purchase -Order menu.
Go to add Purchase order, fill in all the details and save it.
Stocks are not added on issuing Purchase orders.
Once a Purchase order is created you can print it and send it to the supplier.
#### Converting purchase Order to Purchase
On receiving Purchase orders the supplier issues a sales or invoice.
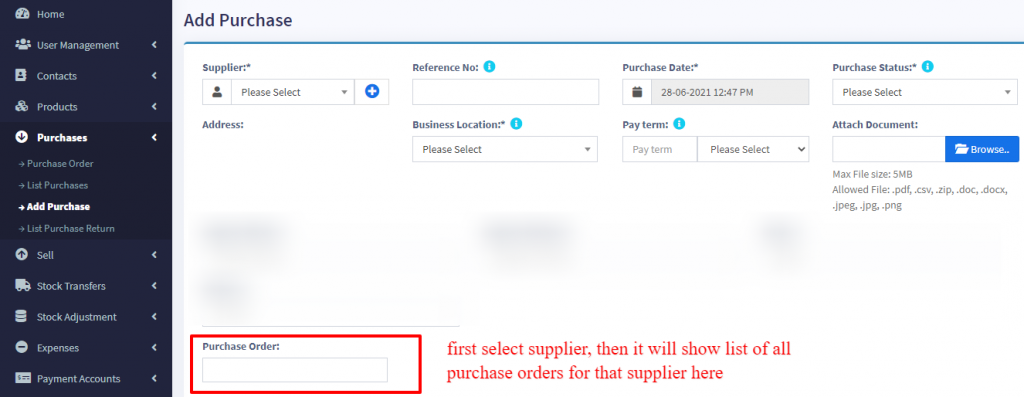
1. Go to Purchase -> Add Purchase, select the supplier.
2. On Selecting it will populate the list of all Purchase orders related to the supplier on the “Purchase Order” dropdown.
3. Select the Purchase Order and it will auto load the products for that order with the product’s price, tax, discounts applied automatically as the sales order.
4. You can increase or decrease the quantity.
5. Save it and the status of the Purchase order will change automatically.
### Video Demonstration:
[](https://drive.google.com/file/d/1K0Xrh_hBp5vAjRG6UFARA-sxJ32HdlKQ/view)
# Adding Bonus or Free Items given by supplier
# Adding Bonus Items or Free items given by Suppliers
2 ways you can do this:
## **Solution 1:**
When adding purchases simply **make purchase price 0** for the free items.
## **Solution 2:**
Find the average price of the item and use that for unit price.
for example, if you purchase 10 quantity for a price of $2 each, 10X2 = $20
# Purchase custom fields
### How to Enable Purchase Custom Fields
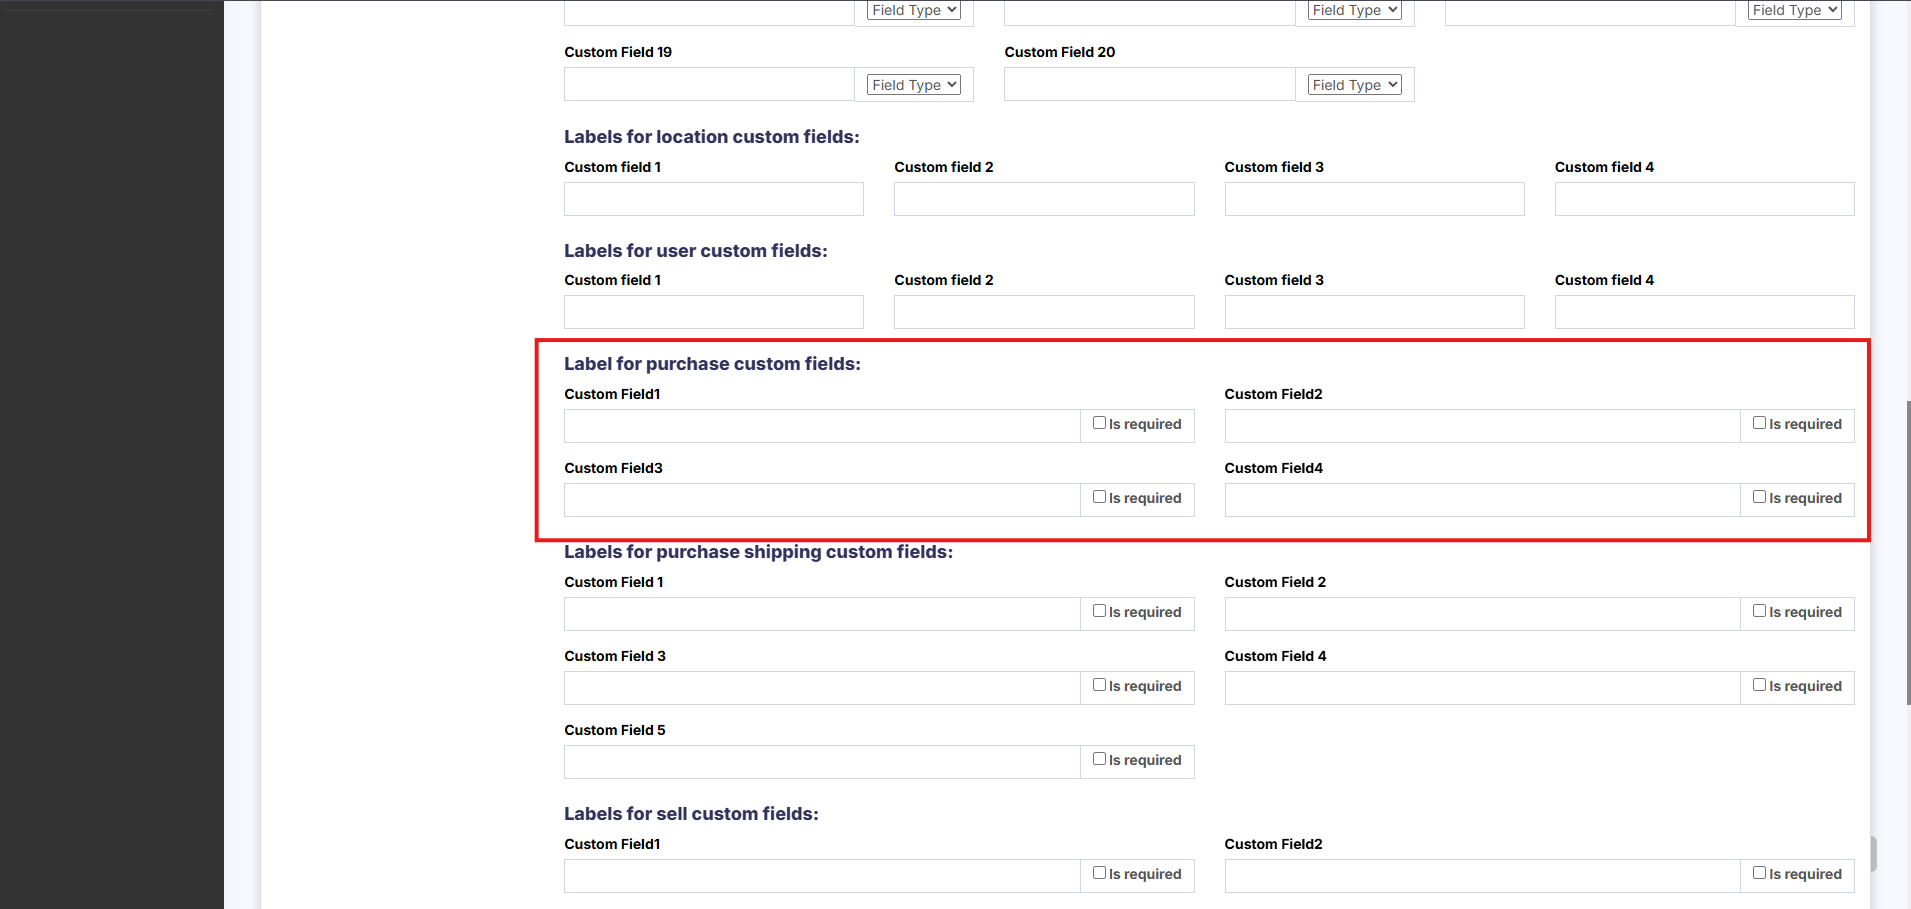
1. Go to **Settings → Business Settings → Label for Purchase Custom Fields**
2. Enter a **label** for each custom field you want to enable
- Once a label is added, the corresponding custom field will automatically appear in the **Purchase** screens
3. To make a field **mandatory**, check the **“Is Required”** checkbox next to the label
[](https://docs.senangurus.com/uploads/images/gallery/2025-10/fX3image.png)
# Stock transfer
# Stock transfer
### What is Stock Transfer?
Stock transfer is the process of sending/transferring stock from one location to another location.
When the stock transfer is done, the stock level decreases from the **Location (From)** and increases in **Location (To).**
- This stock level change happens only if the **Status is Completed**
- Stock changes don’t happen for other statutes like **Pending** and **In-Transit**
- Once the status is marked completed stock transfer **cannot be edited**. But can be deleted
### Editing stock transfer
Stock transfer can be only be edited when the status of the transfer is pending or in transit. After it is completed, the stock transfer cannot be edited. Although you can delete it and create a fresh one if you would like to.
# Sales / Sell
# POS Screen
You can make fast sales using POS page. It provide you more features to add fast sales for your walk-in customers. Generate and print POS invoice in one click. In POS page you can add products in one click and generate invoices. You can search product by brand or category. Following steps is to make a POS sale :
- Select a customer
- Add at least one product
- Apply discount, tax, shipping etc.
- Collect payment
- Generate or print POS invoice
[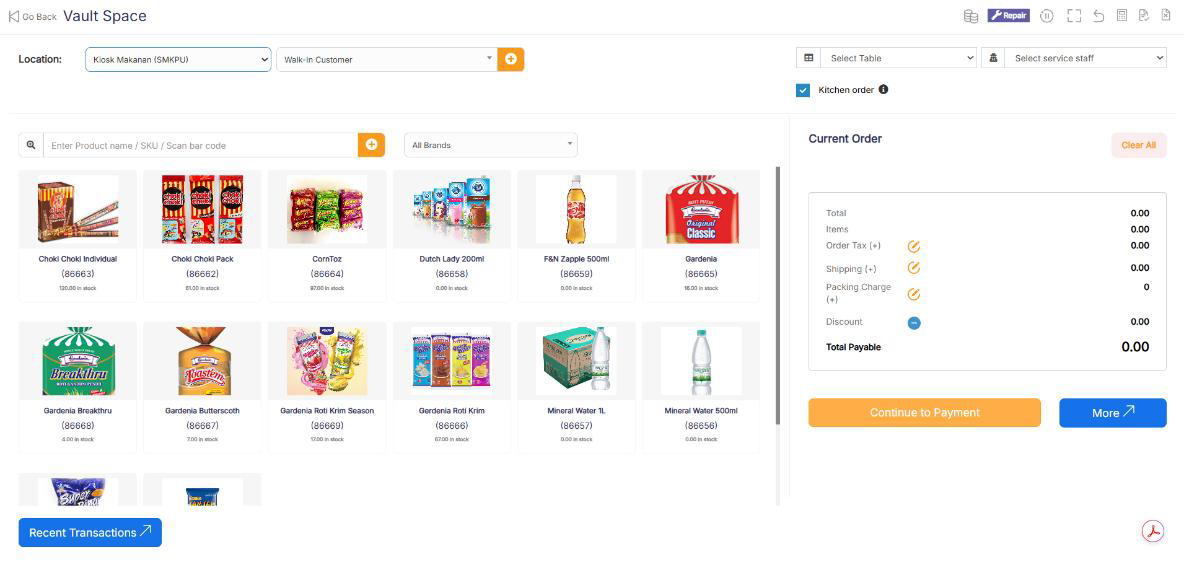](https://docs.senangurus.com/uploads/images/gallery/2025-10/WIlimage.png)
POS Screen.
### **Selling Products, Changing Product Price, Tax & Discount, Lot number & Expiry**
Go to -> Sell -> POS
#### **Selecting Customer:**
By default, there is “Walk-In Customer”. You can search for a customer by name/customer id or phone number or can add new customer by clicking the plus (+) button “Add Customer”.
#### **Searching & Adding Product:**
Enter Product Name Or scan the barcode to search the product. If multiple products are matched then it displays the dropdown of products, selects the product from it. Or if there is a single product then it directly gets added to cart.
#### **Changing Product Price, Tax & Discount for a product:**
[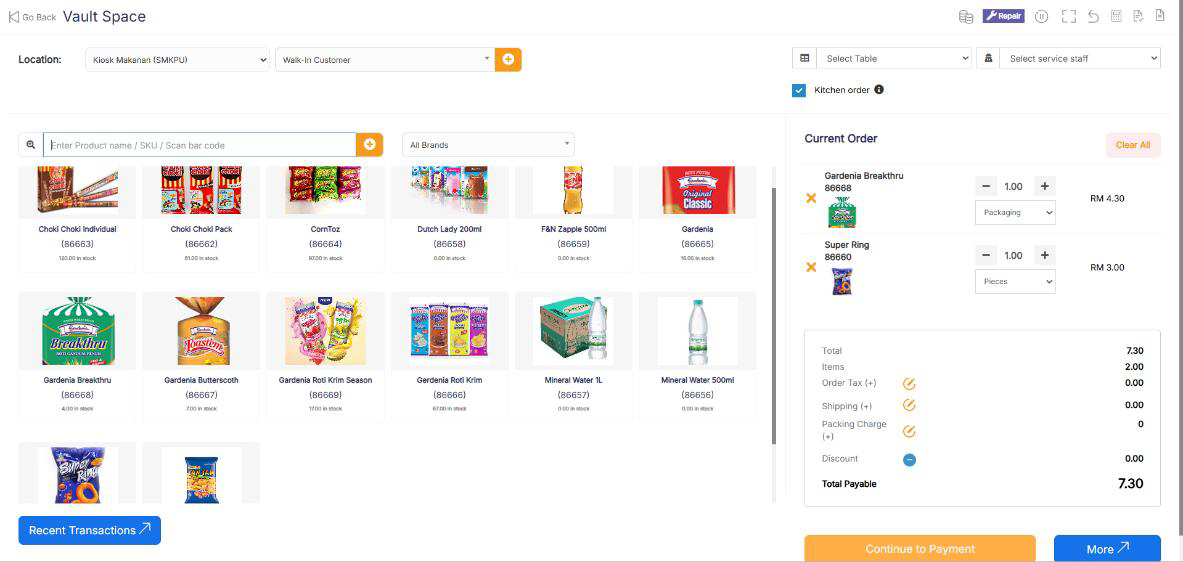](https://docs.senangurus.com/uploads/images/gallery/2025-10/yKhimage.png)
- After the products get added, click on the product name to modify product price, tax & discounts.
Option for different tax in products will be shown only if Inline tax is enabled. You can enable it from Business Settings -> Tax -> Enable Inline Tax in purchase and sell
#### **Selecting Lot number for a product**
- If lot number is enabled then it will show the option to select lot number. ([Enabling Lot number](https://docs.senangurus.com/books/senangurus-business/page/lot-number))
#### **Selecting Expiry for a product**
- **Expiry Date:** If the expiry date is enabled then it will show the option to select lot number. ([Enabling expiry](https://docs.senangurus.com/books/senangurus-business/page/product-expiry-and-related-settings))
### **Cancel Sales:**
To cancel the sales click on the cancel button. Cancel invoices are not saved in the system, so no stock will de deducted.
**To finalize the invoice click on Finalize – Add the payment options and save it.**
On save it will display an invoice printing option.
For invoice to print correctly – The Margins options should be set to “Default”.
List of sales can be viewed from Sell -> List Sales.
List of drafts can be viewed from Sell -> Drafts.
Both Sell & Drafts can be edited to make any changes.
**Express Checkout:** Express Checkout means the sale will be marked as Paid and the payment method will be cash. No separate payment screen will be displayed. Printing of invoice depends on the business location settings.
[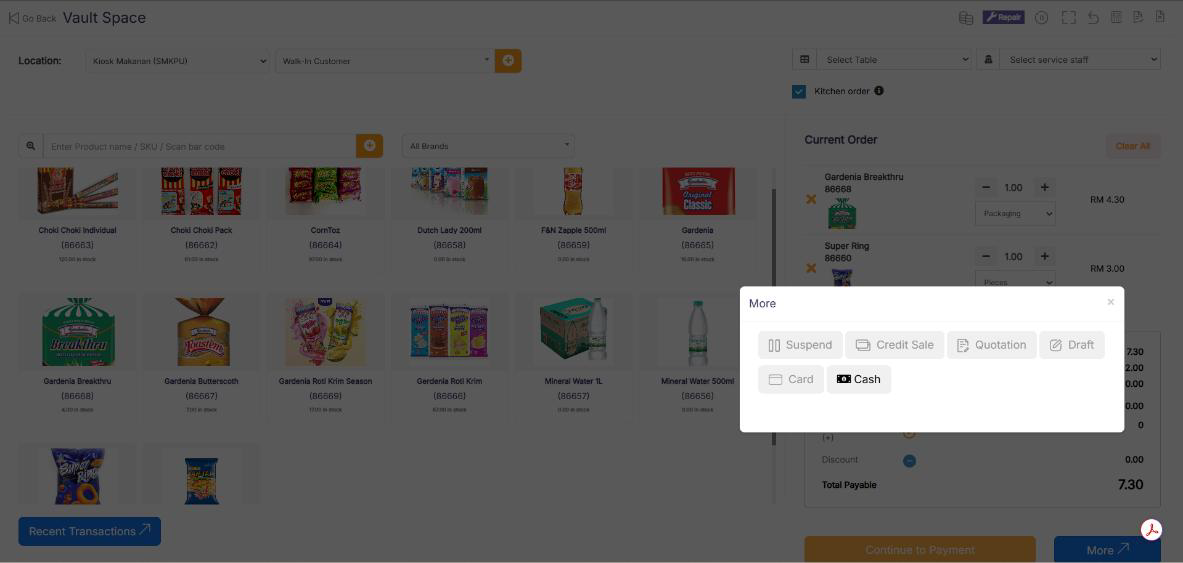](https://docs.senangurus.com/uploads/images/gallery/2025-10/8XNimage.png)
### **100% Credit Sales**
- To sell on credit to the customer you first need to enable this button by going to **Settings -> Business Settings -> POS -> Show Credit Sale Button**
- Then on the POS screen, you will be able to see a button “Credit Sale”, simply click this button to make sales on credit.
### **Half Credit & half payment Sales**
Suppose invoice amount is $1000, customers pays $700 cash and $300 is credit amount on him, then follow these steps:
1. Click on multiple pay button
2. Select the payment method and enter the amount paid by the customer. ($700 in our example)
3. Click finalize payment.
4. Now, the pending amount is automatically added as credit amount on him (or amount to be taken from the customer)
### **Previous sale amount in Sales**
If a sale is made for the customer for a subsequent time for the same product, the previous amount in which the product is sold will be shown for reference in add sale screen.
This feature can also be used for purchase of same products from a supplier.
This feature is available in version 4.7.8 and above
### **Draft & Quotation**
Draft is useful if you want to create a quotation before sales.
Marking a sales as Draft or Quotations will not deduct the available stock.
You can view all Quotations & Drafts from List Quotation or List Draft respectively. Existing draft/Quotation can be edited to make it as final sales.
### **Convert Draft/Quotation to Sale invoice**
1. To convert a draft/quotation to sale invoice, follow the steps below
2. Go to List draft / List quotation. Click on the action button.
3. Select edit in the dropdown.
4. Change the status from draft/Quotation to Final and save it.
### **Suspended Sales**
Suspend Sales means unfinished sale or hold Sale.
Suspended sales stock gets deducted from available stock. You can view all suspended sales by clicking on the Yellow Color button present in very top right of screen (above the date).
#### **Some Use Case of Suspended sales**
1. In a grocery store, if you have suspended button, you can suspend particular customers sales and entertain another customer, when his comeback you can proceed with his sale.
2. In Restaurant, you can suspend the order of customers if not yet paid, and finish it when they finish eating and paid their order, so you can proceed to final sales. You can put Table 1, Table 2, Table 3… so when they finish it’s easy to identify table 3 going to pay.
3. In hotel lots of customers check in stay for 2 nights and order some foods and customers say, just charge to room 024. So you can suspend their orders and edit if there is some additional order and suspend again. Until final it when they pay their bills. on Hotel, on Reference Number: Room 009, Room 012
### **Card / Multiple Pay / Cash**
- **Multiple Pay:** Used when the customer wants to pay with different payment methods like some amount by card, some by cash and some other payment methods. *This option is also used when* the customer *doesn’t* pay *the exact tender amount and you need to calculate the Return Change.*
- **Card:** Used when the customer wants to pay the complete invoice by card.
- **Cash:** Used when customer pay the exact amount of invoice by cash. If the customer pays less or more amount then the invoice amount then use Multiple Pay to get change return.
### **Adding payments from Contact**
Go to contact -> Suppliers. Click on actions for the supplier and it will show “Pay Due amount”, click on it and pay the amount. “Pay Due amount” this option is not displayed if there is no payment due.
### **Adding/Editing Payment Method or Pay-Via**
Follow [Add/Edit Pay-Via / payment method](https://docs.senangurus.com/books/senangurus-business/page/adding-editing-payment-method-or-pay-via-options-custom-payments).
### **Rounding Mechanism for total Sales amount or total payable**
Rounding helps to round the total payable to nearest currency exchange available.
To enable rounding go to **Settings -> Business Settings -> Sales** and choose the **Amount rounding method**
**Amount rounding method**
1. Round to nearest whole number: It will round the payable value to nearest whole number. For example, **1.49** will be rounded to 1.00, and 1.51 will be rounded to 2.00
2. Round to nearest decimal (multiple of 0.05): It will round the payable value to nearest decimal number that is a multiple of 0.05. For example 1.49 will be rounded to 1.50, 1.51 will be rounded to 1.50, 1.59 will be rounded to 1.60, 1.54 will be rounded to 1.55
Similarly, all other round to nearest decimal number works as per the multiplier.
### **Adding sale of a past date**
In SenangUrus Business, sales can also be added for past dates.
#### **Adding past date sales in POS screen**
1. **Enable date selection:** By default, in POS screen all sales are recorded for current datetime. To add sales for past date enable datetime selection by going to **Business Settings** > **POS Tab** > **Enable transaction date on POS screen**
2. **Pick date while doing sales:** Once date is enabled (above step 1) you can now select date in POS screen while making sales, with this the sales will be added for that datetime.
#### **Adding past date sales in Sales screen**
No additional steps are required here, this screen already has the option to select Sale Date. Select that particular datetime to record sales of that.
# Change Return
Suppose during POS the total payment amount by a customer is $250, but the customer pays $300 cash.
In this case, the cashier needs to return $50 cash to the customer.
So, enter all these details in the system, follow the below steps:
1. Click on the “**Multiple Pay**” button. It will open a popup
2. Enter the paid amount by the customer ($300 here)
3. On the right side, it will show a “Change Return” Amount. This amount needs to be returned to the customer
4. Click on finalize button to save the sales.
The change amount is shown in the invoice. To create a custom label for change return **Go to Settings -> Invoice layout** change the ‘change return label’ to a required label and save the changes.
# Selling of Services
SenangUrus Business can be used:
- Exclusively for Services or
- Exclusively for Product Selling (trading) Or
- Combination of Services & selling of Products.
### **Selling Services**
Services are Intangible products.
Example: Repairing, Salon & Spa services, Web Development, Accounting, banking, cleaning, consultancy, education, insurance, expertise, medical treatment, transportation and a lot more.
1. To add service Go to **Add New Products**.
2. Add the name of your Service, Like Computer Repair, Accounting, E-Commerce Development, Consulting, Plumber, Saving, Hair Cutting, etc.
3. While adding service-based products **uncheck** the **“*Manage Stock?*“** option. When Manage stock is unchecked or disabled the stock for such products is not managed, because such a product doesn’t have a stock count with it.
4. **Purchase Price:** Add anything to the purchase price, it can be *1 or 0, or something else*. The *purchase price is of no use in service*.
5. If you want to add a description for such service like for example in computer repair you want to describe the problem for such service then **check** the “***Enable Product description, IMEI or Serial Number***” checkbox.
Now to create invoice or receipt for such service
1\. Go to Add Sales or POS screen.
2\. Enter the name of the service.
3\. If you have enabled “Enable Product description, IMEI or Serial Number”, then it will show you a **popup to add a description**. If you haven’t enabled description you can click on the button as shown the image below.
4\. To print the description in the invoice, go to **Setting -> Invoice Settings -> Invoice Layout**. And click on the layout you’re using. Enable “**Show sale description**“. And Click on “Update” to update the invoice layout.
Now it will display the Description you entered on the invoice or receipt.
### Video demonstration:
# Sales Order
[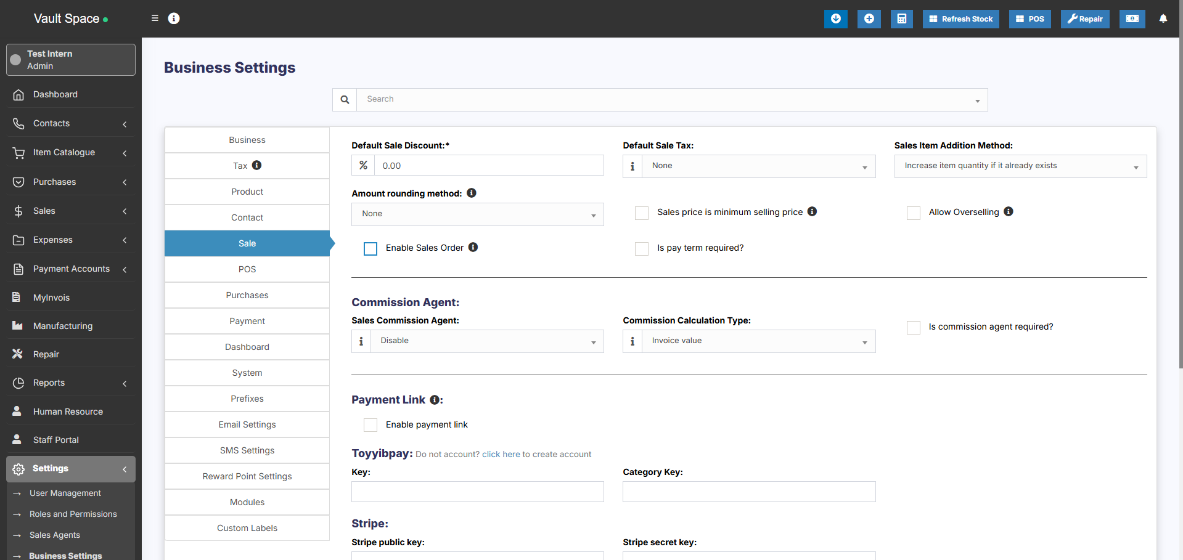](https://docs.senangurus.com/uploads/images/gallery/2025-10/FPLimage.png)
### **What is a Sales Order?**
Sales Order is a document given by the supplier to the buyer against a Purchase Order by the buyer.
A sales order contains the buyer invoicing details, delivery details, products, quantities, pricing, tax, discounts, payment terms, payment details, shipping charges if any, and other notes.
Once the buyer agrees on the sales order, goods are shipped by the supplier.
Sale order has multiple statuses: Ordered, Partial, Completed.
### **Enabling Sales Order**
To enable Sales Order, follow the below steps:
1. Go to Settings -> Business Settings
2. Sales tab -> Enable Sales Order
3. Save it.
### **Using Sales Order in SenangUrus Business - Creating sales order**
After Enabling sales order, inside Sales you’ll find the Sales-Order menu.
Go to add sales order, fill in all the details and save it.
Stocks are not deducted for sales orders.
Once a sales order is created you can print it and send it to the buyer for approval.
#### **Converting Sales Order to Sales**
On approval of sales orders, you can create sales from the sales order.
1. Go to Sales -> Add sales, select the business location & Customer.
2. On Selecting it will populate the list of all sales orders related to the customer on the “Sales Order” dropdown.
3. Select the Sales Order and it will auto load the products for that order with the product’s price, tax, discounts applied automatically as the sales order.
4. You can increase or decrease the quantity.
# Sales Return
There are 2 ways of adding sales return
### **First way:**
Edit existing invoice for the sales by going to edit the invoice and remove the product or reduce the quantity of the product. And save it. The system will automatically add the returned quantity back to stock. This is a simple & recommended way of doing.
### **Second Way:**
Follow the screenshot below:
[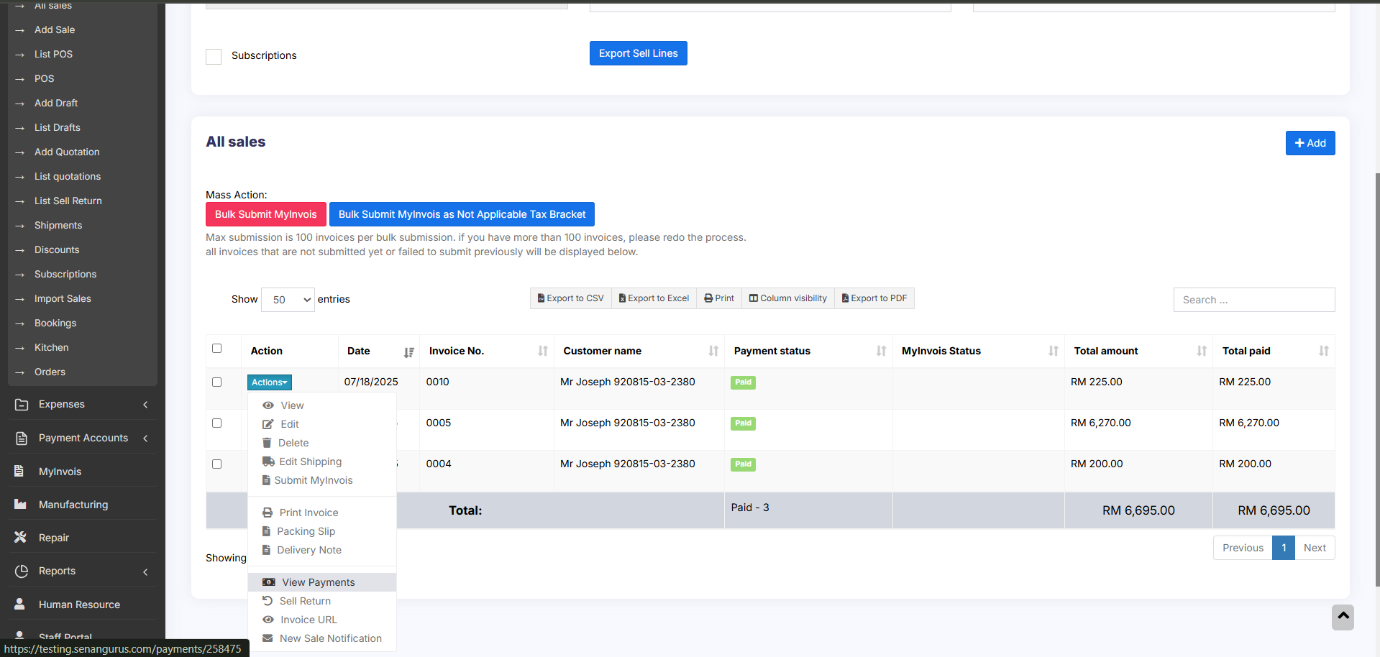](https://docs.senangurus.com/uploads/images/gallery/2025-10/58Fimage.png)
### **Payment for Sale Return:**
When a **Sale Return** is created, the system considers the return amount as a **Due Payment,** indicating that the amount needs to be refunded to the customer.
To complete the return process, you must **add a payment** to record the refund.
To add the payment for sale return, follow the steps.
- Go to **Sales → List Sale Return**.
- In the list, locate the **Payment Status** column for each sale return entry.
- If the status shows **Due**, click on the **Due** button.
- This will open an **Add Payment** pop-up window.
- Enter the **Refund Amount** and click **Save**.
- The **Payment Status** will now update to **Paid**.
#### **Question: Why sell return value not decrease the payment value from the parent invoice?**
- SenangUrus Business will adjust these values in the Profit & Loss report.
- Regarding payment, users have to add a transaction for receiving payment from the customer and then paying them back. This way all the transactions are recorded.
# Sales Subscriptions
### **Enabling Subscriptions:**
To enable subscription, go to **Modules** -> Check the “**Enable Subscriptions**” and save it.
For subscription invoice to auto-generate crone job must be set up.
### **Using Subscriptions:**
1. Subscriptions can be added from both POS sales or normal Sales screen.
2. In POS or sales screen to add a subscriptions click on “**Subscribe?**” Checkbox
3. On clicking subscribe it shows a popup modal, enter the subscription frequency like every 1 day or every 5 days or every 1 month etc. Also enter the subscription frequency, like if a user wants so subscribe only 5 times the enter 5, for unlimited leave it blank.
4. All subscriptions appear in Sell -> Subscriptions screen. From here you can also start/stop a subscription.
5. When a subscription invoice is auto-generated then a notification is sent to admin & sales person.
### **Subscriptions Indicators:**
While adding subscription sales, the sales will be marked with an indication in the “All Sales” screen.
This indicator will be in either of two colors, blue or red.
The indicators represent
1. The blue color indicates that this is an automatically created subscription invoice.
2. The red color indicates that it is a recurring invoice that repeats for a specified number of times and turns to the blue color invoice when the number of times specified is reached.
# Featured Products in POS screen
### **Featured Products for POS screen**
Adding featured products helps you quickly access some products which are frequently or most commonly sold.
To add featured products follow these steps:
1. Go to Settings -> Business Locations.
2. Add/Edit any business locations
3. In add/edit screen you can select multiple products that can be featured in pos for this location.
[](https://docs.senangurus.com/uploads/images/gallery/2025-10/featuredproducts.png)
Select feature products in add/edit business locations
# Cash Register
- Cash Register gives you an overview of a particular user/cashier session
- Whenever a cashier opens to POS screen she must Open Cash Register by entering the “Cash In hand”
- If the cashier has access to more than one location then location also needs to be selected
- Every sale made by the cashier will be logged into the Cash Register. In POS screen, You can view the Register details by clicking on “Register details” button present in the top navigation bar. It displays the Cash in hand, and cash details by other payment methods as well. Also, the amount refunded by the cashier.
- To close a cash register click on Red Color – Close Register Button. On closing Cash register the cashier will have to enter the details of the Total Cash, Total Card Slips, Total cheques and other fields.
- To view all cash register Go to Reports -> Register Report. Here you view all cash register details.
# Invoice Layout
Invoice Layout helps you to create different invoice formats.
To add a new invoice layout:
[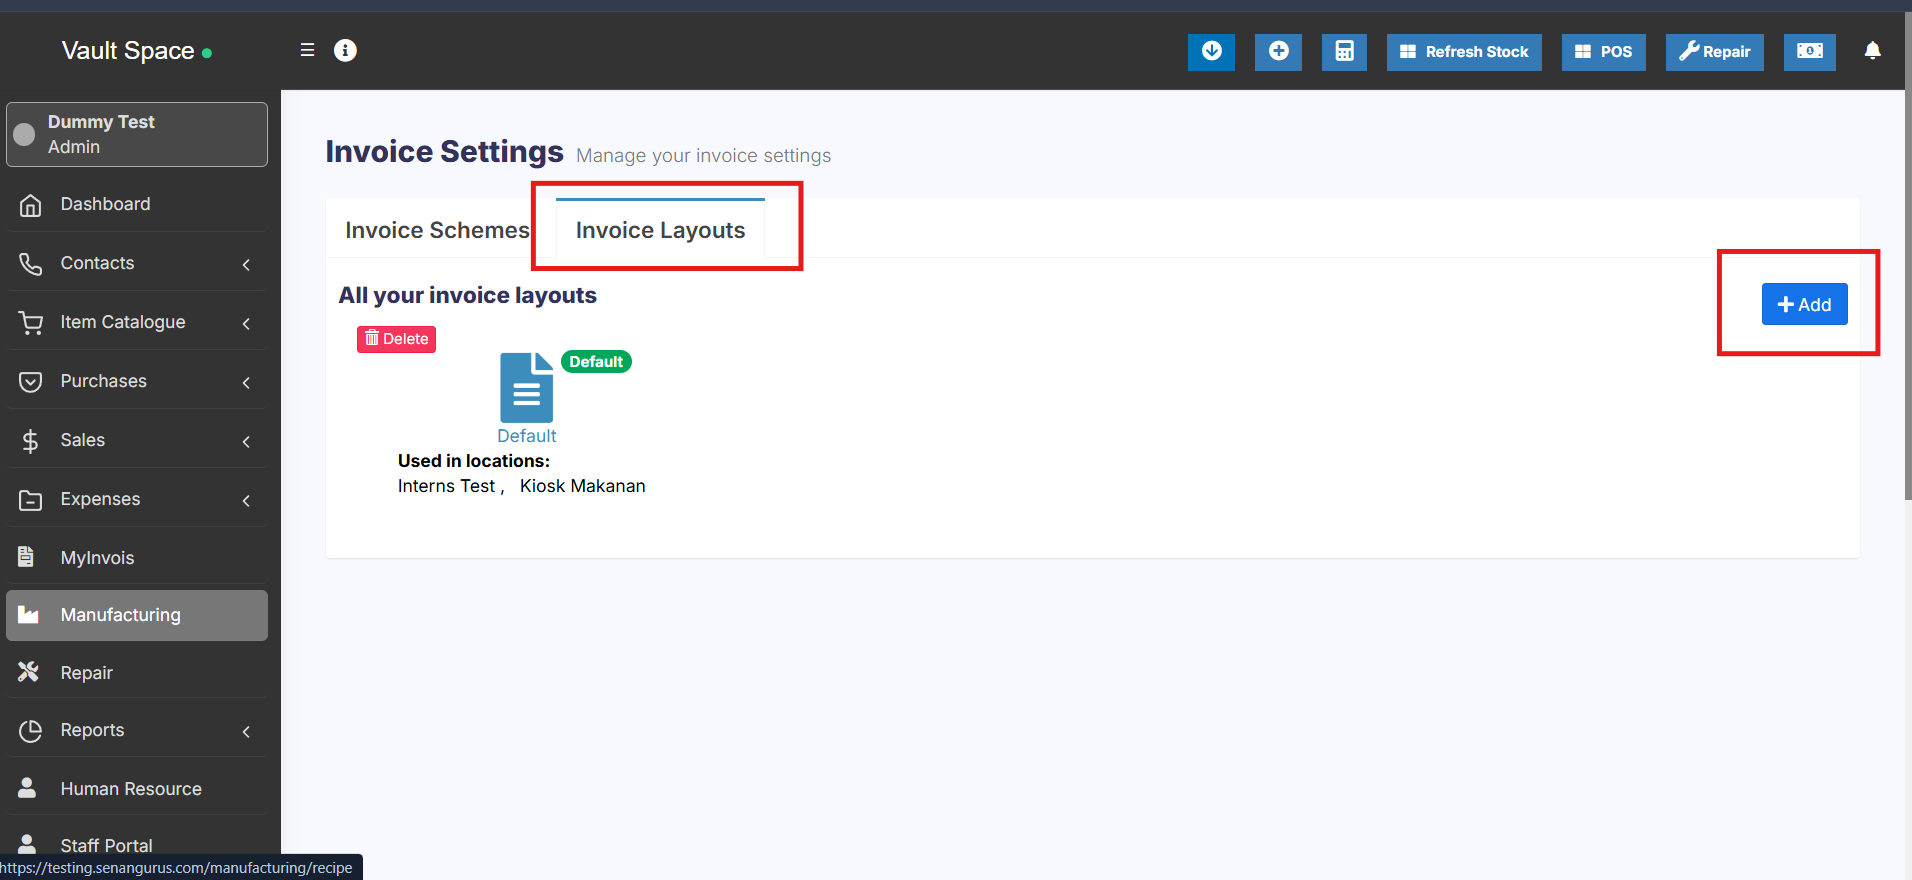](https://docs.senangurus.com/uploads/images/gallery/2025-10/o5ximage.png)
1. Go to **Settings->Invoice Settings->Invoice Layout->Add**
2. Give a unique distinguishable Layout name
3. Add the text to be shown in the top/header of invoice. Generally, it can be your shop name, aligned center with Heading 1 format.
4. Add other relevant details.
5. You can show/hide address fields.
6. You can mark a layout as default. The default layout is used when no layout is found for a location.
7. Click on Save.
To use an invoice layout in a location go to” Business Locations -> Edit” and assign the invoice layout.
### **Invoice Design:**
- In invoice layout, you will find options for invoice designs.
- Used for browser-based printing only & NOT print server-based printing.
-
Slim design is used for thermal line printer-based printer.
### **Editing invoice layout HTML/CSS/Javascript**
To manually change the code for invoice layout the path is: **resources/views/sale\_pos/receipts/{design\_name}.blade.php** Where design\_name = name of the design you want to change like classic/elegant/detailed/slim etc.
### **Tax Summary:**
To see the tax summary in invoice, go to add/edit invoice layout, and enter the “Tax Summary Label” option and it will show the tax summary in invoice.
### **Total in words:**
To display total in words in the invoice Enable:
1.
2. Choose “Word Format”
### **Discounted Price:**
To display the discounted unit price and discount amount in the invoice, enable the following filed in invoice layout
1. Discounted unit price label
2. Discount label
### **Display unit breakdown:**
To display the reduction summary of quantity from multiple units, enable the check box ‘show base unit details (If applicable)’.
### **Display Base and Multiple Unit details:**
If you have added multiple units in your system, you can display the relation of the base and multiple units in the invoice.
For example, if 1 dozen = 12 pieces. Then you can display it in the invoice with the price.
To achieve this, follow the steps given below
Step 1: Go to Settings > Invoice Settings > Invoice Layout.
Step 2: Enable the ‘Show base unit details’ checkbox.
[](https://docs.senangurus.com/uploads/images/gallery/2025-10/Zhtimage.png)
Now, if you select a multiple unit the details will be displayed in the invoice.
### Adding sale custom fields in the invoice:
The sale custom fields can be added to the printed invoice.
**Step 1:** To achieve it, Go to **Settings > Invoice Settings > Invoice Layout**.
**Step 2:** Select the invoice layout in which you need the sale custom fields to be printed.
**Step 3:** Enable the checkboxes for the sell custom fields, “sell 1”, “sell2” etc, and save it.
Now, when you use this chosen invoice layout, the custom fields you set up for sales will automatically appear on the printed invoice.
# Displaying QR code in invoice
### Steps:
1. Edit an [invoice layout](https://docs.senangurus.com/books/senangurus-business/page/invoice-layout)
2. Scroll down to the QR code section at the bottom
3. Click **Show QR Code**
4. Enable all the fields required in QR code, like Business Name, Business Name, Invoice URL, and others
5. Save the invoice layout. Print an invoice and you’ll see the QR code in the invoice
6. **Show Labels:** Enable this option to show the labels(key-value pair) in QR code
# Gift Receipt
A gift receipt shows proof of purchase but leaves out the amount spent. To print a gift receipt follow the below steps:
1. Add a new invoice layout with the name “Gift Receipt”
2. In invoice layout select the **Invoice Design** as Slim and Check the **Hide all prices** checkbox
3. In Business Settings -> POS, check the **Show invoice layout dropdown** and save it.
4. Now in the POS screen whenever you want to issue a gift receipt, simply select the invoice layout as Gift Receipt and print the invoice.
# Invoice External URL
1. With invoice external URL you can share the invoice to a customer via a link.
2. With this link, they can see & print the invoice without they having to login into the system.
3. The link can also be sent in Email & SMS notification. To send url in Email/SMS notification add it in notification template using the url tag.
[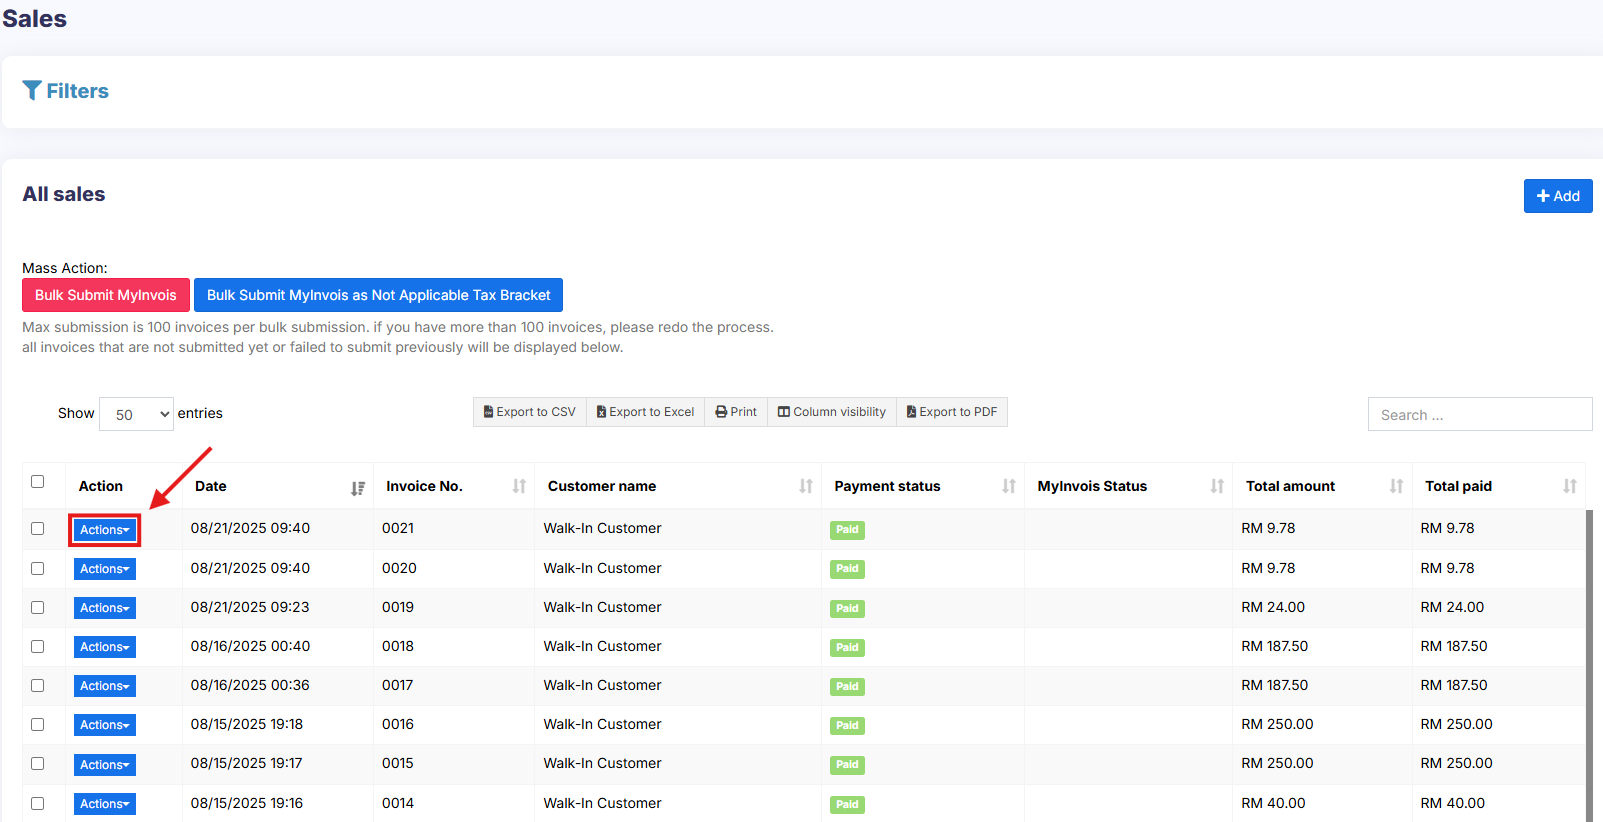](https://docs.senangurus.com/uploads/images/gallery/2025-10/salesinvoice.png)
[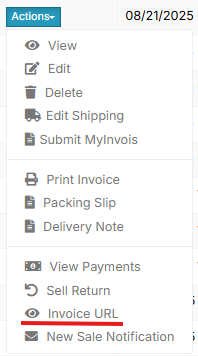](https://docs.senangurus.com/uploads/images/gallery/2025-10/invoiceline.png)
# Configuring keyboard shortcuts for POS screen
## Configuring keyboard shortcuts for POS screen
UltimatePOS supports keyboard shortcuts, by default we have configured shortcuts for different actions in POS screen.
But you can configure it yourself as per your convenience.
To configure keyboard shortcuts, go to Settings -> System Settings. Here in the POS section, you will find a list of Operations and the shortcuts for them.
You can use the Available Key Names with any combination of letters or number to create shortcuts.
– Make sure the shortcuts do not conflict (is not same) with the shortcut of the browser. Making a shortcut same as the browser will have different effects in different browsers.
# Discounts by Brand, Category, Location
# Add/Edit Discount:
Go to sales **-> Discount -> Add**
- **Name:** Enter a meaning full name for the discount.
- **Brand:** Select the product brand where it will be applied.
- **Category:** Select the produc Category where it will be applied.
- **Location:** Select the location
- **Priority:** Discount with higher priority will have higher weight, however priority will not be considered for exact matches.
For example: if there are 2 discounts available for the same brand and/or category then the disount with higher priority will be applied.
- **Discount type**: Fixed or Percentage
- **Start At**: Start date of the discount.
- **End At**: Start date of the discount.
- **Apply in selling price groups:** If checked then the discount will be applied in the selling price group price. If not then it will not be applied.
- **Apply in customer groups:** If checked then the discount will be applied in the customer group price. If not then it will not be applied.
- **Is active:** Activate or not.
[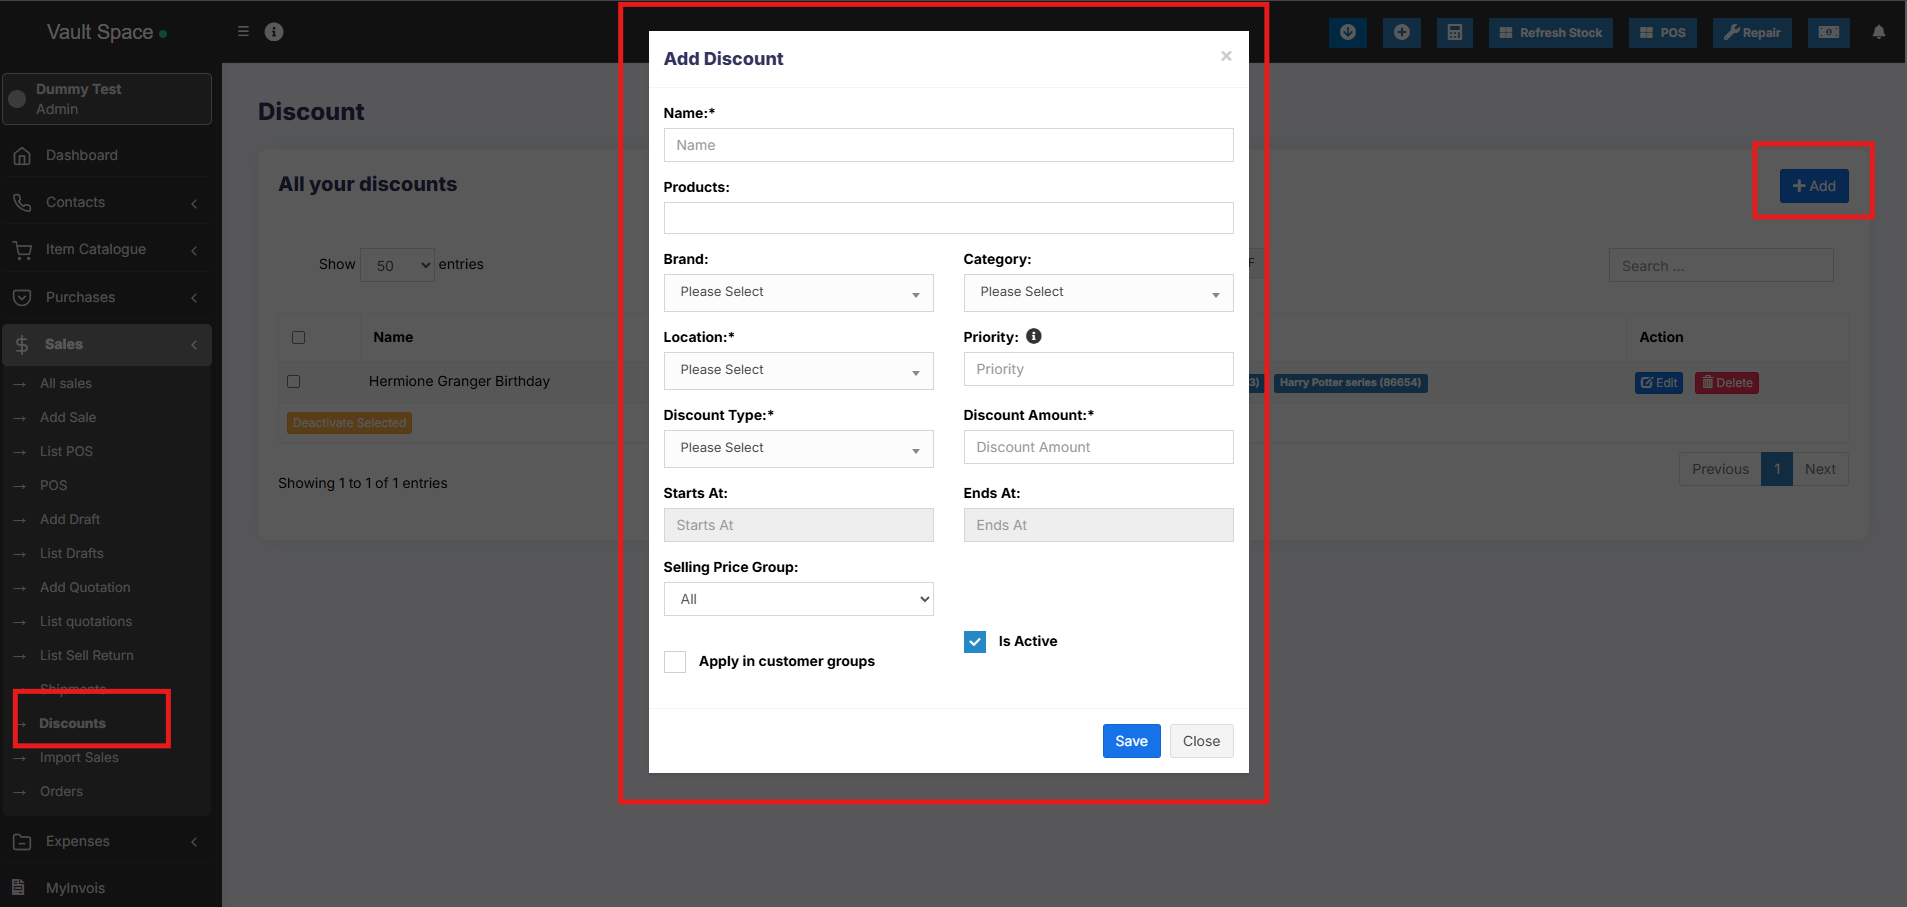](https://docs.senangurus.com/uploads/images/gallery/2025-10/LWAimage.png)
# Reward Points, Royalty points
## Enabling reward points:
1. Go to Settings -> Business Settings -> Reward Points Settings.
2. Click on **Enable Reward Point** and it will get enabled.
## Reward Points Settings:
[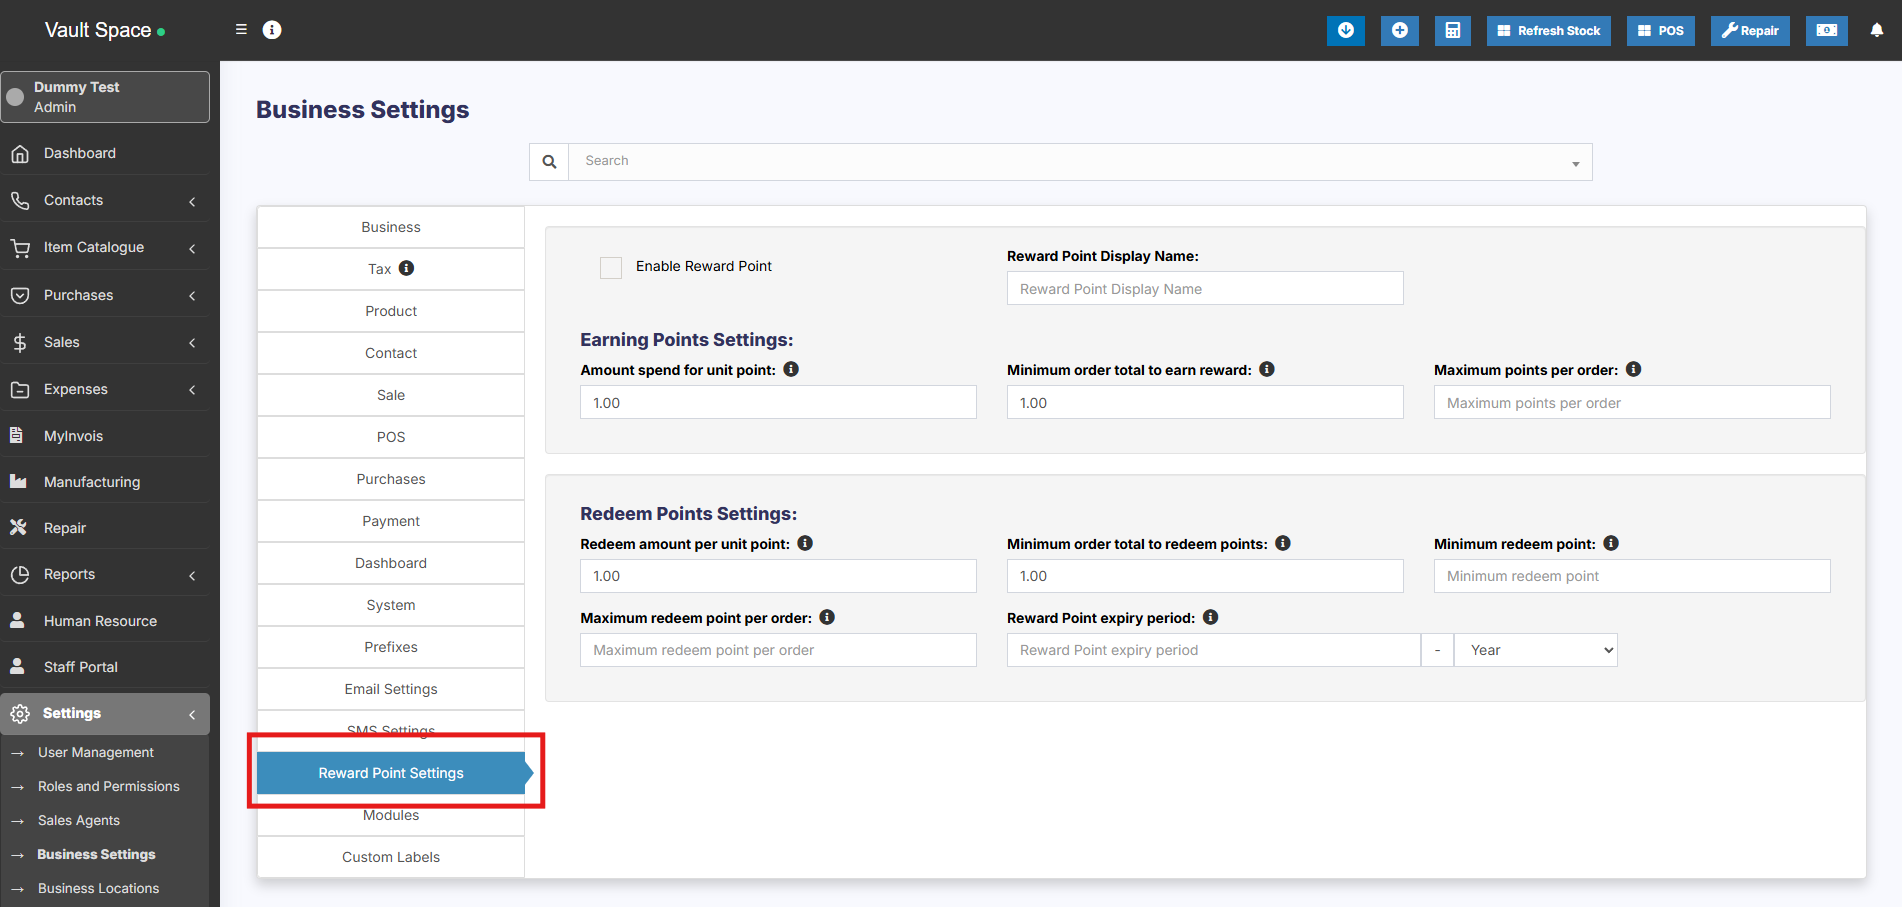](https://docs.senangurus.com/uploads/images/gallery/2025-10/Dggimage.png)
Reward points settings is divided into 2 parts:
1. Earning Points Settings
2. Redeem points settings
### Earning Points Settings:
1. **Reward points display name:** This is display or label name for reward points. Some people like to keep it as reward points or reward coins etc. Only used for displaying label.
2. **Amount spent for unit point:** Meaning how much the customer spent to get one reward points.
**Example**
If you set it as 10, then for every $10 spent by customer they will get one reward points.
If the customer purchases for $1000 then they will get 100 reward points.
3. **Minimum order total to earn a reward:** The minimum amount the customer should spend to get reward points.
**Example:** If you set it as 100 then the customer will get reward points only if there invoice total is greater or equal to 100. If the invoice total is 99 then they won’t get any reward points.
You can set it as a minimum of 1.
4. **Maximum points per order:** Maximum reward points customer can earn in one invoice. Leave it empty if you don’t want any such restrictions.
**NOTE**: On returning a sale the reward point earned in that sale(invoice) will be reduced automatically.
### Redeem Points Settings:
1. **Redeem amount per unit point:** It indicates the redeem amount per point.
**For example:** If 1 point is $1 then enter the value as 1. If 2 points are $1 then enter the value as 0.50.
2. **Minimum order total to redeem point:** Minimum order total for which customers can redeem points.
3. **Minimum redeem point per order:** Minimum redeem points that can be used per invoice. Leave it blank if you don’t need this restriction.
4. **Maximum redeem point per order:** Maximum points that can be used in one order. Leave it blank if you don’t need this restriction.
5. **Redeem point expiry period:** Expiry period for points earned by customers. You can set it in months or years. Expired points will get deducted from the customer account automatically after this period.
**NOTE:** You must set the cron job for expiry feature to work. Cron Job Document
To display customers remaining reward point in invoice you can choose the option in invoice layout to display it.
# Types of Service
1. Types of service is mostly used in restaurants, it is for example Dine-in, Parcel, Courier, 3rd Party Delivery etc.
2. Based on type of service you can change the price of the product by linking types of services to [selling price group](https://docs.senangurus.com/books/senangurus-business/page/selling-price-groups-sell-in-different-prices-wholesaleretail-or-for-different-prices-for-different-locations).
3. You can add packing charges (fixed or percentage)
4. Also, you can add more information like in custom fields.
# Enabling Types of Service
Go to **Settings -> Business Settings -> Modules -> Check the “Types of Service”**
and save it.
[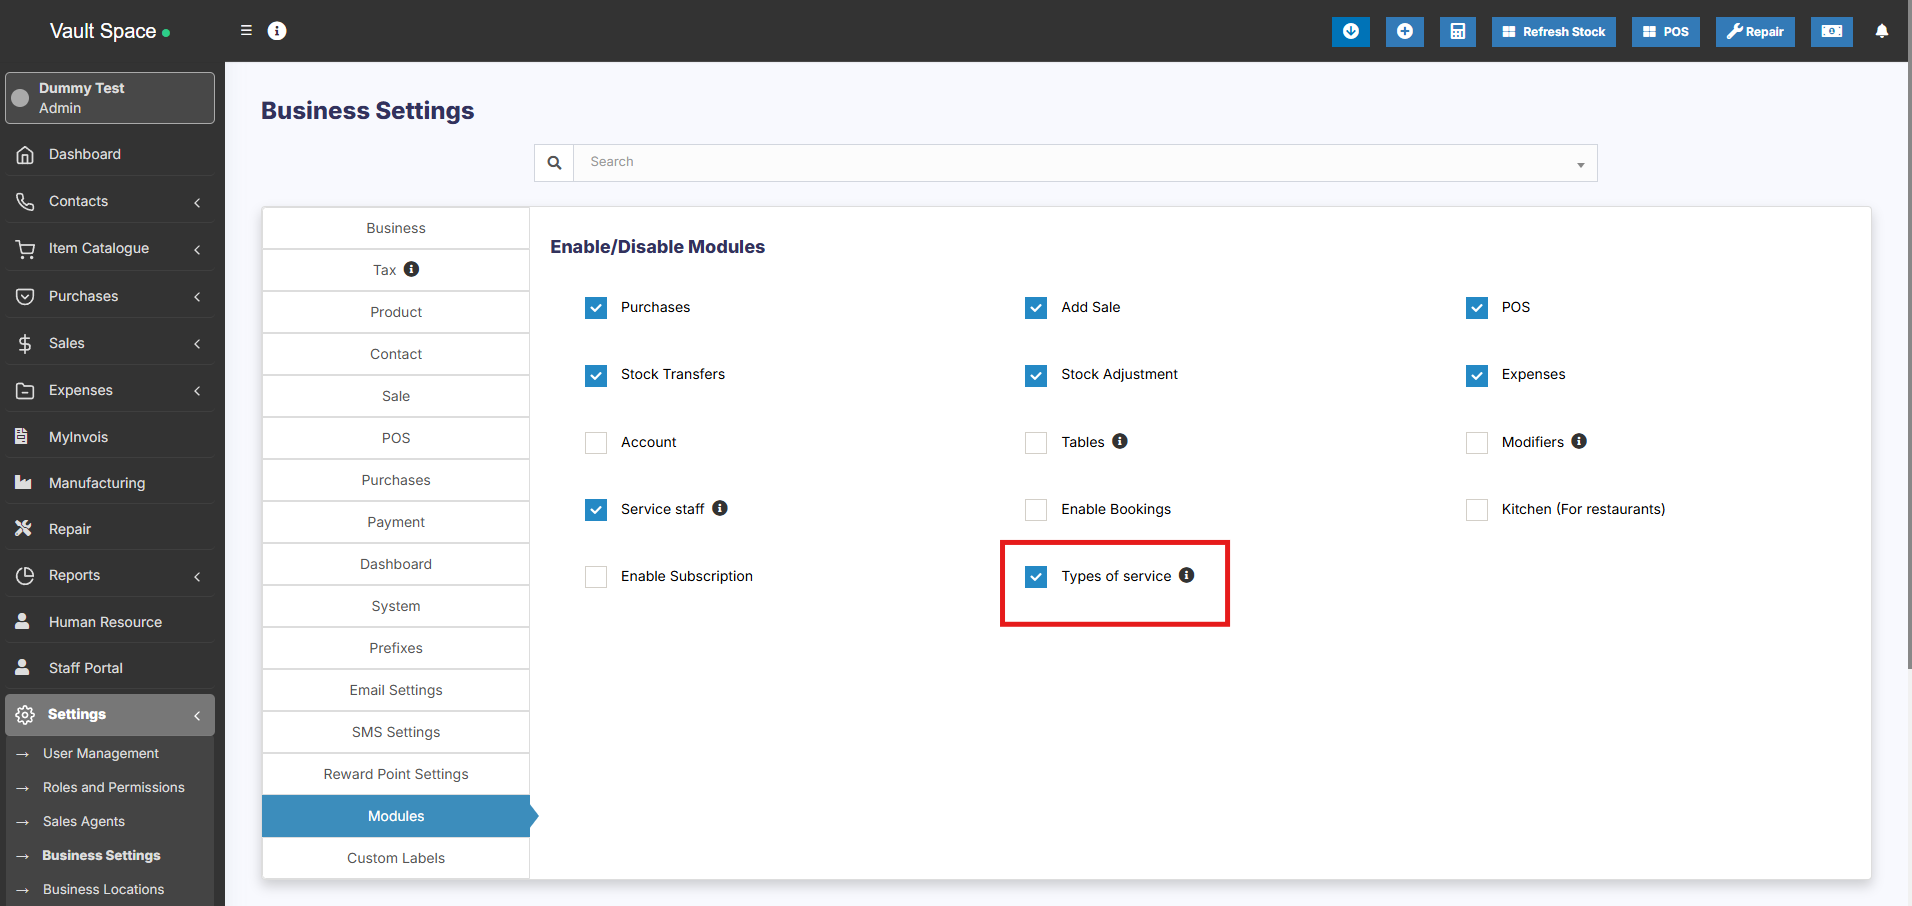](https://docs.senangurus.com/uploads/images/gallery/2025-10/hIiimage.png)
# Adding new Types of Service
1. To add, go to Settings -> Types of service -> Add
2. Add a name, description
3. For each location select the Price Group that will be applicable. Select **Default Selling price** for selling in default price of the product.
4. Enter packing charge, leave empty if not applicable.
5. Enable custom field: this will enable some custom fields in type of service in POS screen.
[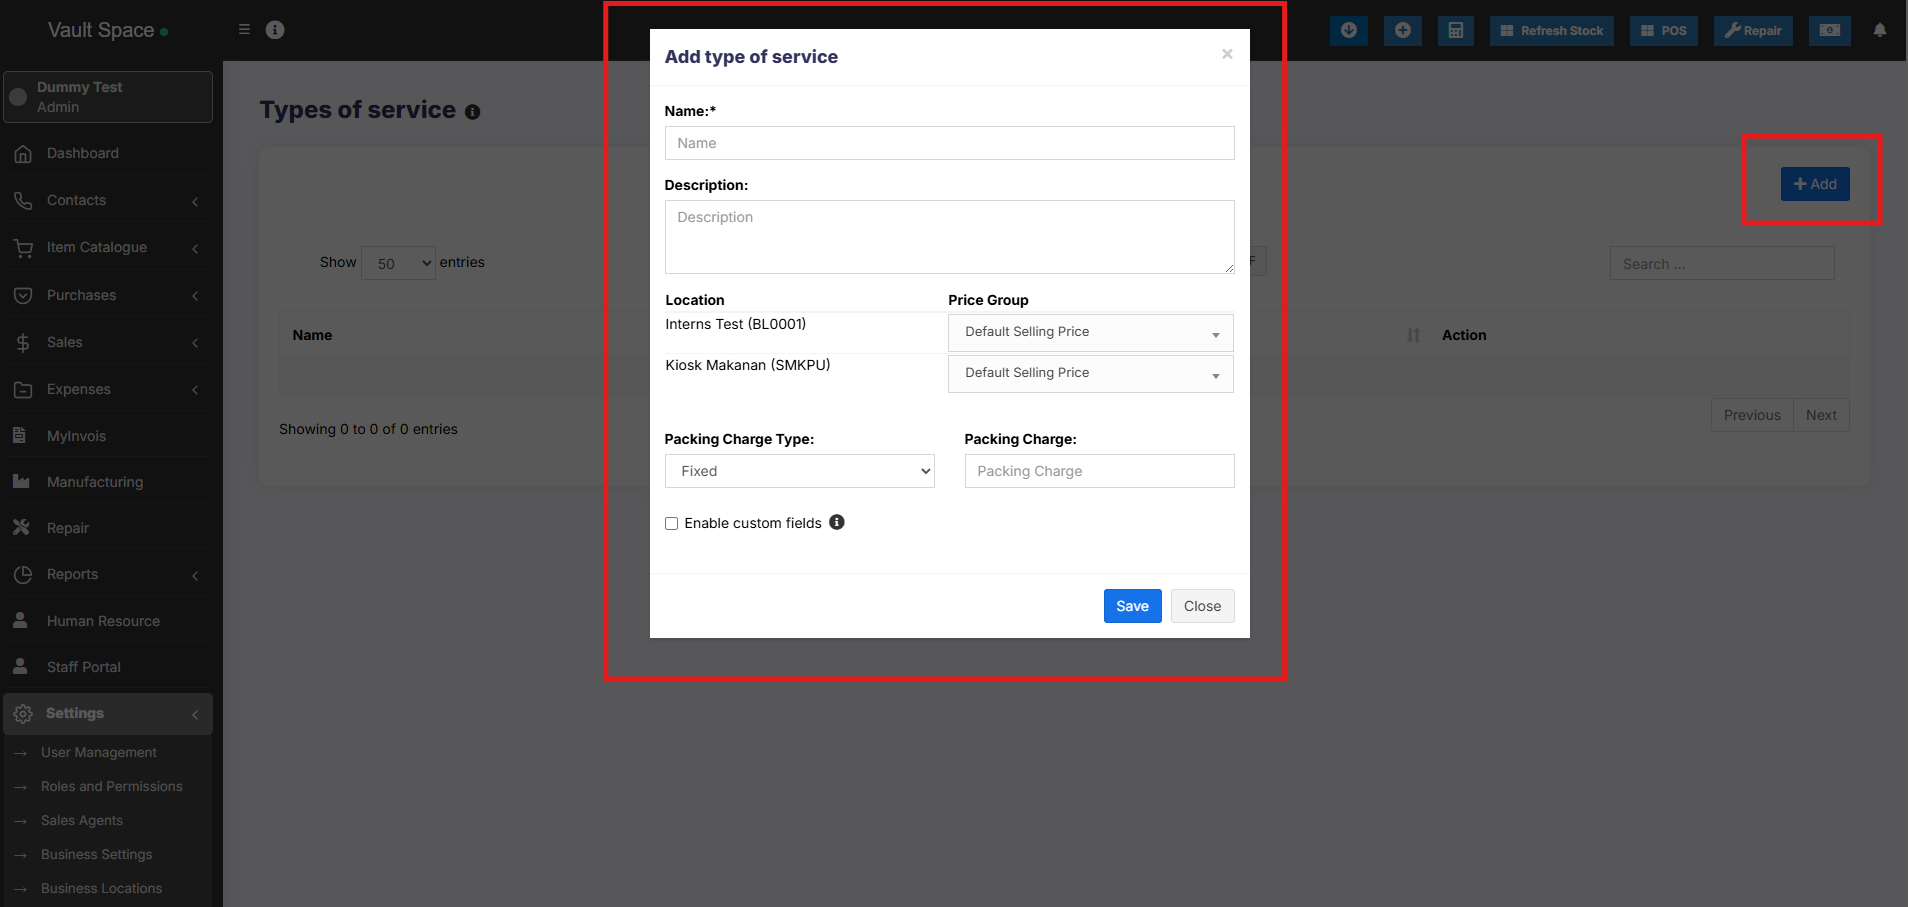](https://docs.senangurus.com/uploads/images/gallery/2025-10/rAAimage.png)
# Using Type of Service in POS/sales screen:
1. On Enabling Types of service in POS screen you will see the option to select Type of service.
2. Before adding a sales select the type of service and enter the relevant details.
3. You can show the type of service information in receipt by enabling it from [Invoice Layout](https://docs.senangurus.com/books/senangurus-business/page/invoice-layout)
# Shipments, Home Delivery or parcel management
## Adding a Delivery person option for Shipments
While adding shipment details during a sale, the delivery person can also be added.
## Adding Delivery Note for Sale
#### How do we print the Delivery Receipt?
To add a delivery note, follow the steps below.
**Step 1**: While adding the sales, be sure to include shipping details (You can refer to the video guide provided below for assistance).
**Step 2**: Navigate to the **All Sales** screen and click on the **Action** dropdown menu for the specific sale added in Step 1.
**Step 3**: From the **Action** dropdown menu, select the ‘**Delivery Note**‘ option, and proceed to print the delivery note directly.
[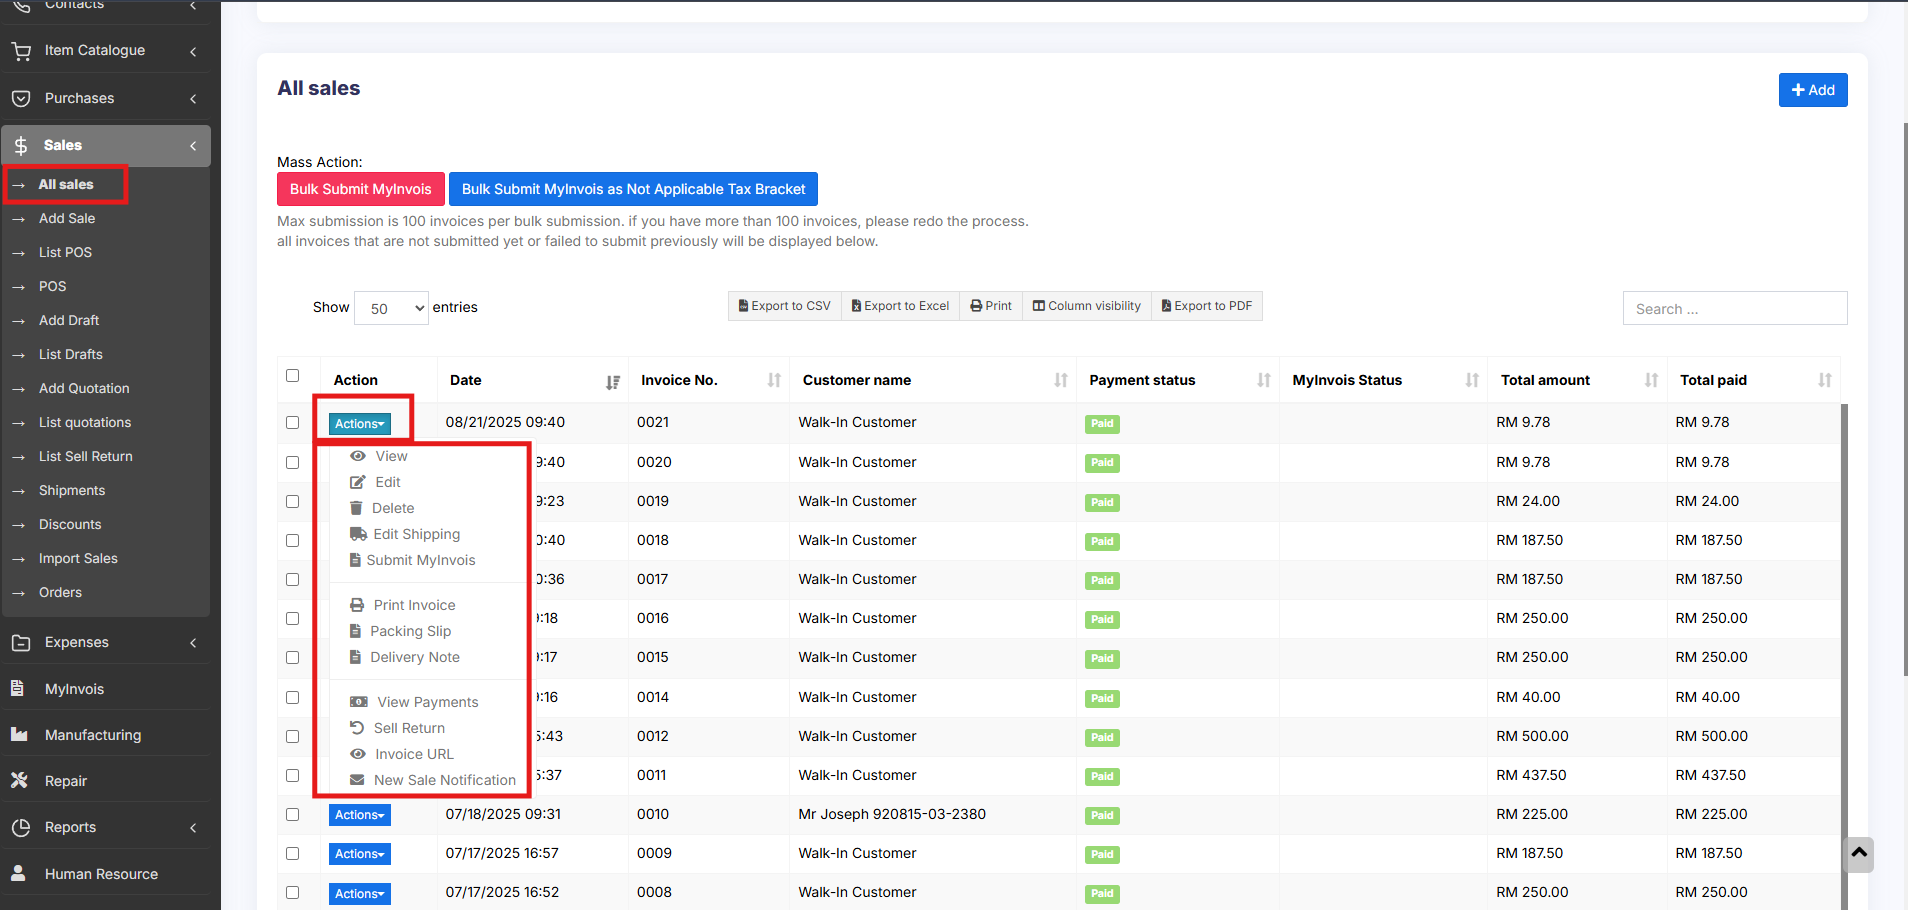](https://docs.senangurus.com/uploads/images/gallery/2025-10/3o4image.png)
# Display product unit price in POS Product suggestion
To display product unit price in POS product suggestion follow the below steps:
Go to Business Settings > POS > Enable “Show pricing on product suggestion tooltip”
and save it.
Then in POS screen Product suggestion tooltip, it will show the product unit price
# Cash Denomination
## What is cash denomination?
Cash denominations are usually different cash tender used in your country. With this feature, cashiers can easily calculate the total amount they have when closing the register by mentioning the number of different tended they have.
## Using cash denomination
When a cashier closes the cash register it will ask to enter the count of each cash denomination. On entering total amount will be automatically calculated.
This count can be viewed from the Report -> Cash Register report by viewing any register.
## Cash denomination in Sale and Purchase:
Cash denominations can be added while making a sale or purchase. To enable this Go to Settings -> Payment.
Select the screens in which you need the cash denomination and type of payment method.
[](https://ultimatefosters.com/wp-content/uploads/2021/04/cashdenominat.png)
The cash denomination table will be shown while you make a sale or purchase in add sale/add purchase screen.
[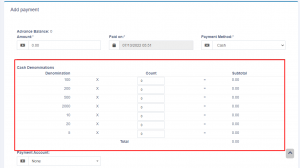](https://ultimatefosters.com/wp-content/uploads/2021/04/cashdeno.png)
# Proforma Invoice
## Proforma Invoice
A proforma invoice is an estimated invoice that is used to request payment from the buyer for goods or services before they are supplied.
The quotations can be converted to proforma invoices.
Select ‘Convert to proforma invoice’ from the action dropdown button on the list quotation page.
The proforma invoices will be added to the ‘list drafts’ screen. You can convert them later into actual invoices.
[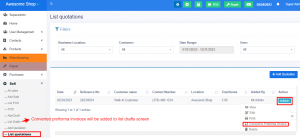](https://ultimatefosters.com/wp-content/uploads/2022/11/proforma-invoice.png)
# Import Sale
### Import Sale
To add bulk sales to the system, you can use this feature.
### Steps to import sale:
[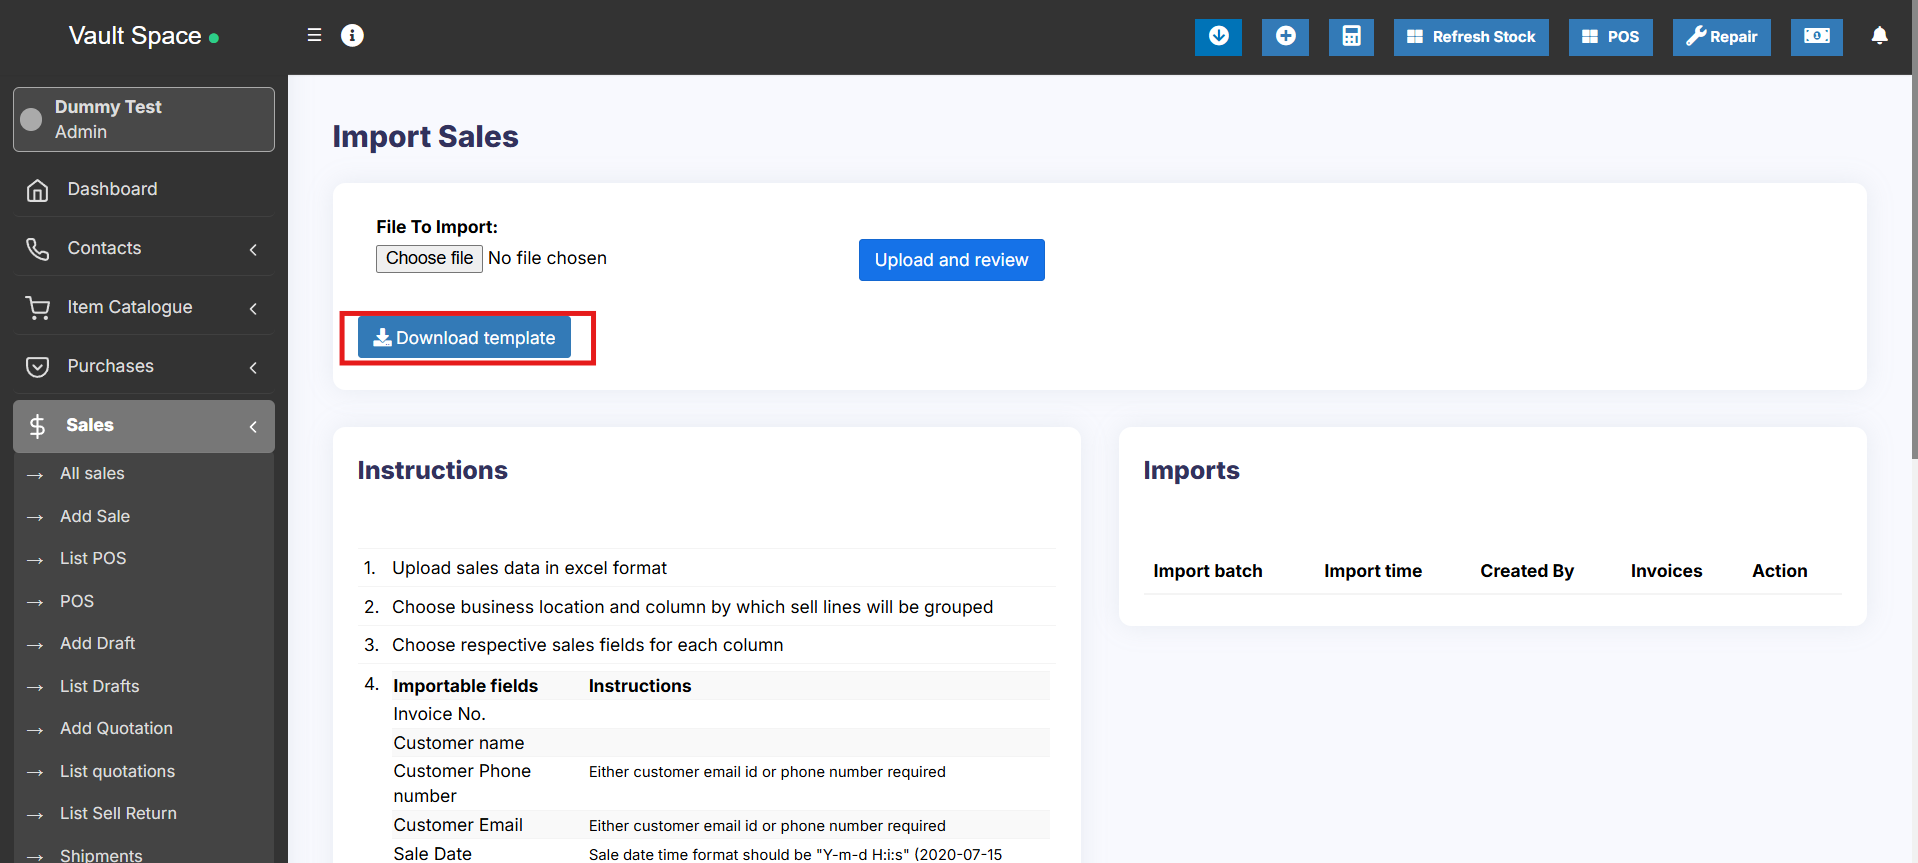](https://docs.senangurus.com/uploads/images/gallery/2025-10/ljKimage.png)
Go to Sale > Import Sale.
Click the ‘Download Template’ button to download the template file.
Once downloaded, open it and add the required details. While adding the details follow the instructions mentioned on the import sale page itself.
Save the excel file and upload it by clicking the choose file button and pressing submit button.
**NOTE:** It may display some error after uploading if some data added in the excel file are not as per mentioned in the instructions.
Change it accordingly and proceed.
### “Group sell line by” field in import sale:
While importing an Excel file for import sale you have to select the option “**Group Sell Line By**“.
This field is used for the system to know which lines need to be in a single sale.
For example, if you add an **Invoice\_Number** column in the Excel import file, then all lines from one sale will have the same **Invoice\_Number**.
In this case, you need to select **Invoice\_Number** option in the **“Group Sell Line By”** dropdown field.
### “**You cannot select a field twice**” Issue and Solution:
You may encounter this issue while you import an Excel file using the Sale Import feature.
This issue happens when the same option name is chosen for multiple columns in the import table
[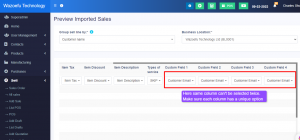](https://ultimatefosters.com/wp-content/uploads/2023/02/importsale1.png)
If you want to remove any column during import, you can select the **SKIP** option in the dropdown.
# Adding Bonus or Free Items at Sale
# Adding Bonus or Free Items at Sale:
Follow the steps below to add a free item during a sale.
1. Add free items(that have an actual purchase price) during the sale by making the selling price 0 for those products.
2. Include a note in the sale description indicating that these items are free, bonus, or complementary products.
3. Enable the ‘sale description’ check box in the invoice layout to ensure that it is printed on the invoice (if required).
# Customer Display Screen
The Customer Display Screen feature allows customers to view their order details in real-time during billing. It enhances transparency and customer engagement by displaying item names, prices, total amount, and promotional messages(Ads).
## How to view the Customer Display Screen
To display the customer display screen, follow the below steps
**Step 1:** Go to POS screen, you will find a screen icon
**Step 2:** Open the icon in a new tab
Whatever products you add or delete or change the price in the POS screen it will reflected in the Customer Display Screen.
## Running Ads in Customer Display Screen
You can run ads like Mega Discount Sale, Stock Clearance Sale etc in the Customer Display Screen.
To upload images for this ads, follow the below steps
Step 1: Go to **Settings > Business Settings > Customer Display** tab.
Step 2: Here you can upload the images.
## Changing Header in Customer Display Screen
To change the header in the customer display screen, follow the below steps
Step 1: Go to **Settings > Business Settings > Customer Display** tab.
Step 2: Here you can Add the header in the text area provided.
# Increasing Recent Transaction List Limit
## Increasing the Recent Transaction Limit in POS Screen
You can increase the number of transactions displayed in the **Recent Transactions List** on the POS screen by updating the environment configuration.
Step 1: Go to .env file in your codebase
Step 2: Search for the variable POS\_RECENT\_TRANSACTIONS\_DISPLAY\_LIMIT =
Step 3: Set a required value for this variable. e.g POS\_RECENT\_TRANSACTIONS\_DISPLAY\_LIMIT = 200
This will increase the number of recent transactions displayed on the POS screen.
# Tax Settings
# Tax Rates, Tax Groups & Disabling tax
### Tax Rates
1. To add new tax go to Settings -> Tax Rates -> Add
2. Add a descriptive name (eg: “VAT@5%”) and specify the “Tax Rate%”
[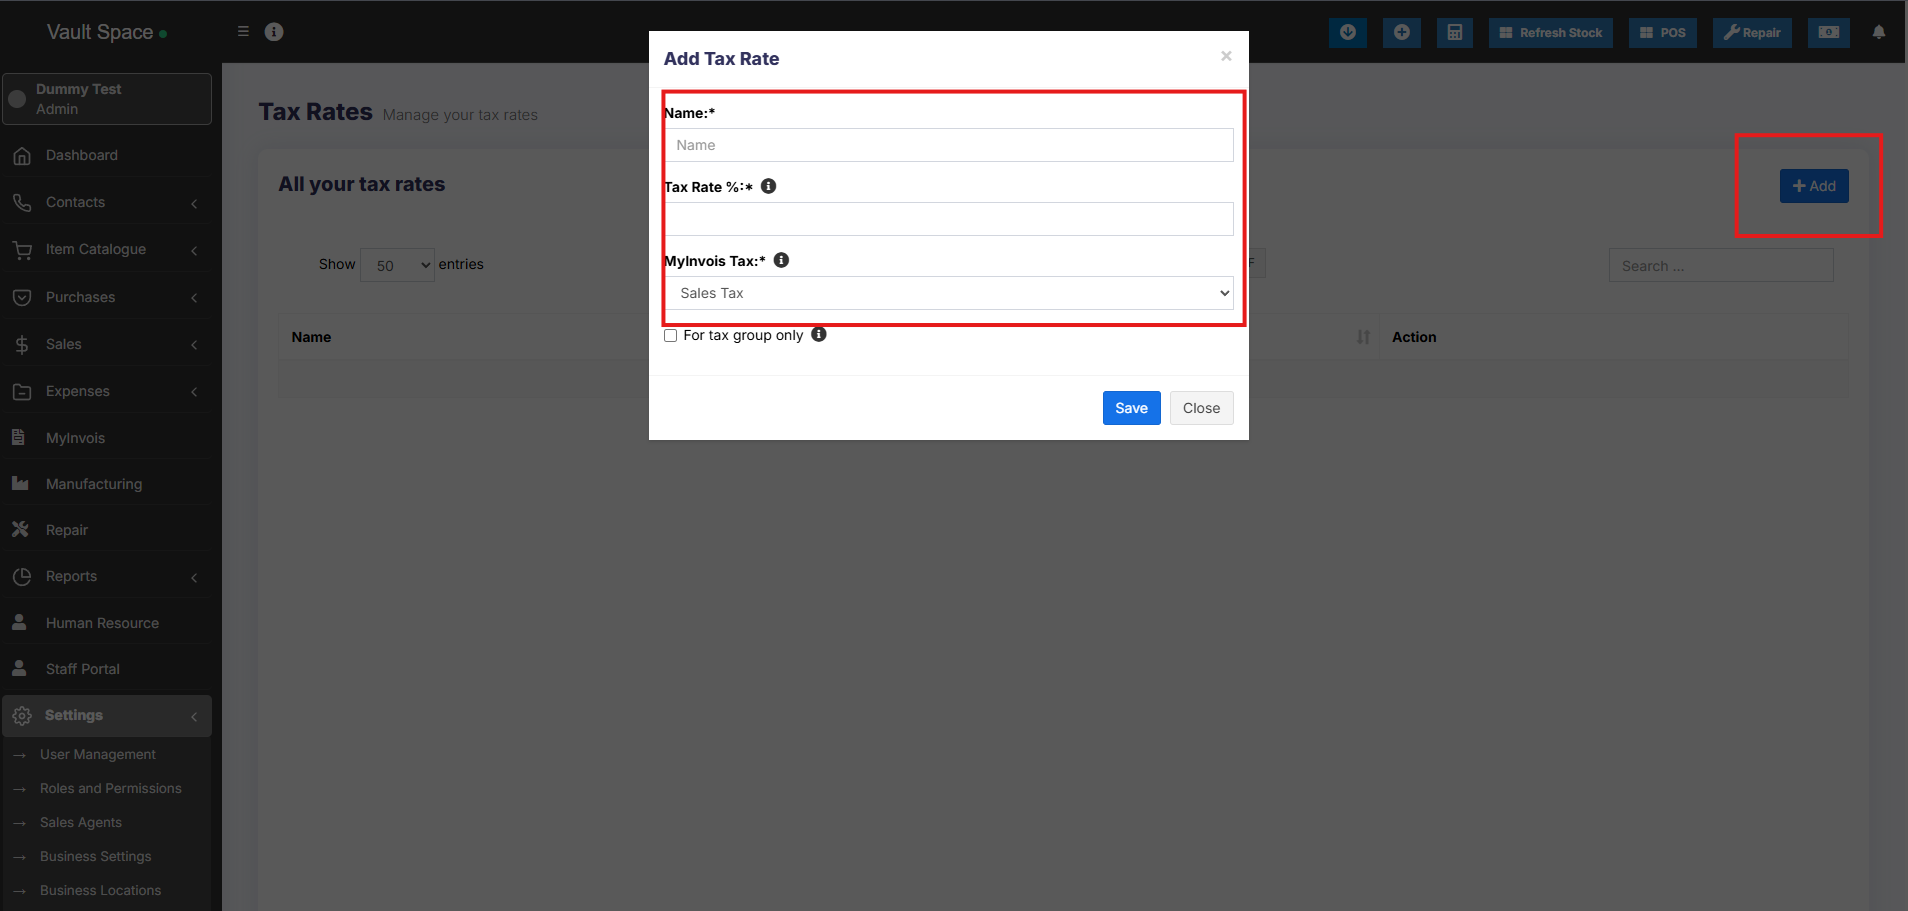](https://docs.senangurus.com/uploads/images/gallery/2025-10/Gpqimage.png)
### Tax Groups
1. Sometime you will need to apply multiple taxes to an invoice or purchase. So you should create tax groups by combining multiple taxes.
2. To add a Tax Group – Click on Add Button, Give a meaningful name, select the tax you want to use in this tax group.
3. The tax rate of tax group will be the sum of tax rates of Sub-taxes added.
4. If sub-tax is edited the corresponding tax group’s tax rate will also get updated accordingly.
5. You cannot delete a Tax if it is used in a Tax Group.
### Disable Tax
1. Don’t add Tax Rates in settings
2. Go to Settings – Business Settings.
1. Uncheck “**Enable inline tax in** purchase **and sell**“
[](https://docs.senangurus.com/uploads/images/gallery/2025-10/XEOimage.png)
If you disable the inline tax in the purchase and sell, the Price Inc tax column will not be shown in the POS screen.
# Inline tax & invoice tax
## Printing Inline Tax in Product Line in Invoice
Inline tax will be printed in product line only using Detailed Invoice design.
Follow the steps mentioned below
**Step 1:** Go to **Settings > Invoice Settings > Invoice Layout**. Select “**Detailed Invoice**” in the Design Dropdown.
[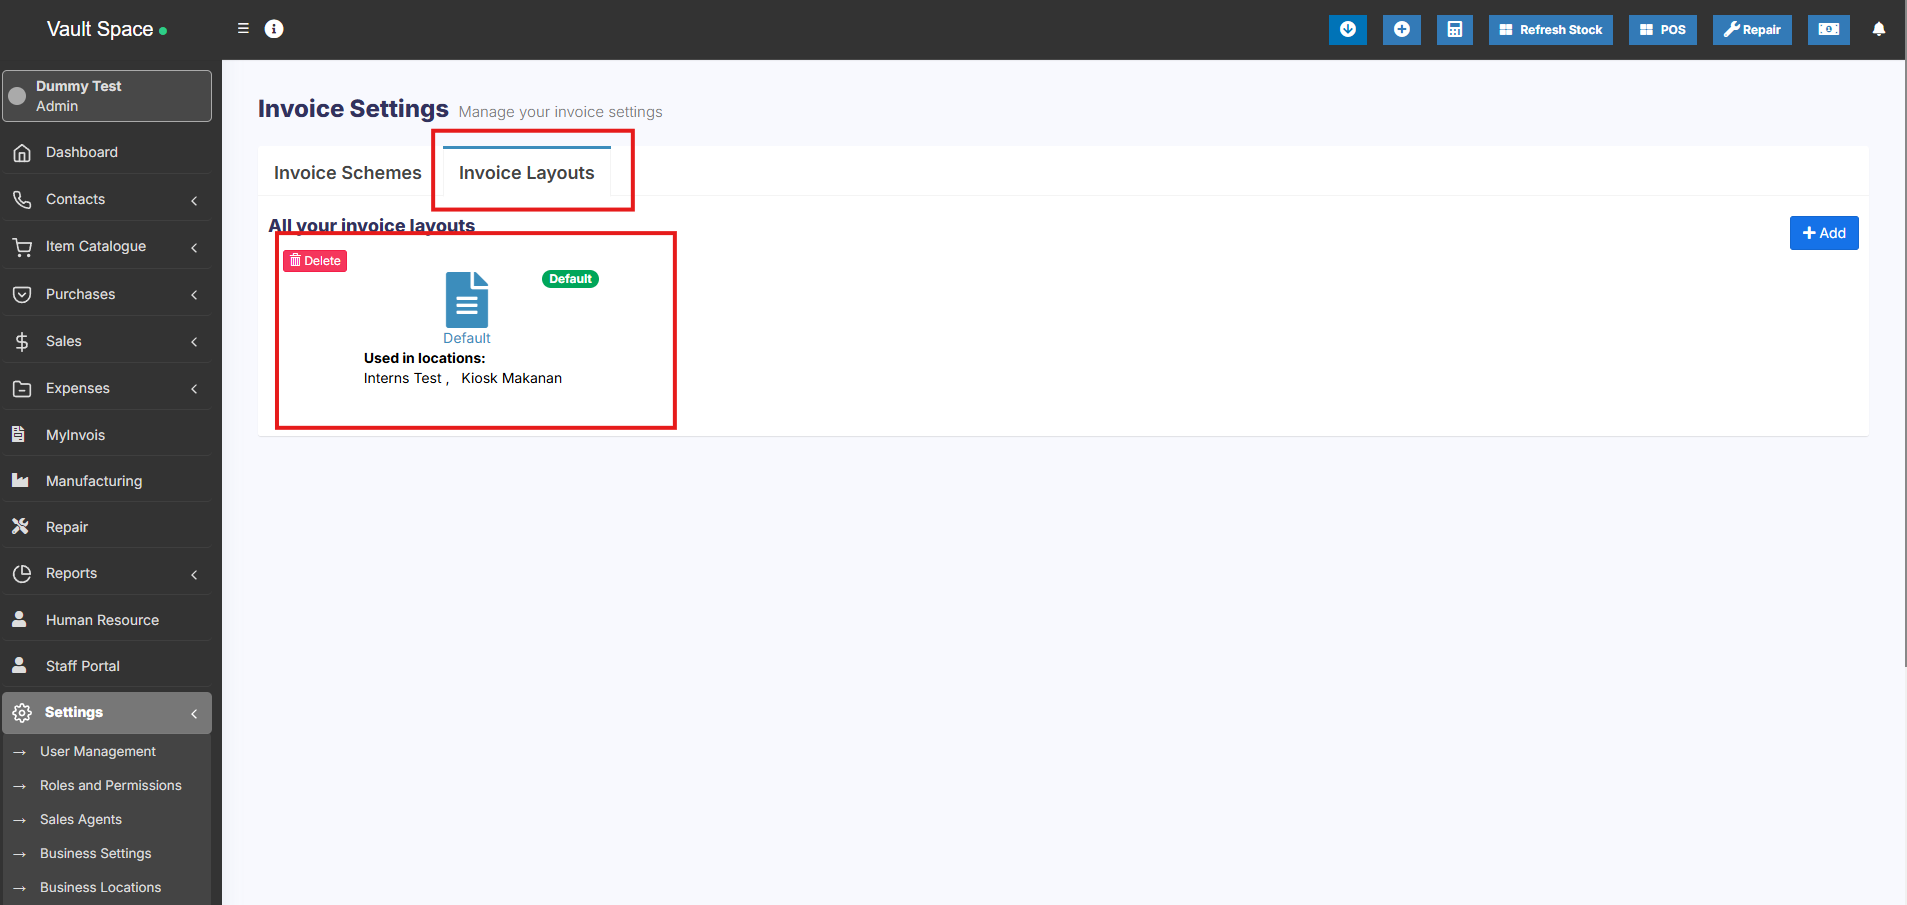](https://docs.senangurus.com/uploads/images/gallery/2025-10/oQ2image.png)
**Step 2:** Also enable the **“Tax label”** field in the same invoice layout settings.
**Step 3:** Save the changes. Now if you add the inline tax during a sale, it will be printed on the product line in the invoice.
# Payment Accounts
# Enabling & using Payment account or bank account
### What is payment accounts in SenangUrus Business?
Payment accounts are like for example bank account. You can transfer money from one payment account to another, deposit cash in payment account, pay to a supplier, or deposit the amount received from a customer here.
### Enabling Payment account
- Go to **Settings ->Business Settings -> Modules**
- Enable payment ‘Account’ option
- Save it.
- After saving you will see the “Payment accounts” option will be visible in the left navigation bar.
[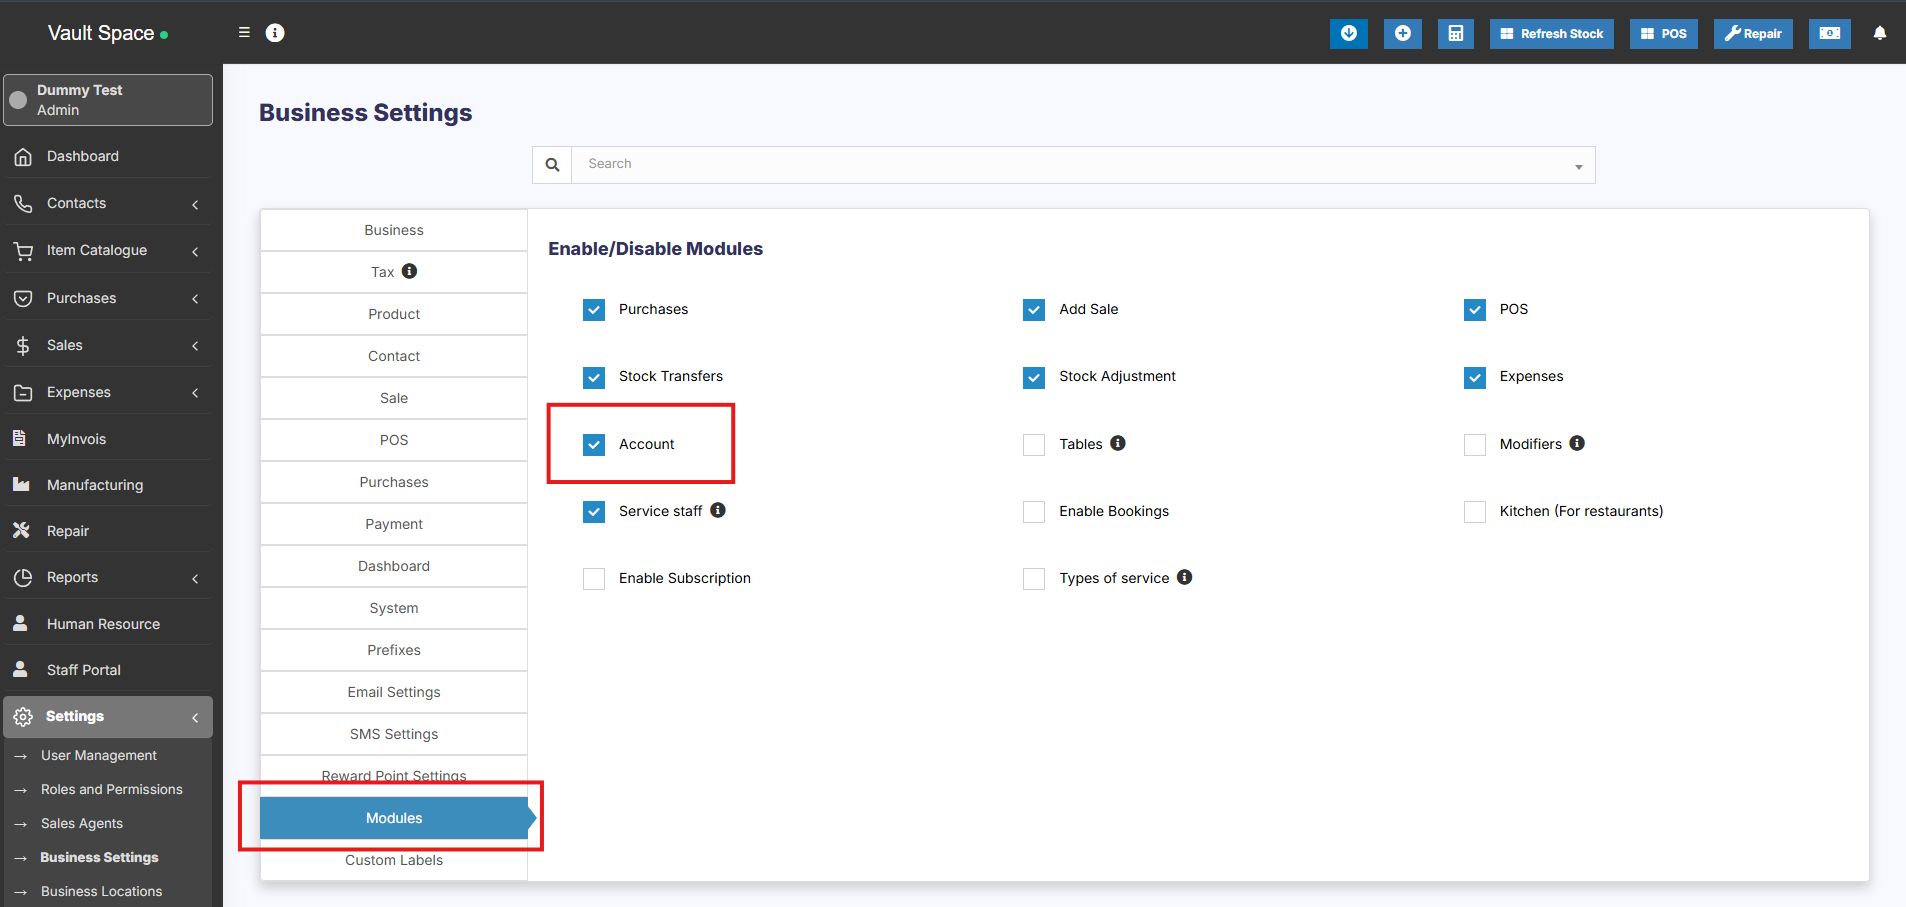](https://docs.senangurus.com/uploads/images/gallery/2025-10/3yzimage.png)
### Payment account type & sub-type
1. Go to **Payment accounts -> List accounts -> Account Types**
2. **Account type:** to add an account type click on Add button and enter the name of the account type and submit. Keep the Parent account type unselected.
3. **Sub-Account type:** To add a sub-account type click on Add button, enter the name of the sub-account type and select the Parent-account-type.
4. When creating an account you can select the account type as per your need.
### Creating Payment accounts
1. To create a payment account, Go to Payment Accounts -> List Accounts, click on Add button
2. Fill in all the details like name, account number, Account type, opening balance, Account details & notes.
3. **Account Details:** Here you can add any additional account details, like for example UPI ID, SWIFT code, BIN number, etc. which vary depending on the accounts.
### Transferring funds between Payment accounts:
You can transfer funds between the payment accounts.
In the Payment Accounts -> List Accounts, click on fund transfer.
[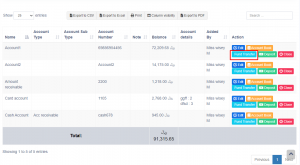](https://ultimatefosters.com/wp-content/uploads/2019/10/fundtransfer.png)
# Setting default payment accounts for payment methods
In Add/Edit business location you can select the default payment account for each payment method.
If the payment account is linked then when adding a payment for sales/purchase/expense, on selecting the payment method the payment account will be automatically selected.
[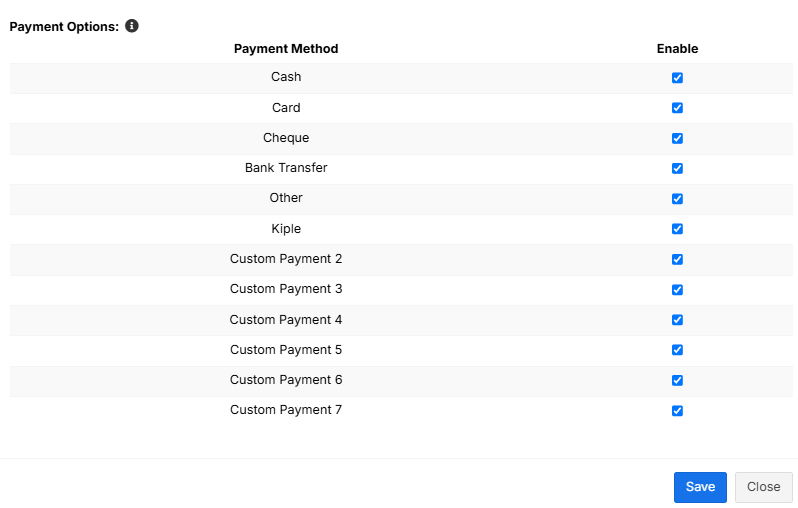](https://docs.senangurus.com/uploads/images/gallery/2025-10/FAAimage.png)
# What is Stock Adjustment? And how to use it?
# What is Stock Adjustment? And how to use it?
### Stock Adjustment
Stock Adjustment helps you decrease the goods you hold in stock, you can enter manual stock adjustments. It’s generally used to write-off damaged stock, or to adjust quantities after a stock take.
To create a stock adjustment
1. First, go to “Add Stock Adjustment”
2. Select the Business Location & date
3. Select Adjustment Type (Normal Or Abnormal). Normal Or Abnormal is generally used to classify adjustment.
Generally Normal Adjustment meaning: Adjustment for normal reasons like Leakages etc.
Abnormal meaning: Adjustment for reasons like Fire, Accident etc.
4. Add the products & quantity you want to decrease the product.
5. **Total *amount recovered*:** Sometimes you can recover some amount from the damaged stocks, like from insurance claims, selling of scraps etc. If there is no amount recovered then you can simply make it 0. The recovered amount is taken into consideration when making a profit & loss report, it is added to the total profit/loss.
[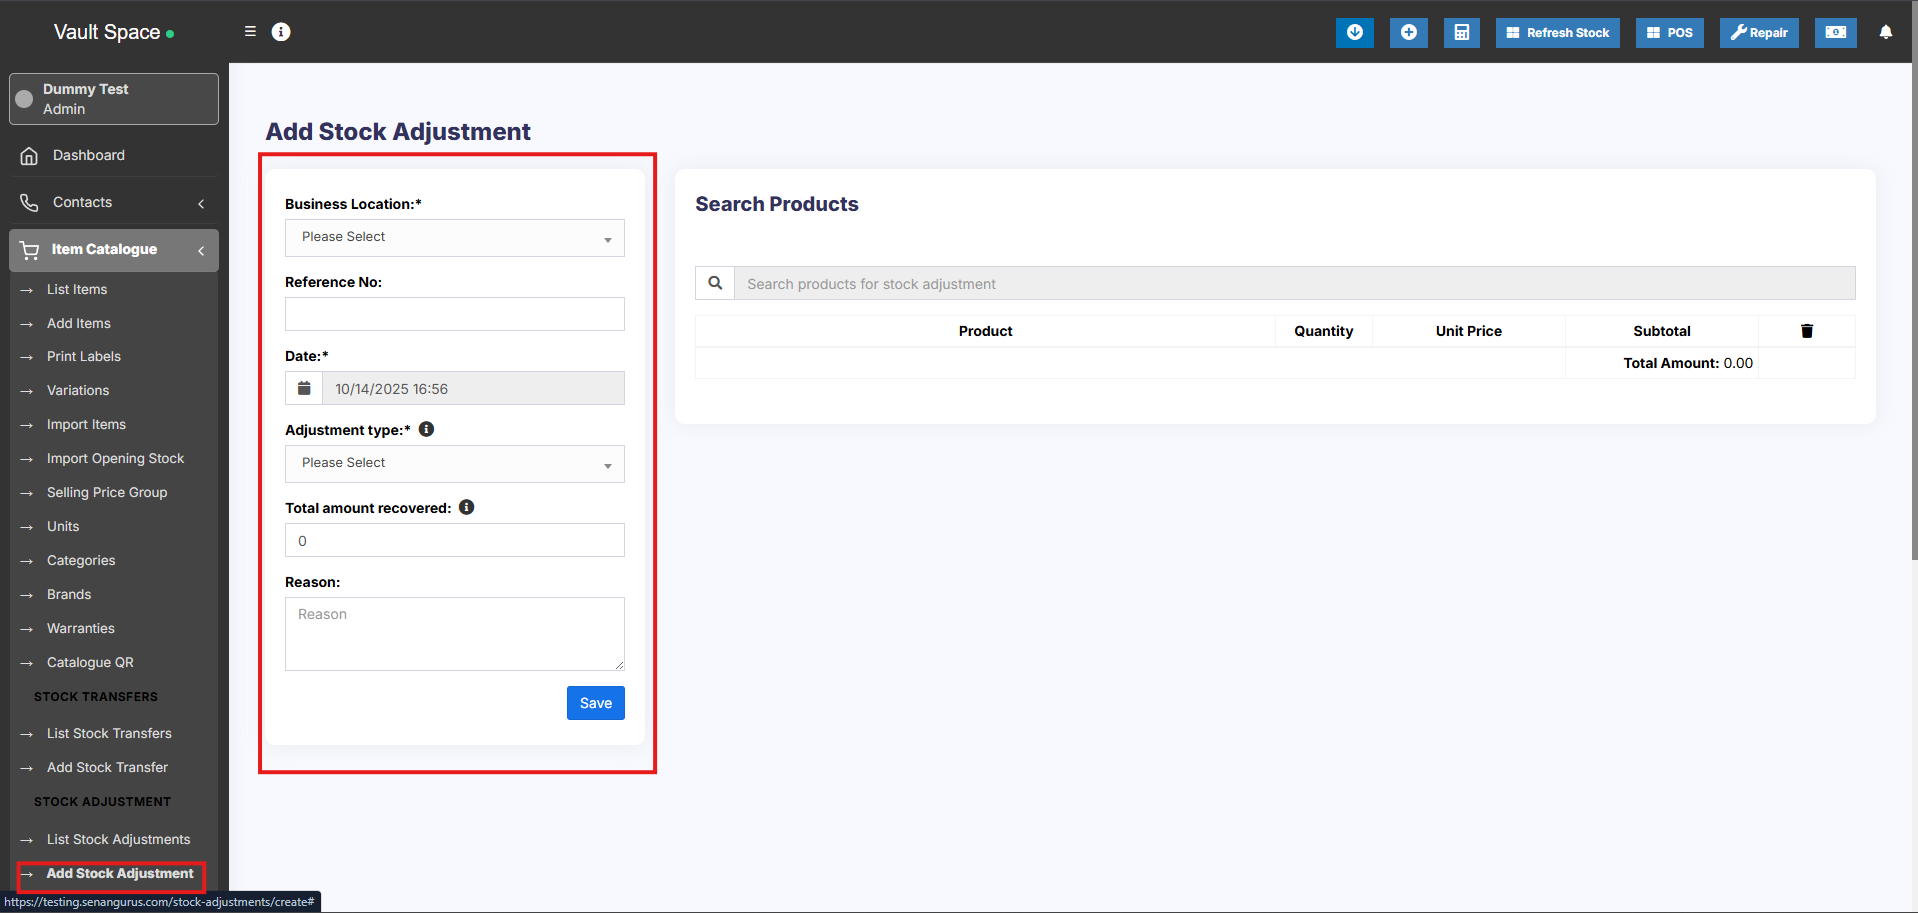](https://docs.senangurus.com/uploads/images/gallery/2025-10/bdTimage.png)
The quantities entered for each product will be deducted from the available quantities.
You can view the details of stock adjustment in “Stock Adjustment Report”.
Also, Stock Adjustment is used in Profit & Loss Report (P & L Report). “Total Stock Adjustment” amount is deducted from (P & L Report) and “Total Stock Recovered” amount is added to Profit & Loss Report.
### Show/Hide Price During Stock Adjustment
While adding a stock adjustment, you can hide the price of the product from certain users.
This can be achieved by following the steps below.
**Step 1:** Go to **User Management** > **Roles**
**Step 2:** Click the **edit** button of the required role, e.g., Warehouse Worker
**Step 3:** Under the Product Section, you can disable the ‘View Purchase Price’ checkbox. If this is disabled, the user with the particular role can’t see the price while adding a stock adjustment.
[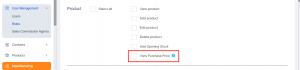](https://ultimatefosters.com/wp-content/uploads/2018/02/role-1.png)
# Reports
# Reports
Reports help you to get an overview of your entire business.
To view report click on Reports & Select the report you want to view.
Some Reports come filter relevant options to help you analyze your business better.
[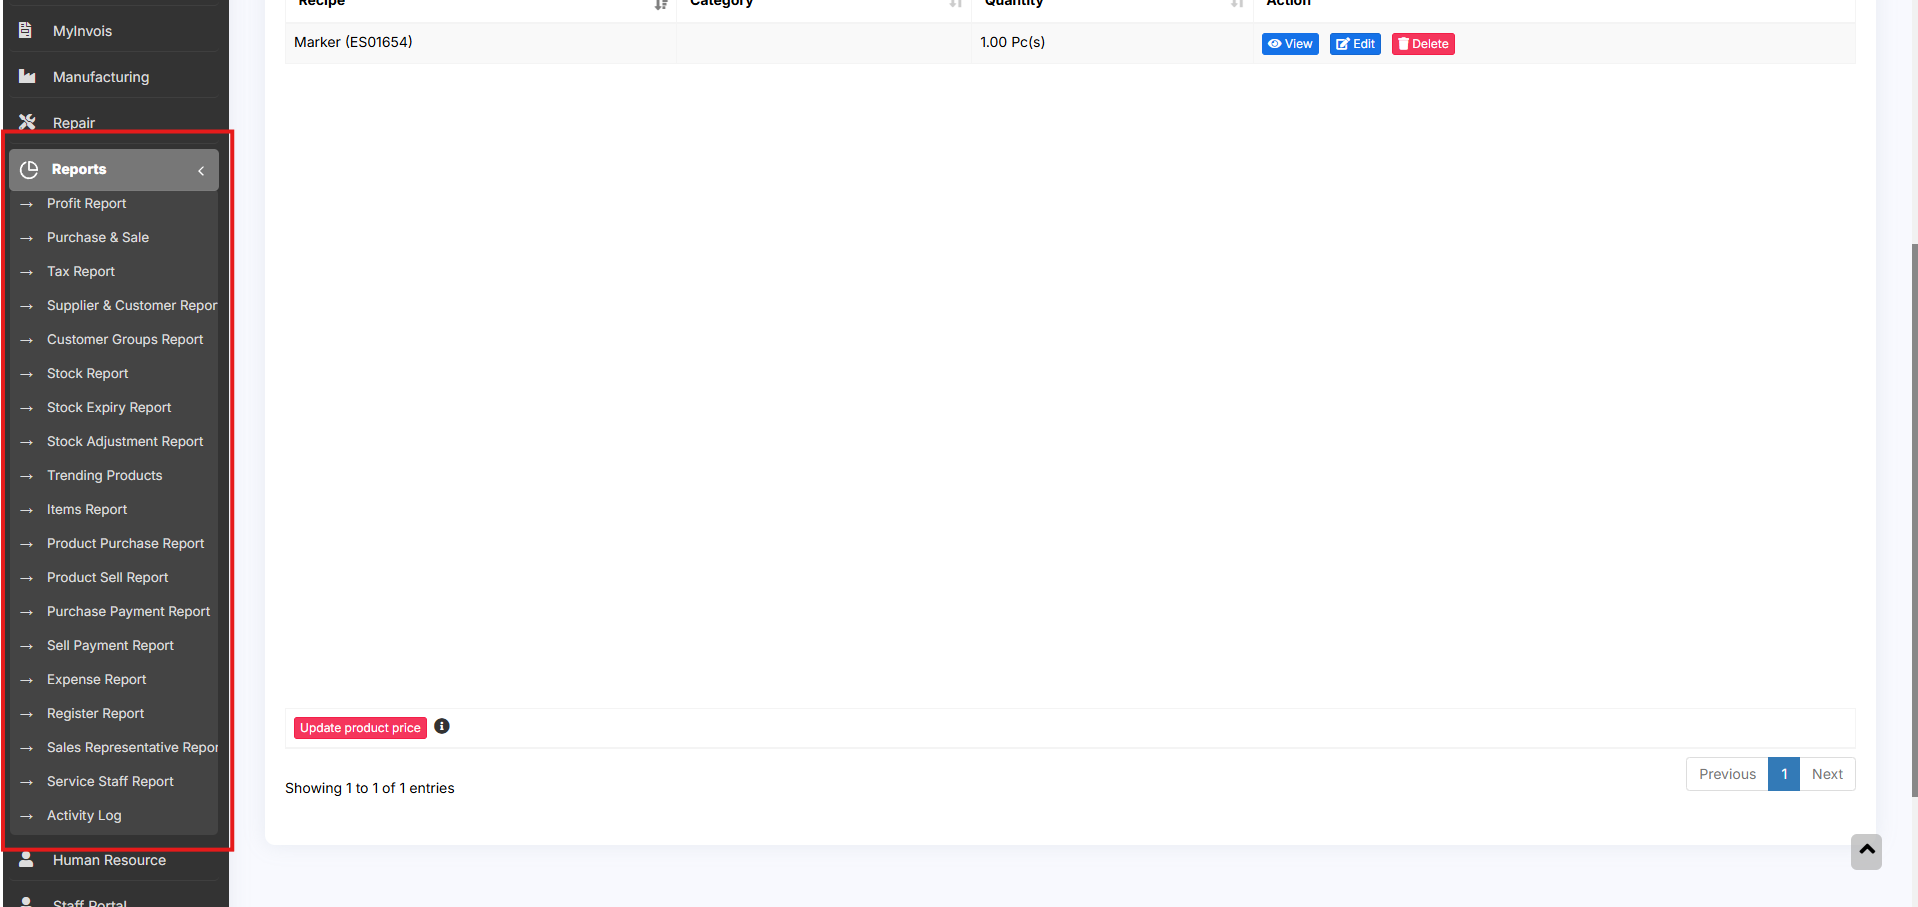](https://docs.senangurus.com/uploads/images/gallery/2025-10/bIzimage.png)
## Purchase & Sale Report
This report shows the total purchase, Purchase Including tax, Purchases with Dues amount; and Total Sale, Sale Including tax, Sale Due.
[](https://docs.senangurus.com/uploads/images/gallery/2025-10/glRimage.png)
## Tax Reports
Shows the Input & Output Taxes.
[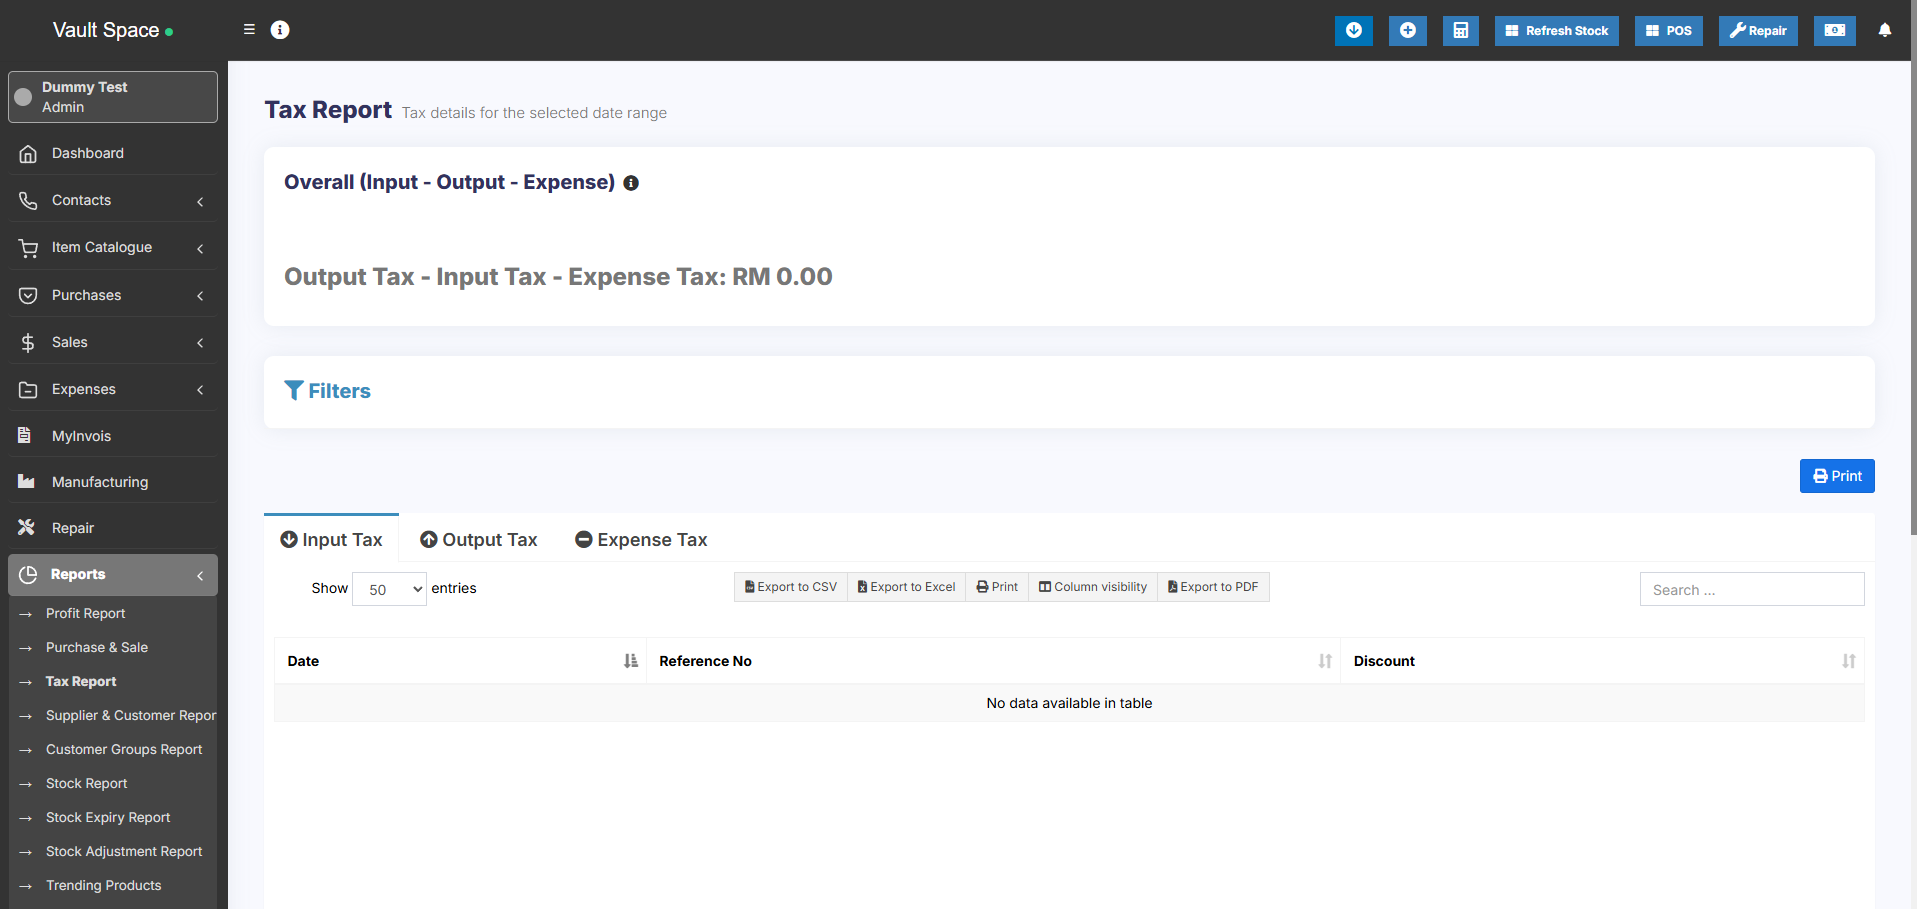](https://docs.senangurus.com/uploads/images/gallery/2025-10/W9Bimage.png)
## Contacts Report(Customers & Suppliers Reports)
This report shows the details of Purchase & Sell with all contacts (Suppliers & Customers) and also any Due amount. Positive Due amount indicates payment by contact, negative indicates payments to the contact.
[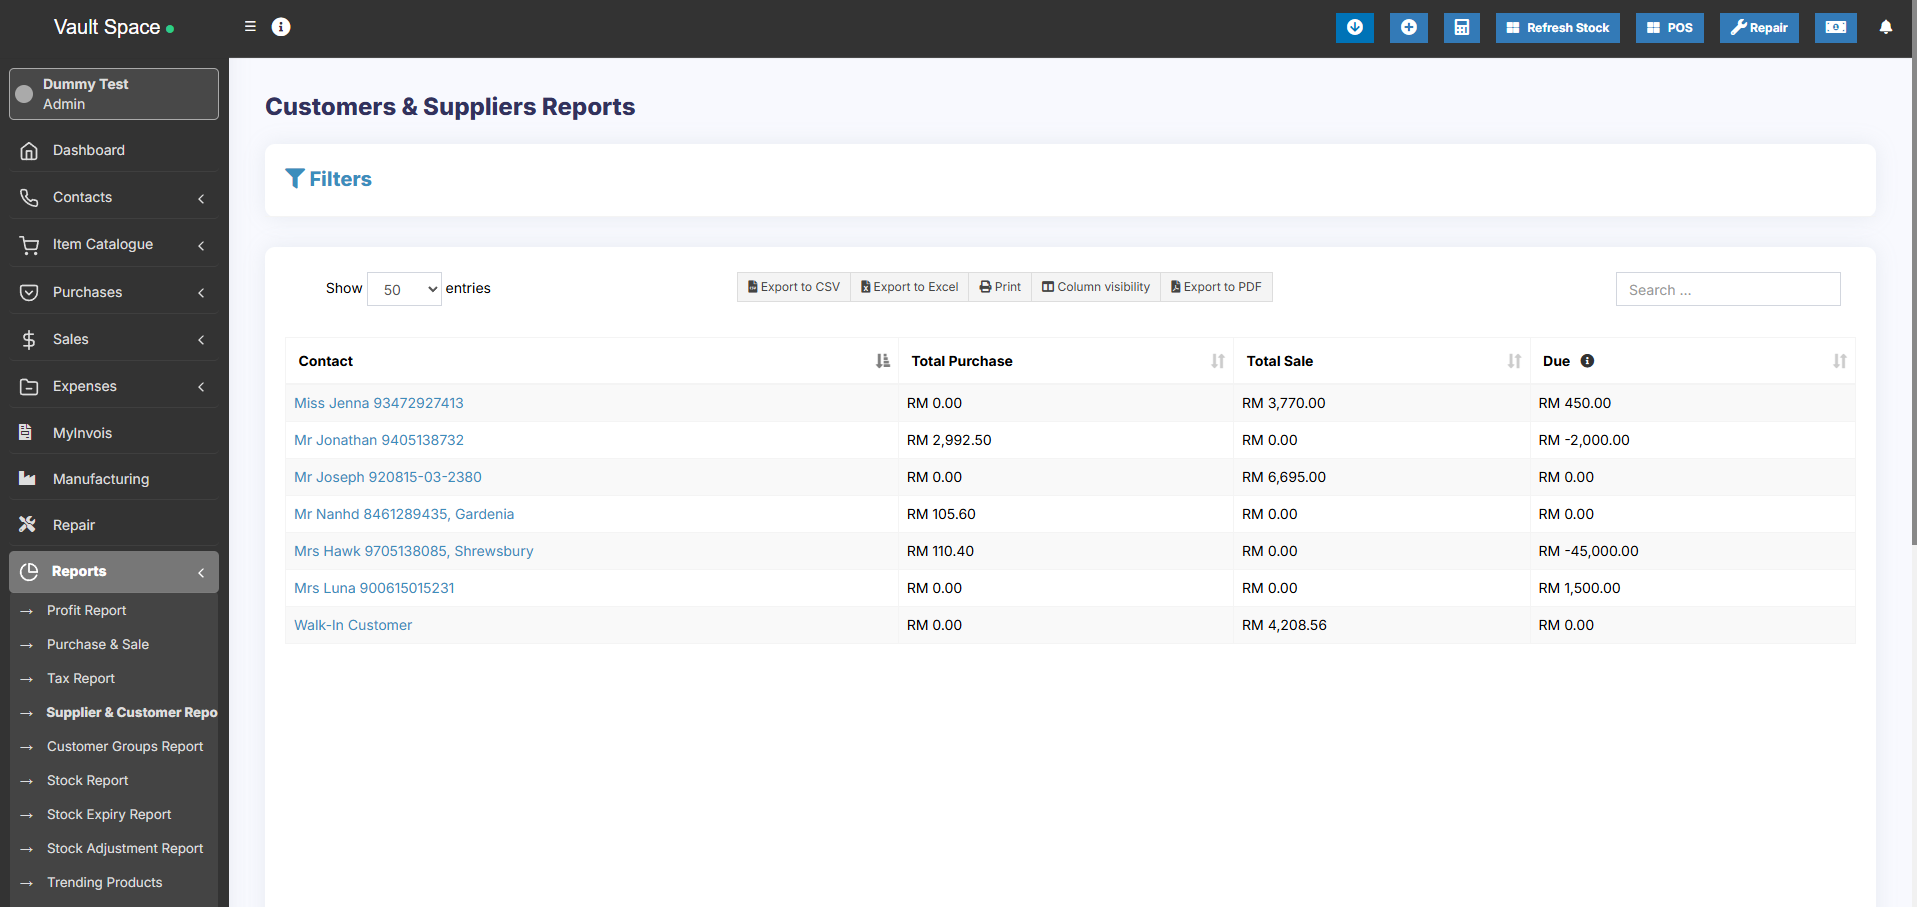](https://docs.senangurus.com/uploads/images/gallery/2025-10/ps8image.png)
## Stock Report
The stock report displays the stock details. With this, you can track the remaining stock and total sold quantity sold for all products.
**For variable products** – you can click on the Green Plus button before the SKU column to get details stock reports for each product variations.
[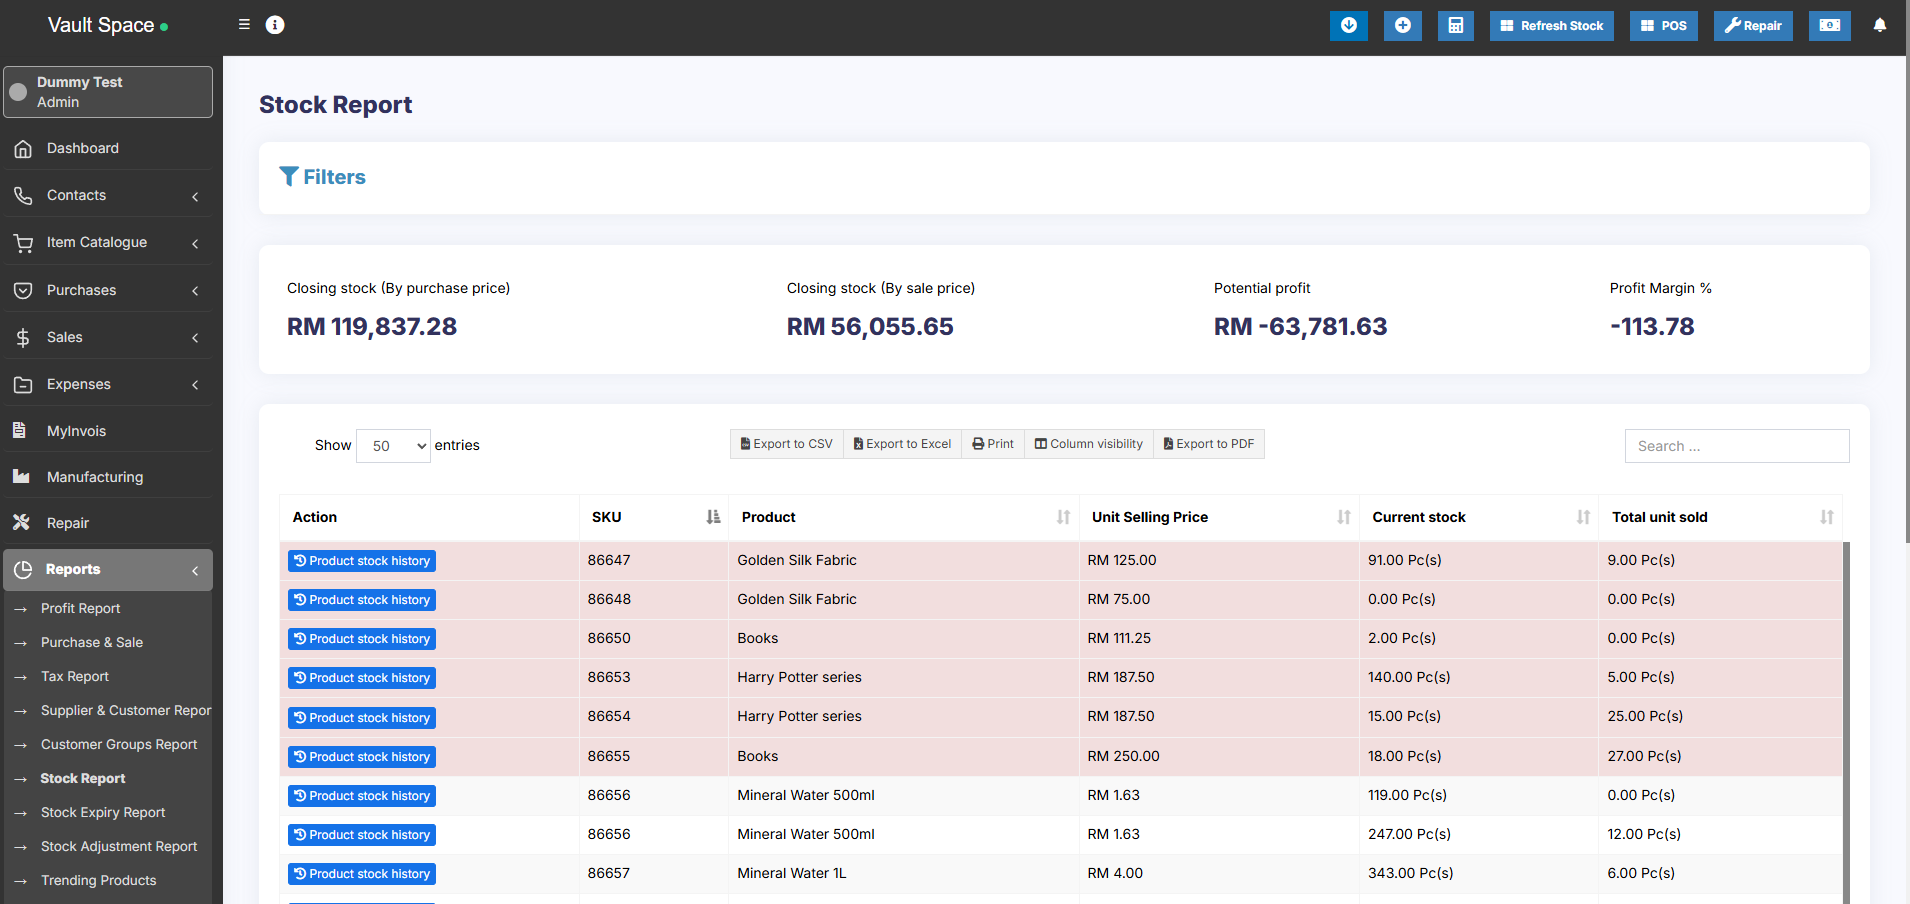](https://docs.senangurus.com/uploads/images/gallery/2025-10/c3mimage.png)
### Stock value by Purchase & sales price
In the stock report, you can also get information about the current stock value based on their purchase price & value based on selling price. Check the below screenshot of stock report.
[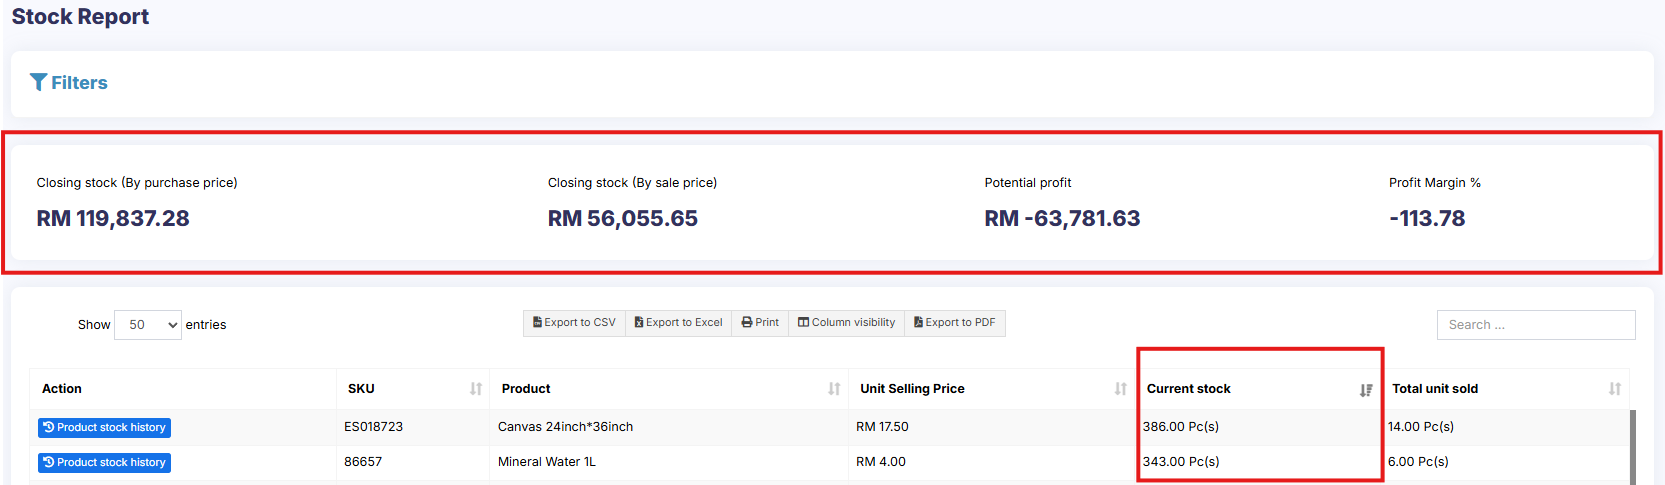](https://docs.senangurus.com/uploads/images/gallery/2025-10/stockvalue.png)
### Tracking product stock report with date
To check the product stock report date wise, use the ‘**product stock history**‘ link in the stock report.
[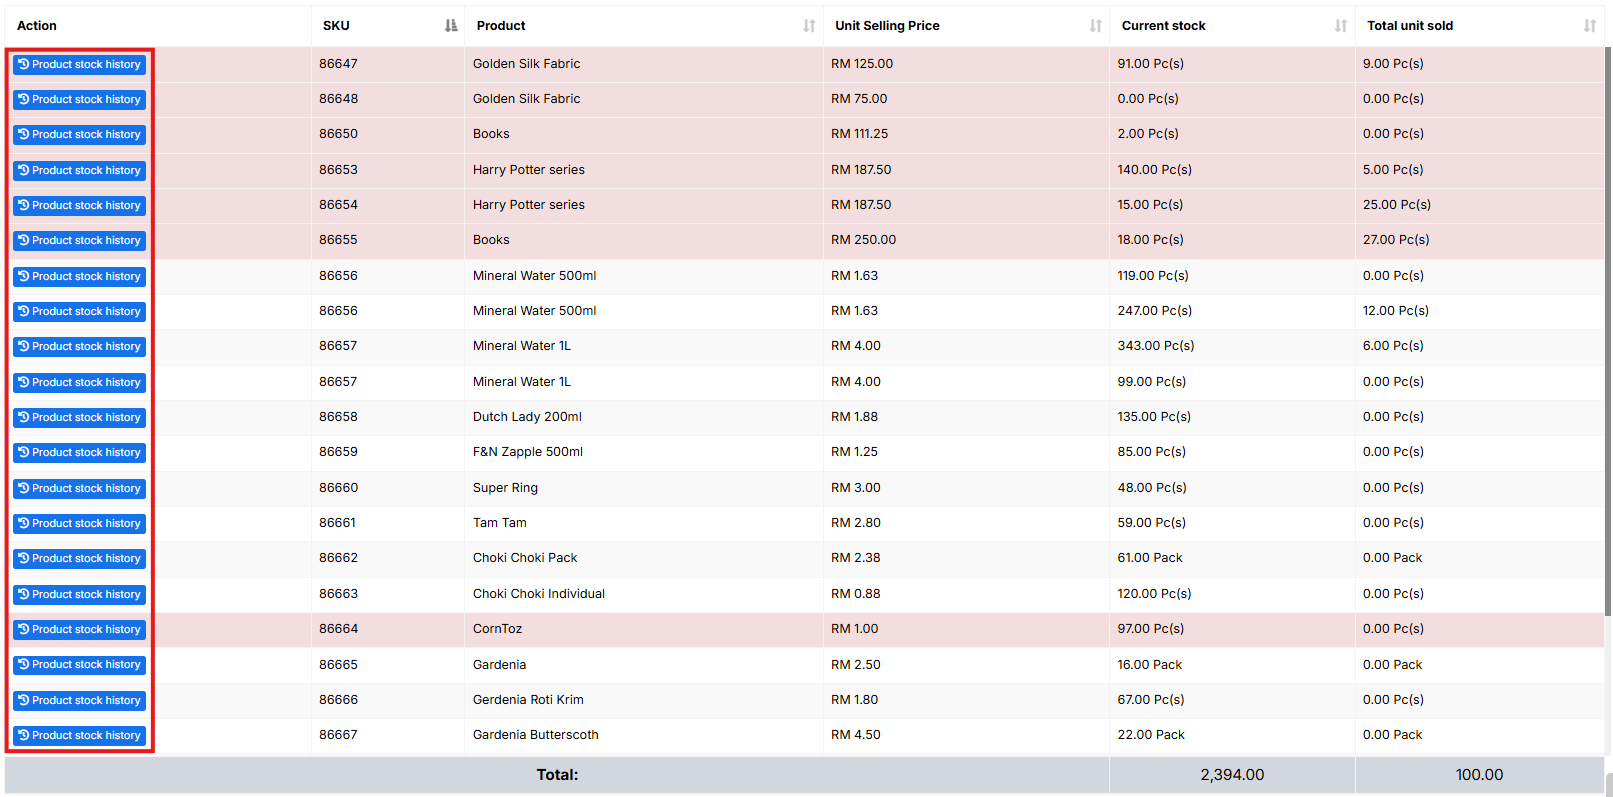](https://docs.senangurus.com/uploads/images/gallery/2025-10/product.png)
## Trending Products Report
- This report helps you to determine the demand of the products.
- You can apply different filters to filter the product.
- Select a Business Location to view trends for a particular business location.
- Select Product Category, Sub-Category, Brands, Units, Date Range to filter them.
- Set “*No. of products*” to view the top that amount of product. Using this you can view Top 5, Top10 or any number of top products.
## Expense Report
Expense report helps you to analyze expenses for business locations and also analyze based on expenses categories.
## Register Report
View details of all registers and filter registers based on User and/or Status (Open or Closed)
## Sales Representative Report
- View Sales and Expenses details of Sales representative
- Filter them with User, Business Location, Date Range
## Grouping Invoices in Product Sell Report
Invoices are grouped based on certain criteria in the product sell report for the user’s convenience.
Go to **Reports** > **Product Sell Report** and click the **Grouped** tab.
The criteria used for grouping invoices here are date and product name.
For example; All Butter Cookies sold today will be shown in one row, and Butter Cookies sold yesterday will be shown in another row. Similarly for each product the invoices are grouped based on date and product.
### Video Demonstration:
# Expense Management
# Expense Refund
**Expense Refund:**
To add a refund for an expense, add a new Expense with the “Is Refund” checkbox checked in the add/edit expense. You have to enter the refund amount and the refund payment details. The refunded amount will be added to the Net-Profit.
# Adding expenses, Adding expenses for an employee or customer or supplier
SenangUrus Business allows you to add expenses for an employee. This expenses can be Salary, Bonuses, Perks, travel expenditure or anything else.
– Simply create a category for the expense you’re adding. Adding relevant categories helps you to classify expenses and analyze them.
– Go to Add Expenses, fill the details, select the relevant category and select the employee name expense for fields.
– Add the expense.
– To view details of all expenses for an employee go to “Sales Representative Report” and select the User. It will show the total expenses for the employee. You can also view the list of expenses from there.
**Expense for Contact** (Customer or Supplier): To add expense for a customer or supplier select the customer/supplier name from the expense for contact dropdown.
## Setting default tax for expense:
**Step 1: Open the File**
Navigate to the file path pos/resources/views/expense/create.blade.php to open the add expense blade file.
**Step 2: Find the Tax Dropdown Label**
In the add expense blade file, search for the tax dropdown label. You can use the code to search for the label.
**Step 3: Set Default Value for the Tax Dropdown Label**
Once you have found the tax dropdown label, you can set the default value for it. This can be done by referring to the following links:
[Link1](https://stackoverflow.com/questions/27892437/add-default-value-to-select-list-in-laravel-formselect)
[Link2](https://laracasts.com/discuss/channels/laravel/how-can-i-set-the-default-value-laravel-select-element-1)
[Link 3](https://laracasts.com/discuss/channels/laravel/how-can-i-set-the-default-value-laravel-select-element-1)
If you have less coding knowledge, you can refer to the add sale blade file located in the resources/views/sell/create.blade.php in the POS codebase. This file can serve as a reference for the required code.
# Notifications
# Notifications Settings [Email & SMS configuration]
[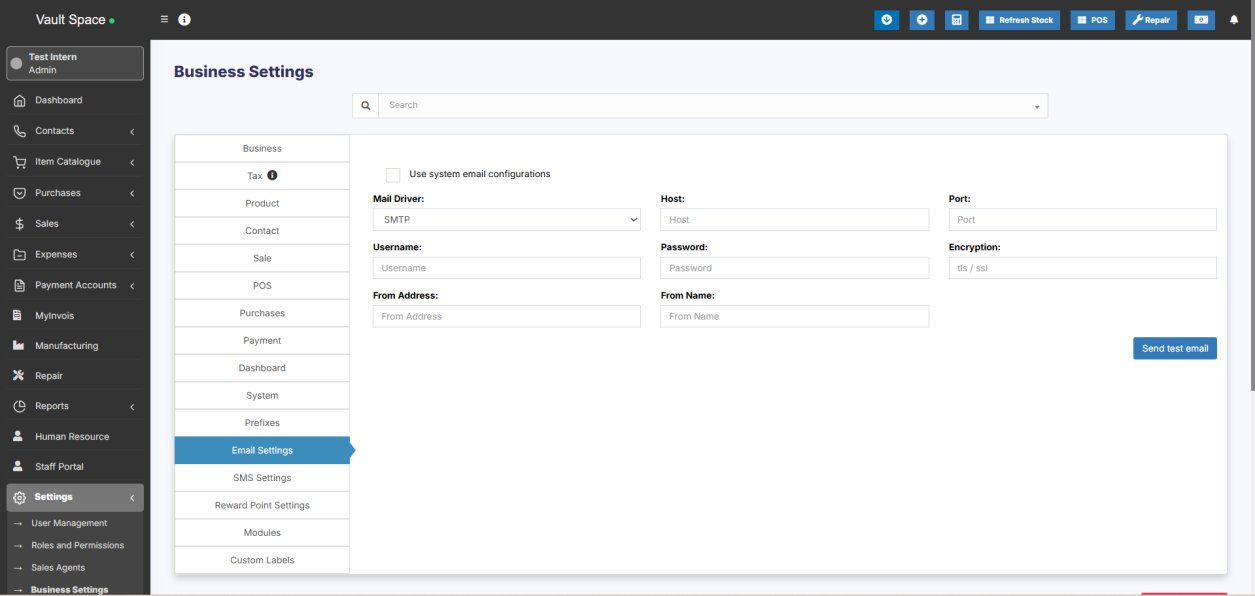](https://docs.senangurus.com/uploads/images/gallery/2025-10/tIRimage.png)
### Setting Notification SMS
To Send SMS notifications you need to setup SMS configuration details.
Go to -> Business Settings -> SMS settings
from here we can set up SMS for most of the vendors having support for REST API, most of the support it. If not then check with your provider
Go to the REST API documentation of your vendor. Contact your vendor if you can’t find it.
Here you’ll find 3 different service type: Nexmo, Twilio, and others.
### Setting up SMS for NEXMO
1. Create a new account in nexmo.
2. From your nexmo dashboard, go to account settings, here you’ll find the API key and secret, the From field enter the from the number provided by nexmo. Enter these details in the pos and try sending a test message.
### Setting up SMS for twilio
1. Go to Twilio & login with your account.
2. Get the SID, Access token, and From information. On your project Twilio Dashboard, you can find the Account SID and Auth Token
3. Save it and try sending a message
### Setting up SMS for others
Let the api structure is
http://your-sms-website.com/api/sendmsg.php?user=&pass=&sender=&phone=&text=
So the configuration will be as follows
**URL**: https://rest.nexmo.com/sms/json
**Send to parameter name**: phone
**Message parameter name**: text
**Request Method**: GET
**Parameter 1 key**: user **Parameter 1 value**:
**Parameter 2 key**: pass **Parameter 2 value**: **Parameter 3 key**: sender **Parameter 3 value**:
### Example Four: Setting up SMS for others
Let the api structure is
$api\_url = “http://sms-pos.testsms.com/app/smsapi/index.php?username=&password=&campaign=XXXXXX&routeid=XXXXXX&type=text&contacts=97656XXXXX,98012XXXXX&senderid=XXXXXX&msg=Hello+People%2C+have+a+great+day”;
So the configuration will be as follows
**URL**: http://sms-pos.testsms.com/app/smsapi/index.php
**Send to parameter name**: contacts
**Message parameter name**: msg
**Request Method**: GET
**Parameter 1 key**: username **Parameter 1 value**:
**Parameter 2 key**: password **Parameter 2 value**:
**Parameter 3 key**: campaign **Parameter 3 value**: XXXXXX
**Parameter 4 key**: routeid **Parameter 4 value**: XXXXXX
**Parameter 5 key**: type **Parameter 5 value**: text
**Parameter 6 key**: senderid **Parameter 6 value**: XXXXXX
### Setting headers:
If required in your api, you can also set headers
**Header 1 key**: **Header 1 value**:
**Header 2 key**: **Header 2 value**:
**Header 3 key**: **Header 3 value**:
### Setting Notification Email
Go to Settings -> Business Settings -> Email settings
Add all the Email SMTP configuration details & it will work.
### Business-level mail setup
For sending mail notifications, the business-level mail setup should be done.
For this provide the required details in Settings -> Business Settings -> Email settings
### Application-level mail setup
For the purpose of receiving forgot password reset link, the application-level mail setup is to be done on .env file.
Refer this – [Document Link](https://docs.senangurus.com/books/senangurus-business/page/setting-up-emailsmtp-for-forgot-password-other-email-notifications)
#### **FAQ:**
**1. Is it possible to send SMS when installing in localhost?**
Yes it is possible to send SMS from localhost with an internet connection
**1. Whether SMS feature work without adding country codes to mobile numbers?**
Some APIs will work without adding country code and some may not. It is based on your API provider.
# Setting up Email/SMTP for Forgot password & other email notifications
Email functionality is used in some parts of applications like “Forgot Password”, “Offline Payment approval for SaaS module” and others from time-to-time.
During installation steps, you can set up email setting with all “SMTP” details or if you’re server support php-mail then you can use that too (php-mail is not recommended)
But if you have not set up it correctly then you can follow the below steps to do it:
- Open you .env file
- You will find the below configurations present there
- MAIL\_DRIVER=smtp
MAIL\_HOST=
MAIL\_PORT=
MAIL\_USERNAME=
MAIL\_PASSWORD=
MAIL\_ENCRYPTION=
- Fill in the appropriate details, you can get in contact with your hosting provider for any of the values above.
- For example with Gmail it looks like below:
- MAIL\_DRIVER=smtp
MAIL\_HOST=smtp.gmail.com
MAIL\_PORT=587
MAIL\_USERNAME=
MAIL\_PASSWORD=
MAIL\_ENCRYPTION=TLS
- Some hosting disable port 587 and due to that email may not work, contact your hosting provider & they will enable it.
- **NOTE**: Use either TLS or SSL, don’t type both. Also, provide the port according to the given encryption used.
## Gmail SMTP:
If you’re using Gmail or GSuite it might throw some errors, check below for a solution:
1. If you have **2-factor authentication enabled** (almost all have this enabled) then create an app password for pos.
1. More details here https://support.google.com/accounts/answer/185833?hl=en
2. Create app password from here: https://myaccount.google.com/apppasswords
2. **Change port & encryption:** Try using port 465 and encryption SSL
# Enable or Disable Auto Sending of notifications
### Enabling auto-sending of SMS & Email to customer on New Sales:
[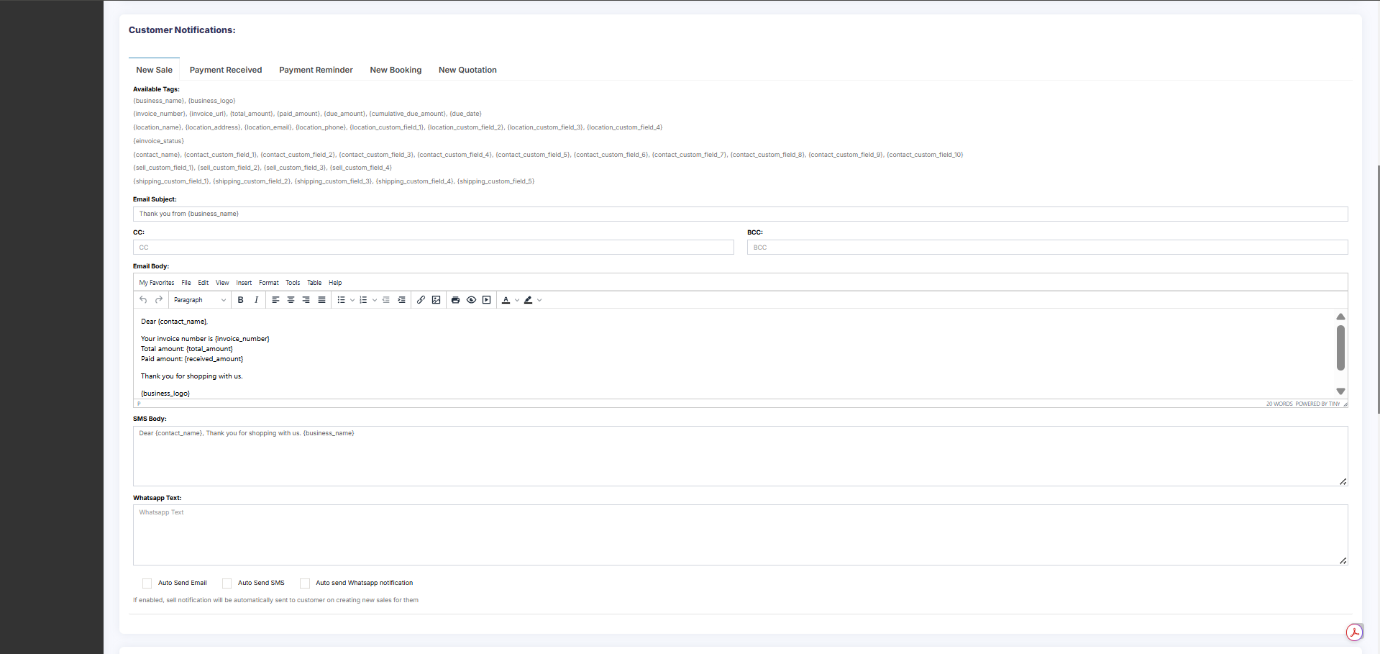](https://docs.senangurus.com/uploads/images/gallery/2025-10/MBbimage.png)
1. First, setup the Email SMTP and/or SMS details in Business settings.
1. [SMS Documentation](https://docs.senangurus.com/books/senangurus-business/page/notifications-settings-email-sms-configuration)
2. [Email SMTP Documentation](https://docs.senangurus.com/books/senangurus-business/page/setting-up-emailsmtp-for-forgot-password-other-email-notifications)
2. Go to **Notification Template**
3. Under **Customer Notification** you will see **New Sales** notification.
4. There you will find the option to enable &
5. Now when ever you make a sales a Email or SMS notification will be send to customer.
If there is any error in Email or SMS configuration then sales will not get submitted, so test it properly.
Email notification will only get send in case the customer have a valid email present
Similarly SMS will only get send if the mobile number is present.
### Enabling auto-sending of Whatsapp Notification on New Sale:
[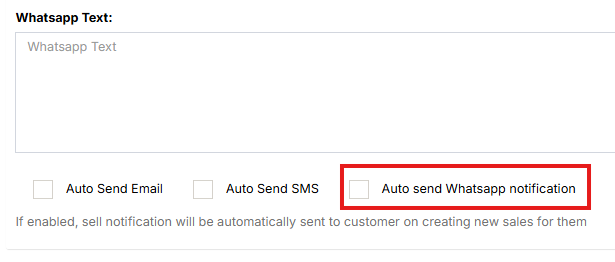](https://docs.senangurus.com/uploads/images/gallery/2025-10/autowhatt.png)
To enable automatic WhatsApp notifications, enable the ‘**Auto send Whatsapp Notification**‘ check box under **Customer Notification > New Sale.**
# Browser/Desktop notification using pusher
Browser notification helps the user to get notified of any notification quickly.
### Requirement:
Your POS must use **https** or must have an SSL certificate installed.
### Steps to enable it:
**Setup pusher:**
1. 1. Signup for a pusher account here https://pusher.com/
2. Login to your pusher account.
3. Click on “Create new app”
4. Enter the details:
*Name your app,*
*Select a cluster,*
*What’s your front-end tech?* will be jQuery
*What’s your back-end tech?* will be Laravel.
Click on “Create my app” and after that, you will find the pusher details as given in the screenshot below\\
**Setup in SenangUrus Business:**
1. If you’re using the [SaaS-Superadmin](https://ultimatefosters.com/recommends/saas-superadmin/ "SaaS & Superadmin") module then go to
Superadmin Settings -> Pusher Settings -> Enter the details:
PUSHER APP ID, PUSHER APP KEY, PUSHER APP SECRET, PUSHER APP CLUSTER and save it.
2. If not using SaaS-Superadmin, then login to cpanel/directadmin or FileZilla, open the **.env** file present in the pos code for editing. Then you will find the pusher related configuration. Enter the below configuration:
BROADCAST\_DRIVER=pusher
PUSHER\_APP\_ID=<your pusher app id>
PUSHER\_APP\_KEY=<your pusher app key>
PUSHER\_APP\_SECRET= <your pusher app secret>
PUSHER\_APP\_CLUSTER=<your pusher app cluster>Save the file and the notification will work.
Pusher notifications will not support on IOS devices. You need to disable pusher notifications in IOS for SenangUrus Business.
# Email Notification Settings
## Email Setup in Business Settings:
Emails to customers/suppliers and users can be sent through UltimatePOS for various purposes.
For example, Sale/Purchase Email Notification, Recurring Invoice Notifications etc
In order to send these notifications, the email details are to be set up in Business Settings.
#### Steps for Setting Mail Details
Follow the steps below to add this
**Step 1**: Go to Settings > Business Settings > Email Settings.
**Step 2:** Add the required details
- MAIL\_DRIVER=smtp
MAIL\_HOST=
MAIL\_PORT=
MAIL\_USERNAME=
MAIL\_PASSWORD=
MAIL\_ENCRYPTION=
You can get in contact with your hosting provider for any of the values above.
For example with Gmail it looks like below:
- MAIL\_DRIVER=smtp
MAIL\_HOST=smtp.gmail.com
MAIL\_PORT=587
MAIL\_USERNAME=
MAIL\_PASSWORD=
MAIL\_ENCRYPTION=TLS
Some hosting disable port 587 and due to that email may not work, contact your hosting provider & they will enable it.
Use either TLS or SSL, don’t type both. Also, provide the port according to the given encryption used.
**Step 3:** After adding all the details, click the test SMS button to check if the configuration is correct.
If it gives some error, you can fix it accordingly.
If you are using GMAIL SMTP check the procedure mentioned in this document – [Gmail-SMTP\_Document](https://docs.senangurus.com/books/senangurus-business/page/setting-up-emailsmtp-for-forgot-password-other-email-notifications)
# Internal System Notification
SenangUrus Business generates notifications internally for certain activities.
The notification icon is present on the home screen, which when clicked displays the notifications in a pop-up window.
Following is the list of activities for which notifications are generated in SenangUrus Business
**1.Recurring Expense Notification**
- Whenever a recurring expense is generated at a specific time, it is notified.
2\. **Recurring Invoice Notification**
- Whenever a recurring invoice is generated at a specific time, it is notified.
- Whenever a document is shared with other users or updated, the other user will be notified about it.
4\. **New Leave Notification** (HRM Module)
- Whenever a user applies for a leave, the admin is notified about it.
5\. **Leave Status Notification** (HRM Module)
- Whenever the admin approves or cancels a leave, the user is notified about it.
6\. **Payroll Notification** (Essentials Module)
- Whenever a payroll is added for an user, the user will be notified about it.
- **NOTE**: To generate this notification, the “Send Notification” check box should be enabled while adding the payroll.
- Whenever the subscription expires, a notification is sent to the user regarding it.
- **NOTE:** The days before which the notification is to be sent before the subscription expires can be mentioned in settings.
- Whenever all orders are synced from the Woocommerce App to POS notification is received in POS.
# Settings
# How to Search in Settings?
Settings is overwhelming. There are a lot of options in here. So in **SenangUrus ERP** we implemented as easy way to search for any option. Follow the screenshot below.
[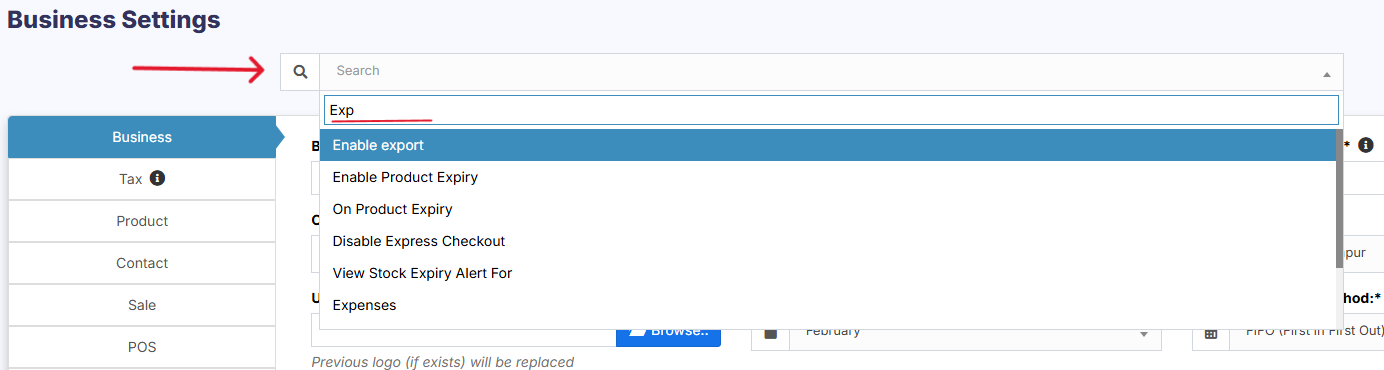](https://docs.senangurus.com/uploads/images/gallery/2025-10/screenshot-2025-10-13-170000.png)
# Business Settings
Business Settings allows you to set some of the common business-related information.
**Here you can change:**
[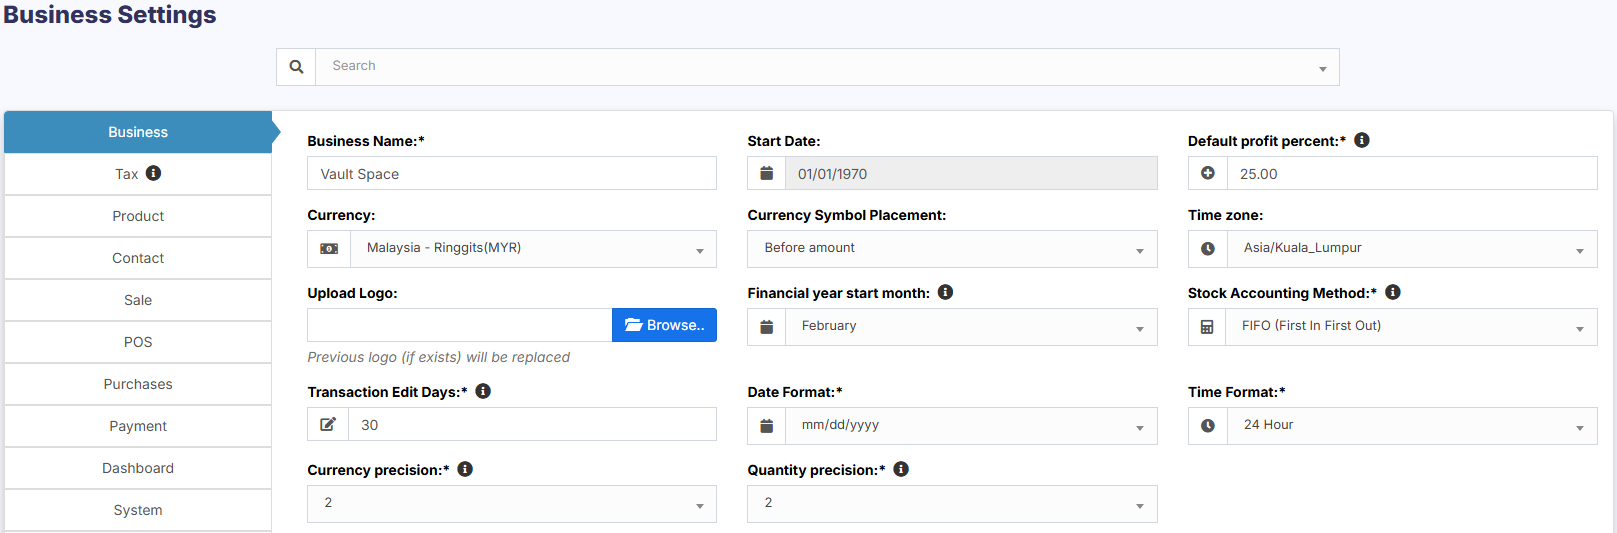](https://docs.senangurus.com/uploads/images/gallery/2025-10/Wrkimage.png)
- Business name
- Start Date
- Set Default Profit margin
- Currency
- Timezone
- Logo
- **Financial year**: For some countries, the financial year starts from January and for some it stars on April. Here you can set the appropriate option for your country.
- Tax information
- Product SKU prefix: Enable this feature to generate a prefix for Product SKU. Once enabled, while adding a new product the SKU field with add this prefix along with the input given or if left empty will autogenerate a value along with this prefix.
- Default Sales discount
- Default Sales tax
- **Business Setting** > **Contact** > **Default credit limit**: The credit limit provided here will be used as default value when creating a customer or supplier
- **Business Setting** > **Sale** > **Default Sale Discount**: The default discount will be used for all sales in POS & Add sales screen.
### **Sales:**
#### Sales Item Addition Method:
1. It has 2 options: “Add item in new row” & “Increase item quantity if it already exists”
2. This option is related to POS & Sales screen when a new product is added.
3. Add item in new row: It will always add a product in new row
4. Increase item quantity if it already exists: If the product already exists in the cart it will increase its quantity else it will add it in a new row.
[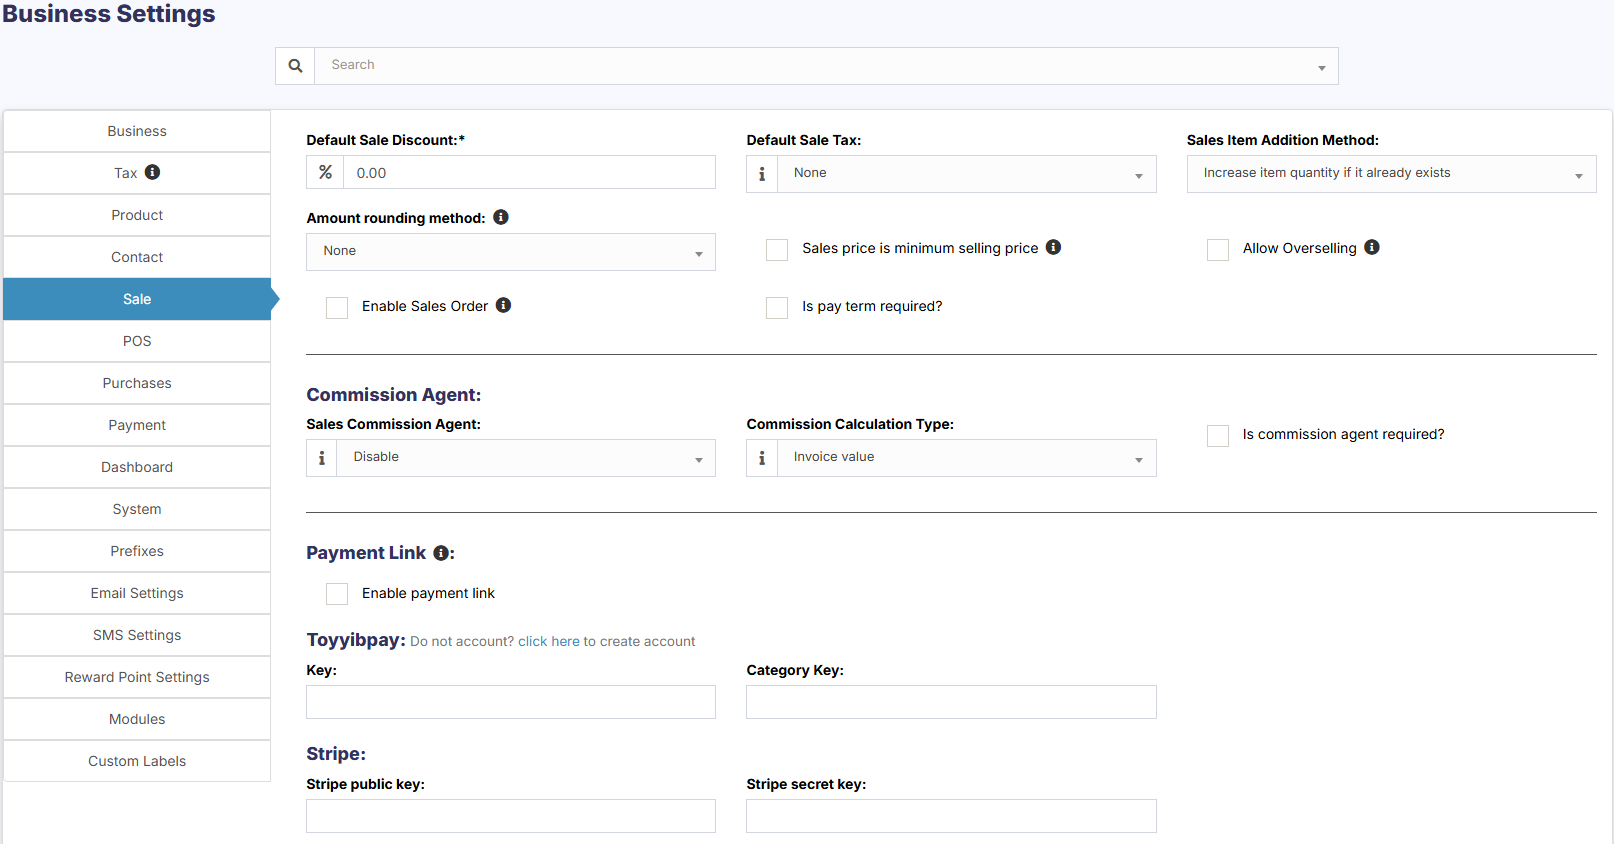](https://docs.senangurus.com/uploads/images/gallery/2025-10/4qPimage.png)
#### Amount rounding method:
The price of the products can be taken as a whole number or as a rounded decimal value by selecting the particular roundoff method. If none is selected the value is taken as a whole number.
[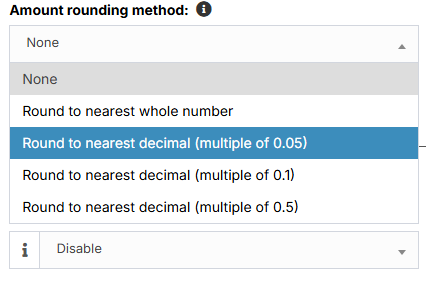](https://docs.senangurus.com/uploads/images/gallery/2025-10/BW2image.png)
#### Sales price is minimum selling price:
If this option is enabled then the product cannot be sold at a price lower than the selling price set for the product.
It can be sold at a higher price but not at a lower price.
[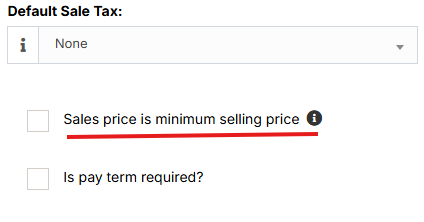](https://docs.senangurus.com/uploads/images/gallery/2025-10/K4Limage.png)
#### Enable inline Tax:
To display the price inc. tax on the POS screen, kindly enable the check box in the Business Settings->Tax.
[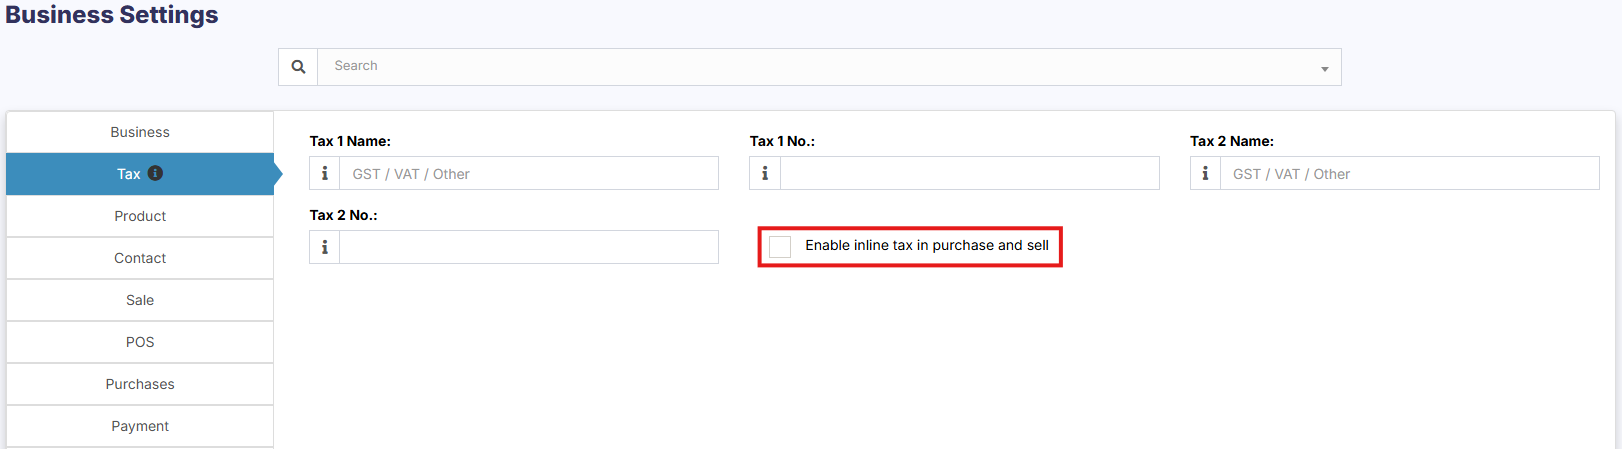](https://docs.senangurus.com/uploads/images/gallery/2025-10/iQBimage.png)
#### Enable Sales Order:
This will enable the [sales order](https://docs.senangurus.com/books/senangurus-business/page/sales-order) feature.
[](https://docs.senangurus.com/uploads/images/gallery/2025-10/screenshot-2025-10-13-221307.png)
#### Default Sale Discount:
The default sale discount can be added to products in **Business Settings** -> **Sale**
[](https://docs.senangurus.com/uploads/images/gallery/2025-10/screenshot-2025-10-13-221552.png)
#### Limit for Transaction Edit:
**How to edit transactions for more than 30 days?**
In order to increase the limit for editing the transaction, set the number of days in the business settings.
[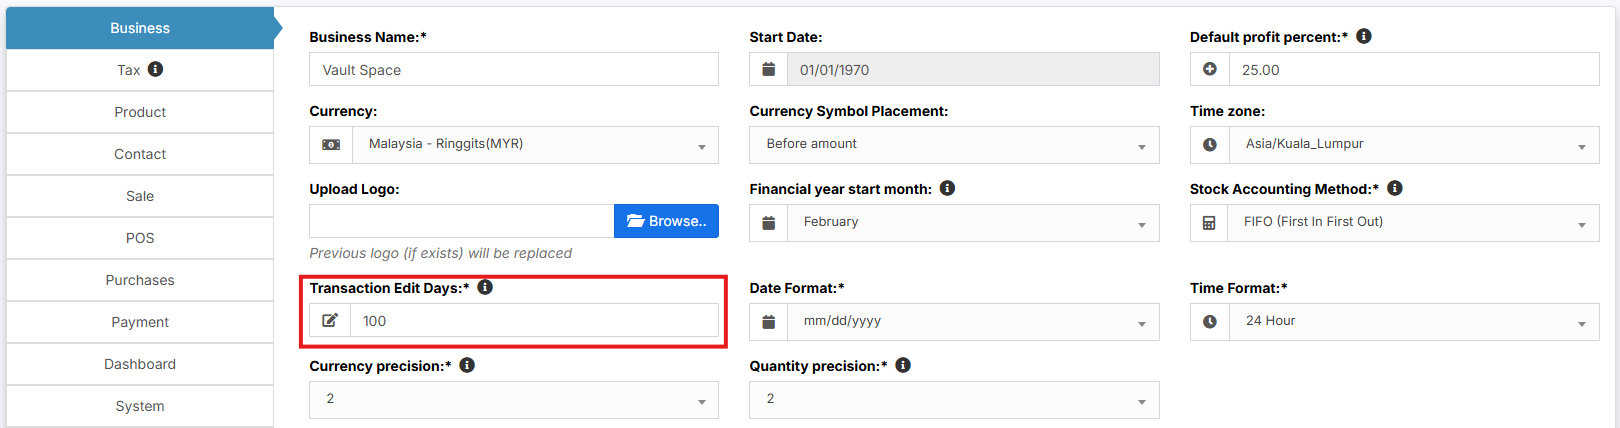](https://docs.senangurus.com/uploads/images/gallery/2025-10/raRimage.png)
#### Data table Entry Selection:
The default number of entries in the data tables can be selected in Business **Settings** -> **System**.
[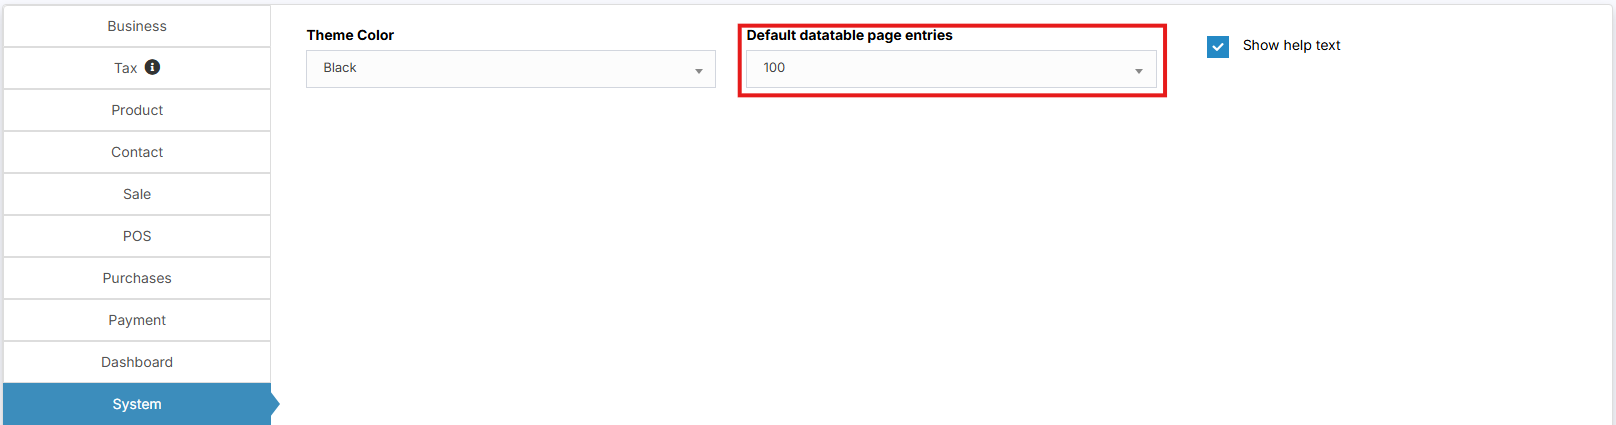](https://docs.senangurus.com/uploads/images/gallery/2025-10/XHTimage.png)
#### Allow Overselling of Products:
In some cases, the products need to be sold even when they are out of stock. In such cases, you can enable the “**Allow Overselling**” Option from the **Business Settings > Sale**.
[](https://docs.senangurus.com/uploads/images/gallery/2025-10/YM8image.png)
This will allow you to add sales for non-stock products.
If the sale is added for products that are out-of-stock using the Allow Overselling Option, then the profit will be calculated as negative for those products.
#### Video Demonstration:
[](https://drive.google.com/file/d/1NO6BTn8O3ejw8MU3Ksx8iouUneaSnaVH/view)
# Setting Invoice Scheme
With SenangUrus ERP you can configure the format for your invoice number.
[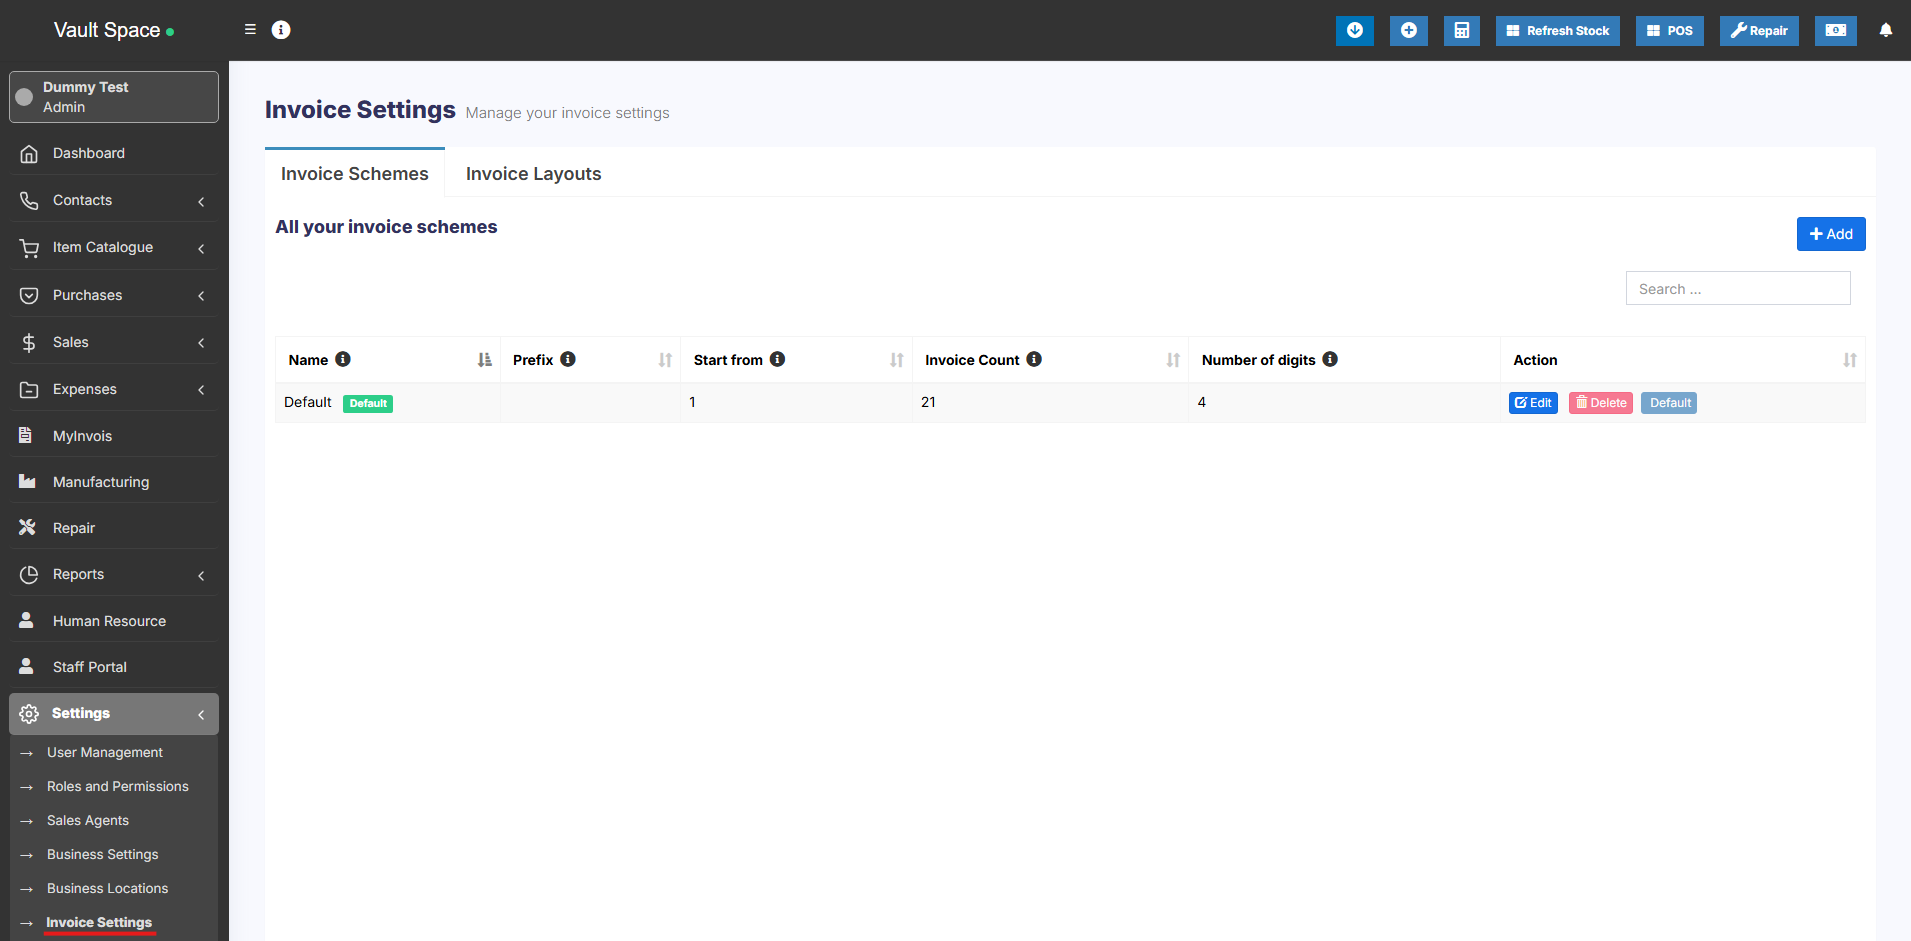](https://docs.senangurus.com/uploads/images/gallery/2025-10/screenshot-2025-10-13-222305.png)
[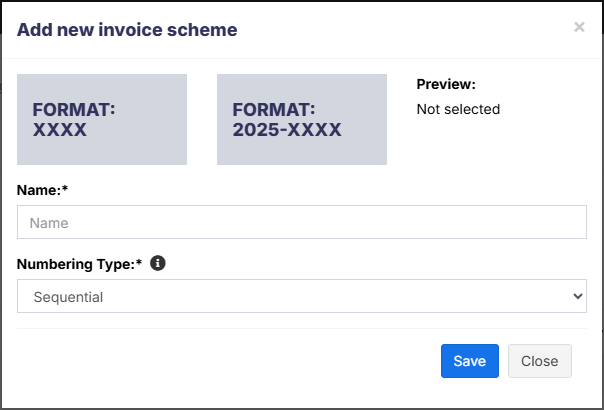](https://docs.senangurus.com/uploads/images/gallery/2025-10/qLKimage.png)
To configure go to **Settings** -> **Invoice settings**
- Click on Add and select a scheme format.
Format can be **XXXX** or **<year>-XXXX**
- You can also provide a custom prefix, invoice start number, number of digits in the invoice number.
- The preview box will display the preview according to the chosen option.
- You will need to set a default invoice scheme for a business to use it.
# Adding a new Label or barcode settings
SenangUrus ERP comes with some commonly used barcode configurations for you our-of-box. If your barcode configuration isn’t covered then you can easily create a new configuration.
[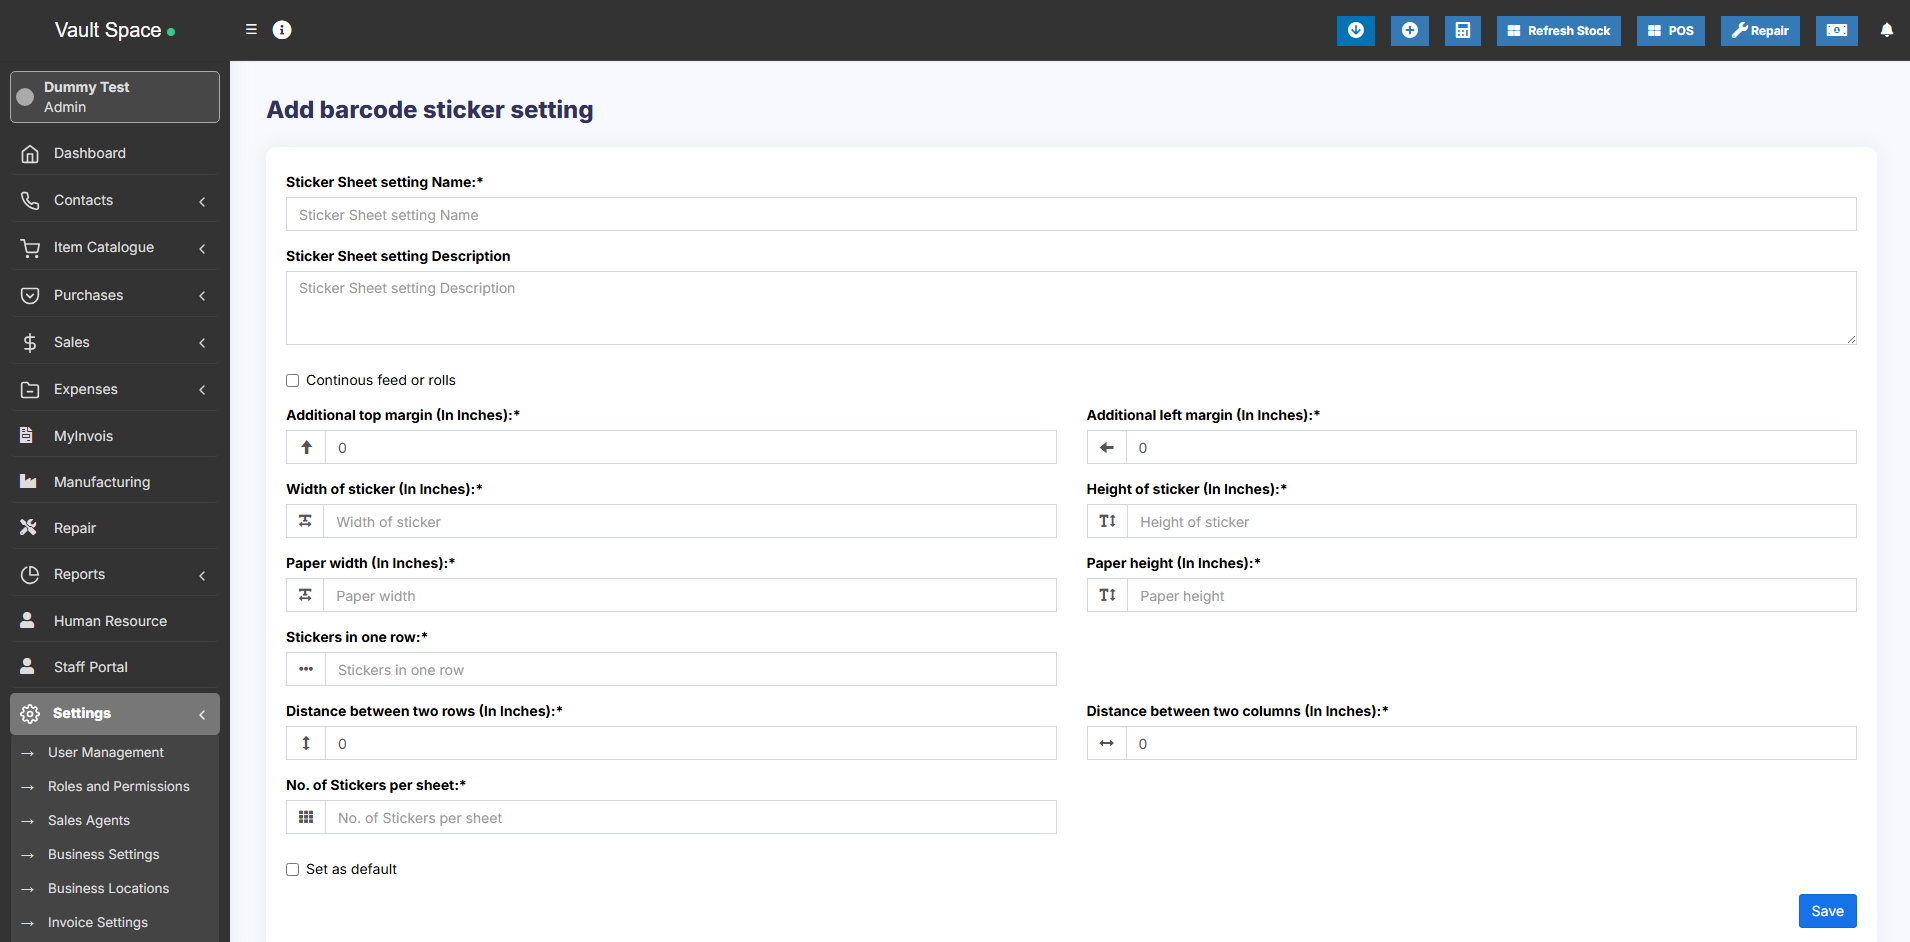](https://docs.senangurus.com/uploads/images/gallery/2025-10/cBCimage.png)
*You must have all measurement details of the sticker to create a configuration. All dimensions need to be in inches.*
### Adding Barcode sticker settings
1. Go to settings -> Barcode Settings -> Add
2. Enter a descriptive name of the setting. Add some description for your information.
3. If you’re using a Roll, then check the “Continues feed or rolls” checkbox.
4. Enter Additional top margin (In Inches), Additional left margin (In Inches), width of the sticker, Height of the sticker, Paper width, Paper height, number of stickers in one row, distance between 2 rows, distance between 2 columns and the total number of stickers per sheet.
5. Some of this information are not needed for Continues feed or rolls.
You **must** test you setting by printing a dummy sticker in Purchase – print label option. If something seems wrong then edit the measurement accordingly.
# Changing the custom fields labels
To modify the labels of custom fields, go to **Settings -> Business Settings -> Custom Labels**
[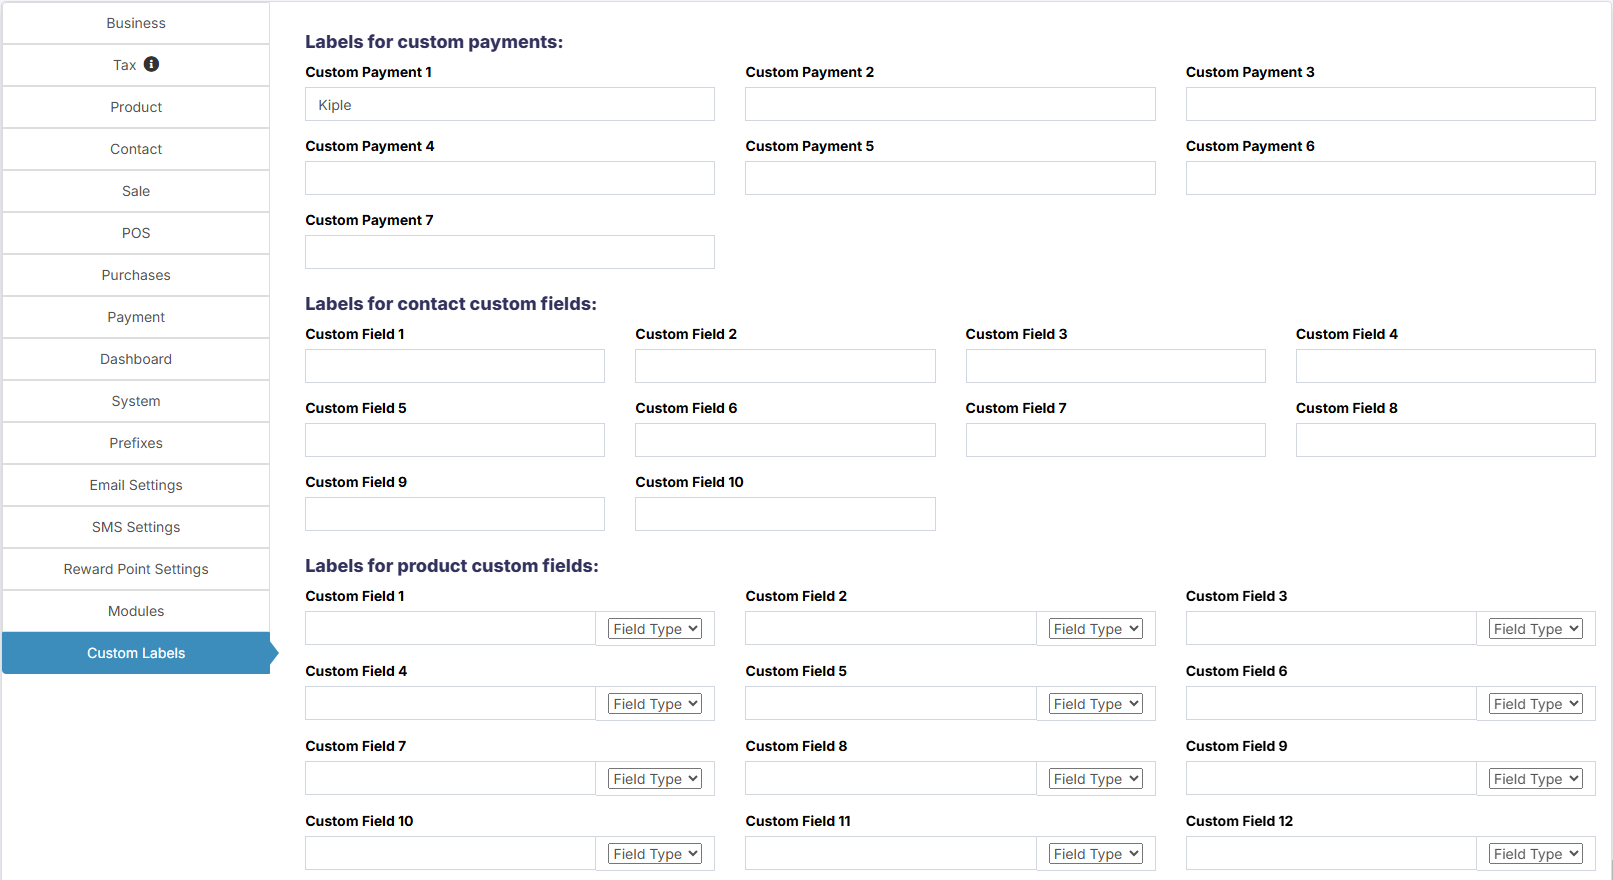](https://docs.senangurus.com/uploads/images/gallery/2025-10/JV7image.png)
Here you can give names to all custom fields.
# Changing Application/theme Color
To change Application or Theme color follow the below steps:
[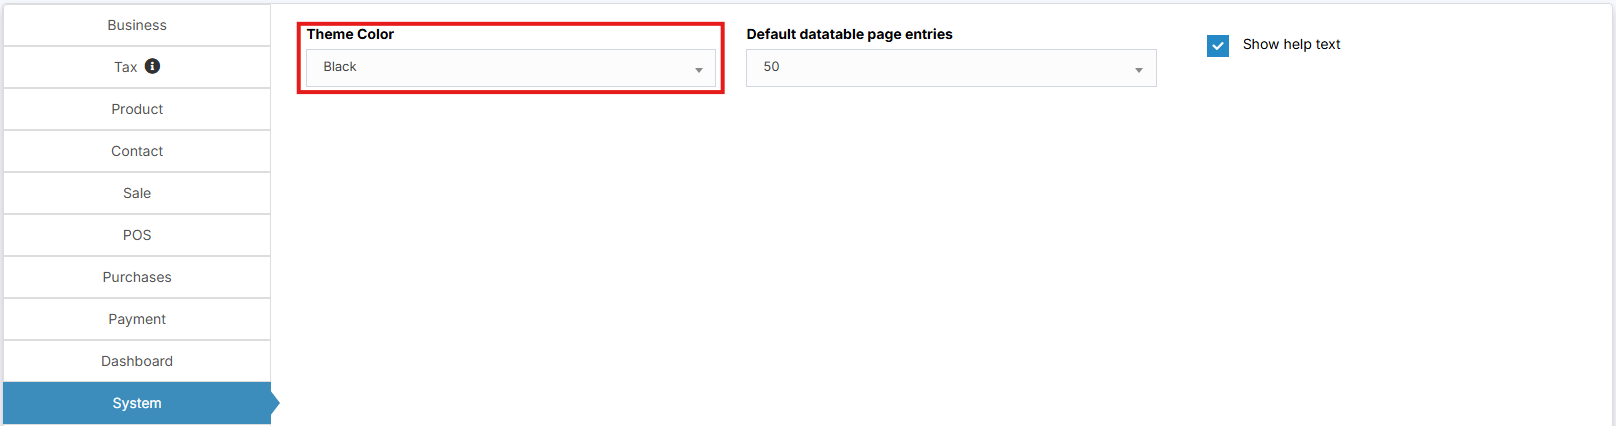](https://docs.senangurus.com/uploads/images/gallery/2025-10/screenshot-2025-10-13-223143.png)
1. Go to Settings -> Business Settings -> System (tab)
2. Change the **Theme Color** to your desired color. A total of 11 colors (Light & Dark options) are given
# Hardware Support
# Barcode Scanner
### How to add Barcode Scanner
Adding a barcode scanner is easy & simple.
- Simply Plug-in the barcode scanner in your computer.
- If there is some driver provided with the scanner then install it.
- Point the cursor to any field in POS where you want to insert the barcode and scan the barcode. The scanner will automatically scan and input the barcode value to the input field.
# Label weighing scale
### Label weighing scale integration
A Label weighing scale generates a barcode based on the configuration of Prefix, Product SKU length, Quantity integer part length & Quantity fractional part length.
### Enabling & setting it
To enable weighing scale integration in SenangUrus ERP, do the below settings:
1. Go to **Settings** -> **Business Settings** -> **POS** -> Check **Enable Weighing scale** and save it.
[](https://docs.senangurus.com/uploads/images/gallery/2025-10/f5Fscreenshot-2025-10-13-144405.png)
[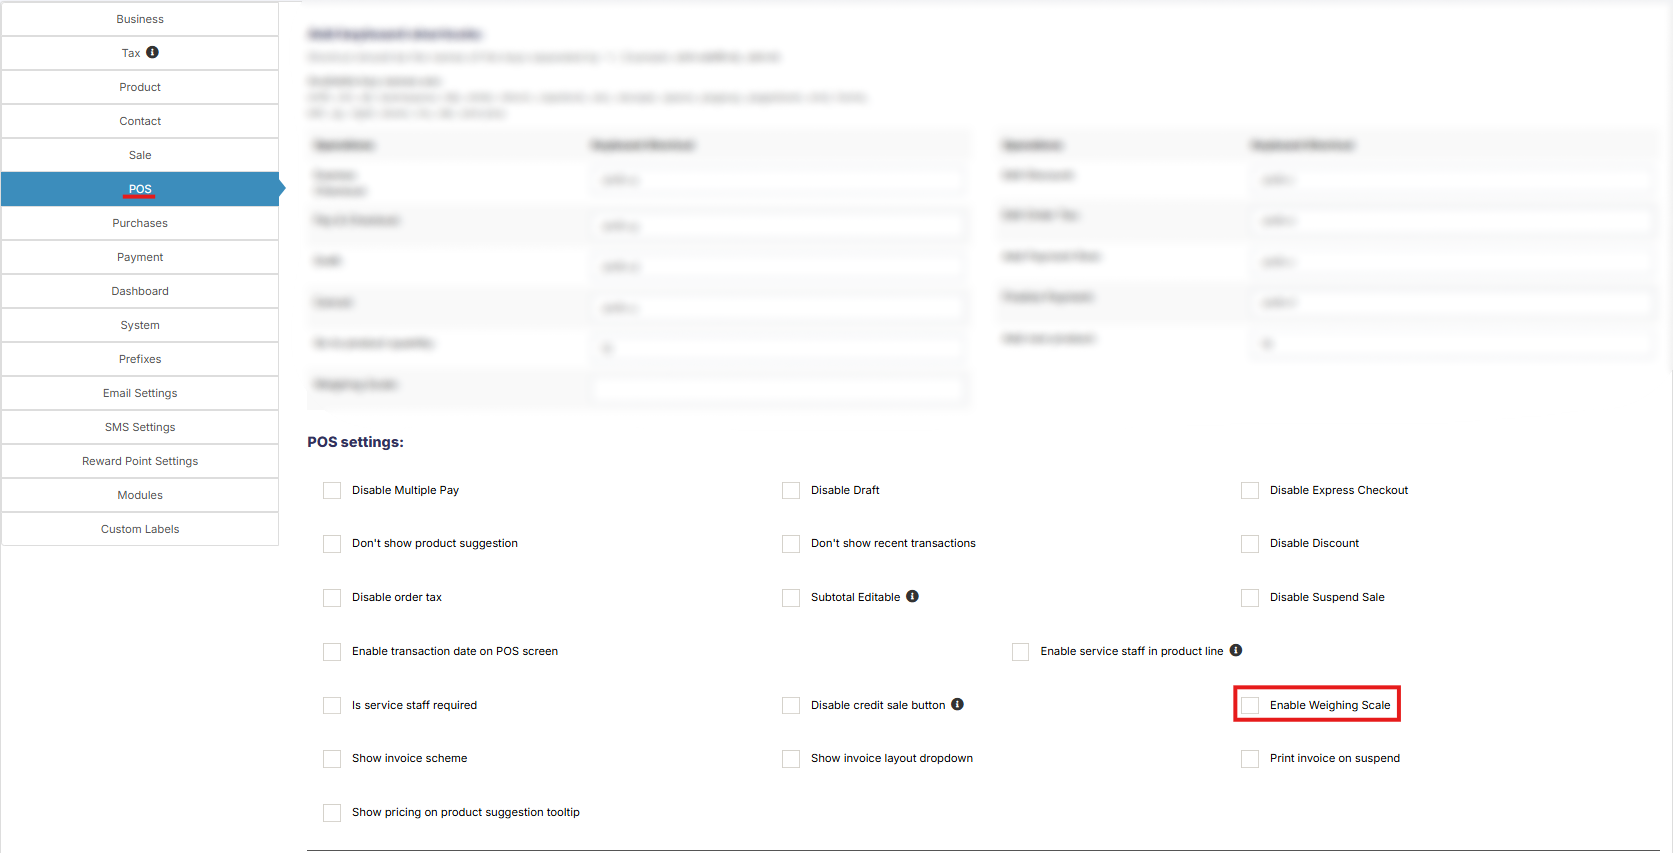](https://docs.senangurus.com/uploads/images/gallery/2025-10/screenshot-2025-10-13-164358.png)
2. Below it provide the setting for the weighing scale.
1. Prefix
2. Product SKU length
3. Quantity integer part length
4. Quantity fractional part length
And save it.
3. Go to the POS screen, click on the weighing scale button present next to the product SKU search field, on clicking, it will open a modal where you can scan/enter the barcode generated by the weighing scale. On Successful match of settings and barcode, the product will be added as per the specified quantity in the barcode.
4. You can add a shortcut key for weighing scale by going to Settings -> Business Settings -> POS
# How to setup printer to open cash drawer automatically?
Your cash drawer can be configured to automatically open when you print a receipt for each transaction. Here are the steps you can take to configure your cash drawer.
1. Plug in the RJ12 connector cable (which looks similar to a phone line) from the cash drawer into your the receipt printer.
2. Next, go to the **Settings** menu in Windows 10, select **Devices** and select **Printers & Scanners** on the left-hand menu.
[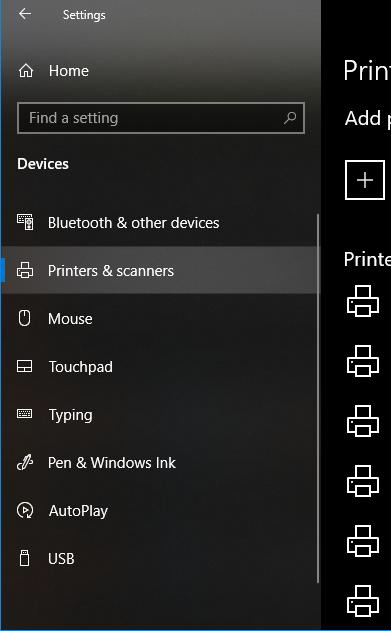](https://docs.senangurus.com/uploads/images/gallery/2025-10/ehMimage.png)
3. Select the printer you’d like to configure, and click on the **Manage** button.
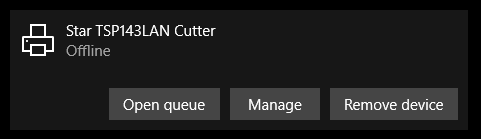
4. Next, click on the **Printer Properties** link and a window will open. From here, select the **Device Settings** tab.
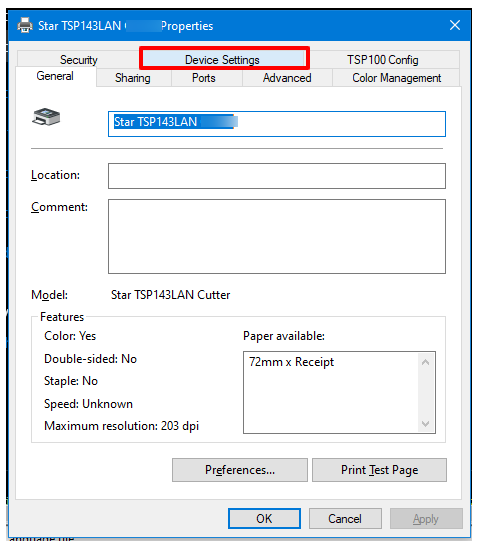
5. Under **Installable Options**, find the **Peripheral Unit Type** and change it to **‘Cash Drawer’**.
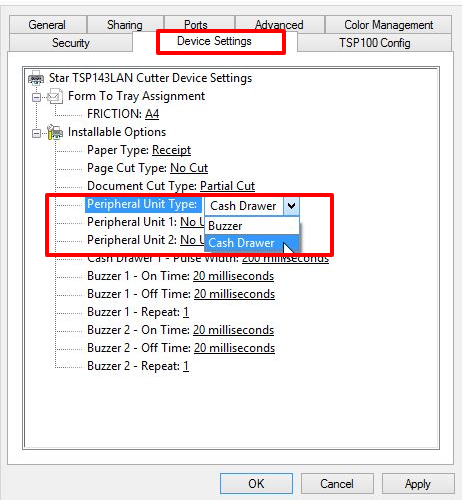
6. Change the **Peripheral Unit 1** and **Peripheral Unit 2** fields to **‘Document Bottom’** to have the drawer open after the receipt starts printing.
*If you want the cash drawer to trigger before the receipt prints, select **‘Document Top’** in **Peripheral Unit 1** and **2
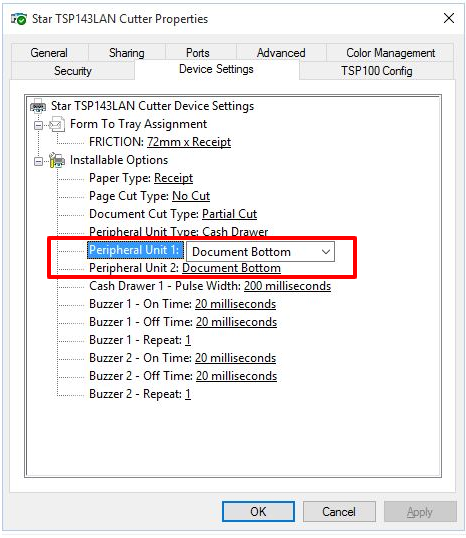***
7. Click **OK** to save these settings and perform a test sale to see if it’s been configured properly.
# Others
# Graph/Chart not displaying
Graph/Chart doesn’t work as expected when you don’t follow the installation guide properly. To make sure it works you should install it using the installation guide.
**NOTE:** not following the installation process will have many other additional other problem, so we always recommend to follow it.
If you have followed the installation guide and then also it is giving this problem then follow the below-given solution.
**Alternate Solution:**
Open the .**env** file which is present inside the pos codebase. In the .env file, you will find “**APP\_URL**“, set the correct value of the url in here.
For example, if the POS URL is http://pos.ultimatefosters.com then **APP\_URL=http://pos.ultimatefosters.com**
# Increasing/Decreasing upload documents & images size limit
- To change the document size limit open config/constants.php
- You will find to variables
- ‘image\_size\_limit’ => ‘500000’, //in Bytes
- ‘document\_size\_limit’ => ‘1000000’, //in Bytes,
- Change the value of the above to change the size limit.
- Size must be provided in Bytes.
- Bytes to MB converter (https://convertlive.com/u/convert/bytes/to/megabytes)
# Logo or Image not Getting displayed
If you’re using **UltimatePOS version 2.11.4** do this: https://ultimatefosters.com/ultimate-pos/update-guide-updating-ultimate-pos/#NOTE\_If\_you8217re\_updating\_from\_V2113\_to\_V2114\_or\_higher\_then\_do\_these\_additional\_steps
In **UltimatePOS version 2.11.2** we implemented an easy way to fix images issue.
1. Login in UltimatePOS with **Administrator account (or** superadmin **account)**
2. Go to **<pos\_directory>/public** directory via FTP or cPanel and delete “**storage**” directory if present. This may or may not be present.
**PS**: don’t delete <pos\_directory>/storage.
3. Run **www.yourwebsite.com/install/fix-image** and it will fix the image issue. If it displays some error the check the error information as given below.
If you’re using a **lower version then 2.11.2** then follow the below steps or update your version.
1. This can happen if the “**symbolic link**” is not created successfully during installation steps.
2. Go to **<pos\_directory>/public** and delete “**storage**” directory if present. This may or may not be present.
**PS**: don’t delete <pos\_directory>/storage.
3. If you’re using in localhost then open your command prompt (cmd) or if in hosting server then use shell access to login via terminals. Contact your hosting provider if you need details on accessing via terminal.
4. Go to pos directory:
**cd <pos\_directory>**
5. in the pos directory run the below command:
**php artisan storage:link**
6. If it shows success then check your application, it should show the images now.
If it shows some **error** like:
- **Undefined command “php”** then add php to your environment variable or check your server documentation on running php via command line.
- symblink**() Permission denied**: Change permission of public directory as mentioned in the installation doc.
- symlink**() has been disabled**: Contact your hosting provider to enable it.
# White Labeling & Rebranding SenangUrus Business
A white label product is a product or service produced by one company (the producer) that other companies (the marketers) rebrand to make it appear as if they had made it.
Ultimate POS allows you to white label the product with your company name and resell it as per purchase license rules.
To white label the application:
During installation, it asks for Application name & Application title. Simply use your company name or your branded product name as the name of the application. Also, give a meaning title to it.
– Now the name you entered will be displayed in Landing Page & also in the footer of the application.
– You can also change the application name after installation. Simply open `.env` file present in the root folder of the application and change the `APP_NAME` & `APP_TITLE` value.
# Tips & Tricks for using SenangUrus Business effectively.
### **Improving Browser based Print (Receipts or other)**
- In chrome/firefox before printing, it shows a preview dialogue. The preview dialogue left side has some setting.
- Enable Background style
- Try setting the margin as default.
- Set correct page size (mostly A4)
- Enable/Disable **header & footer to show/hide the page URL.**
-
### **Create Shortcuts for web application**
- - Are you tired of opening browser and the opening your website? If yes we have a solution.
- Open SenangUrus Business in chrome.
- Click the wrench icon (3 dots) in the right corner of the screen.
- Scroll down to Tools and select “Create Application Shortcuts” or “Add To Desktop”
- From the dialogue box, choose whether you want the shortcut to appear on your Desktop, in your Start menu or pinned to your Taskbar.
- Click create and your shortcut will appear in the desktop.
### **Website to Desktop apps in One-Click**
- You can use this online tool to convert website to Desktop App – [Website-to-Desktop](https://ultimatefosters.com/recommends/website-to-desktop/ "Website-to-Desktop")
- This tool is just a wrapper for browser
- We haven’t tested SenangUrus Business 100% with this tool, but you can give it a try.
### **Browser Full-Screen mode or distraction-free mode**
- - Whenever you’re in “Full Screen” mode and use a browser-based printing option it gets exit from Full Screen. This also happens if you navigate to another page in full screen.
- But if you have enabled “Full Screen” by pressing “F11” it will not get exit during navigation and also during browser-based printing.
- Using SenangUrus Business POS sales screen in “Full screen” by pressing “F11” gives an ultimate experience.
### **Barcode Scanner Trick**
- Many barcode scanners send an “End of Line” or “CR/LF” ( the ‘Carriage Return’ and the ‘Line Feed’) characters after each scan. This will result in some issue with SenangUrus Business. Well, it’s not an issue with SenangUrus or the scanner. This feature is useful in some cases. But you should disable it while using SenangUrus.
- Some noted behaviors are, in POS screen invoice gets automatically submitted after scanning, automatically page gets redirected after scanning.
- To disable it simply follow the instruction provided by your manufacturer. ALL branded manufacturer have instruction available to “Disable Carriage return & Line Feed”. Google it.
- For example: In this link, you will find simple instructions for Honeywell scanners (“RESOLUTION” present at bottom of page) (https://honeywellaidc.force.com/supportppr/s/article/How-to-remove-the-Enter-after-each-scan)
Do you have a particular Trick to improve user experience? Share with us [here](https://ultimatefosters.com/support/)
Bookmark this link, as we will keep updating it.
# Decimal Precision for Currency & Quantity
Some countries like Bahrain, Kuwait, Tunisia, Oman, etc has 3 decimal currencies. So with this feature, you can adjust the decimal significant figures for currency & quantity.
The default precision is 2 for currency & quantity if you want to change it follow the below steps:
Go to Settings -> Business Settings. Here you can enter the required decimal precision for quantity and currency.
[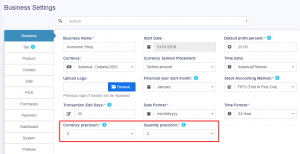](https://ultimatefosters.com/wp-content/uploads/2019/04/decimalprecision.png)
If you are using version 4.7.7 or below, follow the below steps to change the decimal precision.
1. Go to **config/constants.php**
2. Change **currency\_precision** value to change the precision for currency. The maximum is 4.
3. Change **quantity\_precision** value to change the precision for quantity. The maximum is 4.
# Adding Favicon, Login & Registration page background image
## Adding Favicon
To change the Favicon.ico image go to **/public** folder and replace the **favicon.ico** file present there.
Clear cache of your browser and it will start to show the new image you added.
## Changing Logo in Login & Registration page
Replace the image **pos\\public\\img\\logo-small.png**
Keep the new image name as “**logo-small.png**”
## Changing Background Colour in Login Page
How to change the blue background in the login page?
To change the blue background in the login page, check the css file and change the line as mentioned below.
Step 1: Login to your server and open the codebase files for UltimatePOS.
Step 2: Go to pos\\resources\\views\\layouts\\partials\\extracss\_auth.blade.php and edit line no 15. Add the required color code here.
## Setting Background Image in Login/Registration and Pricing Page
You can change the default blue background in the **Login Page**, **Registration Page**, and **Pricing Page** by updating the style file.
Step 1: Go to pos\\resources\\views\\layouts\\partials\\extracss\_auth.blade.php
Step 2: Inside this file, you will find the code for both **background image** and **background color**.
Step 3:
To apply your choice:
- **For Background Image** → Un-comment the line of code for the background image.
- **For Background Color** → Un-comment the line of code for the background color.
## Changing Application Name in Landing page
To change the application name in the landing page, follow the steps given below
**Step 1:** Open .env file present in your codebase.
**Step 2:** Search for **APP\_NAME**.
**Step 3:** Change the value for the **APP\_NAME** =”examplePOS” as required.
## How can I display the login page instead of the landing page? (Making login page as the landing page)
If you want to redirect the landing page of your POS system to login page page, you can modify the route in the **pos/routes/web.php** file to call the login blade instead of the welcome blade.
This will display the login page instead of the default welcome page when the POS system is accessed.
To change the route and call the login blade, follow these steps:
1. Open the **routes/web.php** file in your code editor.
2. Search for the route that specifies the view for the welcome blade file.
3. Replace the view name with the name of the login blade file.
4. Save the changes to the routes/web.php file.
For more information on using blade templates in Laravel, refer to the Laravel documentation at [https://laravel.com/docs/10.x/blade](https://laravel.com/docs/10.x/blade).
If you need to pass data to the view, you can refer to this guide at [https://www.geeksforgeeks.org/different-ways-for-passing-data-to-view-in-laravel/](https://www.geeksforgeeks.org/different-ways-for-passing-data-to-view-in-laravel/).
For more information on file paths in UltimatePOS, refer to this documentation at [https://ultimatefosters.com/docs/ultimatepos/technical/different-files-path/](https://ultimatefosters.com/docs/ultimatepos/technical/different-files-path/).
# Export Feature
## Export Feature in UltimatePOS
Ultimate POS allows you to export your data into either Excel, CSV, or pdf files. You can export your sale, purchase, products, categories, all your reports, etc.
On the top of every data table, you can find export buttons as shown in the image below.
[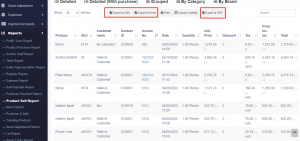](https://ultimatefosters.com/wp-content/uploads/2022/04/Exportfile.png)
## Removing columns from the data table
If you want to remove the action column or any other column while exporting the data, use the column visibility feature. Select the columns that are to be removed and then click export.
[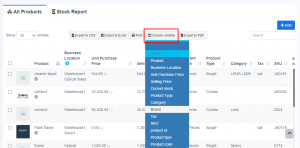](https://ultimatefosters.com/wp-content/uploads/2022/04/columnvisibility.png)
# Login Session Time
## **Increasing the login session time:**
Follow the file path below to increase the login session time of your SenangUrus Business.
config/session.php
# Issue: Product not shown on view
Sometimes, you may encounter an issue where the “List Products > View” function does not work.
This problem may arise from the permission restrictions for the uploads folder in the code base.
1. Log in to your server and find the pos/public/uploads folder. Then, change the permission to ‘777’.
2. Save the file and try to view the product again.
If you still have the issue, open a ticket in support and post the issue.
# Solution for Sell Delete Not Working Issue
## Error: Deleting Sale Not Working, shows “Something Went Wrong Please Try again Later”
#### Issue:
Sometimes, when attempting to delete a sale, the system may display the following error: **“Something went wrong. Please try again later.”**
This usually occurs due to a database configuration issue.
### Solution:
Follow the steps below to diagnose and fix the issue:
#### Step 1: Check the Error Log
Navigate to your application’s log file located at: **pos/storage/logs/laravel.log**
#### Step 2: Identify the Error
If the log shows the following error: **General error: Prepared statement needs to be re-prepared**
#### Step 3: Update Database Configuration
Open the database configuration file located at:
`pos/config/database.php`
Find the MySQL configuration block and ensure it includes the following option:
‘mysql’ => \[
‘driver’ => ‘mysql’,
‘url’ => env(‘DATABASE\_URL’),
‘host’ => env(‘DB\_HOST’, ‘127.0.0.1’),
‘port’ => env(‘DB\_PORT’, ‘3306’),
‘database’ => env(‘DB\_DATABASE’, ‘forge’),
‘username’ => env(‘DB\_USERNAME’, ‘forge’),
‘password’ => env(‘DB\_PASSWORD’, ”),
‘unix\_socket’ => env(‘DB\_SOCKET’, ”),
‘charset’ => ‘utf8mb4’,
‘collation’ => ‘utf8mb4\_unicode\_ci’,
‘prefix’ => ”,
‘prefix\_indexes’ => true,
‘strict’ => false,
‘engine’ => null,
‘options’ => extension\_loaded(‘pdo\_mysql’) ? array\_filter(\[
PDO::MYSQL\_ATTR\_SSL\_CA => env(‘MYSQL\_ATTR\_SSL\_CA’),
\\PDO::ATTR\_EMULATE\_PREPARES => true, // Add this line
\]) : \[\],
\],
**Important:** Make sure the line `\PDO::ATTR_EMULATE_PREPARES => true` is included under the `options` array. This setting helps prevent the “re-prepared” error by enabling emulation of prepared statements.
#### Step 4: Save Changes
After updating the configuration save the file.
# Adding/Modifying Currency in ultimatepos
With UltimatePOS we have tried to include many currencies inbuilt in the system. But we have missed some of them, sorry for that!!
No worries, still you can add any new currency into the system.
1. To add new currency open the database table which is used for UltimatePOS. Go to table currency
2. Click on “Insert” new row option.
3. Fill your currency details as below and save it.
- country
- currency
- code
- symbol
- thousand\_seperator
- decimal\_seperator
Great, Your currency is added now.
# Tables, Service Staff, Bookings, Modifiers, Kitchen
# Tables, Service Staff, Bookings, Modifiers, Kitchen
### Enable Modules:
Go to **Business Settings** & enable the below **Modules:**
[](https://docs.senangurus.com/uploads/images/gallery/2025-10/screenshot-2025-10-13-144405.png)
[](https://docs.senangurus.com/uploads/images/gallery/2025-10/VKyimage.png)
1. Tables
2. Service Staff
3. Modifiers
4. Kitchen
1: Enabling Tables & Service Staff will automatically enable Bookings module.
2: Enabling Tables & Service Staff will automatically enable the reports for it. “Table Report” & “Service Staff Report”.
### Table Module
1. Enable “Table” module as explained above
2. After table module is enabled go to **Settings** -> **Table**
[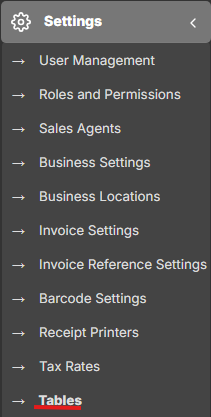](https://docs.senangurus.com/uploads/images/gallery/2025-10/screenshot-2025-10-13-154045.png)
3. Add all the table of you restaurants by selecting Business Location, Table name & Short Description(optional)
[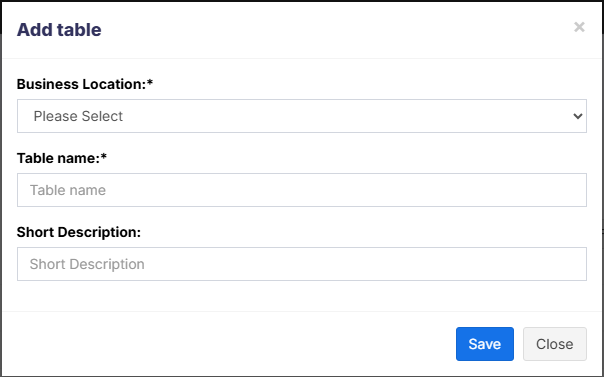](https://docs.senangurus.com/uploads/images/gallery/2025-10/screenshot-2025-10-13-153923.png)
4. Tables are used in POS screen take order for a particular table.
- If you have multiple locations & the logged in user have access to multiple locations then in POS screen you must select the Business Location to get table related to that location.
### Service Staff
1. Enable “Service Staff” module as explained above
2. After Service Staff is enabled go to User Management -> Roles.
3. Go to – Create or Edit a role. Check the “Service Staff” checkbox for **User Type** to make to assign Service Staff permission to it.
4. Orders are assigned to Service Staff in POS screen.
5. “Service Staff” can see a new menu “Orders” which will help them to know all the orders for them. They can View the order item and change the order status.
6. **Enable service staff for each product in a sale**: To assign different service staff for each product in sales/pos screen, go to **Business Settings -> POS -> Enable service staff in product line**
## Bookings
1. Enable “bookings” module as explained above
2. Go to the booking section from the left navigation.
3. There you will see all “Today’s Bookings”
4. Also, a calendar is present where you can “**Double**” **click** any date to add bookings for it. In add booking screen you can select the Location, Customer, Correspondent, Table, Service Staff, Start & End time. Also, notification can be sent to customers.
## Modifiers
Modifiers are like extra stuff that can be added to a product, like extra cheese to a sandwich etc.
1. Enable modifiers module as described above.
2. Go to Settings -> Modifiers
1. Click on add
2. Give a new to modifier set. Like “Cheese”
3. Enter multiple Modifiers name & price. Like “Single” – 10, Double – 17
4. Save it.
5. Click on “Manage Product” for the modifiers.
6. Associate all products where this modifier can be used. Like Sandwich.
3. After modifiers are added, in POS screen when the product is added for sale, it will show the modifiers that can be used for this products. Like if we add Sandwich then it will display the “Cheese”, “Bread” modifiers.
4. Modifiers can be mostly used in Restaurants. Also, it can be used in various other similar businesses & shops.
## Kitchen
1. Enable the kitchen module as explained above.
2. Go to Kitchen screen from left navigation.
3. Whenever an order is received in POS screen it will reflect in Kitchen screen.
- Order details can be viewed here.
- Orders can be marked as cooked. After marking as Cooked it will reflect in Order screen for service provider so that they can serve it the customer.
## Auto-refresh kitchen & Order screen:
- The kitchen and order screen will auto-refresh after a certain interval.
- By default, the refresh duration is set to 600 seconds.
- To change this duration:
1. Open **pos/config/constants.php**
2. Change the value of **orders\_refresh\_interval**. The value entered should be in seconds.
# Adding & Editing Payment Method or Pay Via options (Custom payments)
# Adding & Editing Payment Method or Pay Via options (Custom payments)
### Payment Methods:
[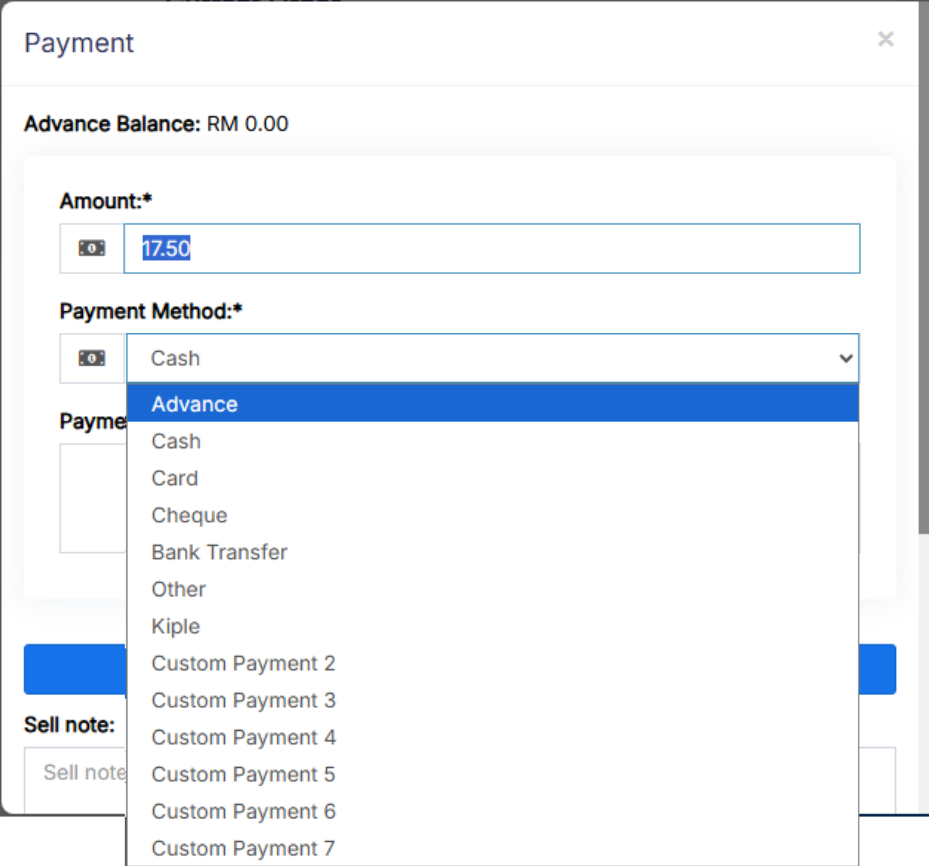](https://docs.senangurus.com/uploads/images/gallery/2025-10/XN4paymethod.png)
In the above screen, you can see “**Pay method**” or **“Pay Via”** options, the same option appears in **POS “Multiple Pay”** popup. With SenangUrus ERP you can add or edit existing payment options.
### **Enabling/Disabling Payment Methods in a business location:**
- In **Settings** -> **Edit business location:** [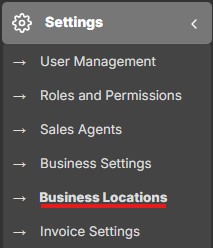](https://docs.senangurus.com/uploads/images/gallery/2025-10/86ximage.png)
[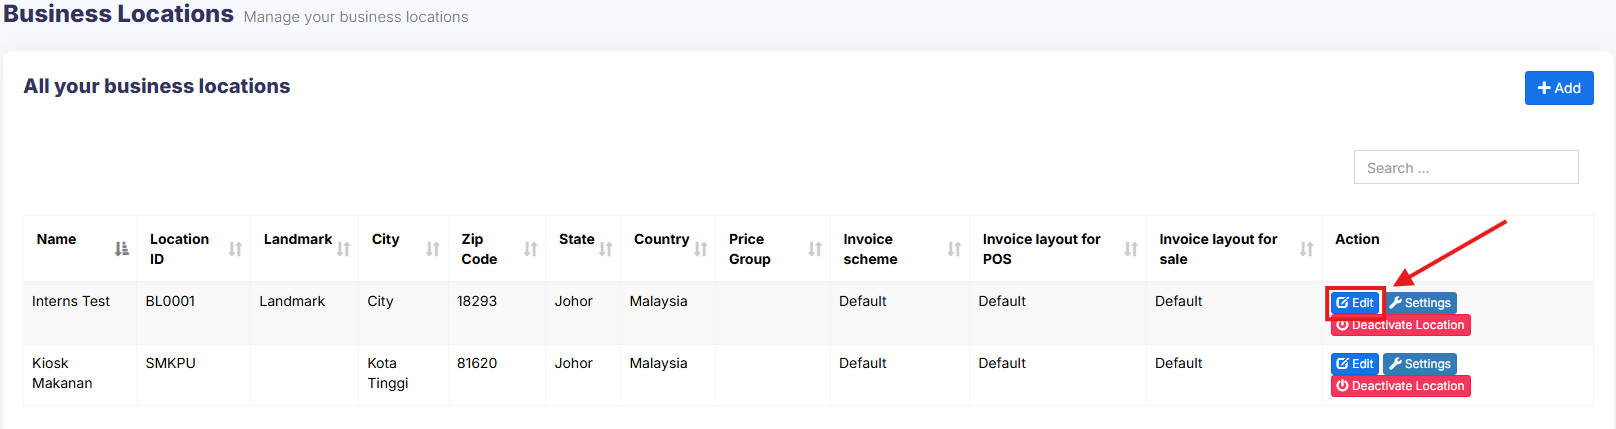](https://docs.senangurus.com/uploads/images/gallery/2025-10/asGimage.png)
you will find a list of all payment methods, you can enable/disable it by checking/unchecking the option.
[](https://docs.senangurus.com/uploads/images/gallery/2025-10/CYBimage.png)
- Set default account for payment methods: [https://ultimatefosters.com/docs/ultimatepos/payment-accounts/setting-default-payment-accounts-for-payment-methods/](https://ultimatefosters.com/docs/ultimatepos/payment-accounts/setting-default-payment-accounts-for-payment-methods/)
### **Editing custom payments labels:**
- By default, the custom payment labels display as “Custom Payment 1” and similar.
- Go to **Settings** -> **Business Settings** -> **Custom Label** -> **Labels for custom payments:** [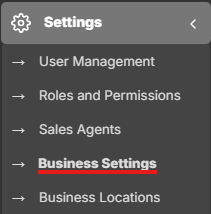](https://docs.senangurus.com/uploads/images/gallery/2025-10/xrmimage.png)
[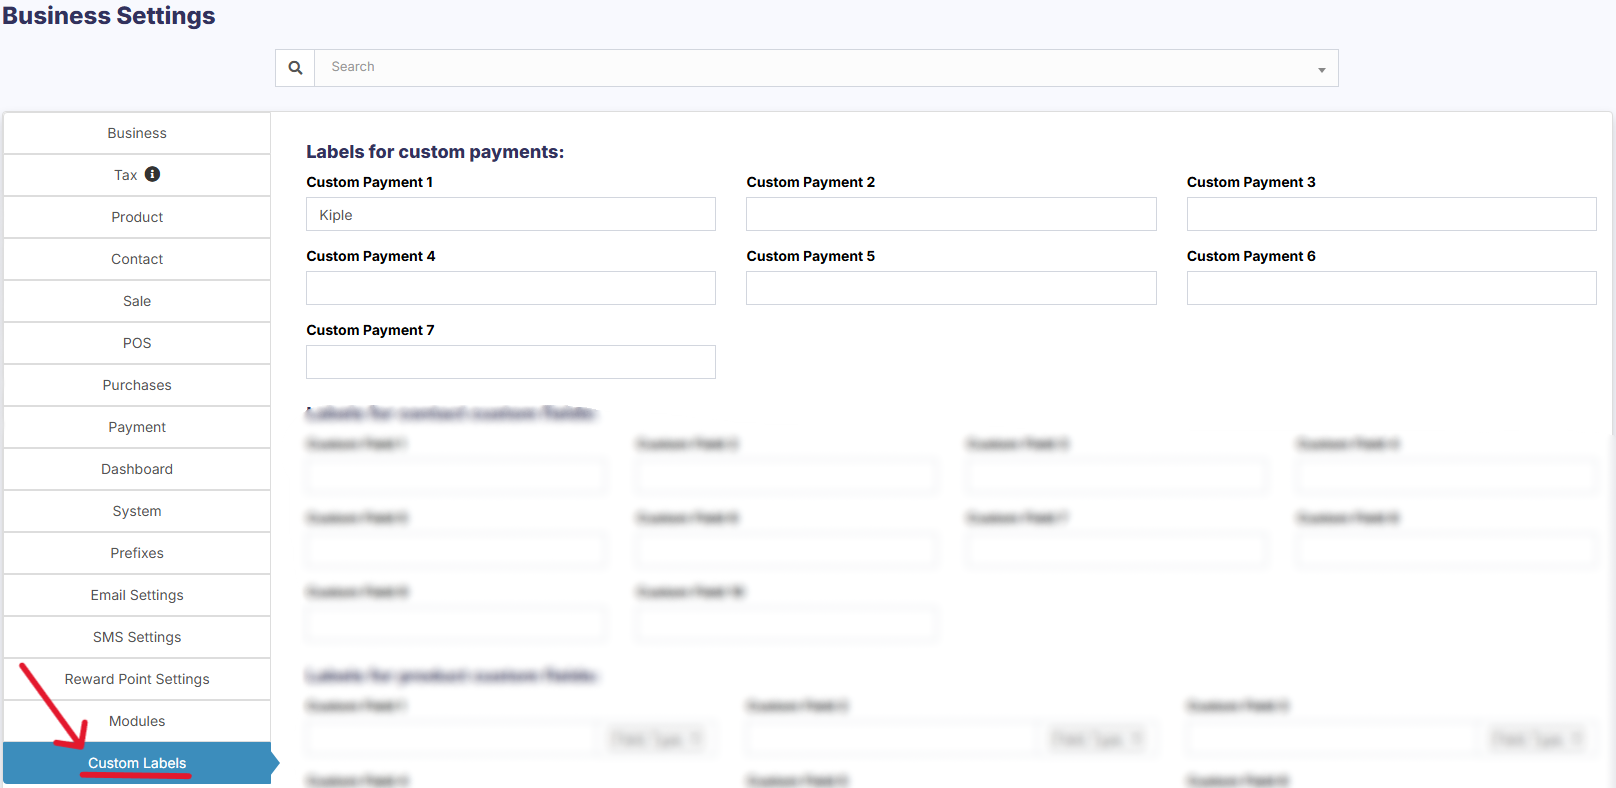](https://docs.senangurus.com/uploads/images/gallery/2025-10/l3Lscreenshot-2025-10-13-144648.png)
- Change ‘Custom Payment 1’ or the others to something you need.
- For example, if we want the labels of custom payment 1 to display as **‘GrabPay’** then it will be like this:
- **‘custom\_payment\_1’ => ‘GrabPay’,**
### **Using custom payments in POS:**
- While making a sale, in POS screen click on the multiple pay button.
- Select the required custom payment method for the payment method field.
[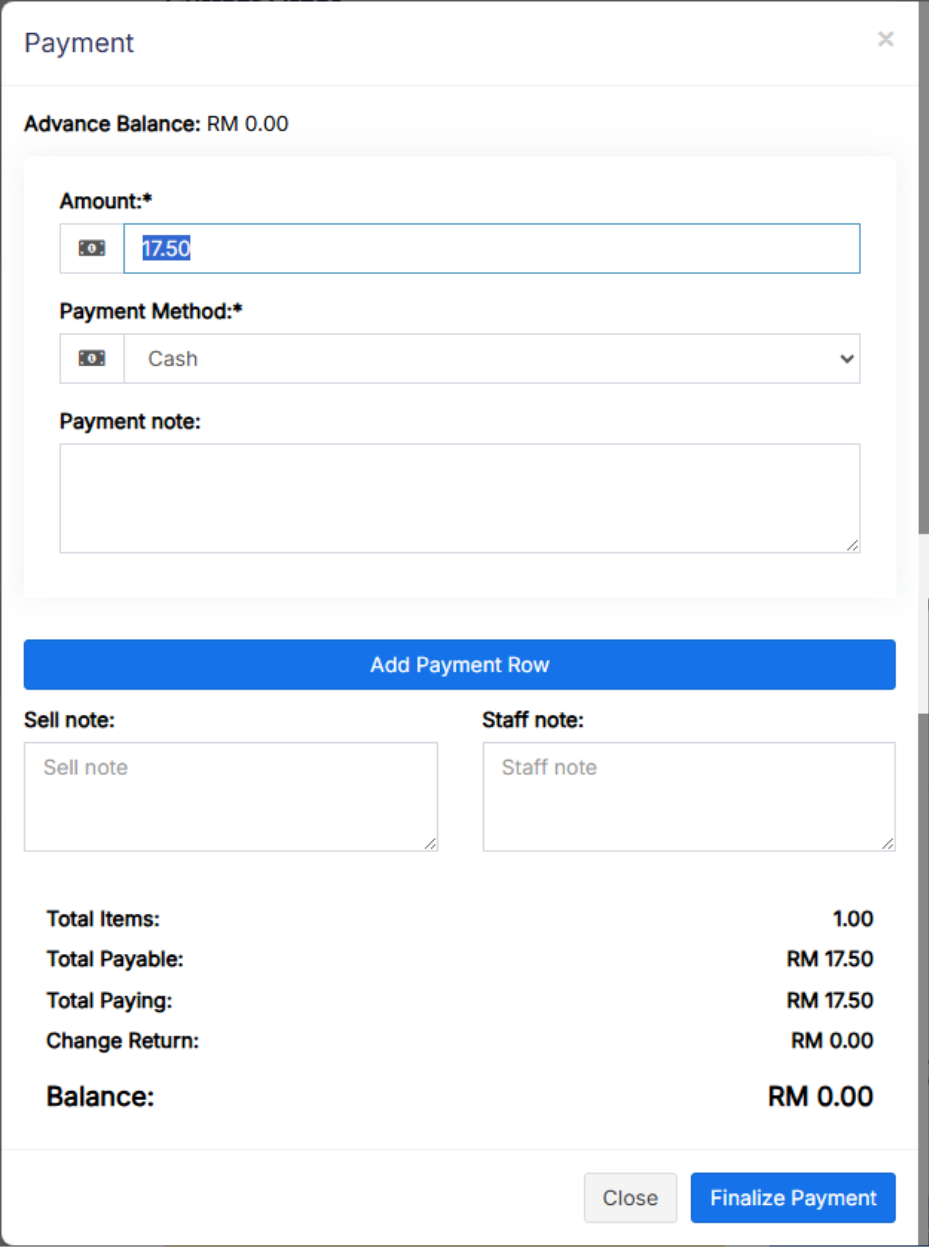](https://docs.senangurus.com/uploads/images/gallery/2025-10/paypos.png)
# Frequenty asked questions, Common Issues & Errors.
# Frequenty asked questions, Common Issues & Errors.
### Datatable or List table not working
Most of the time the list of sales or purchase or unit or category or any other list keep showing **processing…** and doesn’t display the data. Follow these steps to fix this error
1. Login to your cPanel or Directadmin or similar panel.
2. Disable **mod\_security** Or contact your hosting provider to disable mod\_security.
3. After it is disabled refresh the page and you’ll see the list will work.
### How to add Barcode Scanner
Adding a barcode scanner is easy & simple.
- Simply Plug-in the barcode scanner in your computer.
- If there is some driver provided with the scanner then install it.
- Point the cursor to any field in POS where you want to insert the barcode and scan the barcode. The scanner will automatically scan and input the barcode value to the input field.
### Disable Tax
[](https://docs.senangurus.com/uploads/images/gallery/2025-10/vBpimage.png)
1. Don’t add Tax Rates in settings
2. Go to Settings – Business Settings.
1. Uncheck “**Enable inline tax in** purchase **and sell**“
2. Uncheck “**Enable Price & Tax info**“
3. Select “**Default Sale Tax**” as None
### Disabling Printing of Receipts in POS screen
[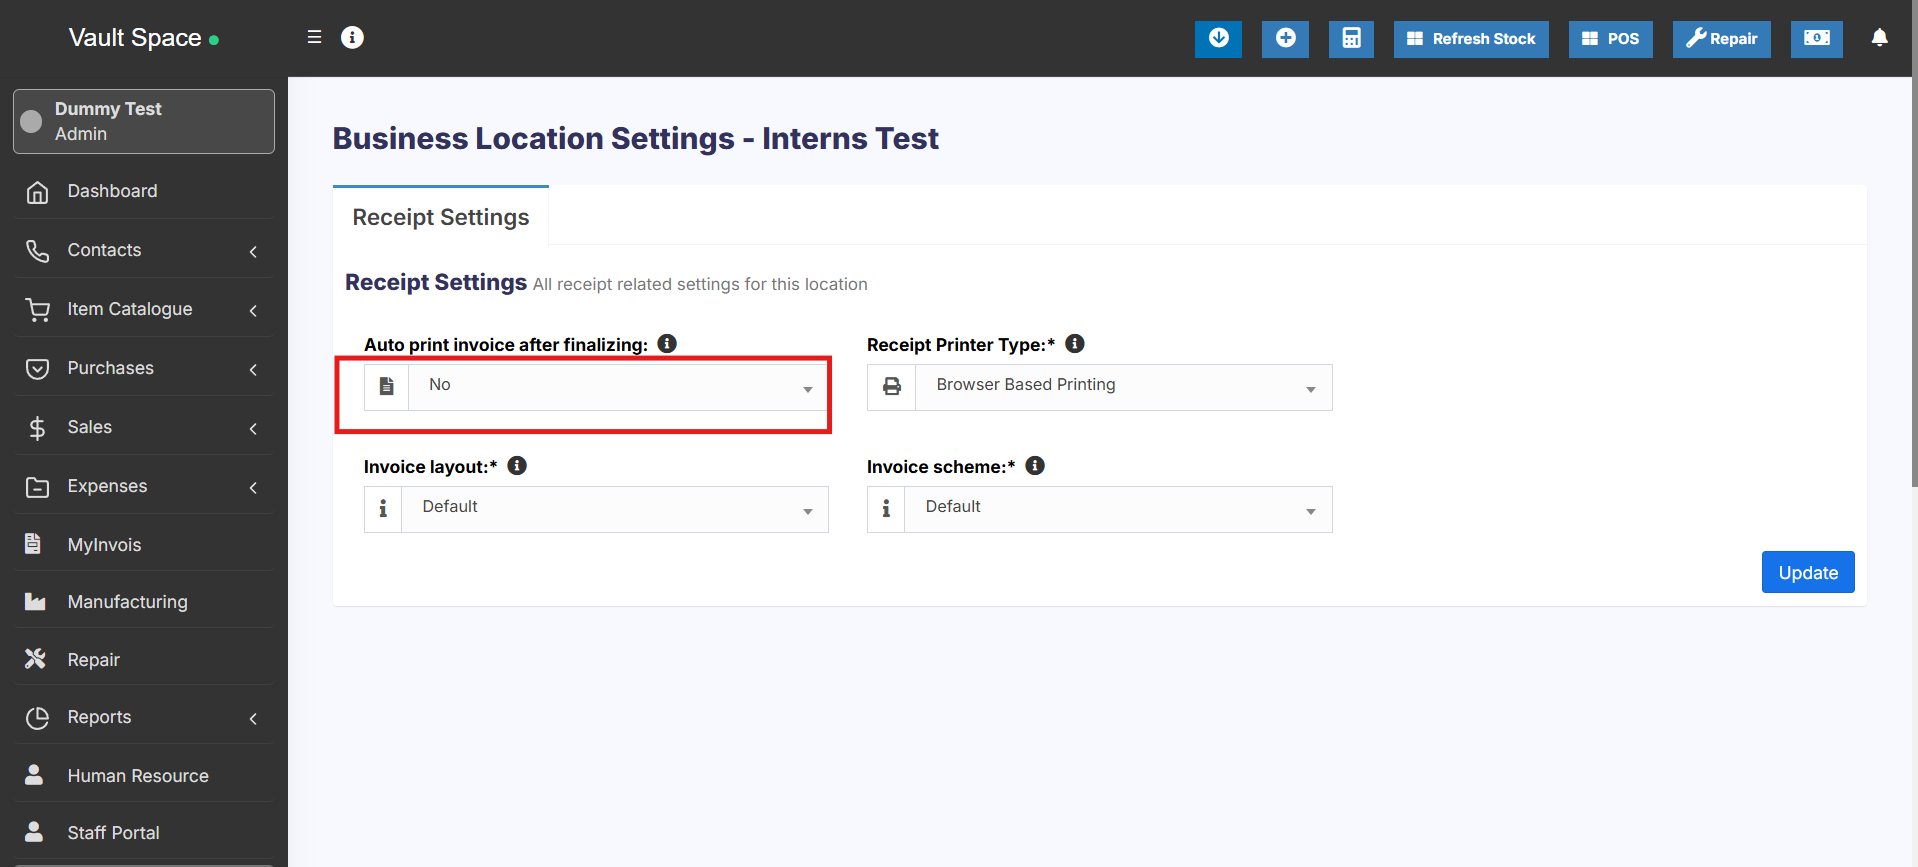](https://docs.senangurus.com/uploads/images/gallery/2025-10/6h0image.png)
To disable printing of receipts, go to Settings -> Business Locations -> Click on Setting for the business location where you have to disable printing, make “**Auto print invoice after finalizing:”** as No.
# Feature List for SenangUrus Business
# Feature List for SenangUrus Business
SenangUrus Business comes with lots of features out-of-box. You get most of the feature needed by small & Medium sized businesses to simplify the time-consuming task of accounting & inventory management and instead focus on what really matters – Your Business.
We have developed the application keeping in mind the following things:
- Keep it simple yet very detailed
- Automated time-consuming tasks (like calculating selling price based on default profit margin)
- Provide many customizations options to personalize the application as per your business.
- Ease of use.
Table of Contents \[[hide](https://ultimatefosters.com/docs/ultimatepos/feature-list-for-ultimatepos/)\]
- [1 Key Features:](https://ultimatefosters.com/docs/ultimatepos/feature-list-for-ultimatepos/#Key-Features)
- [2 Version Log](https://ultimatefosters.com/docs/ultimatepos/feature-list-for-ultimatepos/#Version-Log)
## Key Features:
1. **Multiple Business/Shops:**
1. Set up multiple businesses in the application.
2. No restriction on numbers of businesses.
3. Inventory & accounting information is kept separately for each business.
2. **Add Location / Storefronts / Ware House:**
1. Create multiple locations for your business/shop
2. Manage all of them at the same time.
3. Stocks, Purchases, Sell can be tracked differently for locations.
4. Customize invoice layout, invoice scheme for each location
3. **User & Role Management:**
1. Powerful user and role management system
2. Predefined roles – Admin & Cashier
3. Create different Roles with permission as per your need.
4. Create unlimited users with different roles.
4. **Contacts (Customer & Suppliers):**
1. Mark contact as customer or supplier or both(customer & Supplier)
2. View details of transactions with a contact.
3. View total of Credit/Debit balance amount
4. Define pay term and get payment alerts week before the due date.
5. **Products:**
1. Manage Single & Variable products.
2. Classify products according to Brands, Category, Sub-Category.
3. Add products having different units
4. Add SKU number or auto-generate SKU number with prefixes.
5. Get stock alerts on low stocks.
6. Save time by auto calculating selling price, the system is smart to auto calculate selling price based on purchase price and profit margin.
7. No need to type variations every time, create variation template and use it everytime you need to create variable products.
6. **Purchases:**
1. Easily add purchases.
2. Add purchase for different locations.
3. Manage Paid/Due purchases.
4. Get Notified of Due purchases week before the pay date.
5. Add discounts & Taxes
7. **Sell:**
1. Simplified interface for selling products
2. Default Walk-In-Customer automatically added to a business
3. Add new customer from POS screen.
4. Ajax based selling screen – save reloading time.
5. Mark an invoice for draft or final.
6. Different options for payments.
7. Customize invoice layout and invoice scheme.
8. **Manage Expenses:**
1. Easily add business expenses
2. Categorise expenses
3. Analyse expenses based on category and business locations with expenses report.
9. **Reports:**
1. Purchase & Sale report
2. Tax Report
3. Contact Reports
4. Stock Reports
5. Expense Report
6. View Trending Products, drill down by Brands, Category, Sub-category, Units and date ranges
10. **Other useful feature:**
1. Set currency, timezone, financial year, the profit margin for a business.
2. Translation ready.
3. Predefined barcode sticker settings.
4. Create your barcode sticker setting
5. Manage Brands, Tax Rate & Tax groups, Units, Category & Sub-Category
6. Easy 3 steps installation.
7. Detailed documentation
[View More feature added in V1.2](https://ultimatefosters.com/ultimate-pos/release-note-v1-2-whats-new-in-version-1-2/)
**Demo Login Link**: [http://pos.ultimatefosters.com/login](http://pos.ultimatefosters.com/login)
**Username**: admin
**Password**: 123456
Register new business: [http://pos.ultimatefosters.com/business/register](http://pos.ultimatefosters.com/business/register)
SenangUrus Business Application has been thoroughly tested to make sure there are no issues but in case you find any issue feel free to inform us about it: http://ultimatefosters.com/support/
**For any Pre-Sales or Support inquiry**: Feel free to drop us a comment at codecanyon or write us here: [http://ultimatefosters.com/support/](https://ultimatefosters.com/support/)
With this application, you are assured to save time-consuming process of bookkeeping accounting and inventory information. Also, you will have all the required information for detailed analysis of your business.
All screens are simple and intuitive to make it hassle-free to use.
---
## **Version Log**
**Version 1.1:**
1. Assign One or Multiple location to a user role.
2. Stock Adjustment added
3. POS screen – Express Checkout added.
4. POS screen other improvements
5. Expenses related to a staff or user can be added (like salary)
6. Cash Register added.
7. New reports added: Cash Register Report, Sales Representative report.
8. Support of Receipt (thermal ESC/POS) added.
9. Help text added through the system with settings to disable them in Business Locations Settings -> System
10. Business Locations wise settings added for Receipt.
11. Purchases payment can be done in Partials (Previously was only Paid Or Due)
12. Installer improvements
13. Issues fixed.
14. New Translations added.
# Release Notes & Version Log for SenangUrus Business
# Release Notes & Version Log for SenangUrus Business
### Articles
- [V6.x Release notes](https://ultimatefosters.com/docs/ultimatepos/release-notes-version-log-for-ultimatepos/v6-x-release-notes/)
- [v5.x Release notes](https://ultimatefosters.com/docs/ultimatepos/release-notes-version-log-for-ultimatepos/v5-x-release-notes/)
- [v4.x Release notes](https://ultimatefosters.com/docs/ultimatepos/release-notes-version-log-for-ultimatepos/v4-x-release-notes/)
- [v3.x Release notes](https://ultimatefosters.com/docs/ultimatepos/release-notes-version-log-for-ultimatepos/ultimatepos-3-x-release-notes/)
- [v2.x release notes for UltimatePOS (Version Log)](https://ultimatefosters.com/docs/ultimatepos/release-notes-version-log-for-ultimatepos/release-notes/)