Purchases
- Purchase Management
- Purchase Payments
- Purchase Invoice
- Purchase Requisition
- Purchase Order
- Adding Bonus or Free Items given by supplier
- Purchase custom fields
Purchase Management
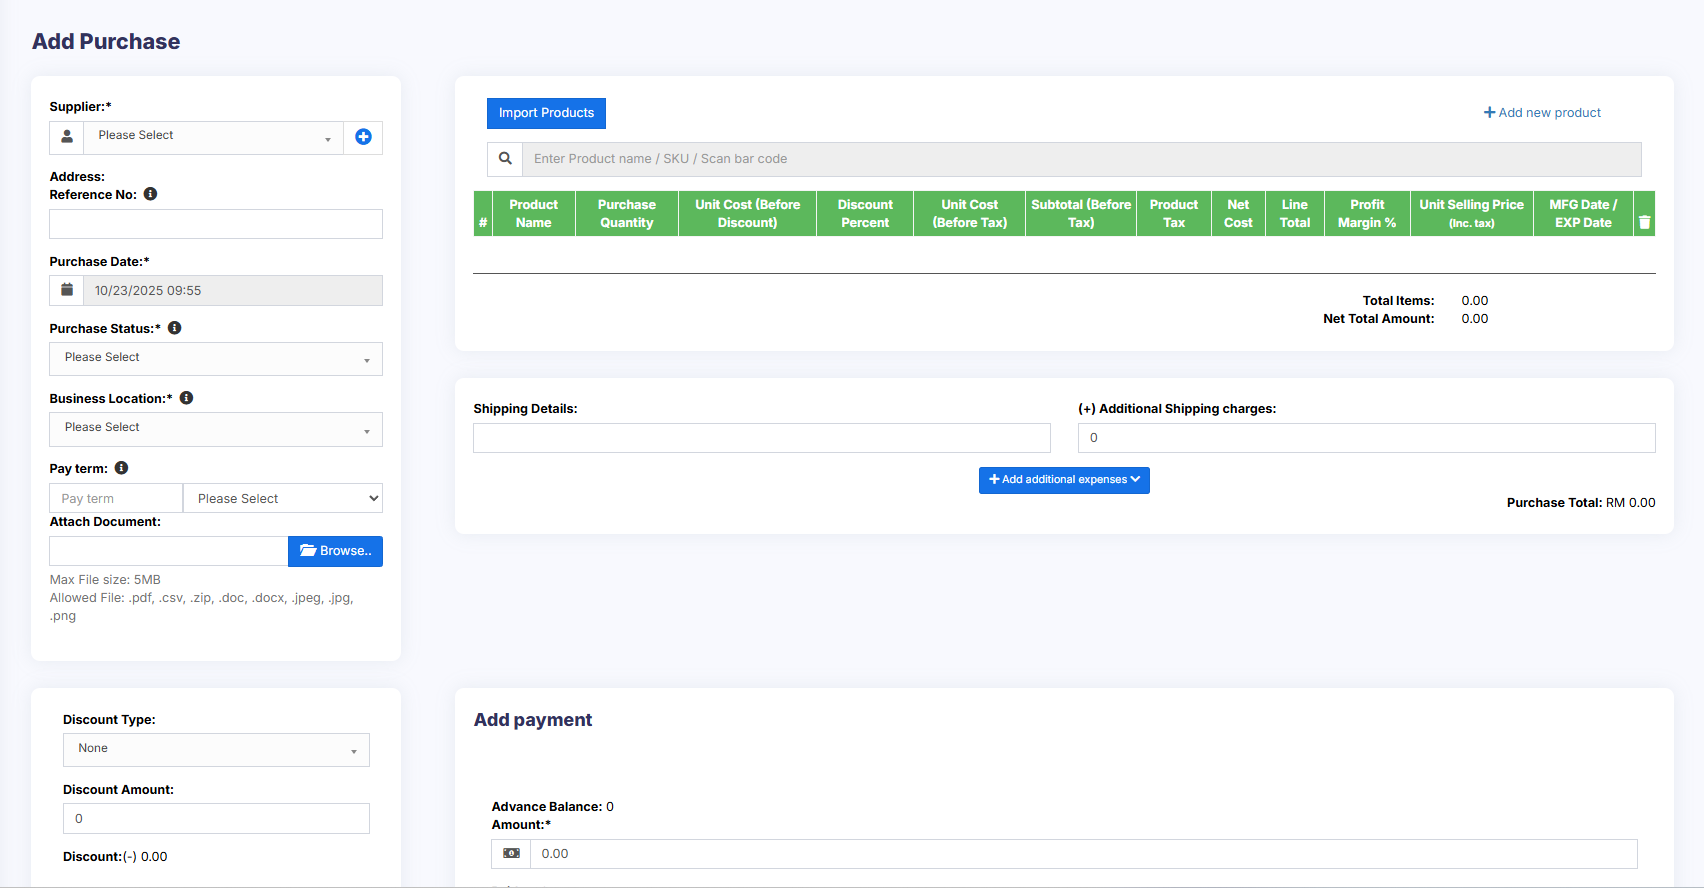
Adding Purchase
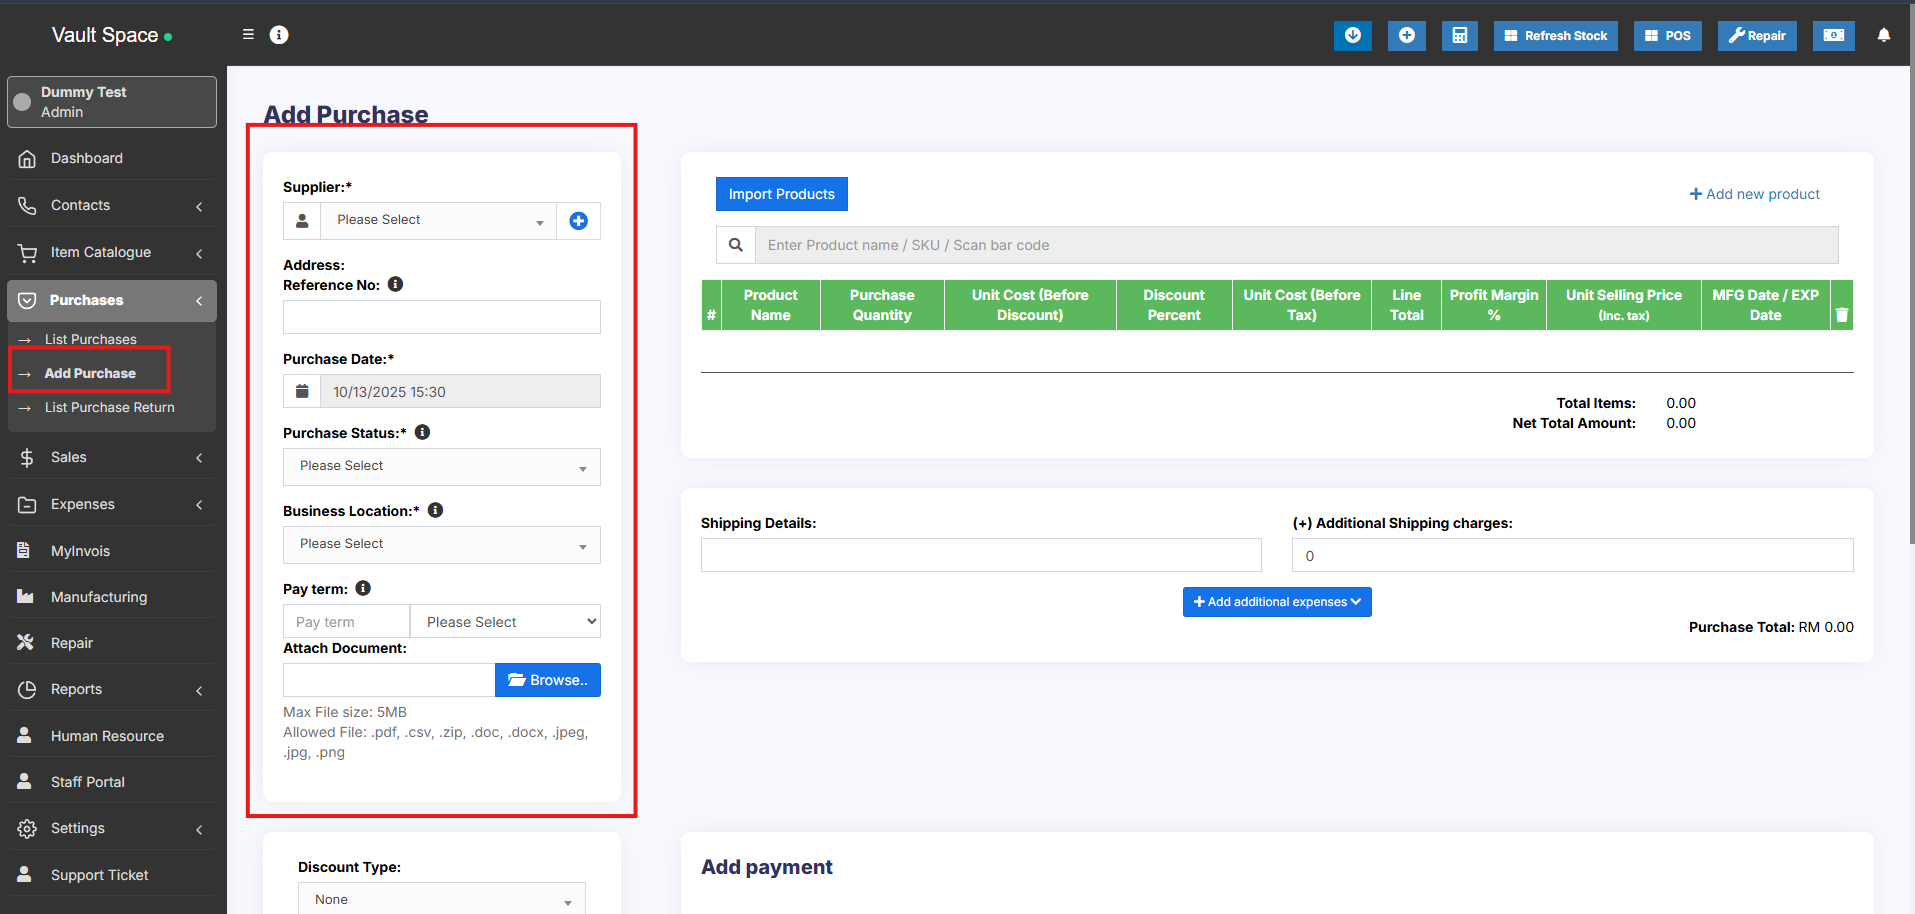
- Go to – Purchases -> Add Purchases
- Type Supplier Name or Business name in the Supplier field. If the supplier doesn’t exist you must add them from Contacts -> Suppliers -> Add
- Enter Purchase reference number, Purchase date & Order Status.
- Select Business Location: Select a location where you want to add the purchase. You can add a new Location from Settings -> Business Locations.
- Type product name or scan the product barcode number. It will show related matched products, select a product to add it to the purchase list.
- On adding a new product you can enter purchase quantity, purchase price, and tax information.
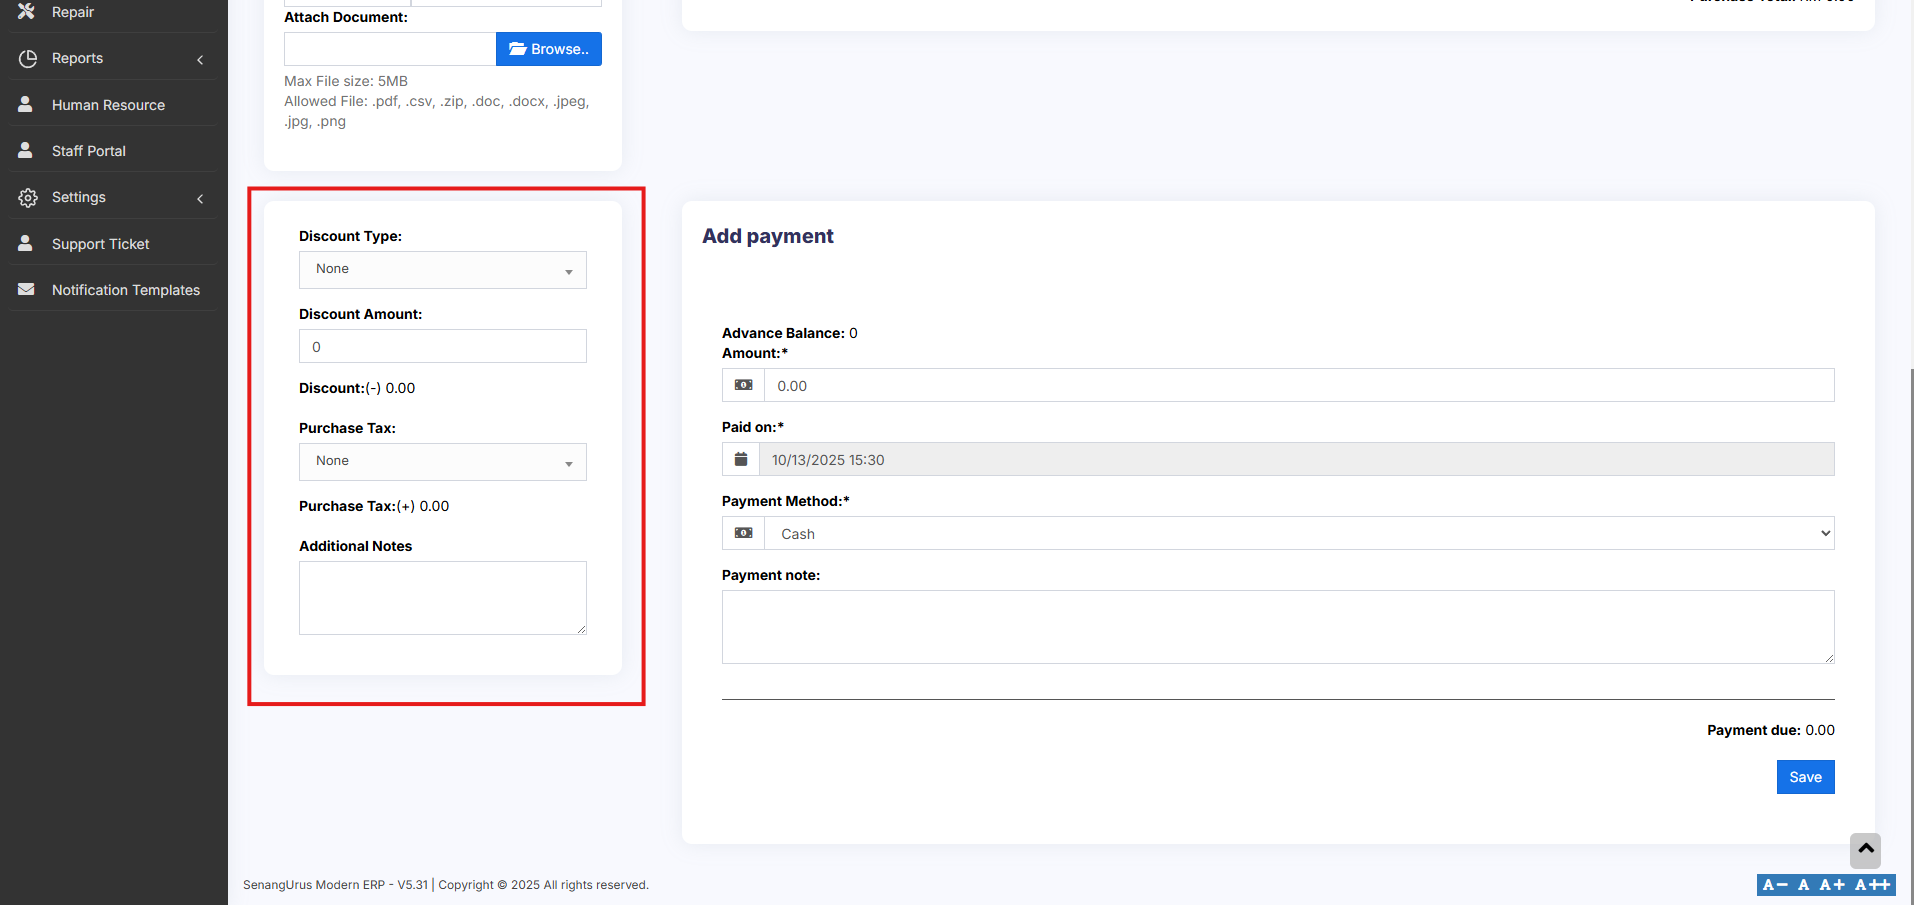
- To add a discount: Select the discount type (fixed or percentage) and enter the amount. ultimatePOS will auto-calculate the amount after discount.
- Enter purchase tax, Shipping Details, Additional Shipping charges, Payment status, & Additional notes.
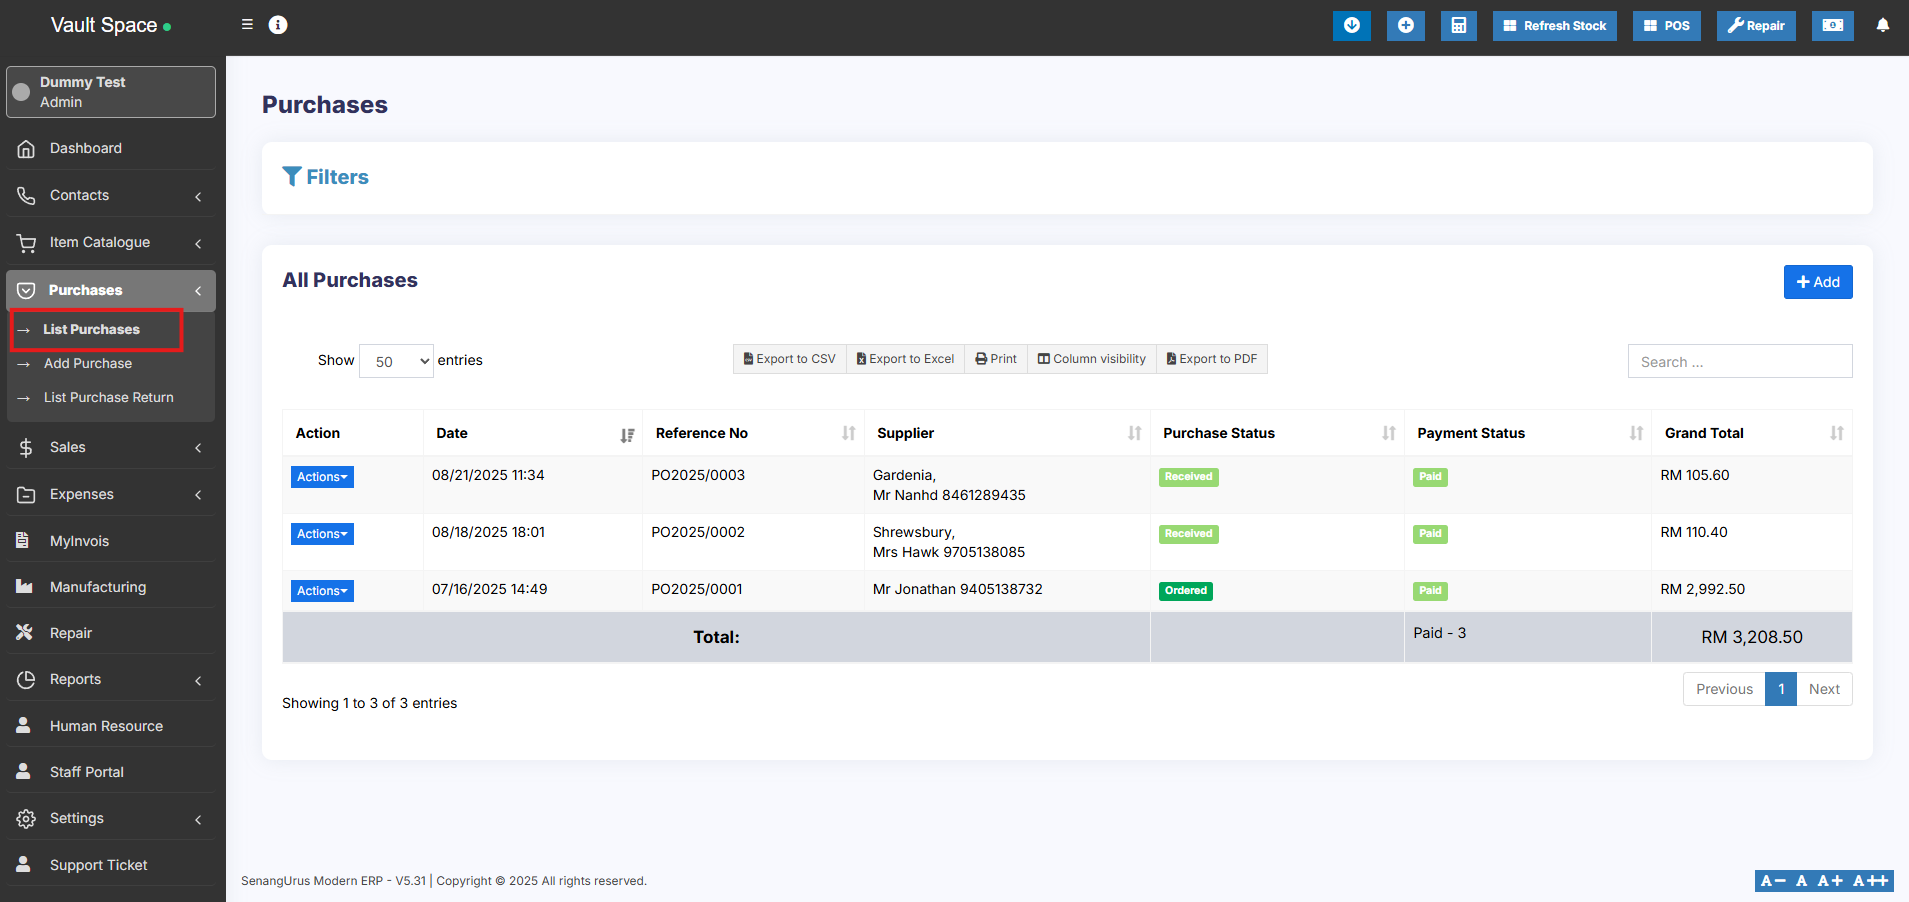
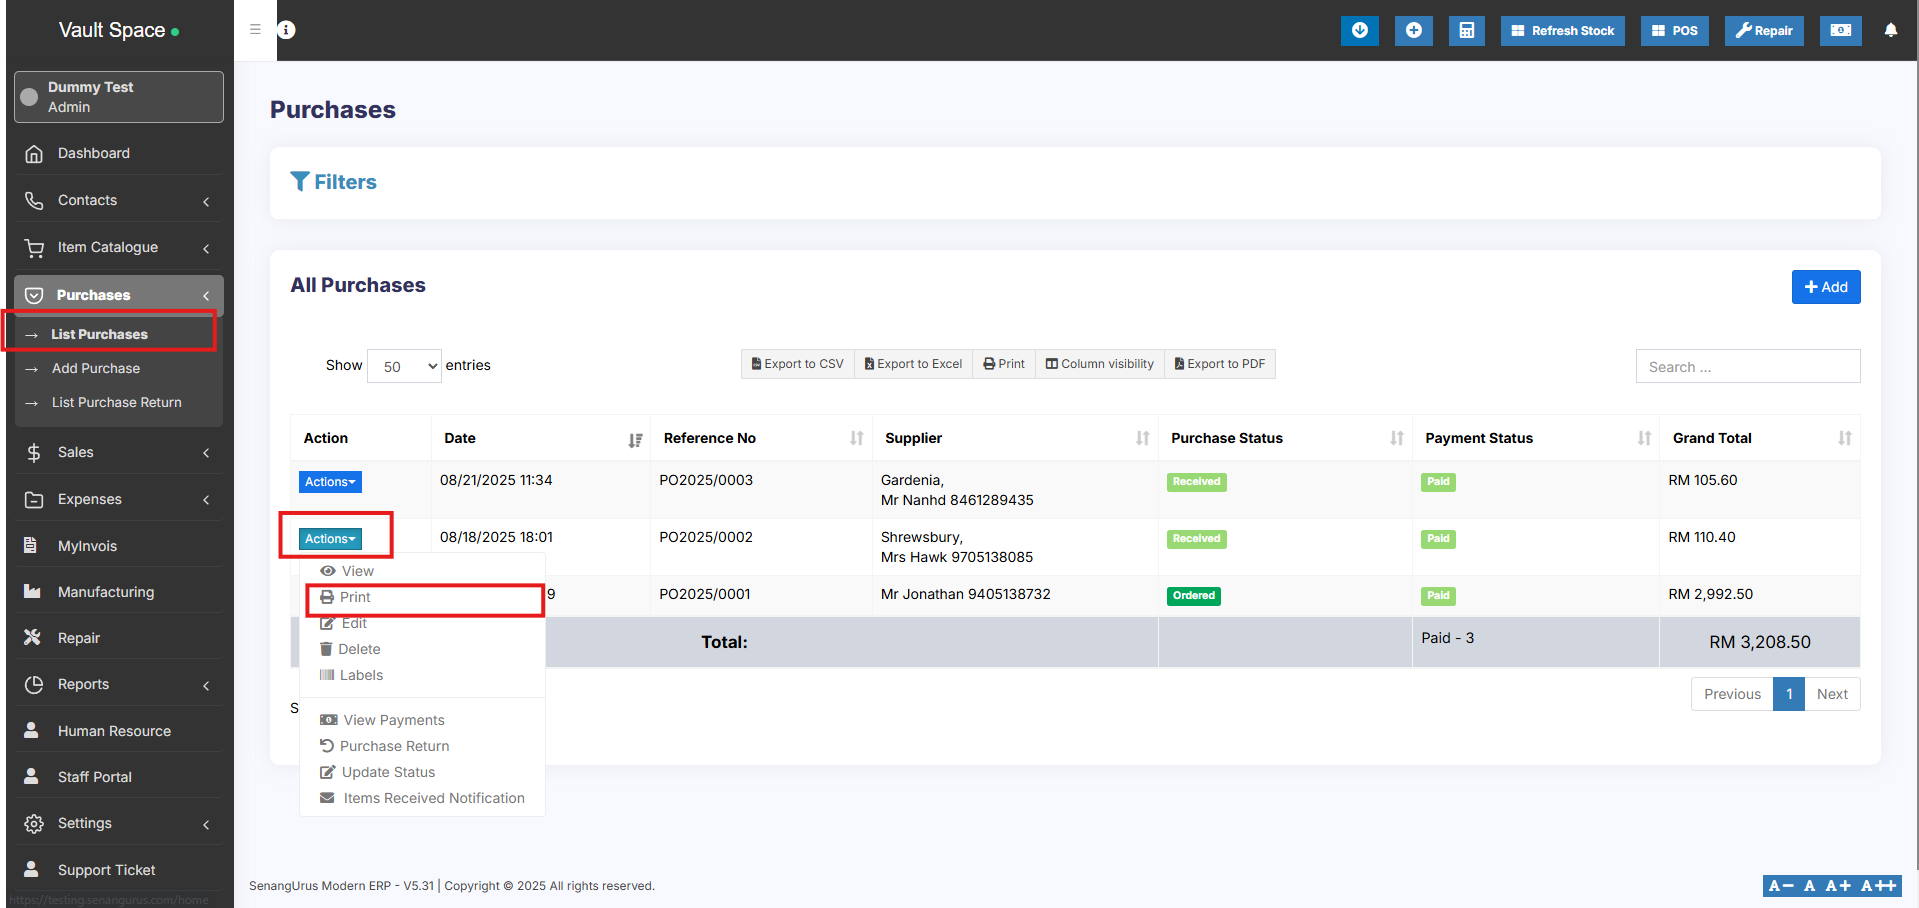
You can view the list of purchases from Purchases -> List Purchases.
You can Print Labels for your purchase by Clicking “Print Labels” in List Purchases screen.
See details on printing Labels here.
No matching product found
This error will be displayed in 3 conditions:
- Reason 1: There are no products matching the name or SKU which you have entered. Check it once in the list products.
- Reason 2: Check the business location selected in add purchase have that product. So if the business location is Location-1, then in add/edit product the product must be assigned to that location. Check More here in Add/Edit Products
- Reason 3: Make sure the product has Stock-Management ENABLED in Add/edit product. If stock management is not enabled in products then it won’t show in the add/edit purchase.
Difference between Default Purchase Price and Current Purchase Price:
Sometimes, the purchase price shown in View Product may differ from the value in reports where current stock by purchase price is calculated.
This difference occurs because the Default Purchase Price and the Current Purchase Price are not always the same.
Default Purchase Price
-
The purchase price entered when the product is first added.
-
Displayed in the View Product page.
-
Remains the same unless updated manually.
Current Purchase Price
-
The most recent purchase price based on your latest purchase entry.
-
Can vary over time depending on market changes or supplier costs.
-
Used in the Current Stock Value by Purchase Price report for calculation.
Example:
-
Last month’s steel purchase price(when product is first added to the system) : $120
-
This month’s steel purchase price: $125
-
View Product shows: $120 (default purchase price)
-
Stock Value Report shows: $125 (current purchase price)
Purchase Payments
Purchase payment meaning paying to the supplier for the Purchases.
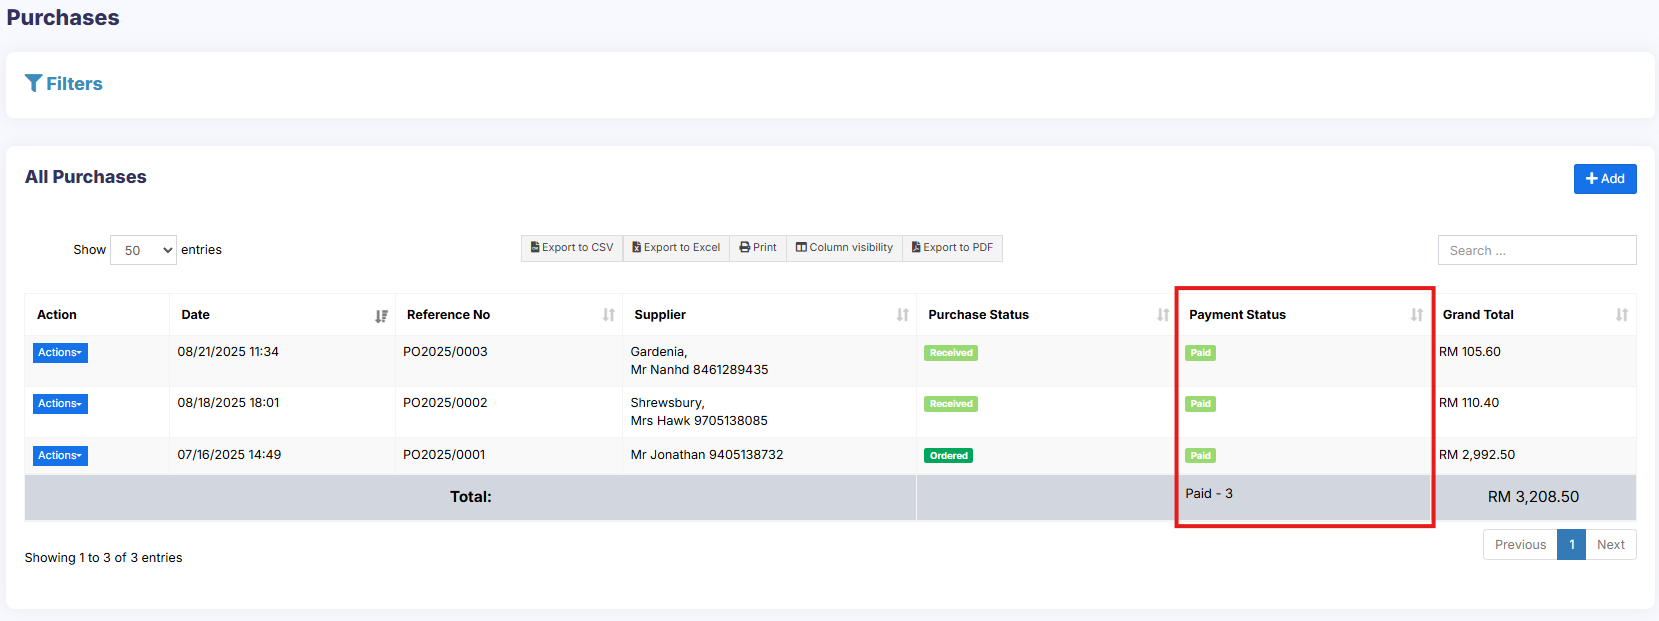
- Paid: The PO is 100% paid.
- Due: The PO is 100% not paid.
- Partial: Partial amount of the PO has been paid.
- Overdue: PO is 100% not paid & past the due date.
- Partial Overdue: Partial amount of the PO has been unpaid & past the due date.
Adding Payments
Adding payment when adding purchase:
In the add purchase screen, you can add the payment for the purchase.
Adding payment from the List Purchase screen
In list purchase click the actions for any PO and it will display the list of actions for it. This option is not displayed if there is no payment due.
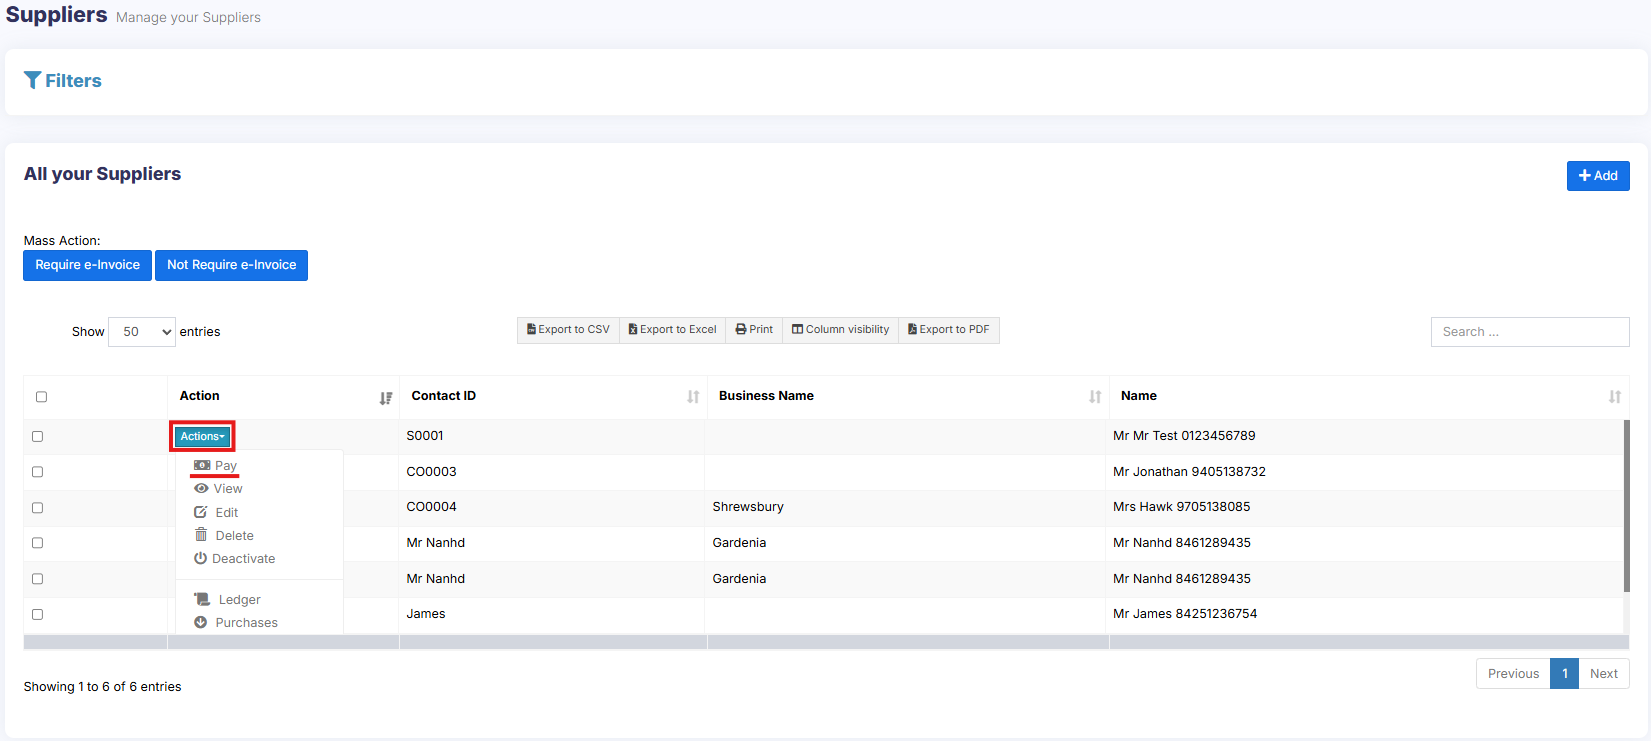
Adding payments from Contact
From list contacts screen, you can add payment for a supplier for all or multiple purchases at once.
When you make a payment for a supplier, the system will automatically mark the purchase invoices as paid in the order of their payment terms – starting from the oldest due invoice to the latest.
Go to contact -> Suppliers. Click on actions for the supplier, and it will show “Pay “, click on it, and pay the amount.
Adding/Editing Payment Method or Pay-Via
Follow Add/Edit Pay-Via / payment method.
Purchase Invoice
Purchase Invoice:
An invoice for purchase can be generated at every purchase.
To print a purchase invoice, Go to List Purchase > Actions > Print.
Barcode for Purchase Invoice:
The barcode is automatically generated in the purchase invoice based on the purchase invoice number.
Purchase Requisition
What is Purchase Requisition(PR)
The purchase requisition is a document that an employee creates to request a purchase of some products when the stock reaches a low level.
Only products less than the alert quantity will be shown while creating the purchase requisition.
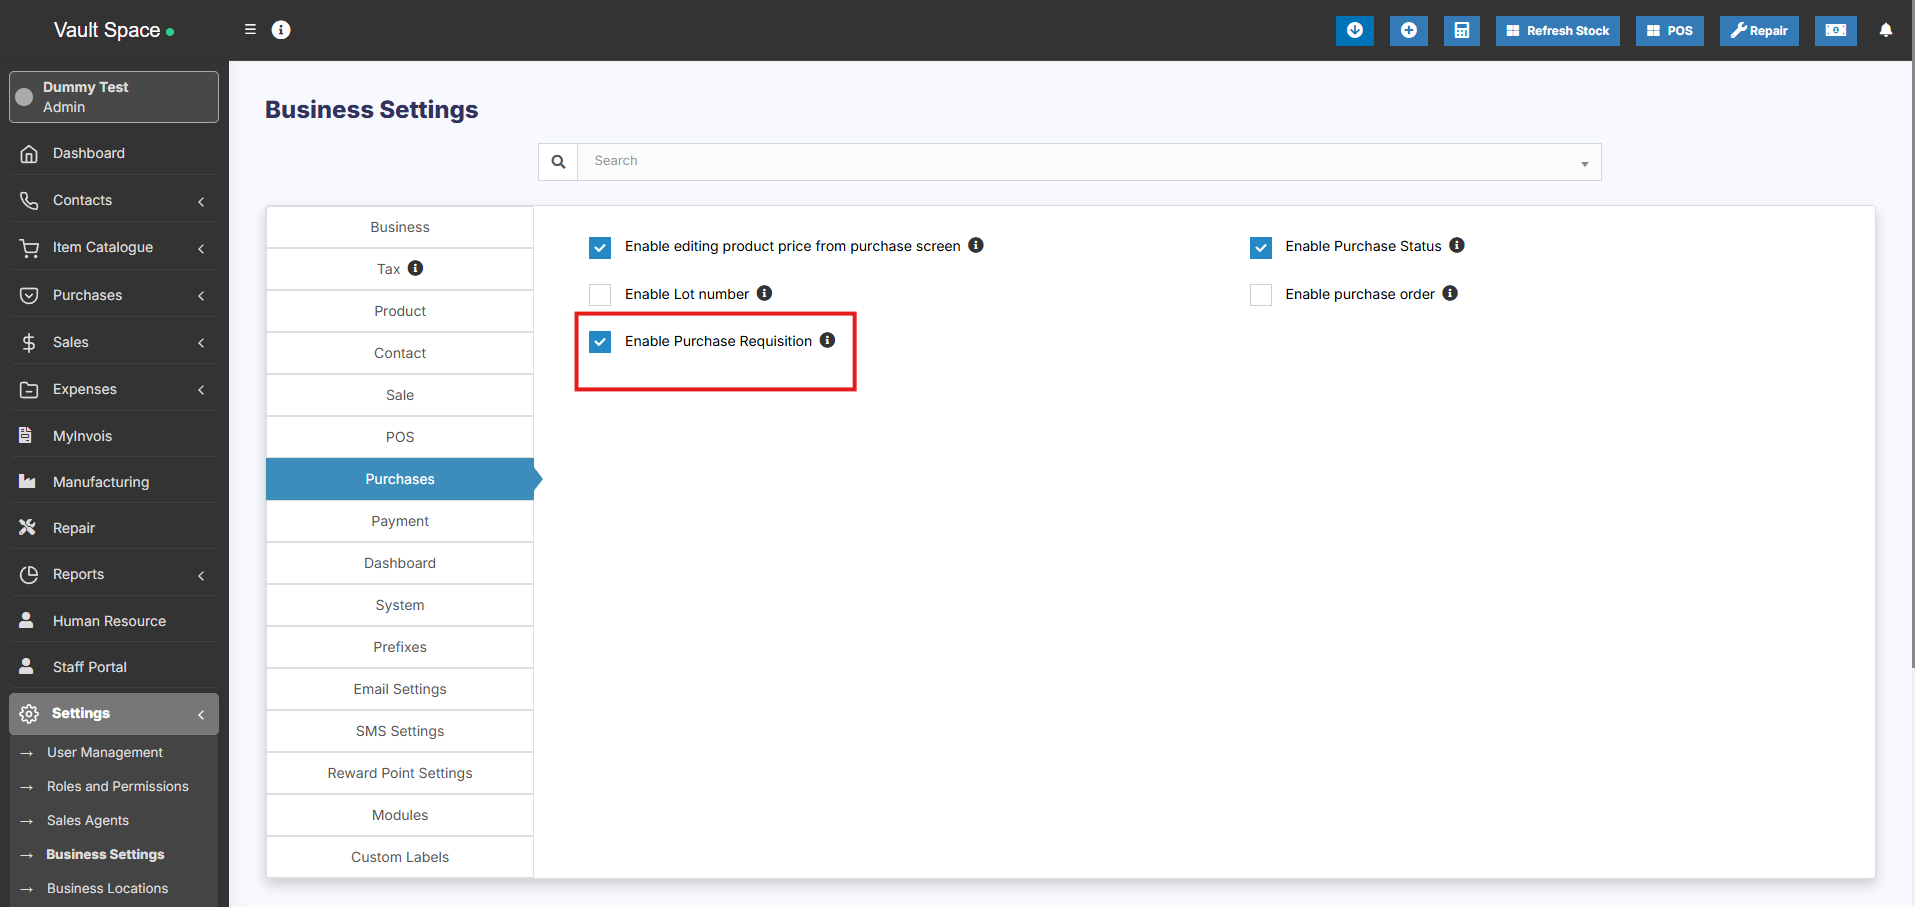
Enabling Purchase Requisition
Go to Settings -> Business Settings -> Purchase and enable the purchase requisition check box.
The purchase requisition tab will be shown in the sidebar.
NOTE: At least one purchase entry must be recorded for a product in order for it to appear on the Purchase Requisition screen. If no purchase has been added for the product you are trying to include, it will not be displayed in the Purchase Requisition screen.
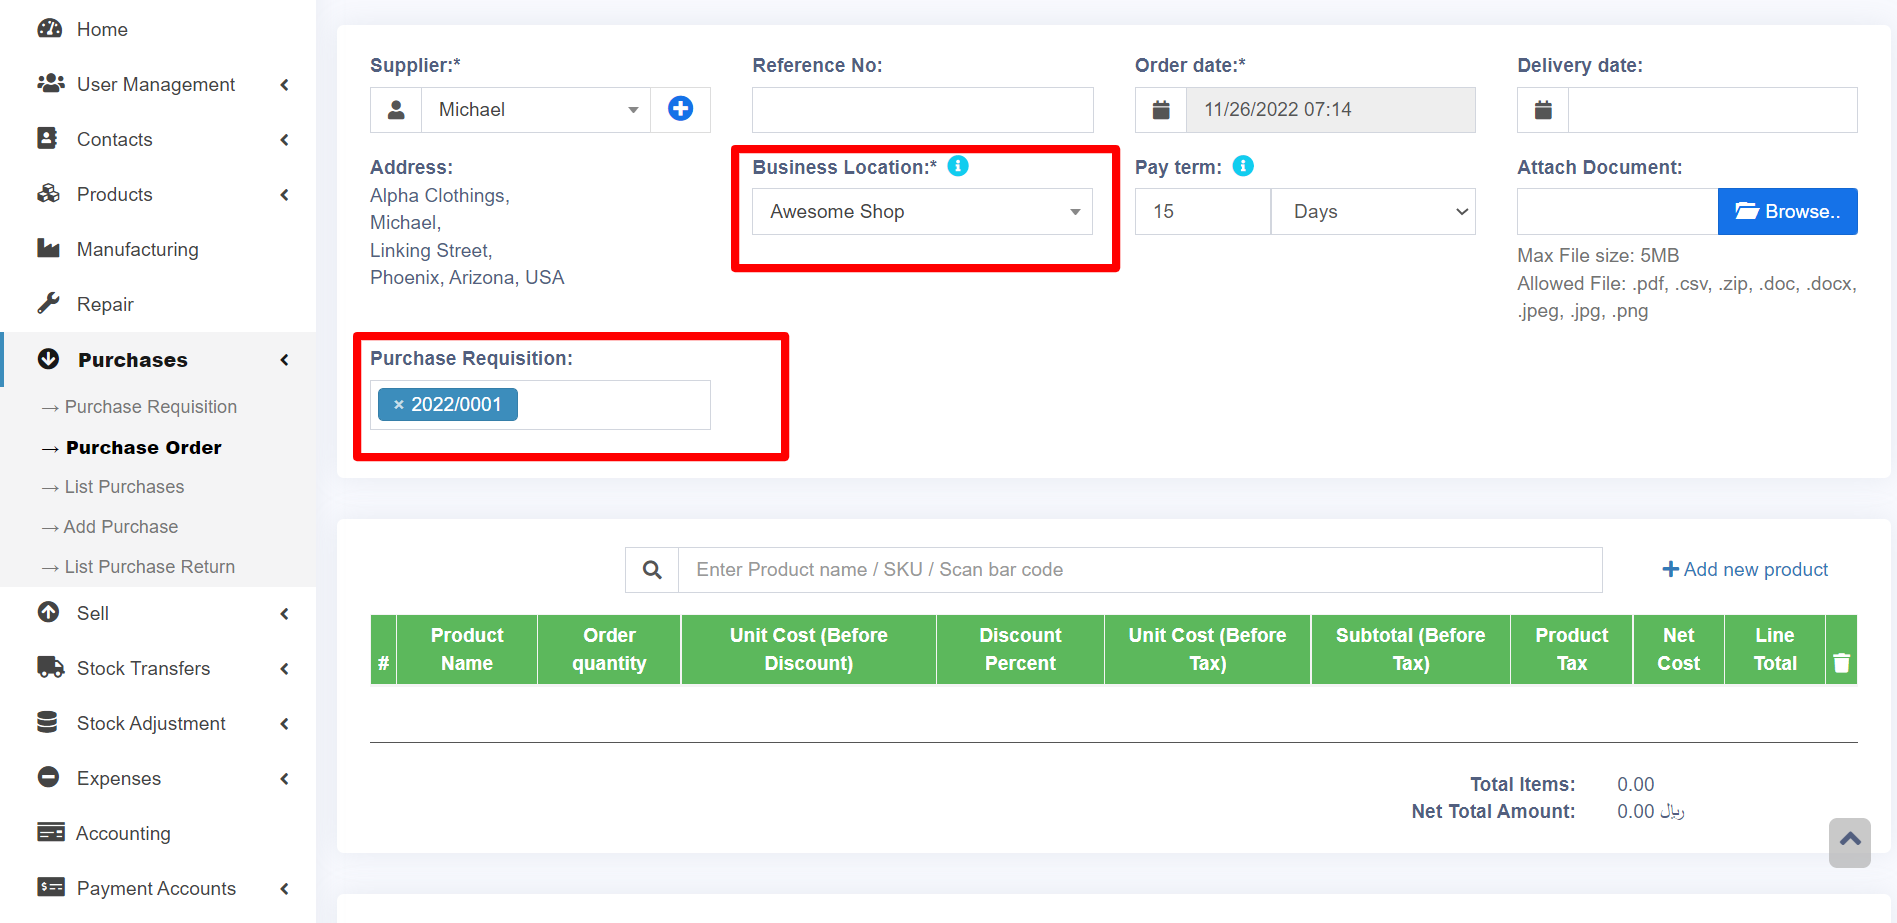
Converting Purchase Requisition to Purchase Order
Once PR is added it’s converted to Purchase Order.
To convert it into a purchase order, follow the steps below.
Go to Purchase order -> Add. [Purchase order document - https://docs.senangurus.com/books/senangurus-business/page/purchase-order]
Here when you select the corresponding supplier the PR id will be shown.
Select the required PR id.
Partial Purchase
If the ordered quantity in the PR is reduced while converting it into a purchase order, then the status will automatically change from ordered to partial.
Purchase Order
What is a Purchase Order?
A purchase order is a document given by the buyer (usually you) to the supplier to request a purchase of goods.
A purchase order contains the buyer invoicing details, delivery details, products, quantities, pricing, tax, discounts, payment terms, payment details, shipping charges if any, and other notes.
The supplier will issue a sales order against the purchase order you have provided.
A purchase order has multiple statuses: Ordered, Partial, Completed.
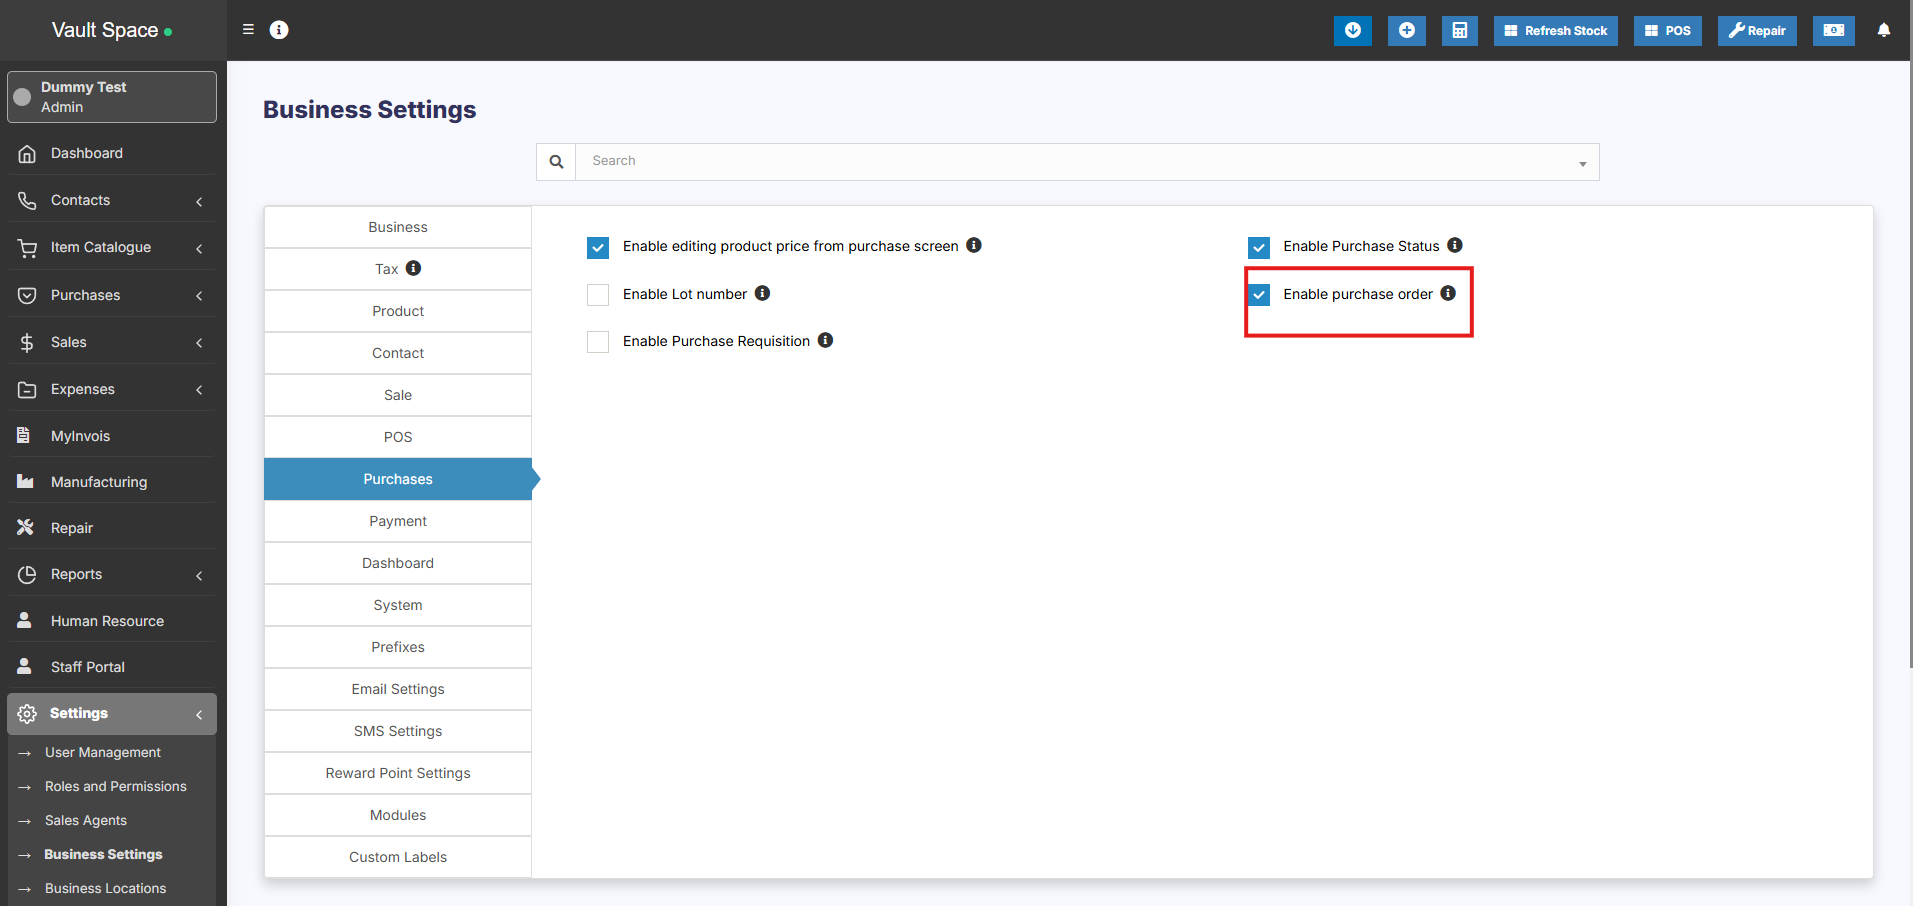
Enabling Purchase Order
To enable purchase Order, follow the below steps:
- Go to Settings -> Business Settings
- Purchase tab -> Enable Purchase Order
- Save it.
Using Purchase Order in SenangUrus Business
Creating purchase order
After Enabling Purchase order, inside Purchase you’ll find the Purchase -Order menu.
Go to add Purchase order, fill in all the details and save it.
Stocks are not added on issuing Purchase orders.
Once a Purchase order is created you can print it and send it to the supplier.
Converting purchase Order to Purchase
On receiving Purchase orders the supplier issues a sales or invoice.
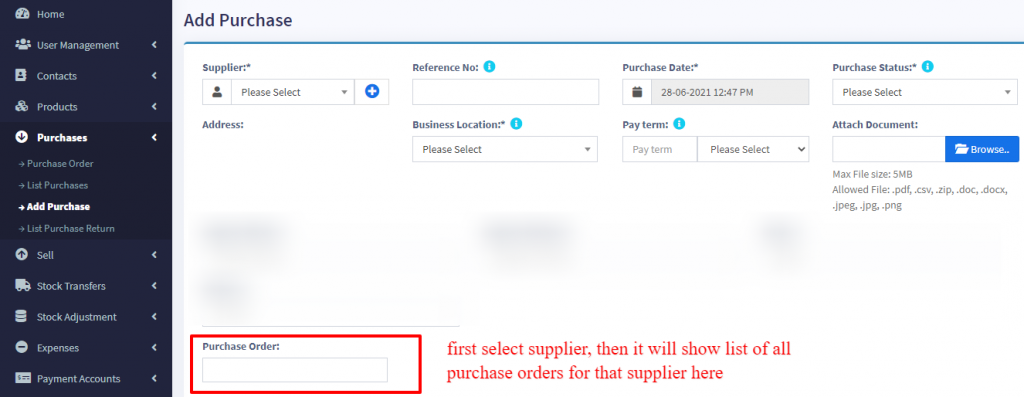
- Go to Purchase -> Add Purchase, select the supplier.
- On Selecting it will populate the list of all Purchase orders related to the supplier on the “Purchase Order” dropdown.
- Select the Purchase Order and it will auto load the products for that order with the product’s price, tax, discounts applied automatically as the sales order.
- You can increase or decrease the quantity.
- Save it and the status of the Purchase order will change automatically.
Video Demonstration:
Adding Bonus or Free Items given by supplier
Adding Bonus Items or Free items given by Suppliers
2 ways you can do this:
Solution 1:
When adding purchases simply make purchase price 0 for the free items.
Solution 2:
Find the average price of the item and use that for unit price.
for example, if you purchase 10 quantity for a price of $2 each, 10X2 = $20
Purchase custom fields
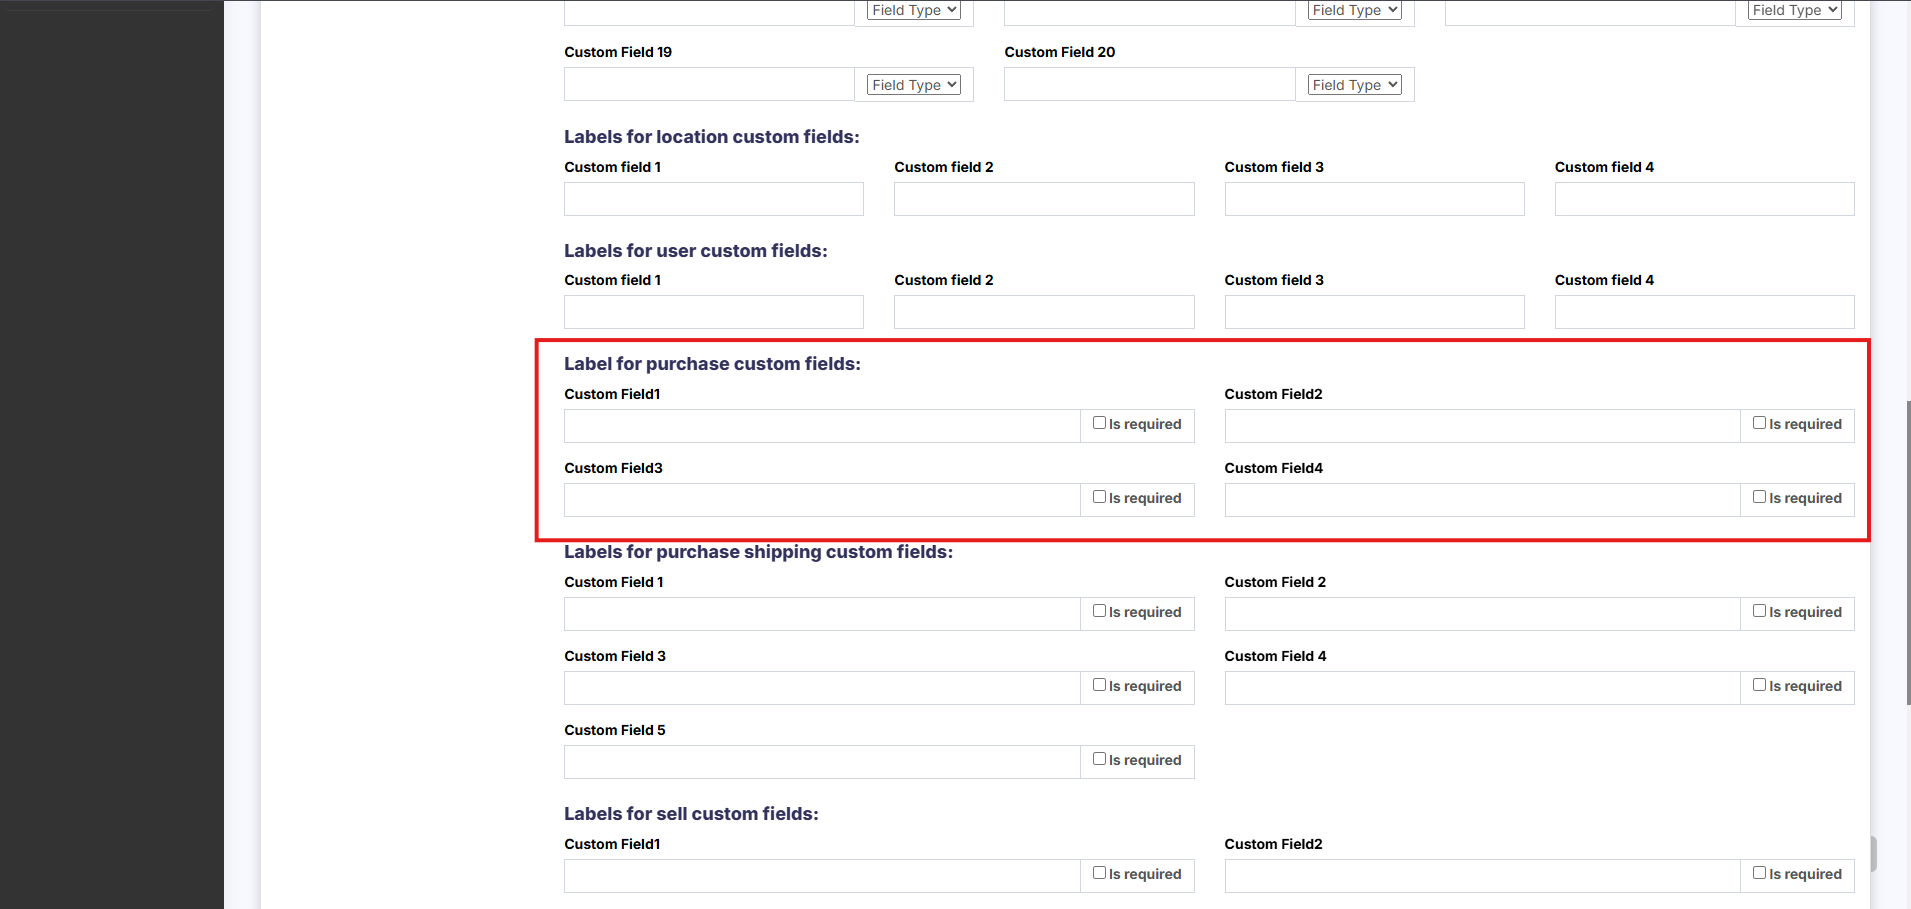
How to Enable Purchase Custom Fields
-
Go to Settings → Business Settings → Label for Purchase Custom Fields
-
Enter a label for each custom field you want to enable
-
Once a label is added, the corresponding custom field will automatically appear in the Purchase screens
-
-
To make a field mandatory, check the “Is Required” checkbox next to the label