# Products
# Products Management
### Adding Products
To add a new product to the system, follow the steps below:
**Step 1: Navigate to Item Catalogue**
- Go to **Add Items**
[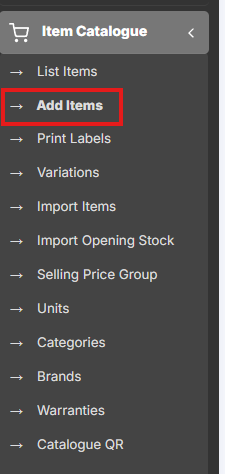](https://docs.senangurus.com/uploads/images/gallery/2025-10/yiXimage.png)
**Step 2: Enter Product Details**
Fill in the following fields:
- **Product Name**: Enter the name of the product.
- **Brand**: Select the brand if applicable.
- **Units**: Choose the appropriate unit (e.g., pcs, kg, litres).
- **Category**: Select the main category for the product.
- **Sub-category**: (Optional) Choose a sub-category if applicable.
[](https://docs.senangurus.com/uploads/images/gallery/2025-10/ZBtimage.png)
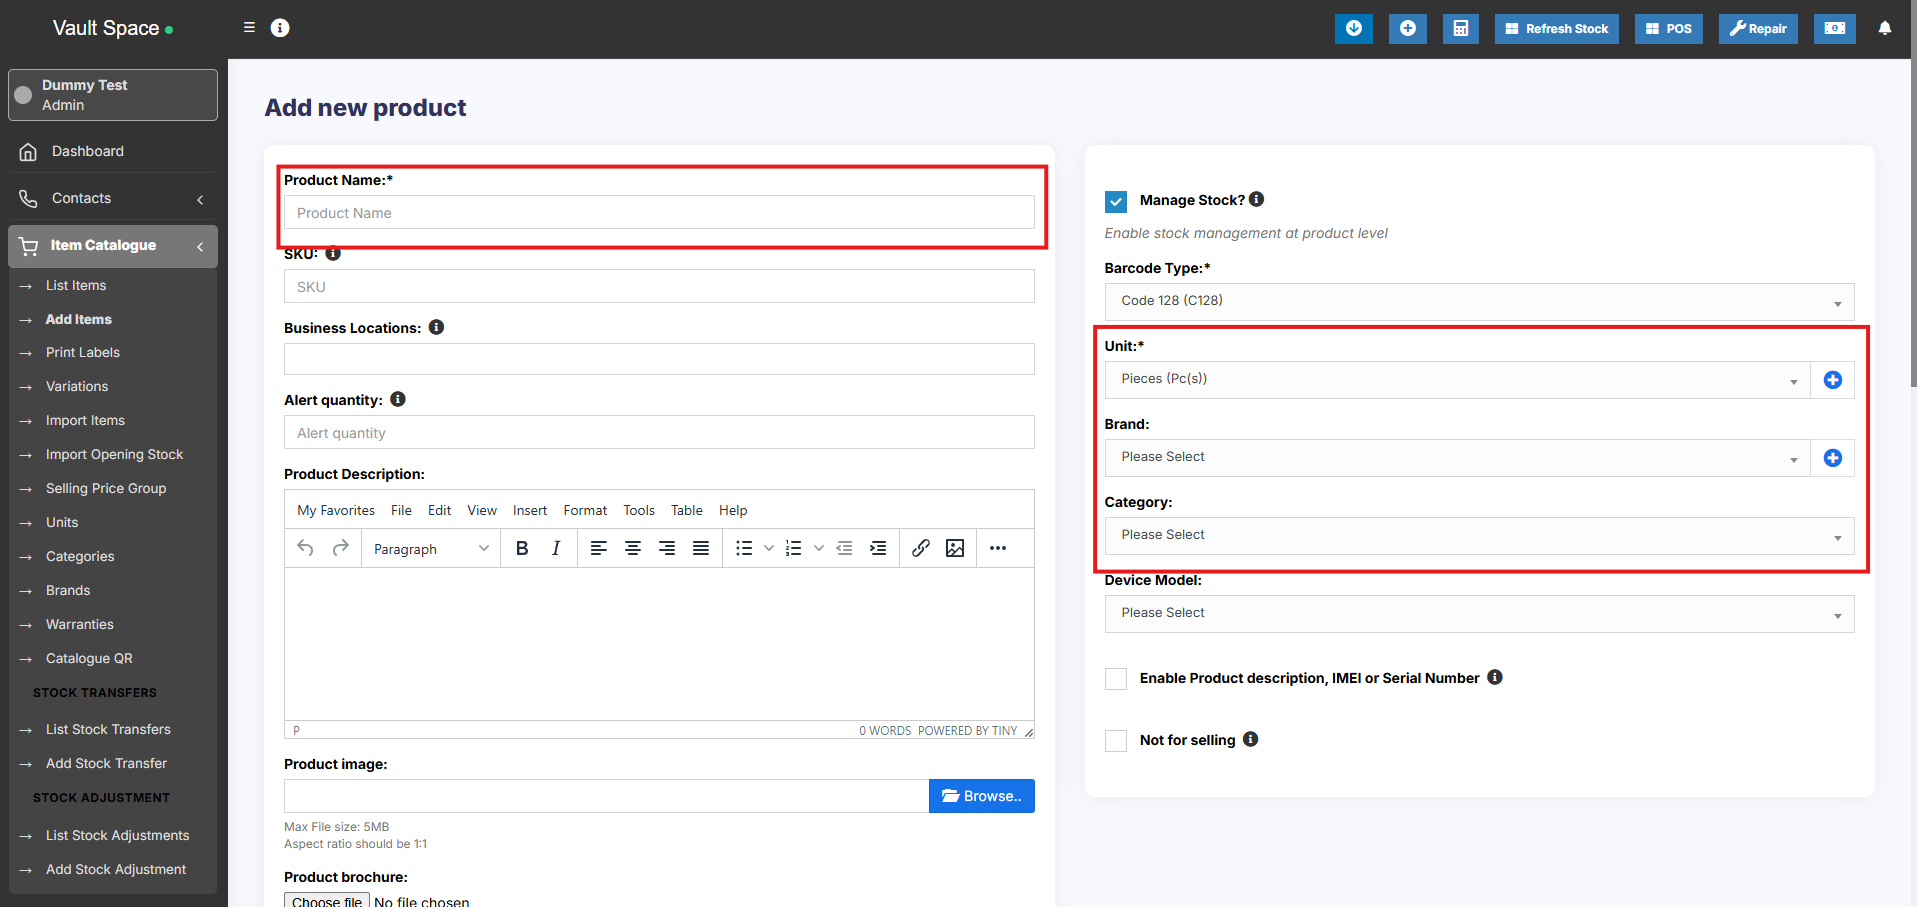
**Step 3: Set SKU (Stock Keeping Unit)**
- **SKU** is a unique identifier used for barcodes and product tracking.
- You can enter a custom SKU or leave it empty to **auto-generate** one.
- Optionally, add a **Prefix** to the auto-generated SKU for easy identification.
[](https://docs.senangurus.com/uploads/images/gallery/2025-10/4KLimage.png)
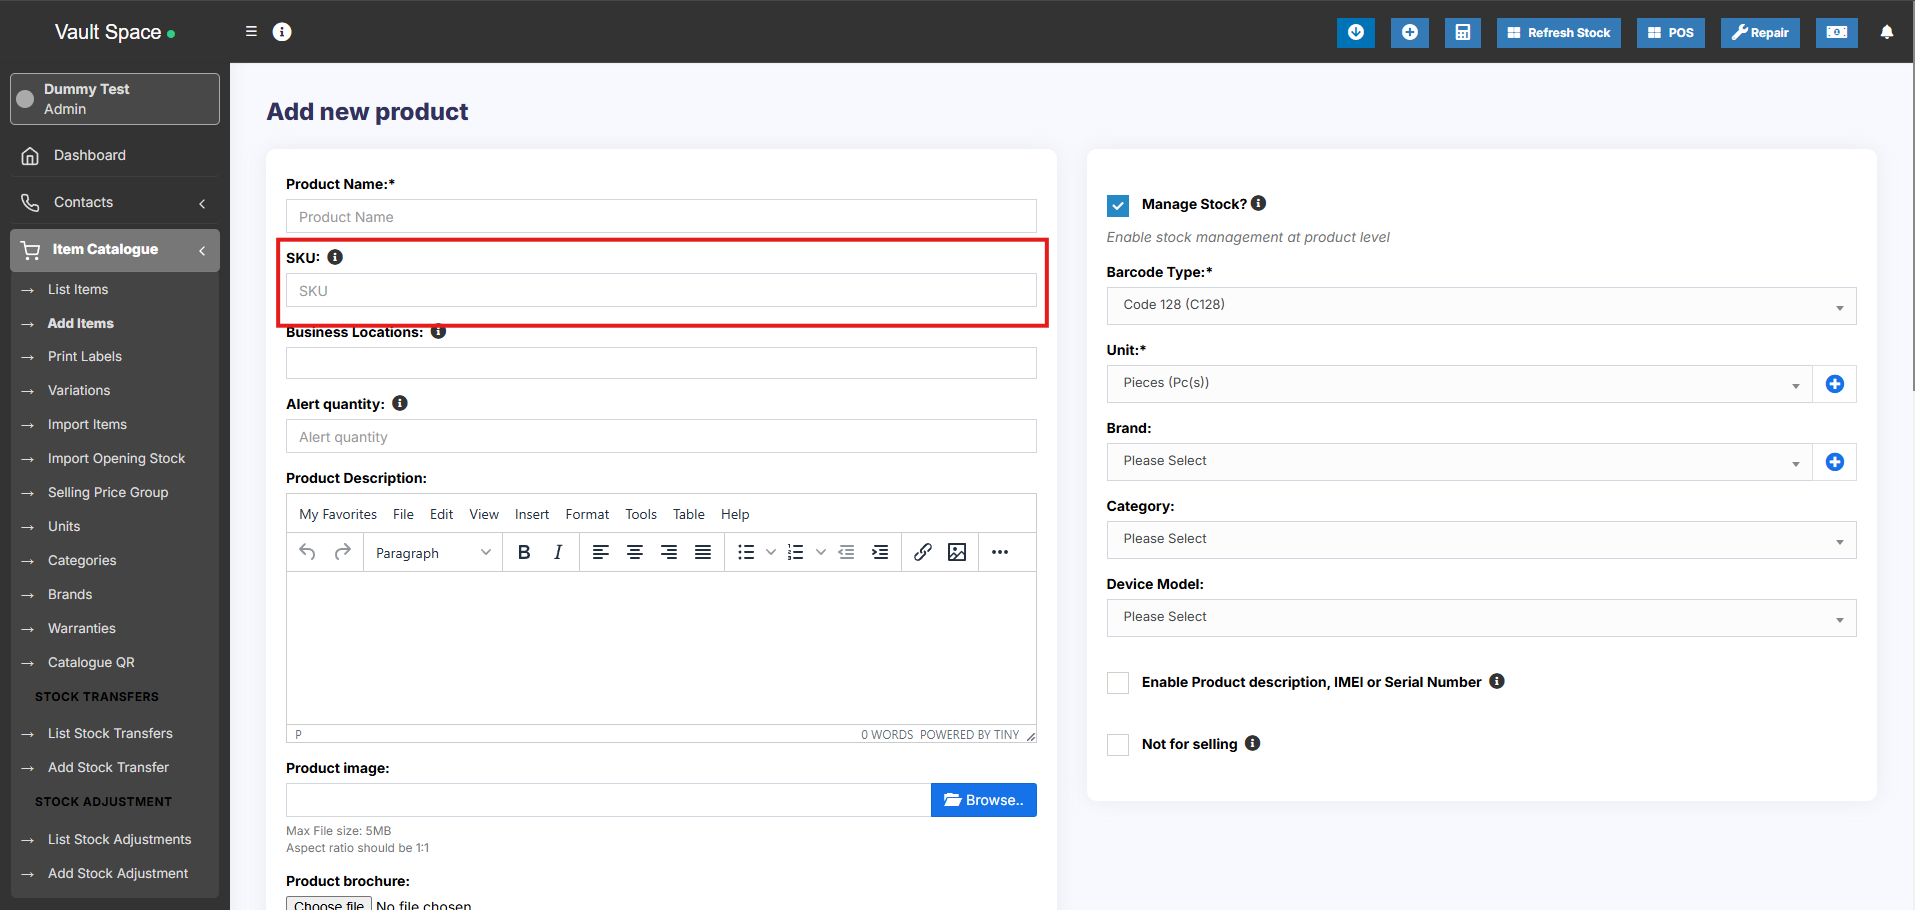
**Step 4: Select Barcode Type**
- Choose a **Barcode Type**. The default and recommended option is **C128**. (Change the barcode type only if your product already has an existing SKU/barcode format.)
[](https://docs.senangurus.com/uploads/images/gallery/2025-10/2Bcimage.png)
**Step 5: Not For Selling (Optional)**
- Enable **Not For Selling** if the product should not appear in the **POS or Sales Screen**. (This option is useful for ingredients in manufacturing or to temporarily disable a product from being sold).
[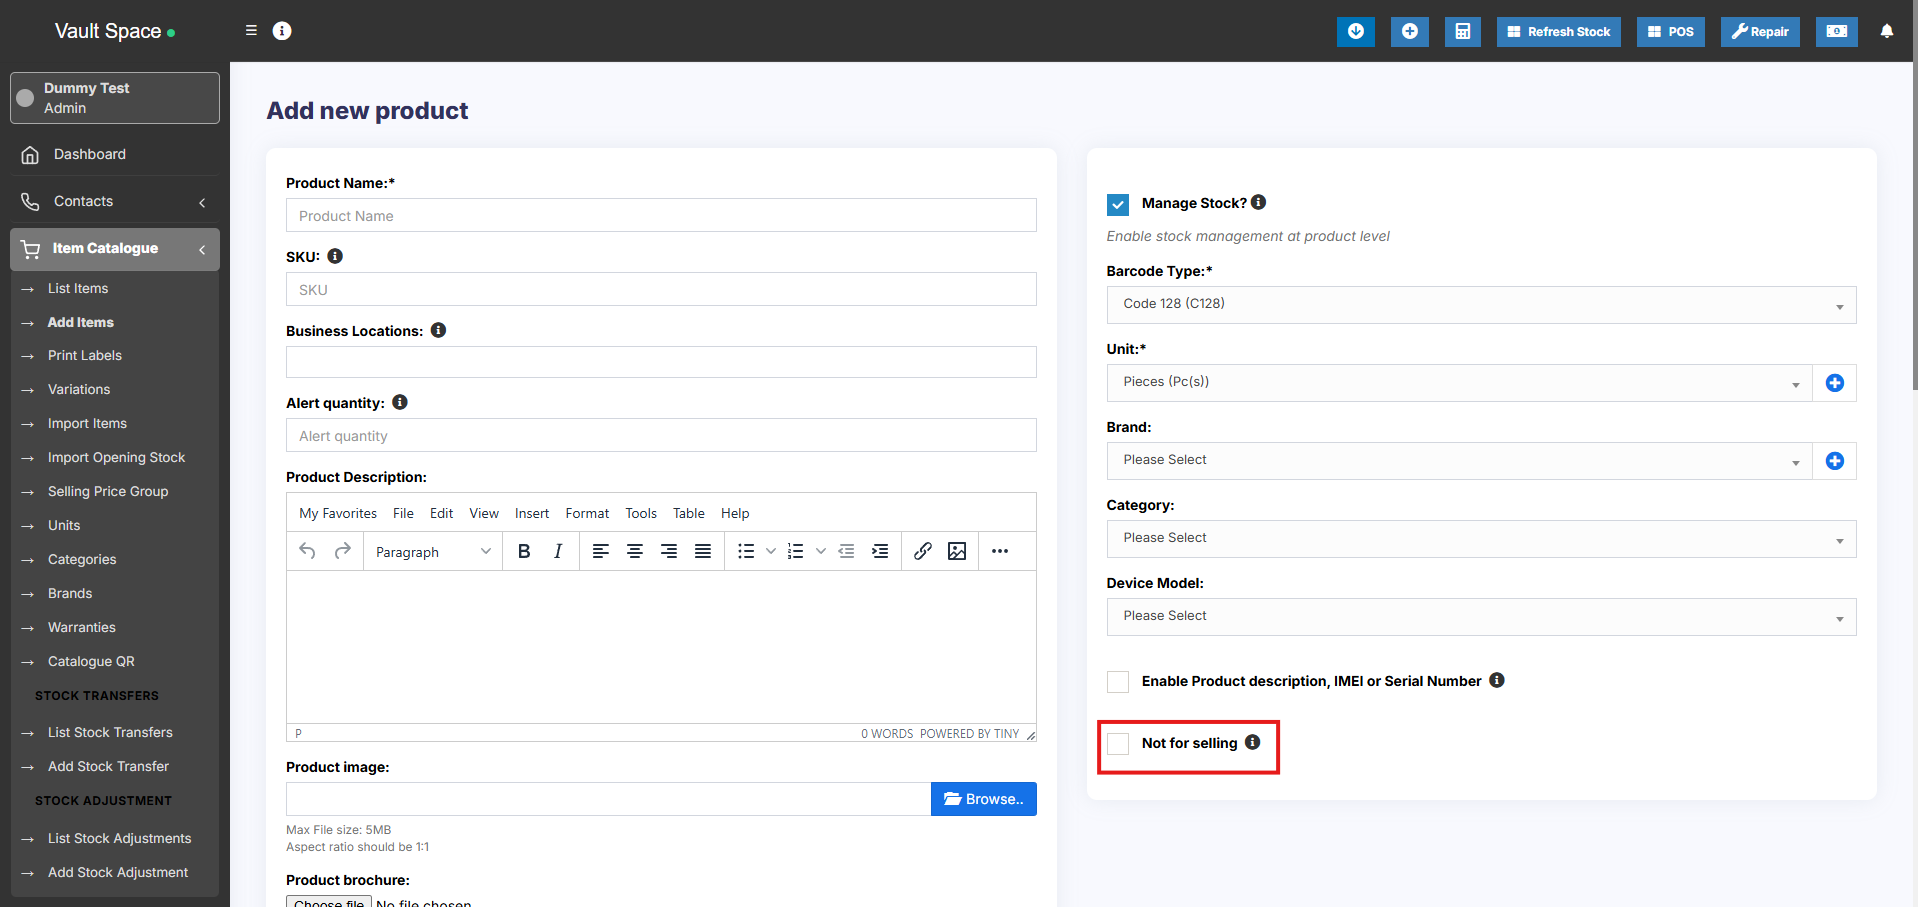](https://docs.senangurus.com/uploads/images/gallery/2025-10/ollimage.png)
**Step 6: Set Alert Quantity**
- Define the **Alert Quantity** to get notifications when stock levels fall to or below this number.
[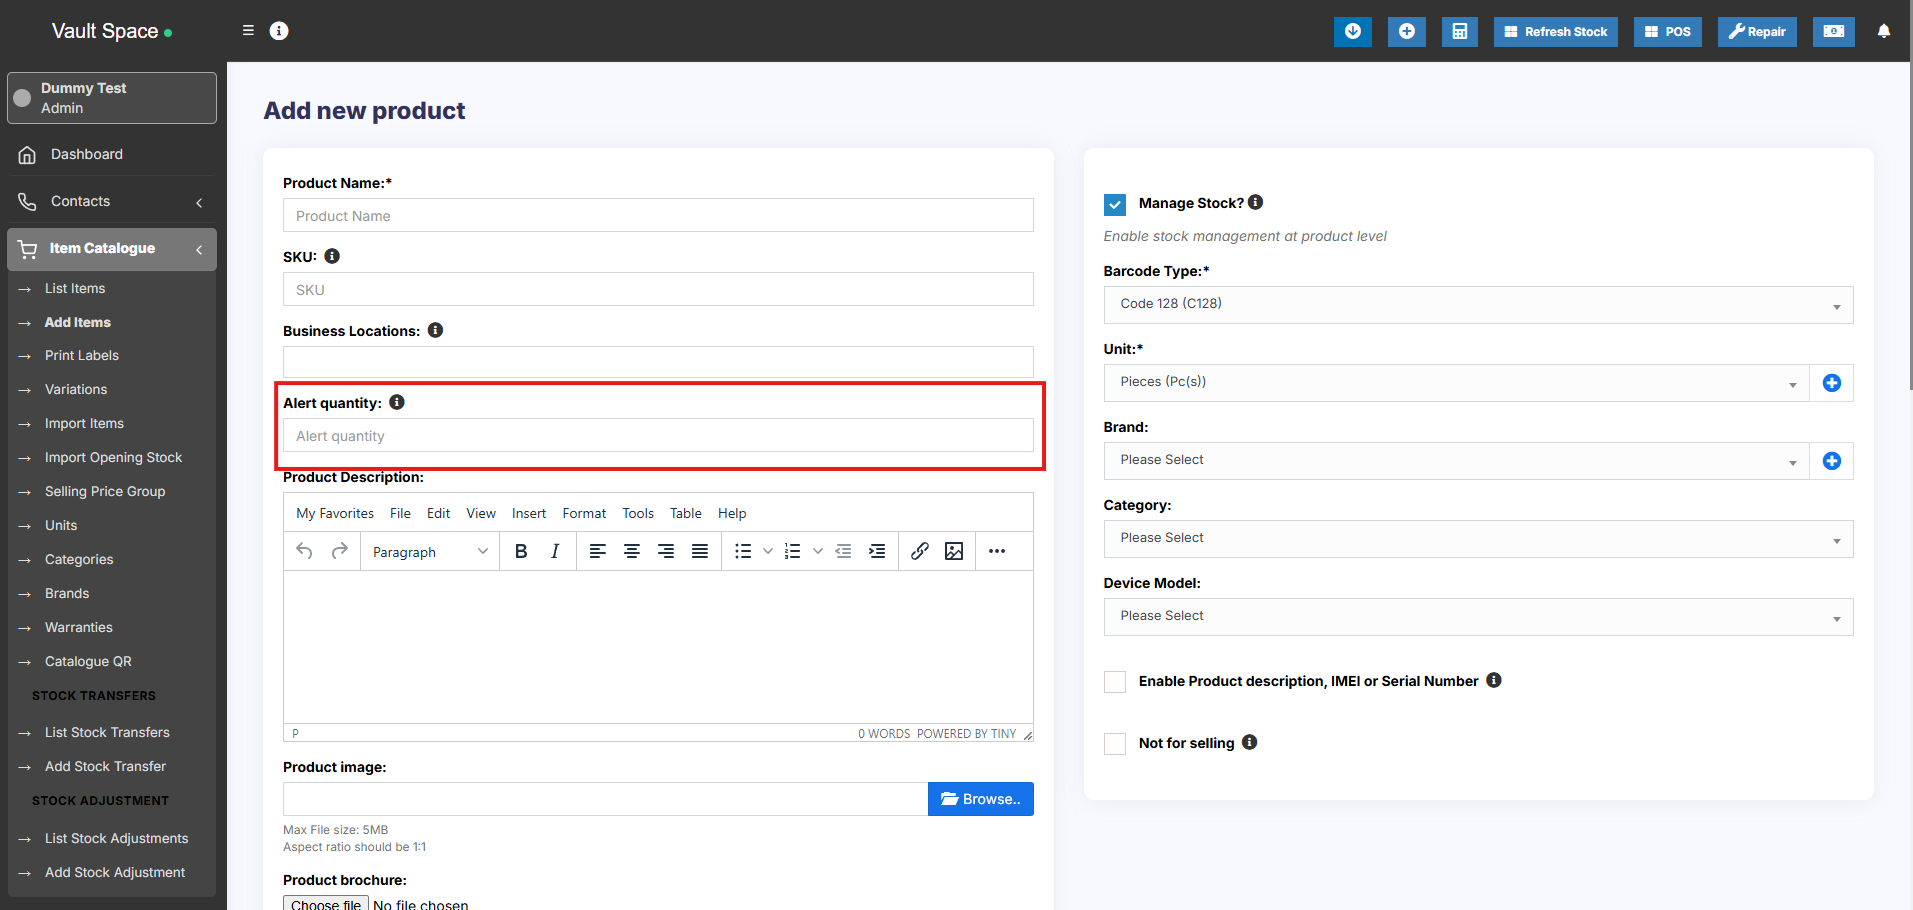](https://docs.senangurus.com/uploads/images/gallery/2025-10/9ssimage.png)
**Step 7: Manage Stock**
- Enable or disable **Stock Management** for the product.
[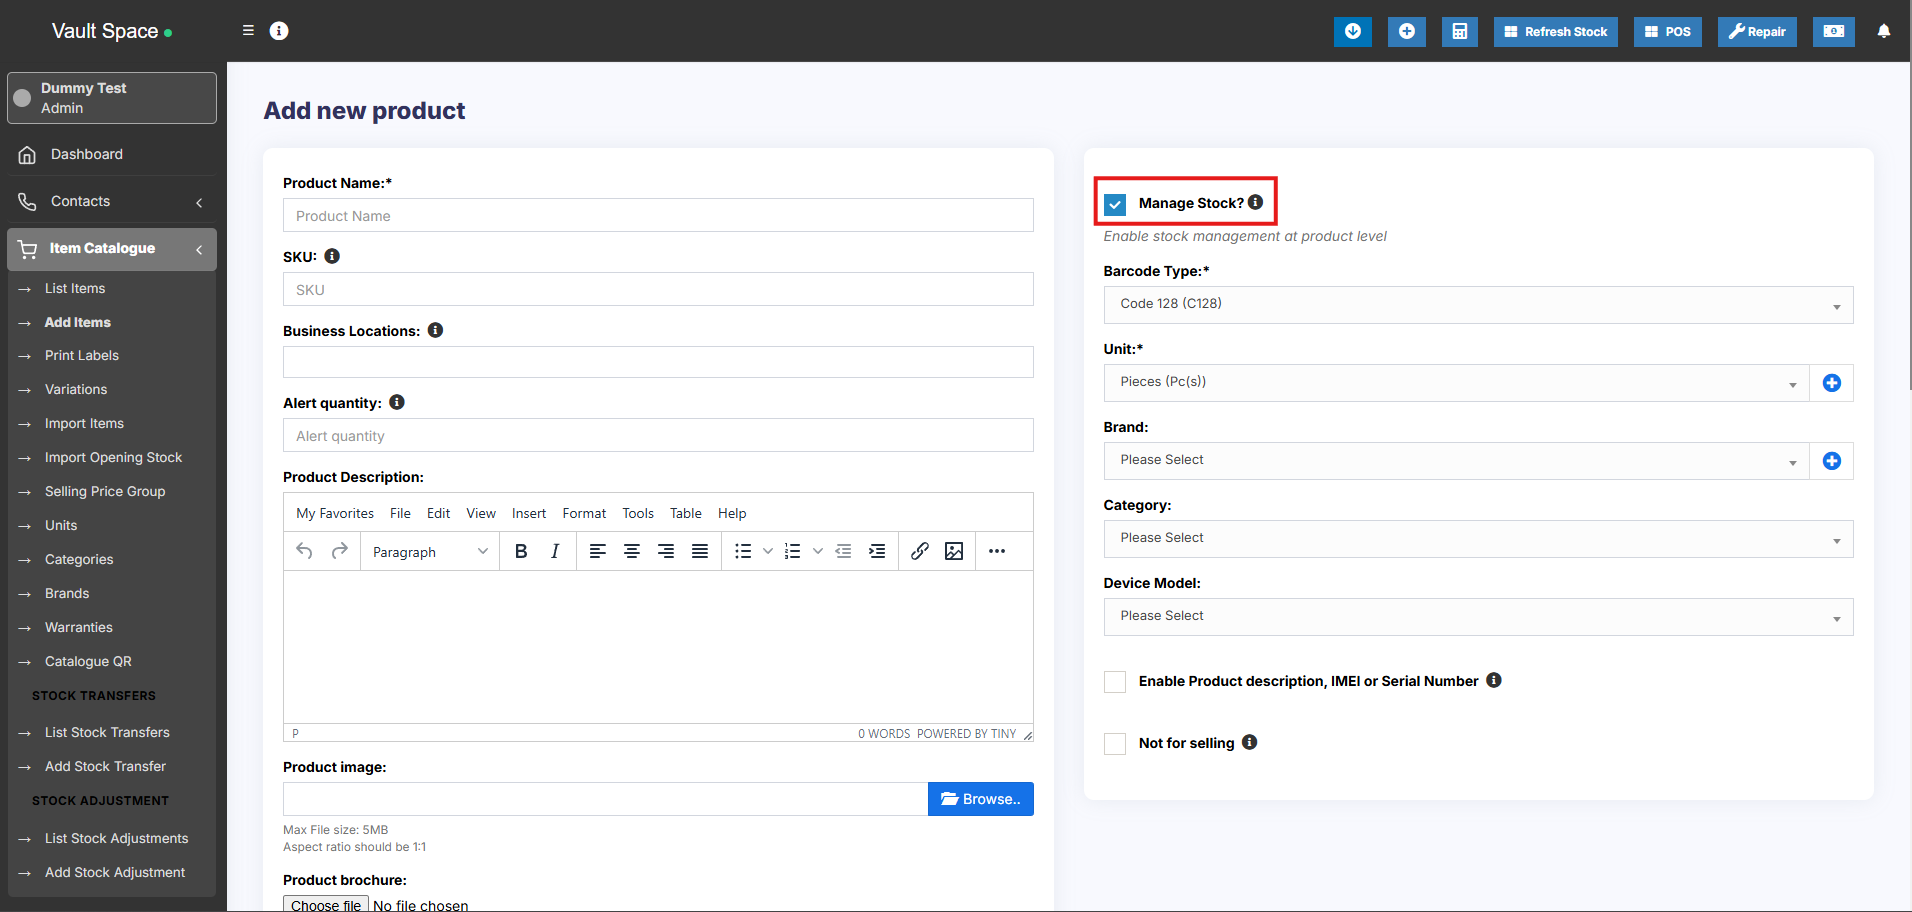](https://docs.senangurus.com/uploads/images/gallery/2025-10/FYtimage.png)
For services (e.g., **Repairing**, **Haircutting**, **Web Development**), stock management is not required.
When stock management is disabled, the product can be sold in unlimited quantities.
**Step 8: Select Business Location(s)**
- Choose the **Business Locations** where this product will be available for sale or purchase.
[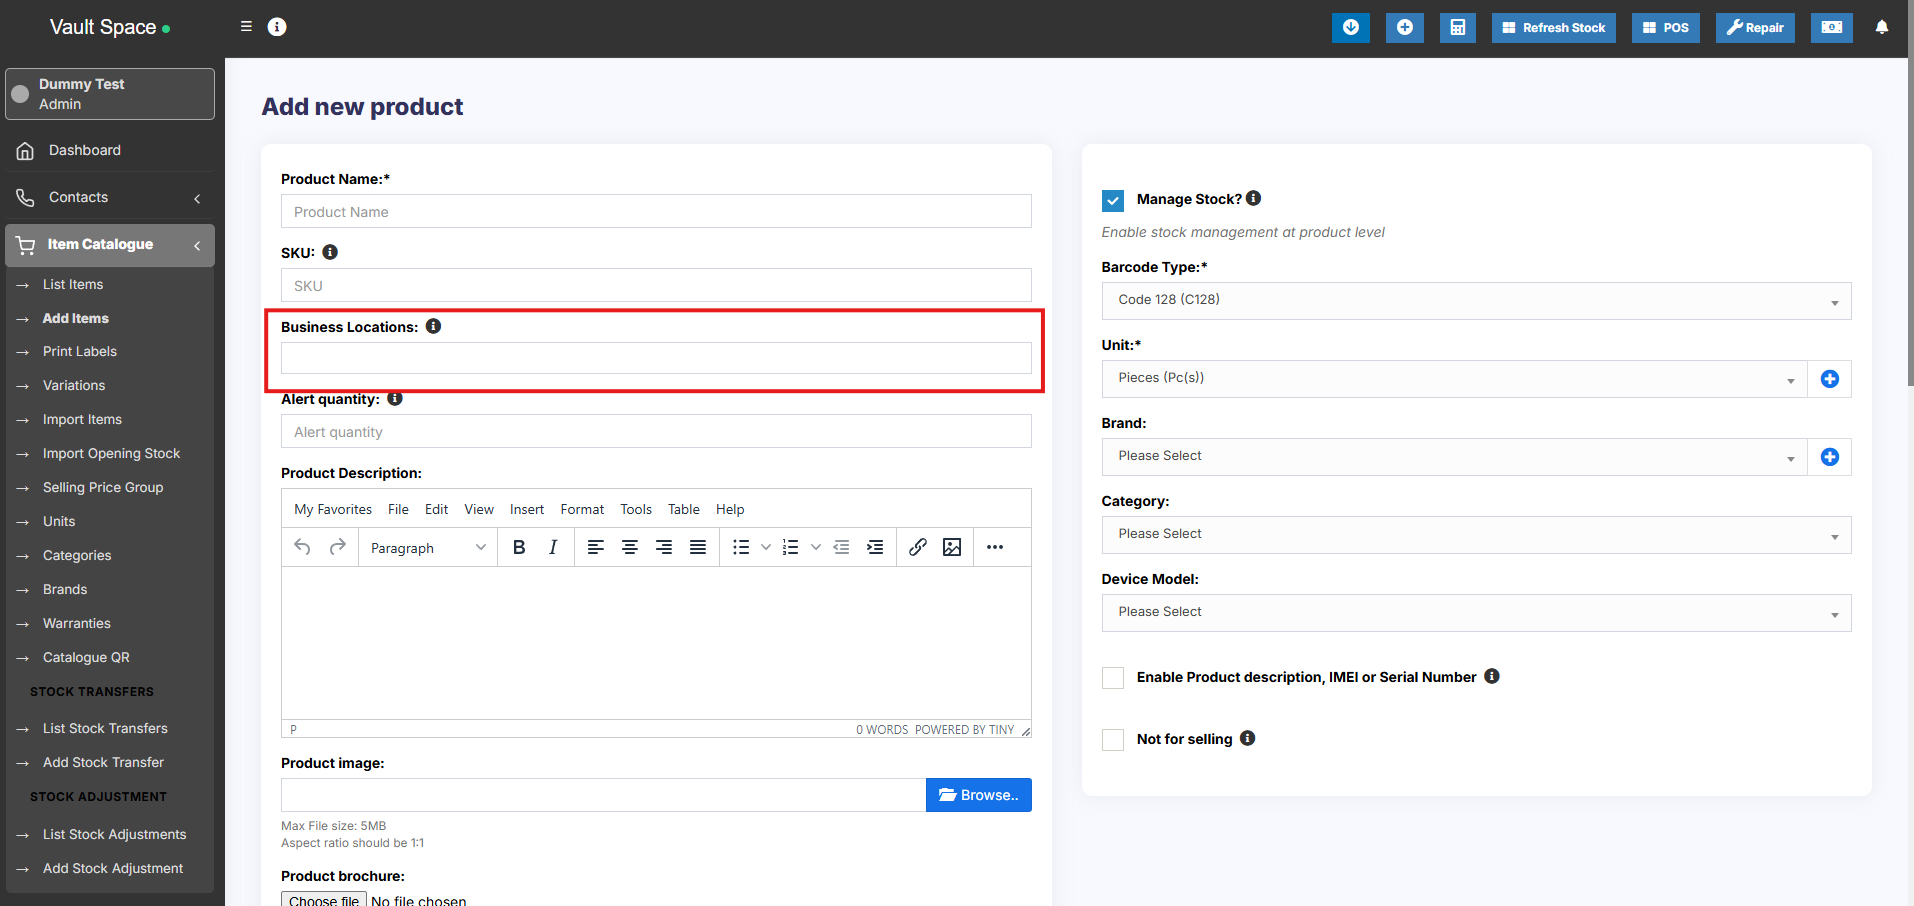](https://docs.senangurus.com/uploads/images/gallery/2025-10/39oimage.png)
**Step 9: Set Applicable Tax**
- Select the **Applicable Tax** (e.g., GST, VAT) for this product.
[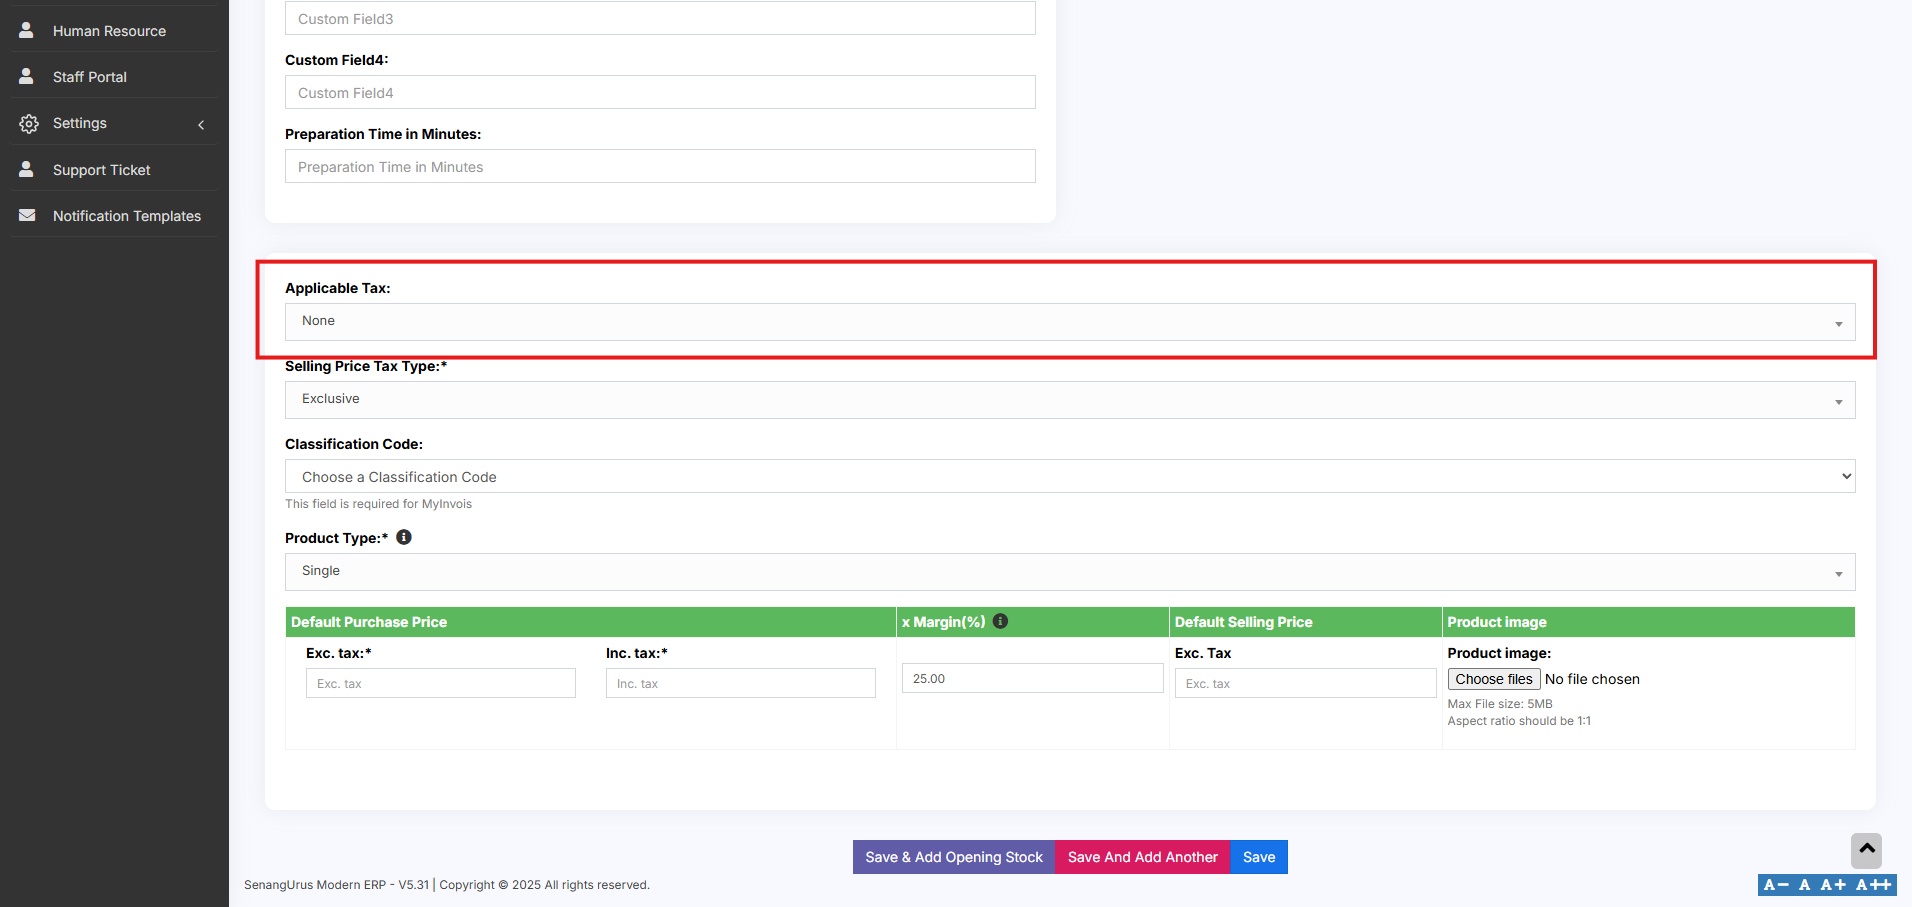](https://docs.senangurus.com/uploads/images/gallery/2025-10/yDWimage.png)
Make sure tax rates are configured in the system beforehand.
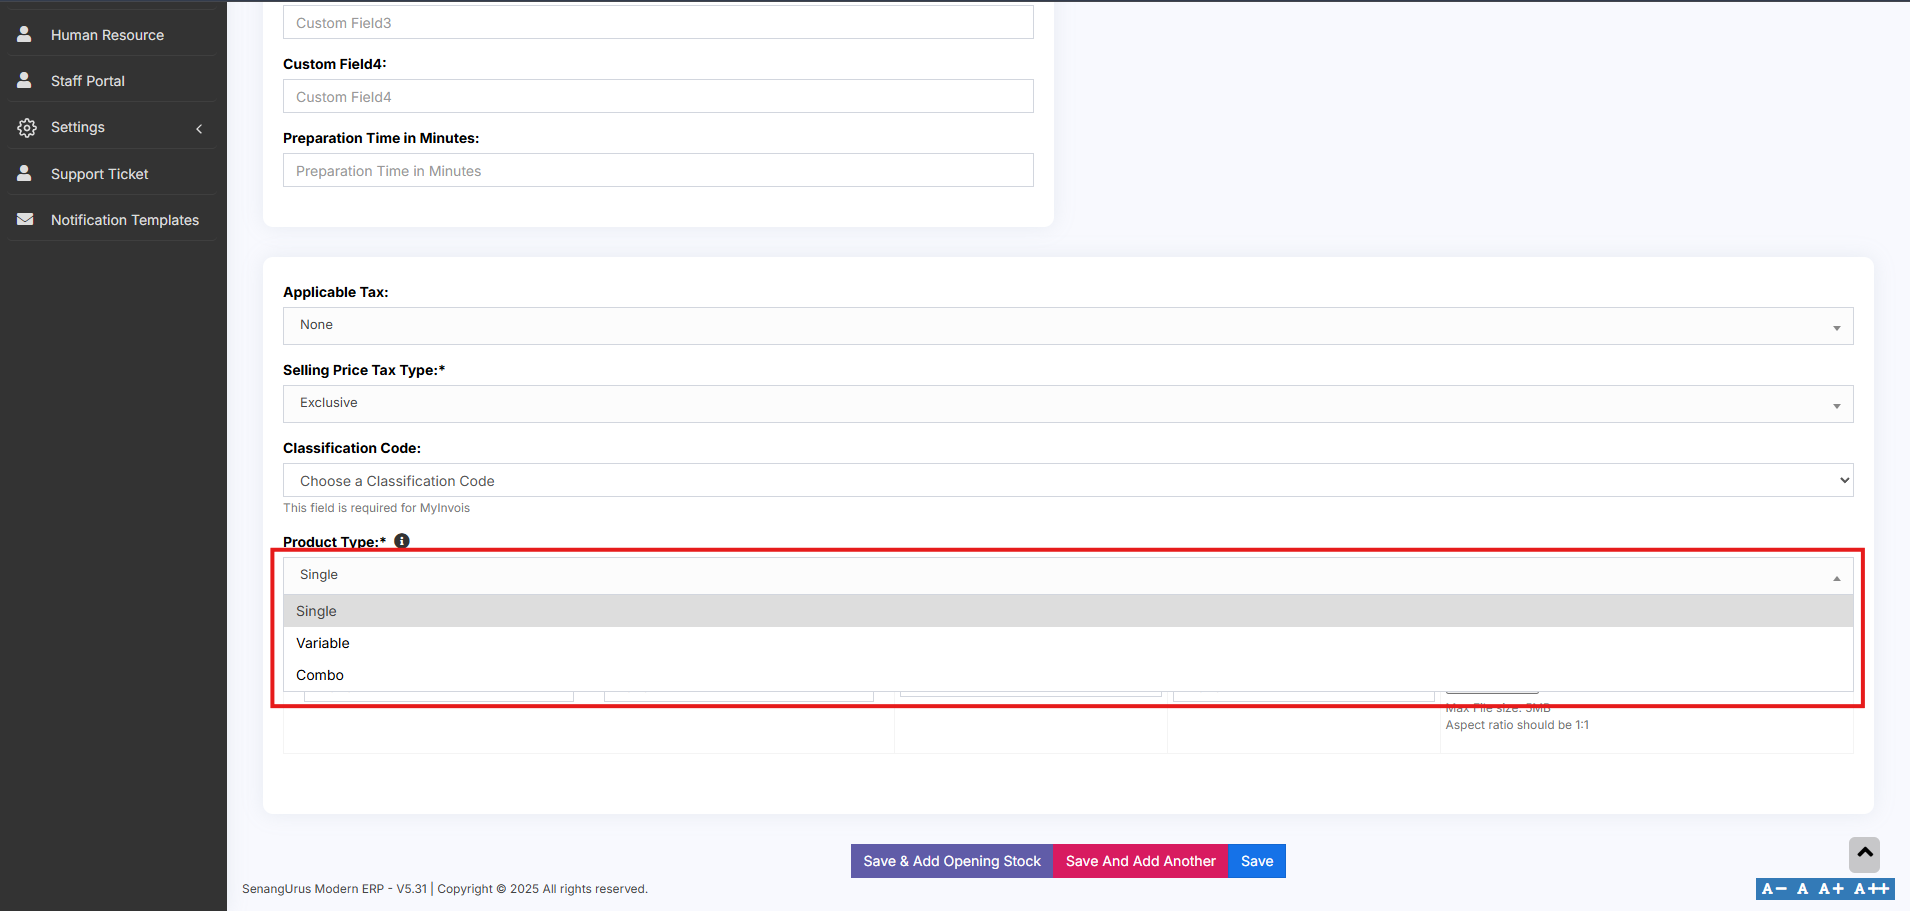
**Step 10: Choose Product Type**
- Select the appropriate **Product Type** (e.g., Single, Variable, Combo) based on your inventory structure.
[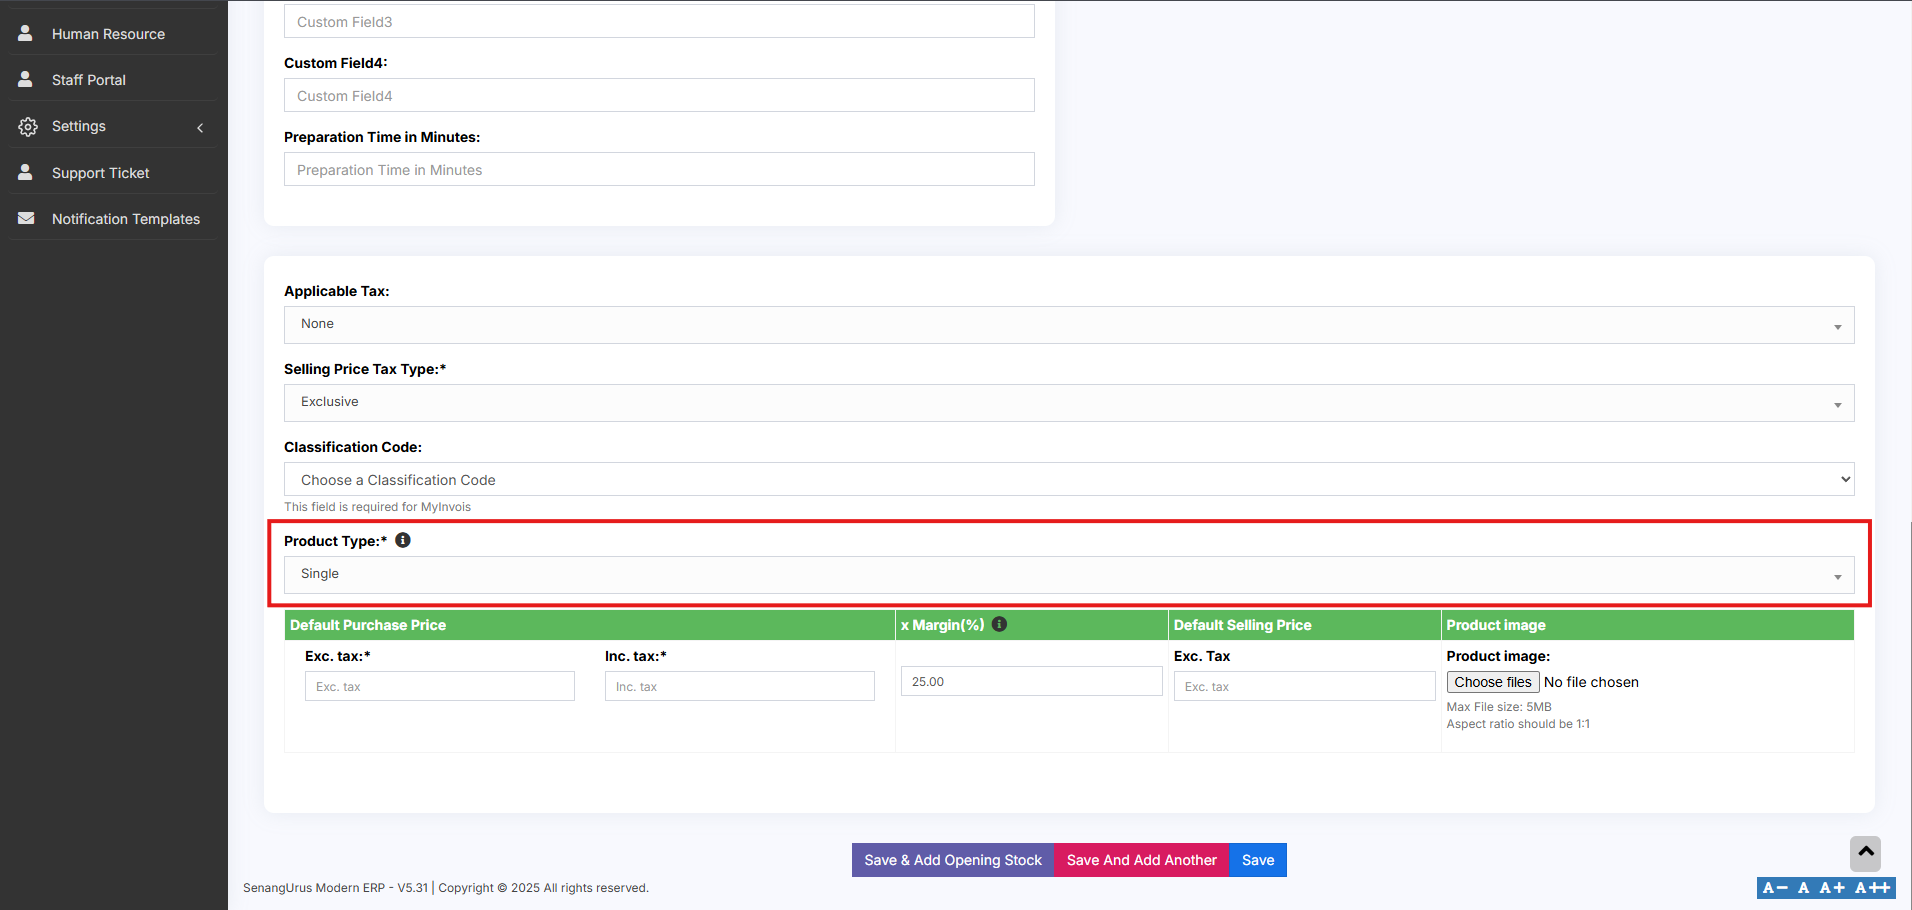](https://docs.senangurus.com/uploads/images/gallery/2025-10/6E7image.png)
Now click on the save button to add the product.
### **Single Product:**
The **Single Product** type is applicable for items that do **not have any variations** (e.g., size, color, weight).
Follow the steps for adding the product as mentioned above, then follow the steps given below
**Step 1: Select Product Type**
- Choose **Single** as the **Product Type**.
[](https://docs.senangurus.com/uploads/images/gallery/2025-10/72eimage.png)
**Step 2: Enter Pricing Details**
You will need to provide the following:
- **Default Product Price** – This can be entered **inclusive** or **exclusive** of tax based on your business preference.
- **Profit Margin %** – Enter the desired **Profit Margin** (e.g., 20%).
[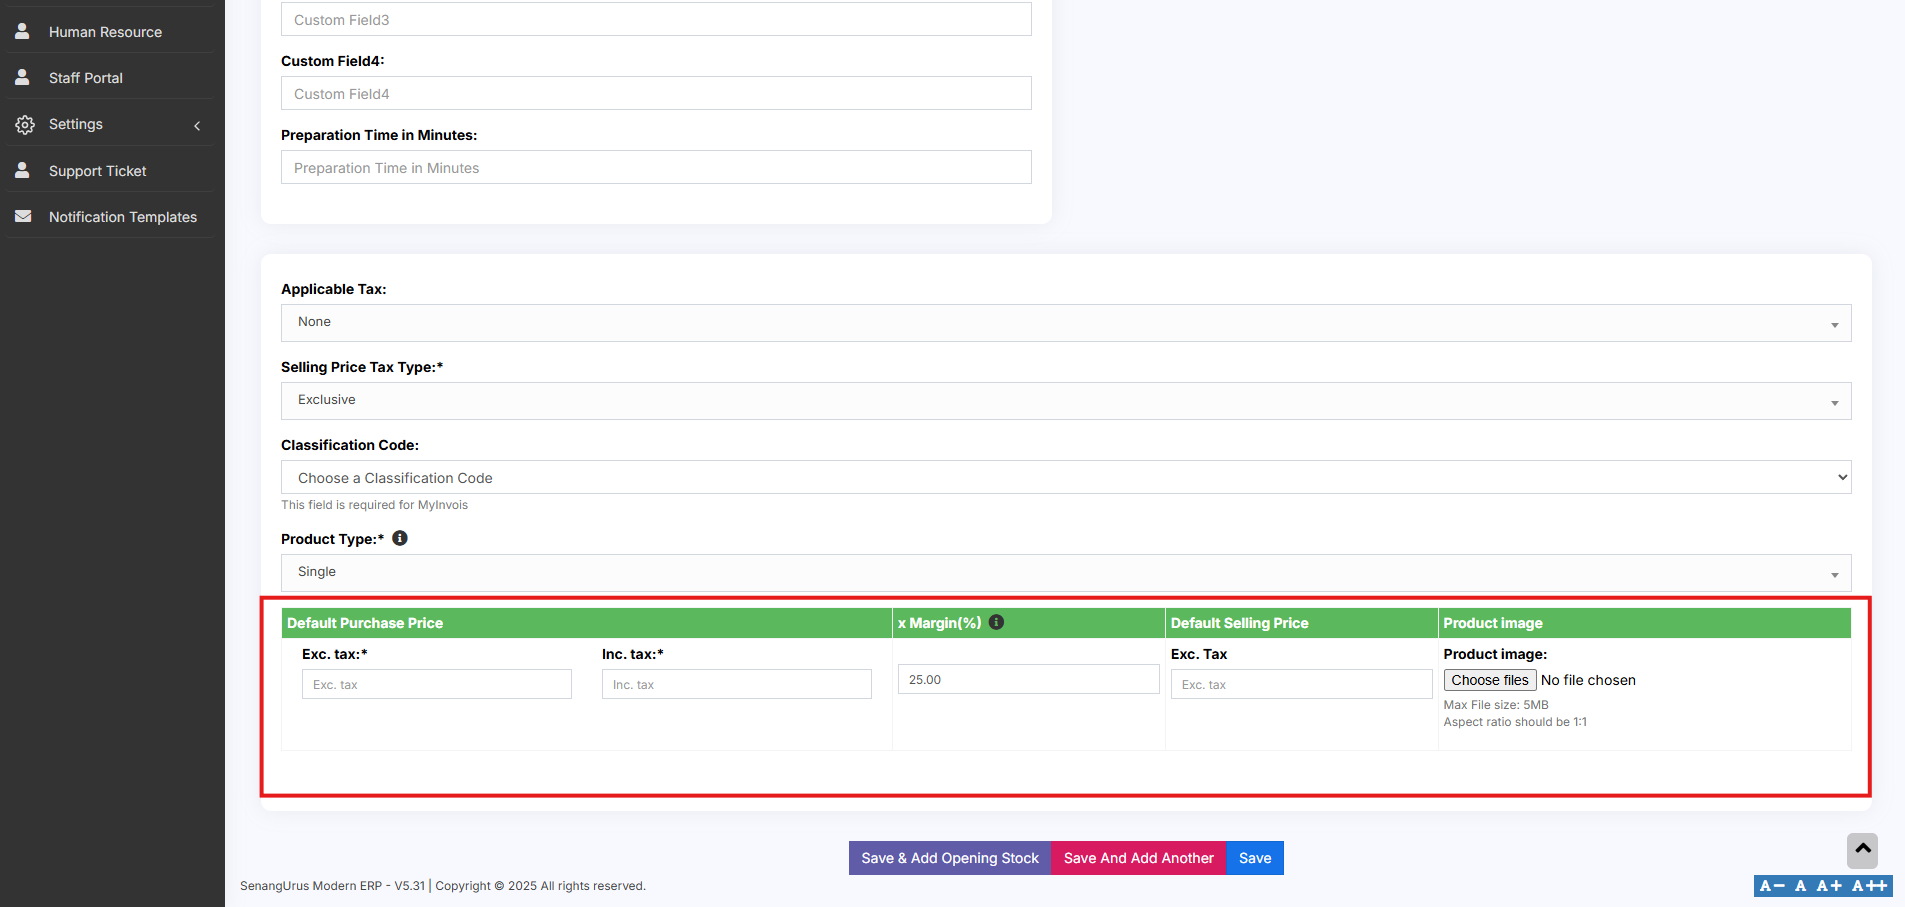](https://docs.senangurus.com/uploads/images/gallery/2025-10/DBwimage.png)
You can set a **default profit margin** in **Settings → Business Settings** to avoid entering it every time.
**Step 3: Auto Calculation of Selling Price**
- The system will **automatically calculate the Selling Price (excluding tax)** based on the profit margin and default cost price.
**Step 4: Manual Price Adjustment (Optional)**
- You can also **manually enter the Selling Price**.
- The system will then **auto-adjust the profit margin** based on the entered value.
This flexibility ensures that pricing can be either profit-driven or fixed-price as needed.
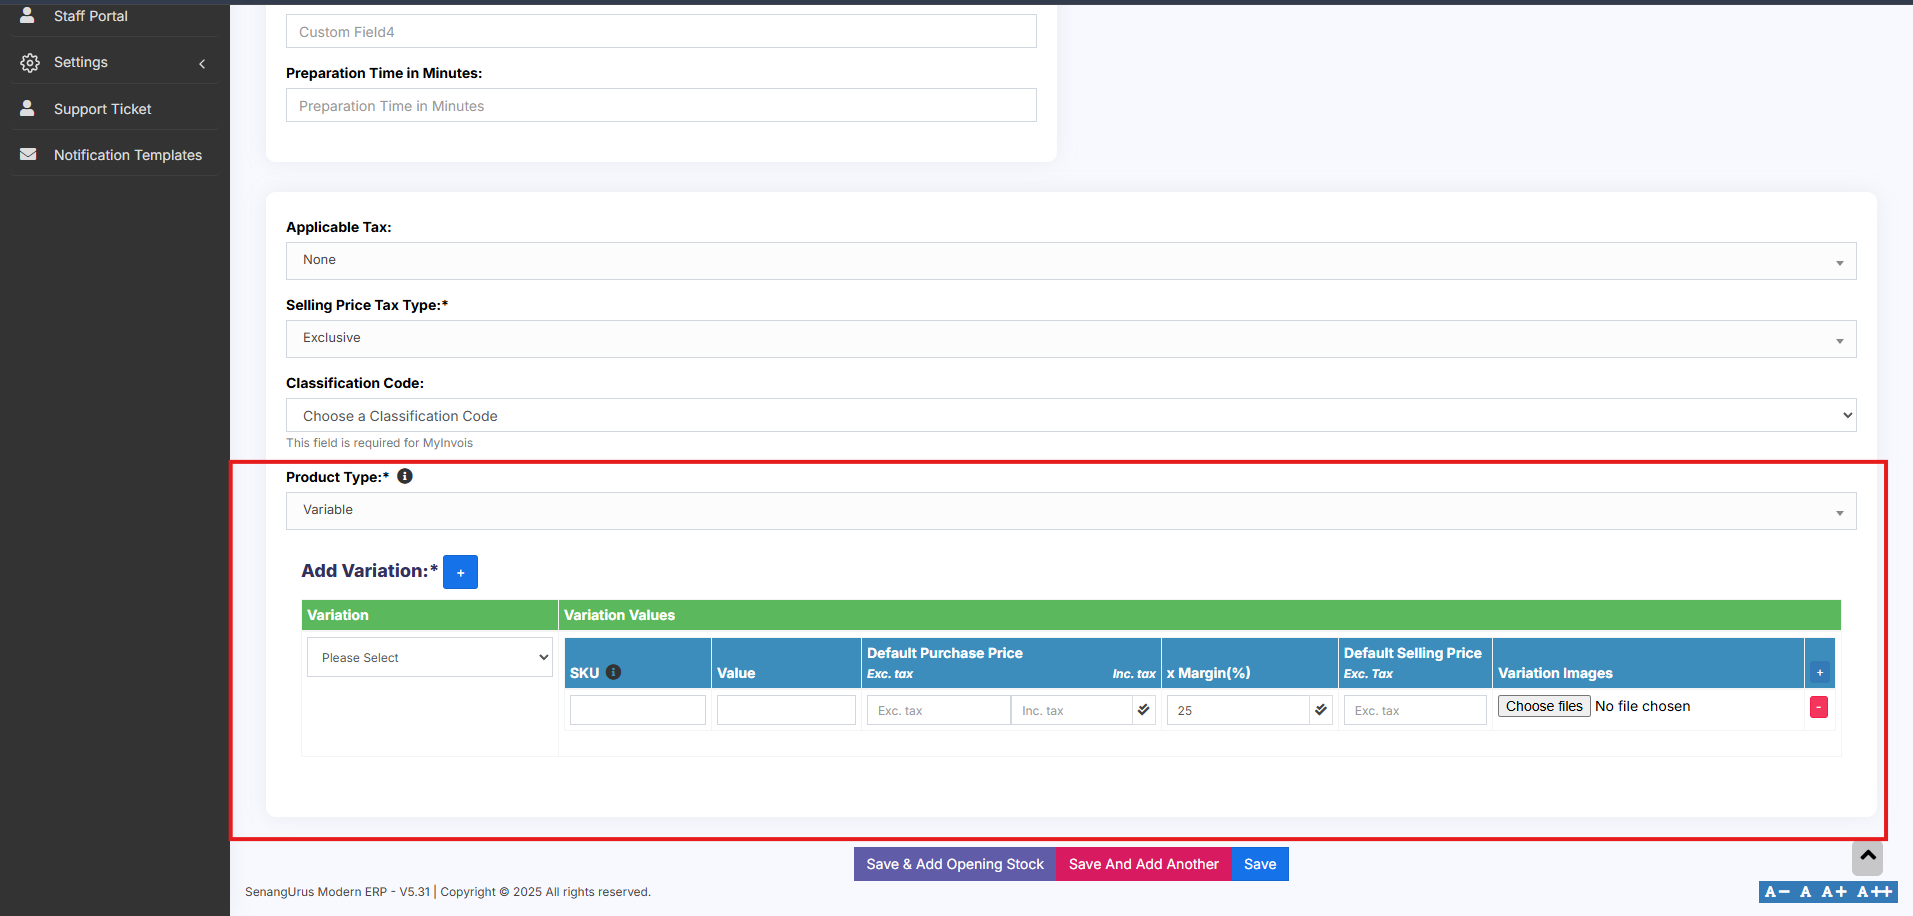
### **Variable Product:**
The **Variable Product** type is used for products that come with **variations**, such as **size**, **color**, **design**, **flavor**, etc.
[](https://docs.senangurus.com/uploads/images/gallery/2025-10/zCAimage.png)
Follow the steps for adding the product as mentioned above, then follow the steps given below for adding variable type
**Step 1: Use for Products with Variations**
- Select **Variable** as the **Product Type** when a product has one or more attributes that vary.
**Step 2: Define Variation Templates**
- Create and manage **Variation Templates** from **Products → Variations**.
Templates save time by allowing you to reuse common sets of variations (like Small/Medium/Large or Red/Blue/Green).
**Step 3: Add Product Variations**
- Once you select **Variable Product**, additional fields will appear for entering variation-specific details.
- From the **dropdown**, choose the desired **Variation**.
- The system will **auto-populate** the variations values based on the selected variation.
**Step 4: Apply Purchase Price, Selling Price, or Profit Margin**
- Enter the **Purchase Price**, **Selling Price**, and **Profit Margin** for each variation.
> To apply the **same Purchase Price**, **Selling Price**, or **Profit Margin** across all variations, follow the steps below:
- Click on the **double tick icon** located next to the first variation entry.
- This will copy the entered values to all variations instantly.
For detailed steps on creating and managing variations, refer to the [adding variations](https://docs.senangurus.com/books/senangurus-business/page/variations) document.
### **Combo or Bundle Product**
Combo Products, also known as Bundle Products, are used to combine multiple individual products into a single product. For example, a **“Computer Set”** can be created as a bundle that includes:
- - 1 PC Monitor
- 1 PC CPU
- 1 PC Keyboard
- 1 PC Mouse
> When a customer buys the **Computer Set**, they receive all of the above components as part of one product.
**Stock Calculation for Combo products.**
- The available stock for a bundle depends on the **lowest available quantity** of any individual product in the combo.
- **Example:**
- PC Monitor: 5
- PC CPU: 4
- PC Keyboard: 10
- PC Mouse: 50
- Stock of **Computer Set** will be **4**, based on the product with the lowest quantity (CPU).
**Stock Management on Sale**
- When a **Combo Product** is sold, the stock of **each individual product** in the bundle is automatically **deducted**.
- This ensures accurate inventory tracking for all bundled items.
**Selling and Purchasing Rules for Combo products**
- **Individual Products** in the bundle can still be sold **separately**.
- **Combo Products cannot be purchased** directly from suppliers. Only the **individual products** within them can be purchased.
[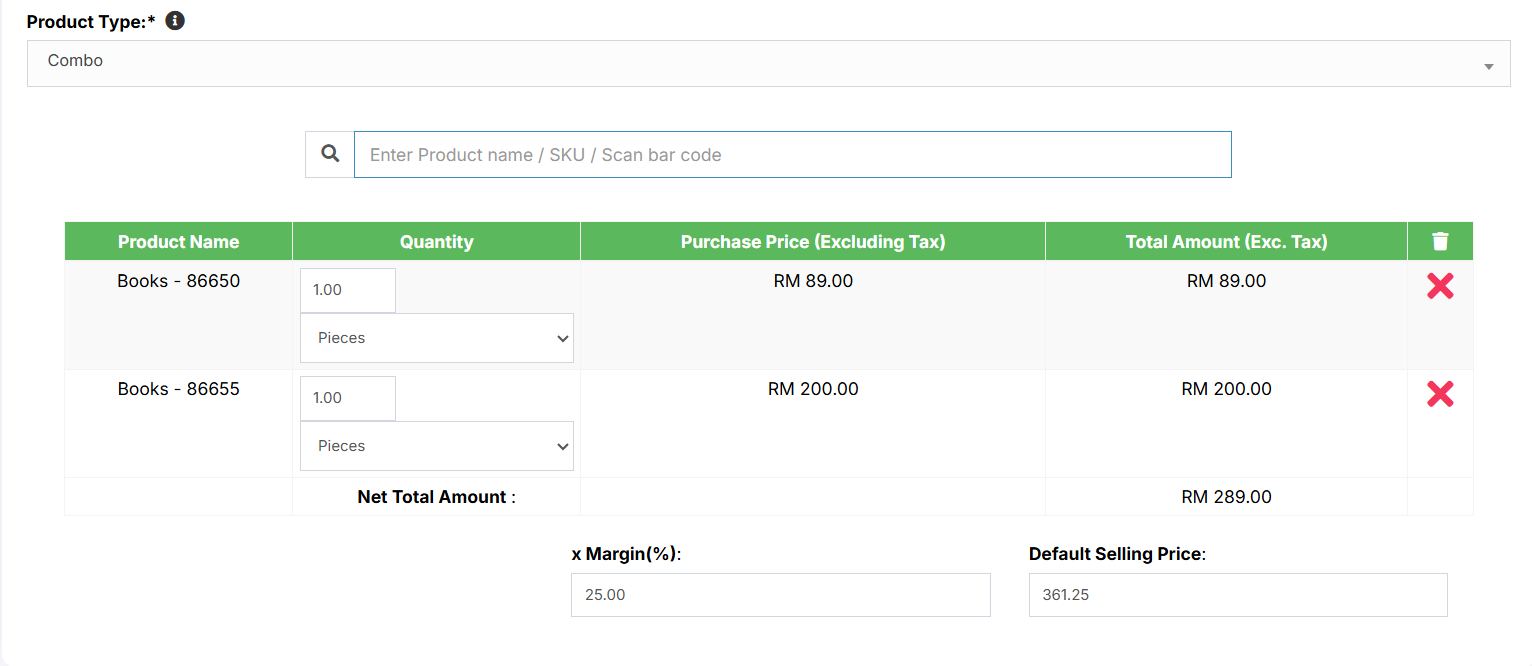](https://docs.senangurus.com/uploads/images/gallery/2025-10/fFpimage.png)
Adding a bundle product
### **Adding a Combo or Bundle Product**
Follow the steps for adding the product as mentioned above, then follow the steps given below
**Step 1: Select Product Type**
- Choose **Combo** as the **Product Type**.
**Step 2: Select Products for the combo**
- Select the required products that are to be sold as a combo and add the required quantity for each product. Now save it
# Adding Products with multiple variations:
If you have products with **multiple variations** (e.g., a shirt that has both **color** and **size**), there are a couple of effective ways to manage them in the system:
**Solution 1: Create a Combined Variation**
To create combined variation follow these steps
- Create a variation with a combined name such as **“Color-Size”**.
- Add combined variation values like:
- **Red-Small**
- **Red-Medium**
- **Red-Large**
- **Blue-Small**, etc.
- While adding the product (e.g., **Shirt**), select this **combined variation**.
This method is simple and works well when all combinations are fixed and known.
**Solution 2: Create Multiple Products**
To create multiple products follow these steps
- Create separate products for each main variation (e.g., **Shirt-Red**, **Shirt-Green**, **Shirt-Blue**).
- For each of these, add **size** as the second variation (e.g., Small, Medium, Large).
- Once you’ve added the first product (e.g., **Shirt-Red** with sizes), use the **Duplicate Product** action to create other color variants without re-entering all data.
This method provides flexibility when dealing with larger sets of unique combinations and allows better inventory control.
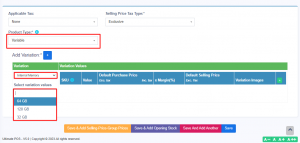
### Select Required variations:
When adding a **Variable Product**, you can choose **only the required variation values**. Follow the steps given below
1. On the **Add/Edit Product** screen, select the **Product Type** as **Variable**.
2. Select the **Variation Name** (e.g., **Color** or **Size**).
3. A **dropdown** will appear, allowing you to pick **specific variation values** applicable to that product.
[](https://ultimatefosters.com/wp-content/uploads/2018/01/variationvalues.png)
This option is available only in POS version 5 and above.
### Changing **Default** SKU length for Products:
To change the length of auto-generated SKUs follow the steps:
- Open the file: `pos/app/Utils/ProductUtil.php`
- Search for the function: `generateProductSku`
- Modify the default value from **4** to your desired SKU length
### Assigning/remove locations of multiple products at once:
1. Go to List Products and select the required products.
2. You can find two button at the end of the list.
3. To Add products to a location, click on **Add to Location** button and select the location.
4. Similarly to remove products from a location, click in **Remove from Location** button and select location to be removed.
[](https://docs.senangurus.com/uploads/images/gallery/2025-10/assignproduct.png)
### Deactivating & Activating Product:
1. Go to List Products and select the required products.
2. You can find a button at the end of the list.
3. To Deactivate products, click on **Deactivate Selected** button to deactivate the selected products.
4. To later Activate the deactivated products in step 3, click on **Actions** button of the product deactivated and click on **Reactivate** option.
[](https://docs.senangurus.com/uploads/images/gallery/2025-10/deactivatingproduct.png)
### Using Product barcode:
**Question:**
How can we use the product’s barcode instead of creating and printing new for every product?
How can we use the brand’s barcode of the product instead of creating and printing new for every product?
**Answer:**
When creating a product, in the SKU field enter the barcode number of the product. This barcode will be used to identify the product in all screens like POS, Sales, purchases, reports, and others.
### How to add a product that already has a Barcode?
Adding products that already have a barcode, follow the same steps as adding any other products.
1. Go to add products
2. Fill in all the product details
3. **IMPORTANT:** in the SKU field scan or enter the barcode of the product.
### Adding product quantity or adding product stock
For systematically managing your business, product quantities can be added in 3 ways:
1. [Adding Opening stock](https://docs.senangurus.com/books/senangurus-business/page/opening-stock)
2. [Adding purchases](https://docs.senangurus.com/books/senangurus-business/chapter/purchases)
3. Manufacturing product: Useful for manufacturers, required [manufacturing module.](https://ultimatefosters.com/recommends/manufacturing-module-ultimatepos/ "Manufacturing module for UltimatePOS")
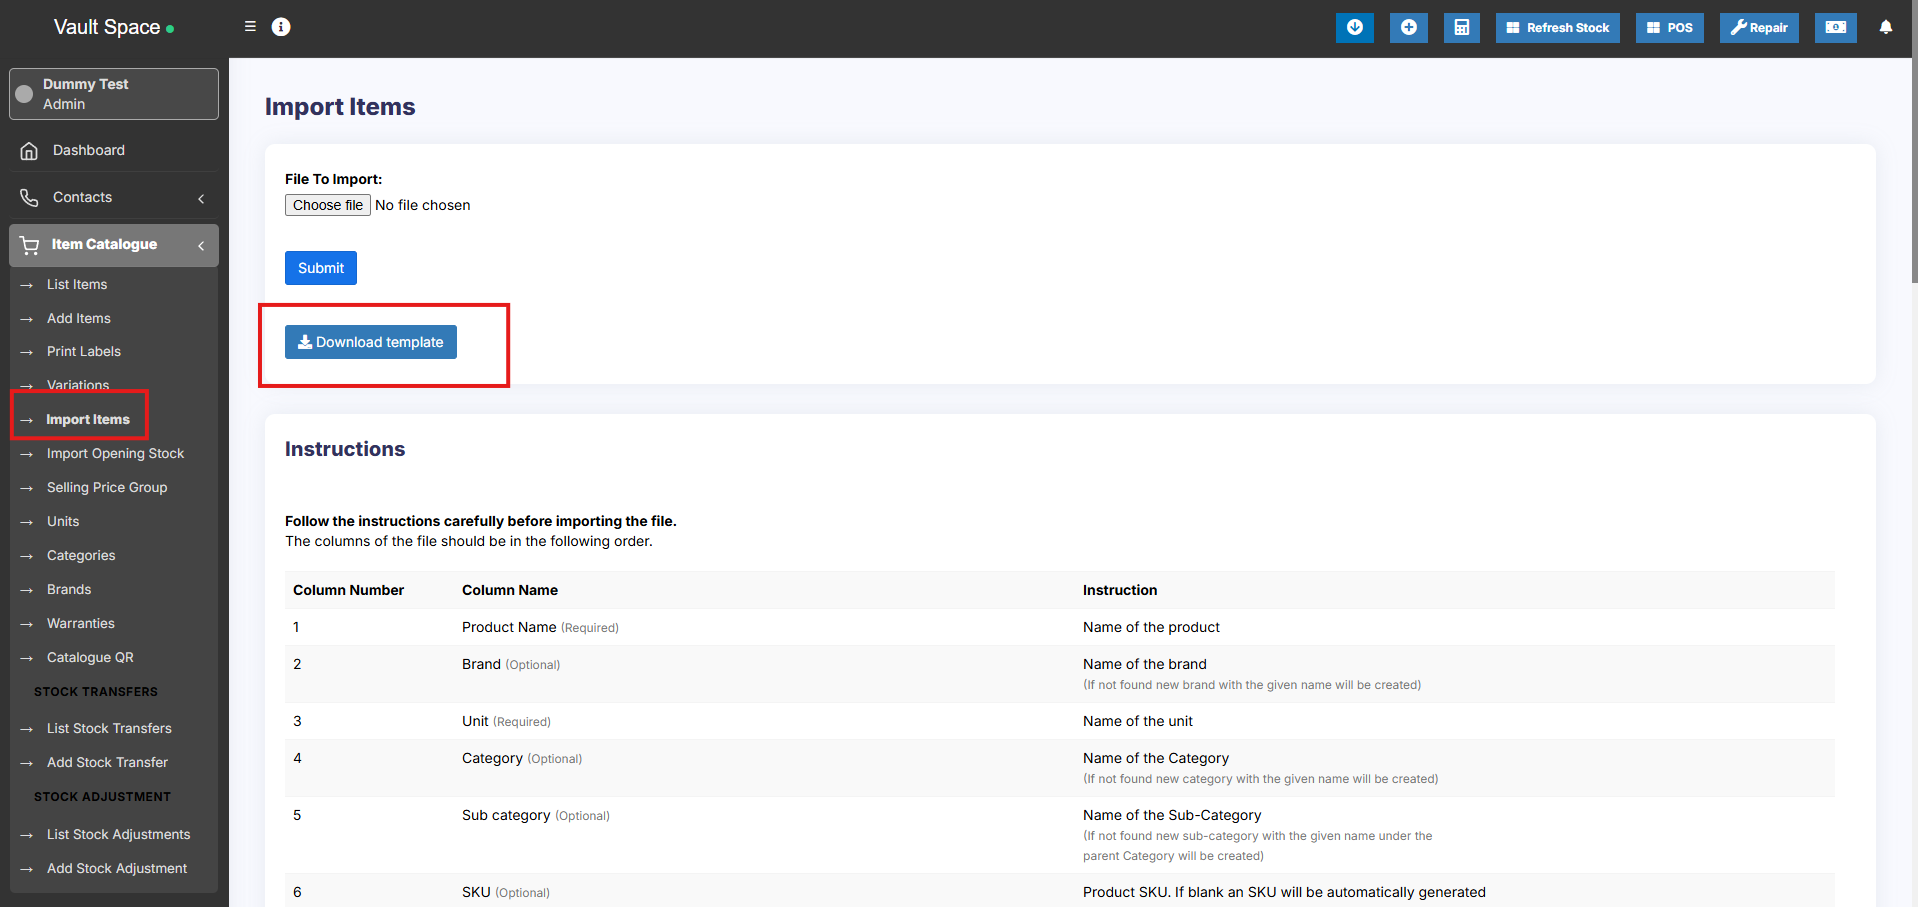
### How to Add Products from One Business to Another or Bulk Import Existing Products into a Newly Installed System
To transfer products between businesses or import existing products in bulk into a new POS system, follow these steps:
1. Use the **Download Excel** feature in the **List Products** section to export the product list.
2. Open the downloaded file and ensure that all data is correctly formatted.
3. Use the **Import Products** feature to upload the exported data into the POS system.
**Note:** When importing, make sure to copy and enter the data into each column provided in the downloaded Excel file according to the **Import Product Template.**
### Video Demonstration:
# Import/Export Products
### Import Products:
#### Steps:
1. Go to Products -> Import Products
2. Download the template file.
3. Fill all the information as per the displayed columns name & instructions. Don’t remove the heading from template file.
4. Import the file
[](https://docs.senangurus.com/uploads/images/gallery/2025-10/G6bimage.png)
### Common Errors:
1. **Error:** UNIT not found
**Solution:** Make sure the unit you provided in excel file is already present in the system. Go to Products -> Units, add the unit & import the file again.
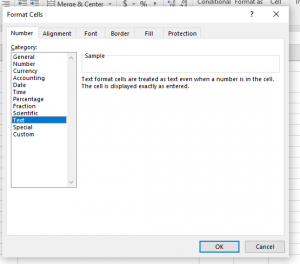
2. **Error:** The separation symbol could not be found the separation symbol could
**Solution:** Format your cells in excel as text in your excel for the expiry date field and give the date as specified(11-25-2018).
[](https://ultimatefosters.com/wp-content/uploads/2020/03/formatcells.png)
#### Not well-defined error:
Many times it can show some not well-defined errors like “non-numeric value encounter” or others
In this case, the best way is to split your import into multiple files.
For example, if you’re importing fil with 500 products, divide it into 2 files of 250 each and import it.
### Export Products:
The products can be exported in excel/pdf formats from the list products screen.
In version 4.7.8, a new export feature is added to export the product in the same template as the import product template.
In the list products screen, click the download excel button.
#### Removing Action Column in Export File:
While you export the products list in excel, cv or pdf, the actions button column might be added in the exported files. In order to avoid this, use the column visibility feature and hide the actions button.
[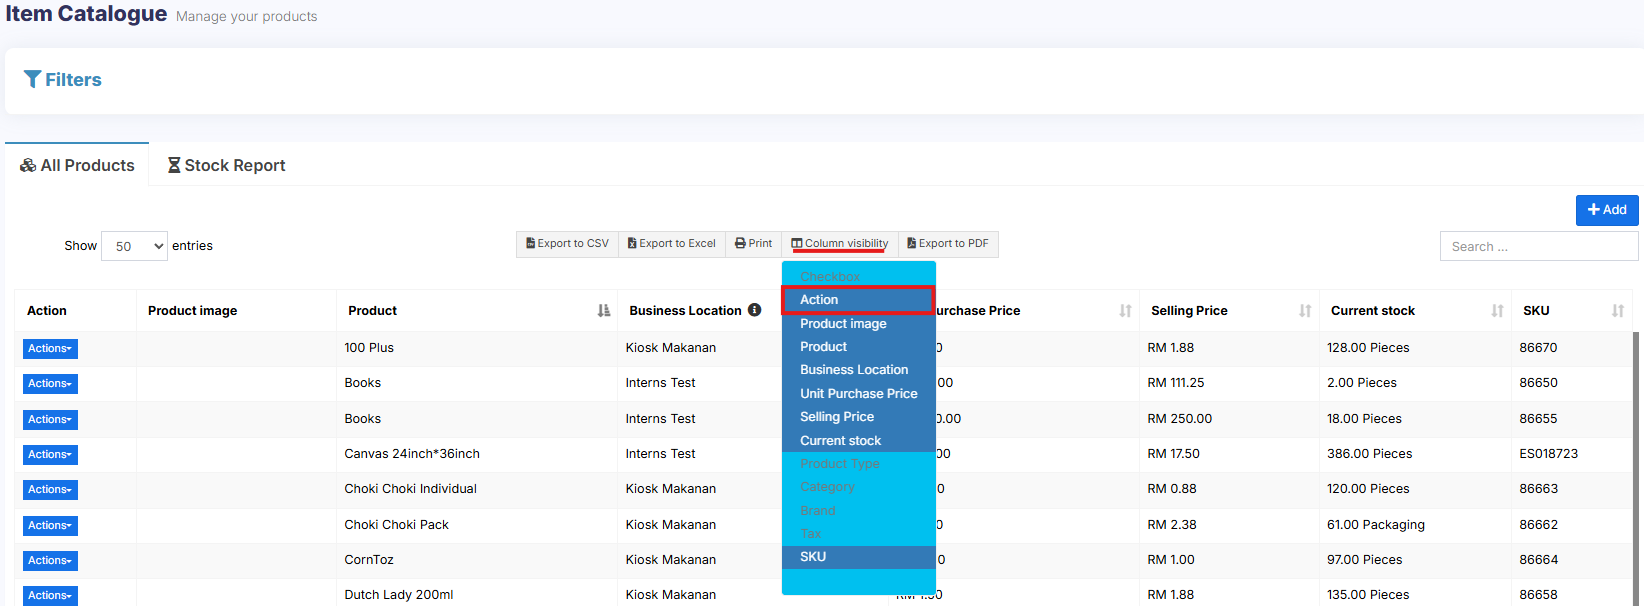](https://docs.senangurus.com/uploads/images/gallery/2025-10/removecolumn.png)
Check the document for making the visibility selection permanent
# Delete Product (Bulk delete)
### Deleting Products
Deleting of a product will remove the products from the database.
**NOTE:** This delete will not work if the product have some transactions related to it. Transaction can be Opening Stock, Purchase, Sales or Stock transfer of the product. It will show some error like:
- Product can’t be deleted because purchases related to this product exist
- Some products couldn’t be deleted because it has transaction related to it.
You can delete products either **individually** or in **bulk**. Follow the instructions below:
### Deleting individual product
1. Go to **List Items**
2. Locate the product you want to delete.
3. Click on the **Actions** dropdown beside the product.
4. Select the **Delete** option.
[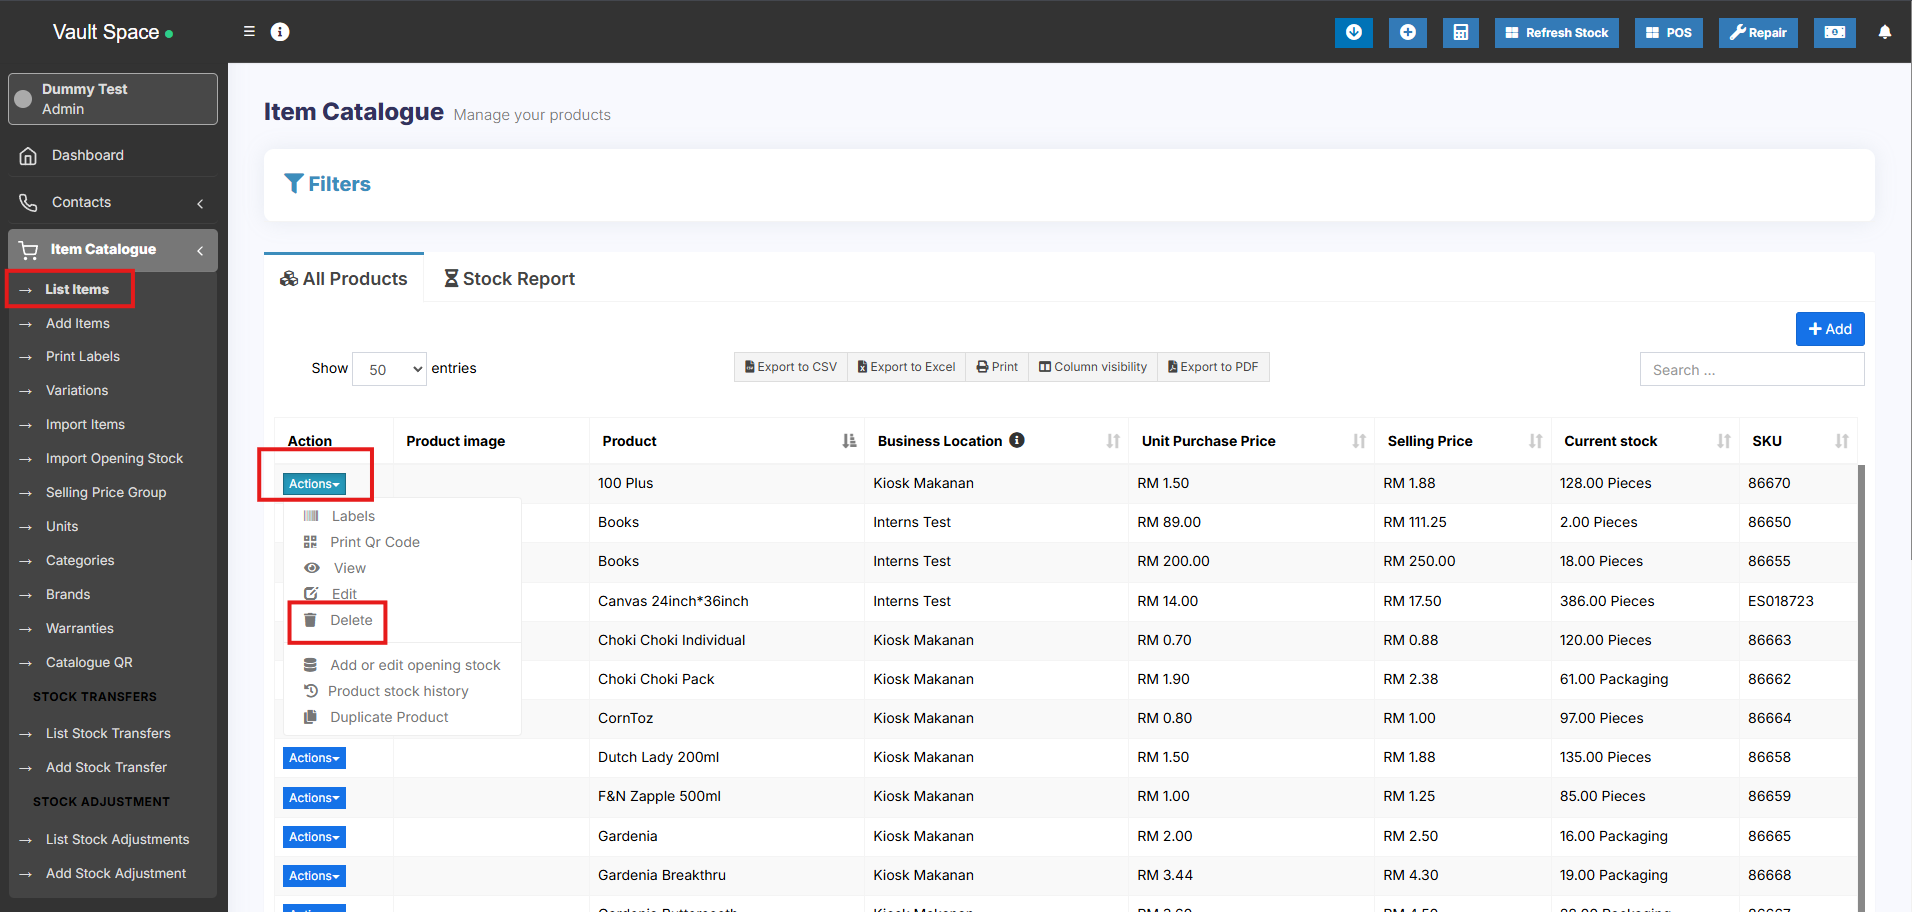](https://docs.senangurus.com/uploads/images/gallery/2025-10/i96image.png)
### Delete product Errors:
#### Some products couldn’t be deleted because it has transaction related to it:
When a product has any transactions it cannot be deleted.
Transactions can be either Sales, Purchase, or Adding opening stock.
The best way to avoid such products is by deactivation them.
# Variations
1. Variations can be added from the **Variations** menu.
2. These variations are used in variable products product.
Example of variation is, for example, Jeans can have multiple colors, so add variations called Colors and provide the value for it. As given in the image below.
[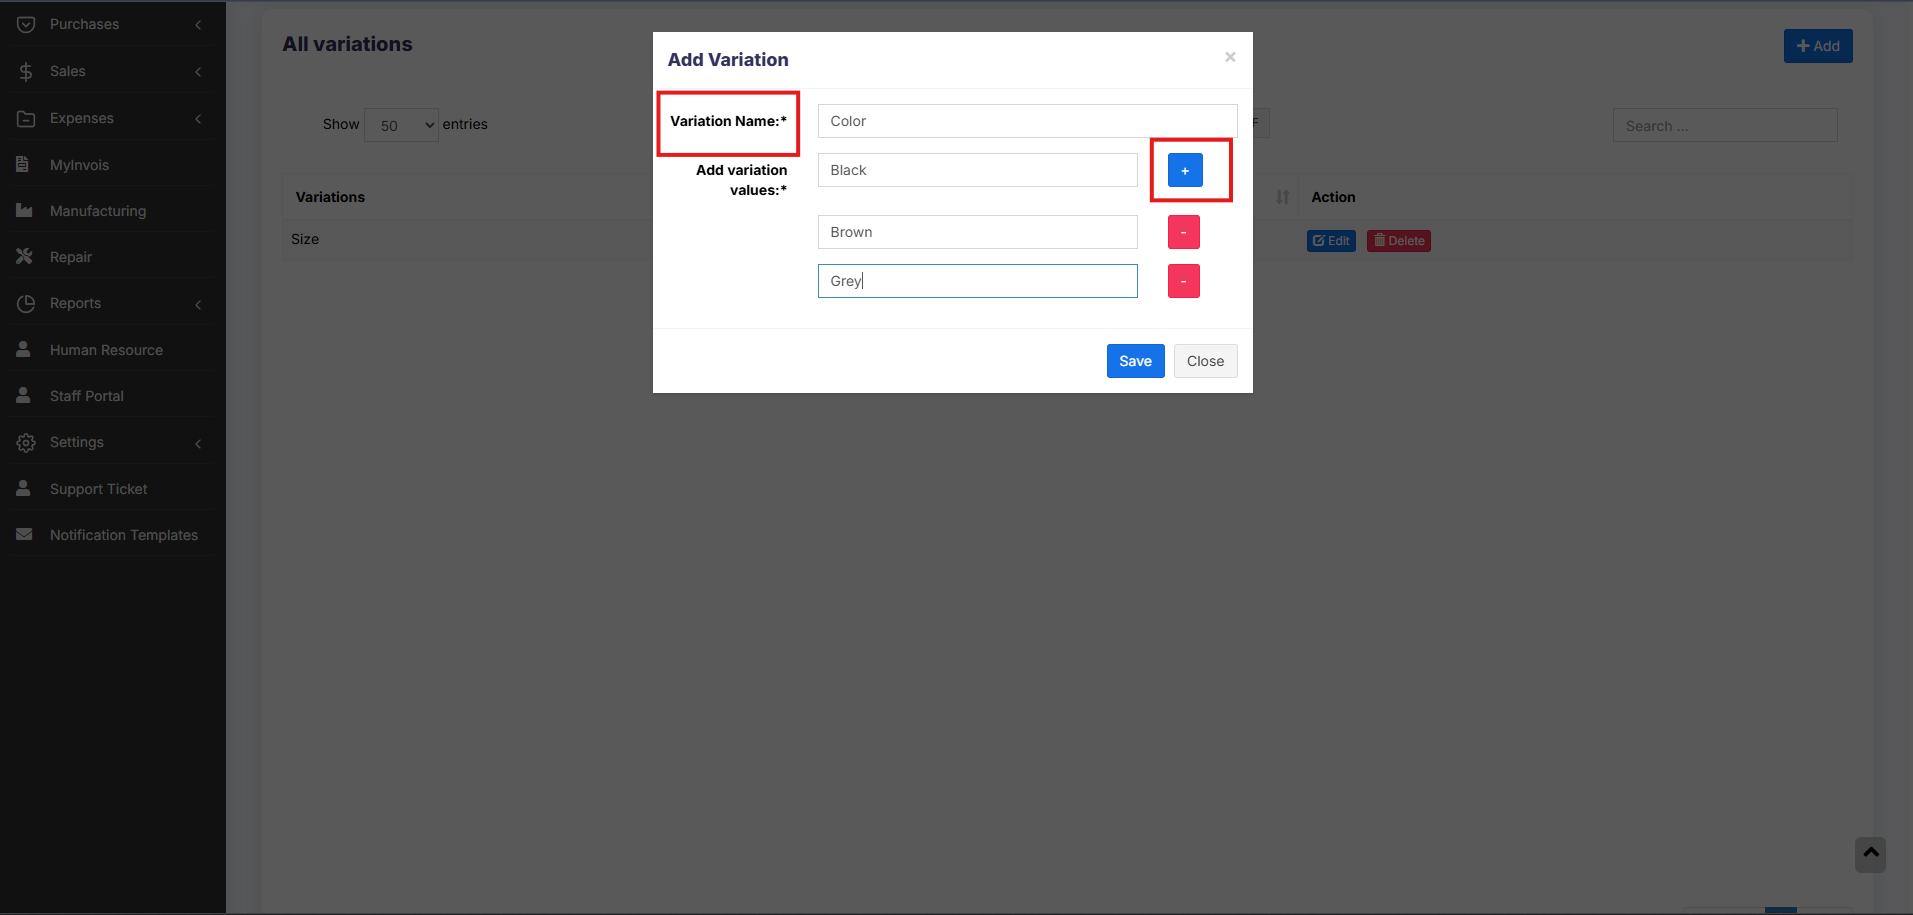](https://docs.senangurus.com/uploads/images/gallery/2025-10/IHwimage.png)
**NOTE**: Delete variation option will not be shown for variations that are already used in some products
### Adding Multiple Variations for Products
If a product has more than one variation, for example, A shirt with size ‘M’ and brand ‘POLO’ or A book with pages 30 and size long.
Add the variation name and type as a combined variation.
Eg: variation name : Size – Pages
variation values – Long -30, Long -120, Long – 200, Small -30, Small – 120 etc.
# Product Units
Different Products have different units. SenangUrus Business allows you to add different units for products.
### Adding Units
1. Go to Units
2. Give the unit name, a short name, and choose if want the unit to allow decimals.
Example:
**Name**: Meter
**Short name**: Mtr.
**Allow Decimal**: Yes.
[](https://docs.senangurus.com/uploads/images/gallery/2025-10/RPfimage.png)
Allowing decimal allows you to purchase/Sell the product in decimal and vice-versa.
### Multiple Units:
This can be useful if you purchase products in a different unit and sell it in a different unit.
For example: Purchase in dozens and sell in pieces.
Or purchase in boxes and sell in pieces.
**Steps:**
1. Add the lower unit from Add Unit Screen. For example pieces.
2. Add the higher unit as per the screenshot:
- Check “Add as multiple of another unit”
[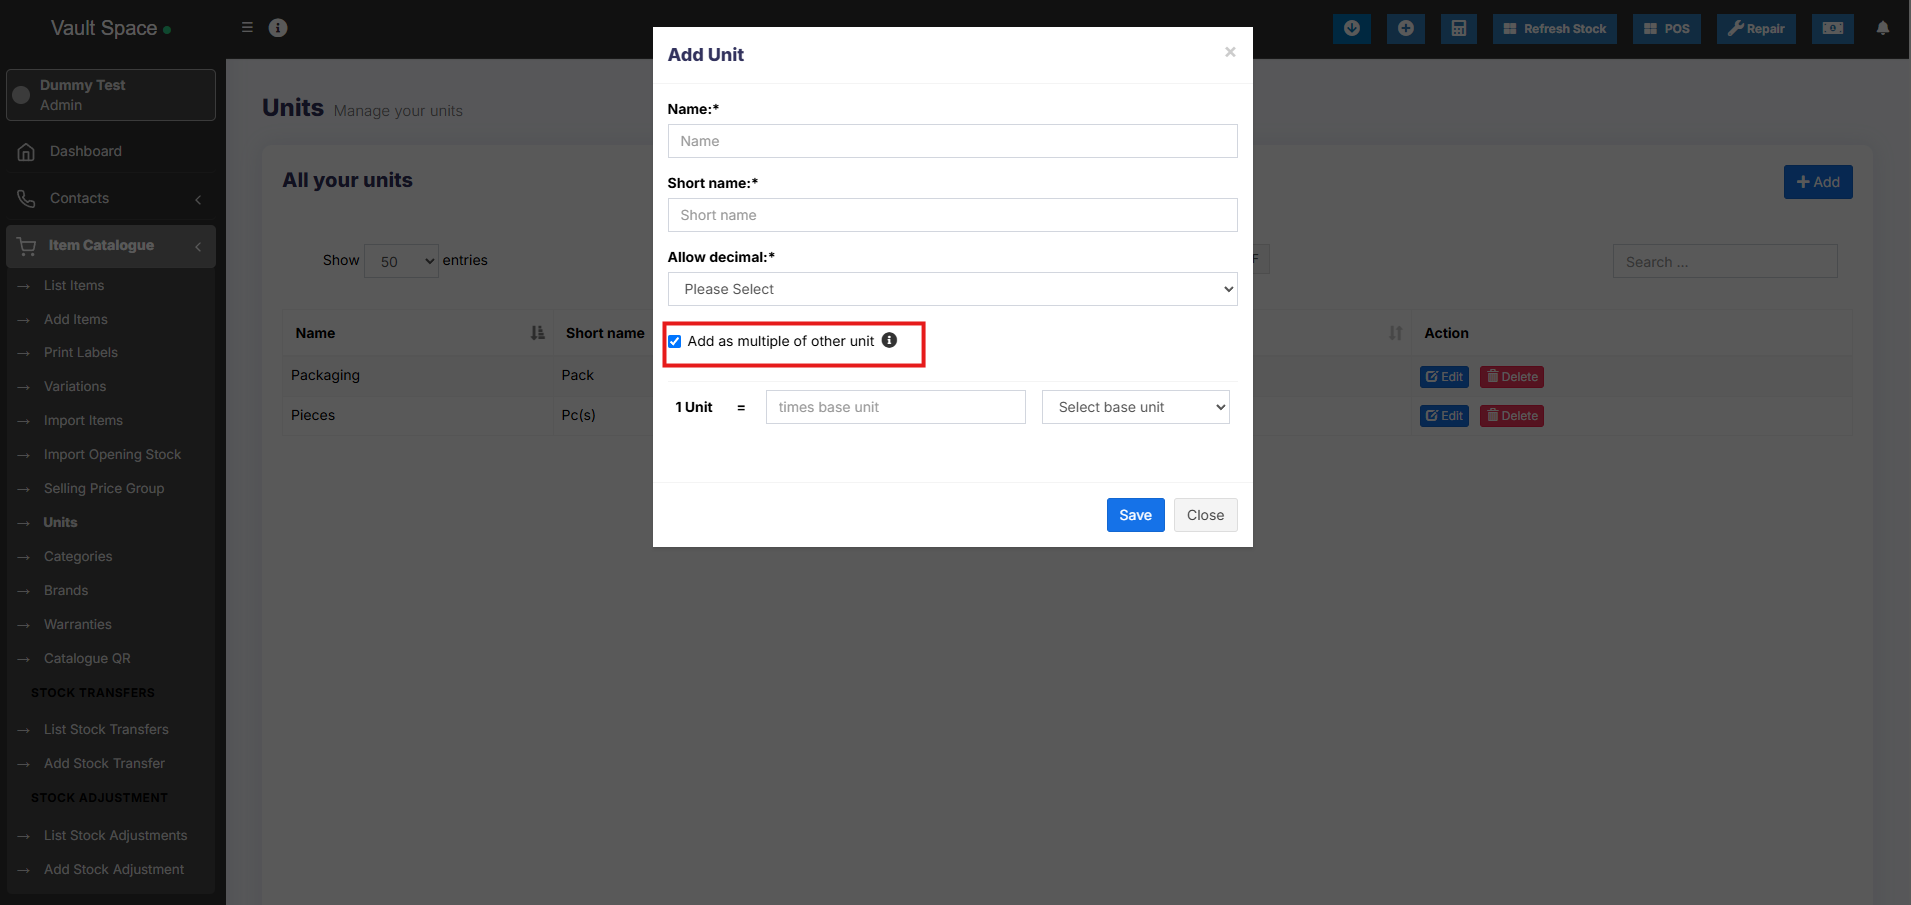](https://docs.senangurus.com/uploads/images/gallery/2025-10/sVCimage.png)
- Provide the conversion Details.
3. Use the unit in Add/Edit Product. While adding/editing purchase/ sale you can see the dropdown for units. Select the desired unit and it will change the unit purchase/sales price accordingly.
**NOTE**: You will not see the main Units (Dozen in this example) in the Add-Product Unit dropdown, select piece as the unit of product. All purchases/sales get saved in the lower unit (pieces in the above example). So after adding purchases/sales if you edit the conversion details, it will affect the purchases/sales quantity accordingly.
### Selecting relevant Sub Units for a product
For some products not all sub-units will be required. Suppose for example you sell Oranges only in Dozens or only in pieces then it will be useful.
Enable it from Business settings ->Products -> Enable relevant sub-units
Now when adding products select the Unit for the products and it will give option to select multiple applicable sub-units. Selecting the sub-units will allow you to do purchases or sales on this selected sub-units.
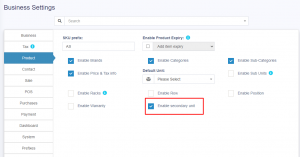
### Secondary Units:
Secondary units can be added to products. A secondary unit can be used if a particular product’s subunit may vary each time. For example, 1 piece of stone can be 10 kg or 20 kg, or 30 kg.
To enable this go to Settings-> Business Settings – > Products.
[](https://ultimatefosters.com/wp-content/uploads/2018/01/enablesecunit.png)
On enabling this, a secondary unit label will be shown in add/edit products screen.
[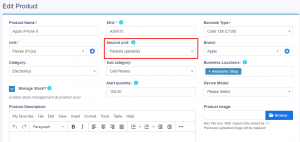](https://ultimatefosters.com/wp-content/uploads/2018/01/addeditsecunit.png)
Selecting this product in the purchase/sale/POS screen will also show the secondary unit label.
The details of secondary units for products are shown in the product stock history of that product.
**NOTE**: The secondary unit is not considered for calculation. It is only used for the user’s knowledge of tracking the products with varying subunits.
**NOTE**: Available only in version 4.7.8 and above.
# Product Category (Categorizing products)
Categorizing products helps you to easily manage and filter them in reports.
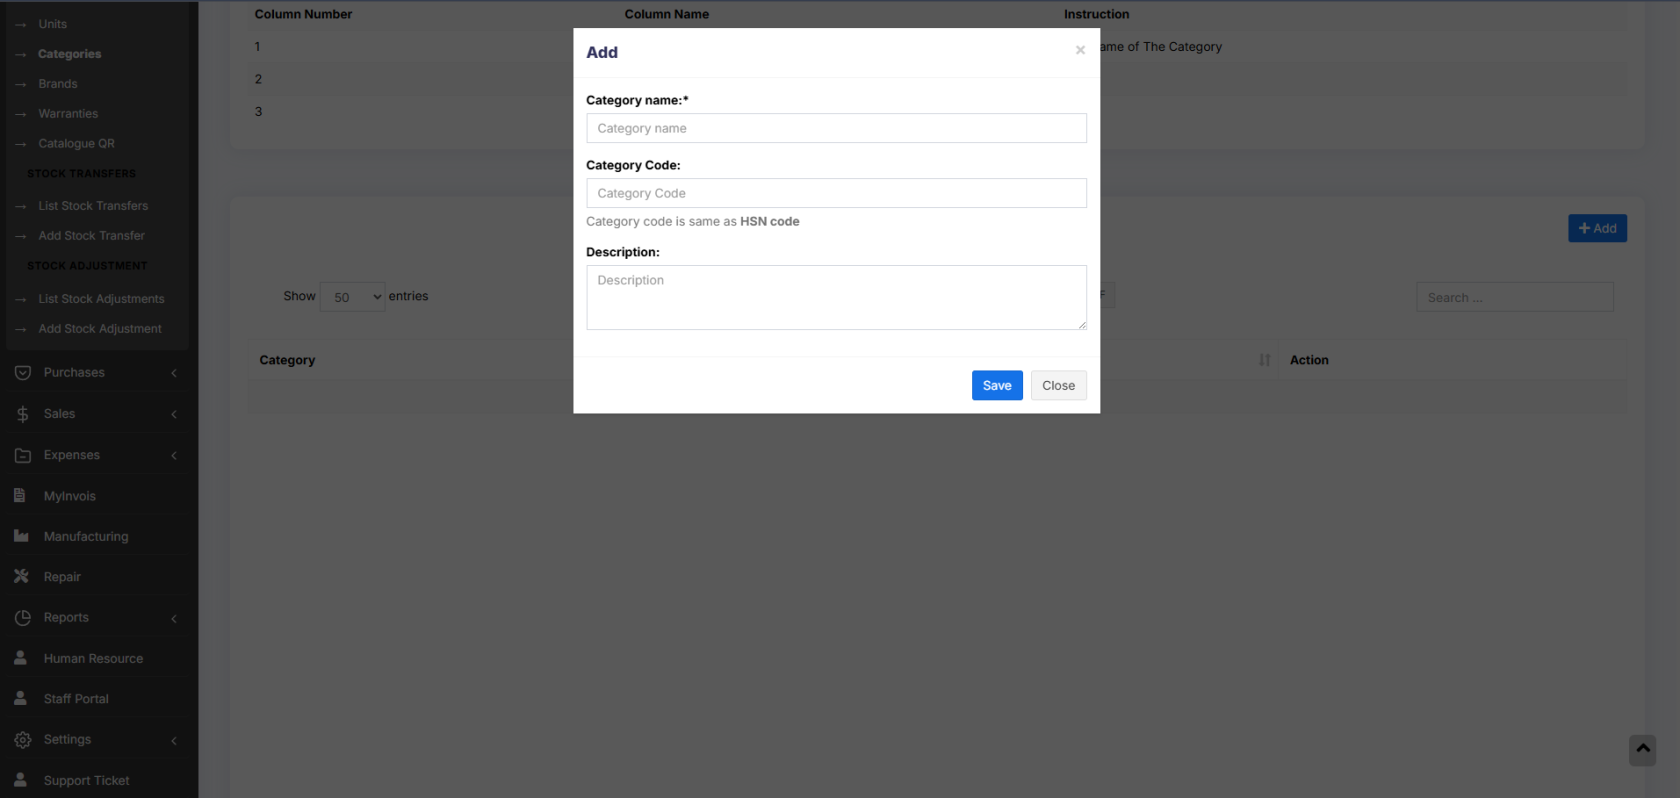
### Adding Category & Sub-Category
1. Go to Product -> Categories -> Add
2. Add Category name, category code(HSN code)
3. If the category is sub-category select “Add as sub taxonomy” and select the parent category.
[](https://docs.senangurus.com/uploads/images/gallery/2025-10/yctimage.png)
# Product stock history
1. The **Product Stock History** feature allows you to view detailed records of all stock-related transactions for a specific product, including:
- **Sales**
- **Purchases**
- **Opening Stock**
- **Transferred Stock**
- **Stock Adjustments**
You can also **filter the history by date range** to analyze stock movement over a specific period.
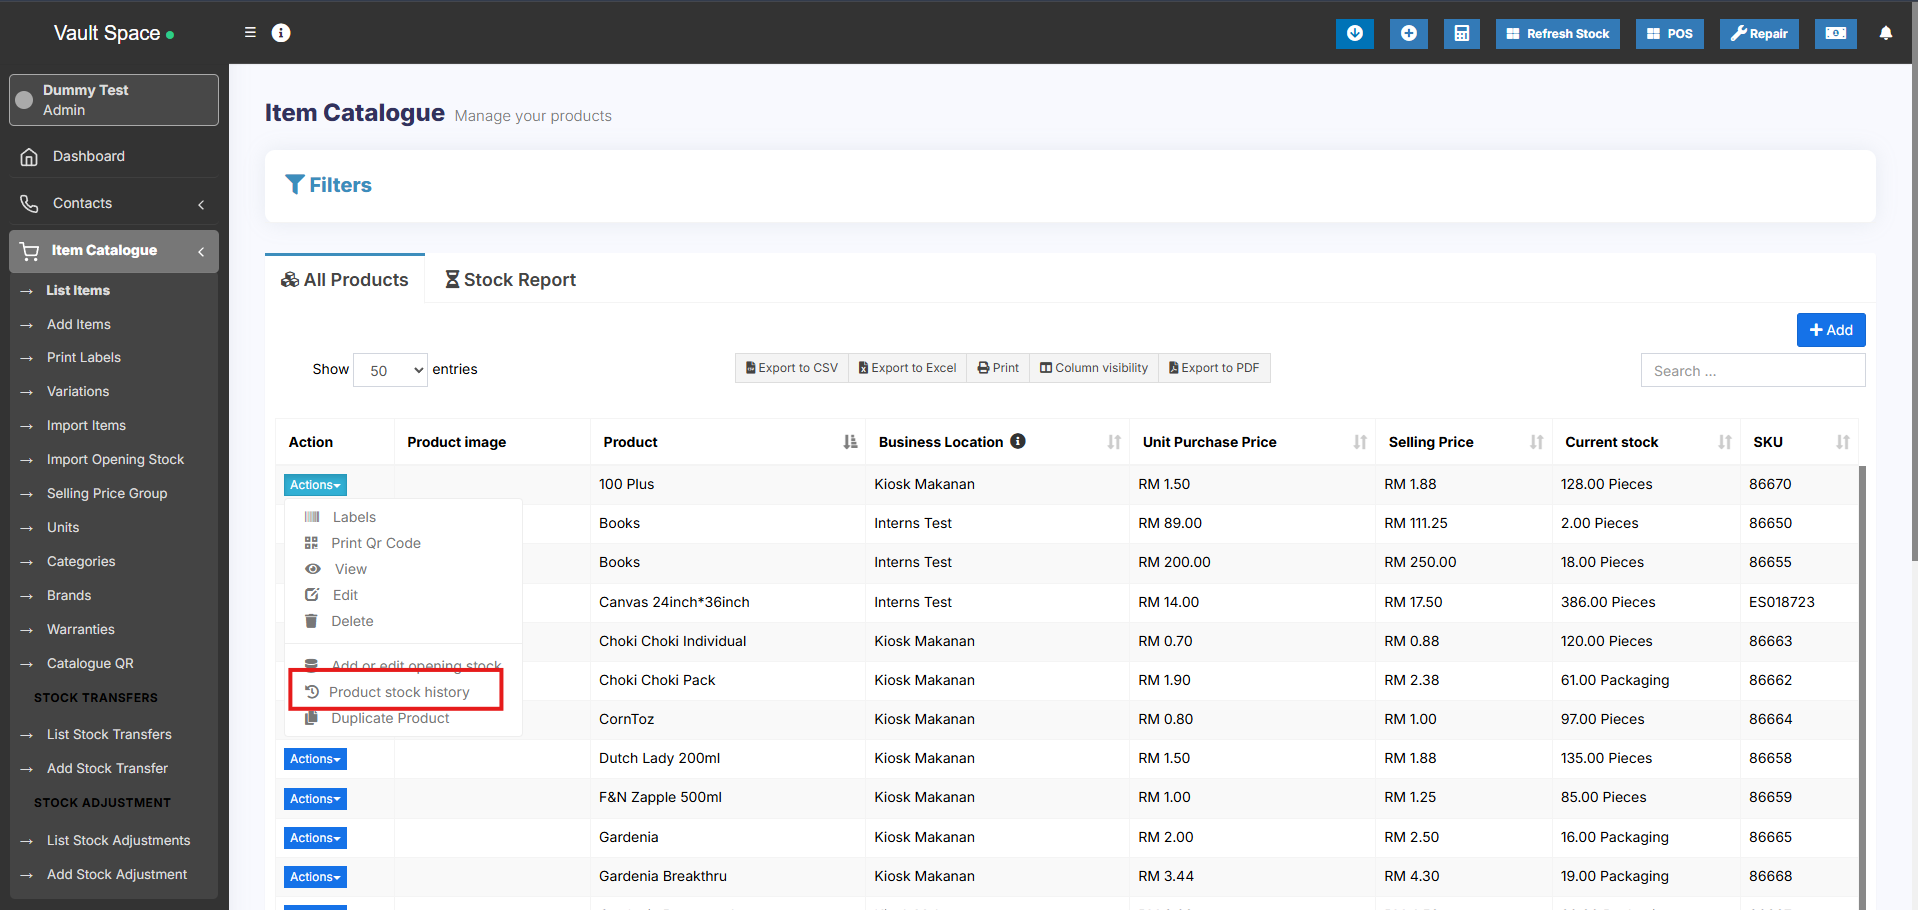
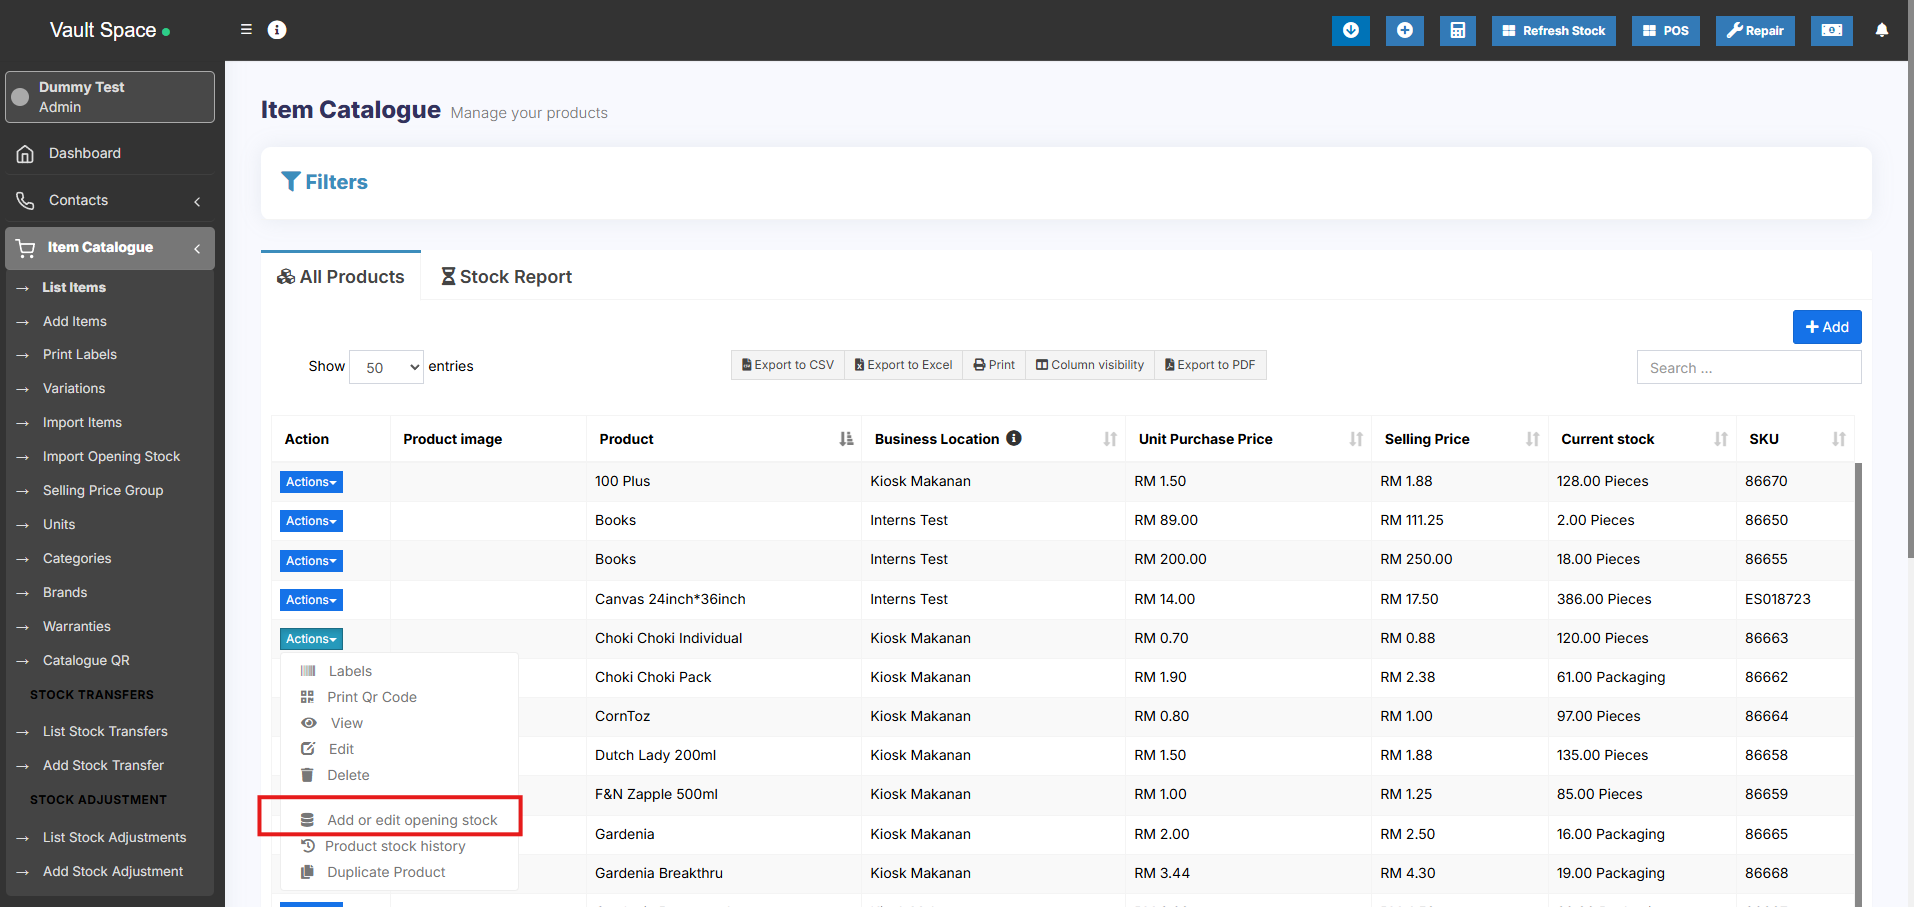
### How to View Product Stock History
1. Go to **List Items**
2. Click on the **Actions** dropdown for the desired product
3. Select **Product Stock History**
[](https://docs.senangurus.com/uploads/images/gallery/2025-10/BOQimage.png)
This helps in tracking product-level inventory changes and resolving stock-related discrepancies efficiently.
# Product expiry and related settings
### Enabling expiry for products
1.To enable expiry go to **Settings -> Business Settings -> Product section**. And check the “Enable Product Expiry” checkbox.
2. On enabling Product expiry, you can choose either “Add Item Expiry” or “Add manufacturing date & Expiry Period”
[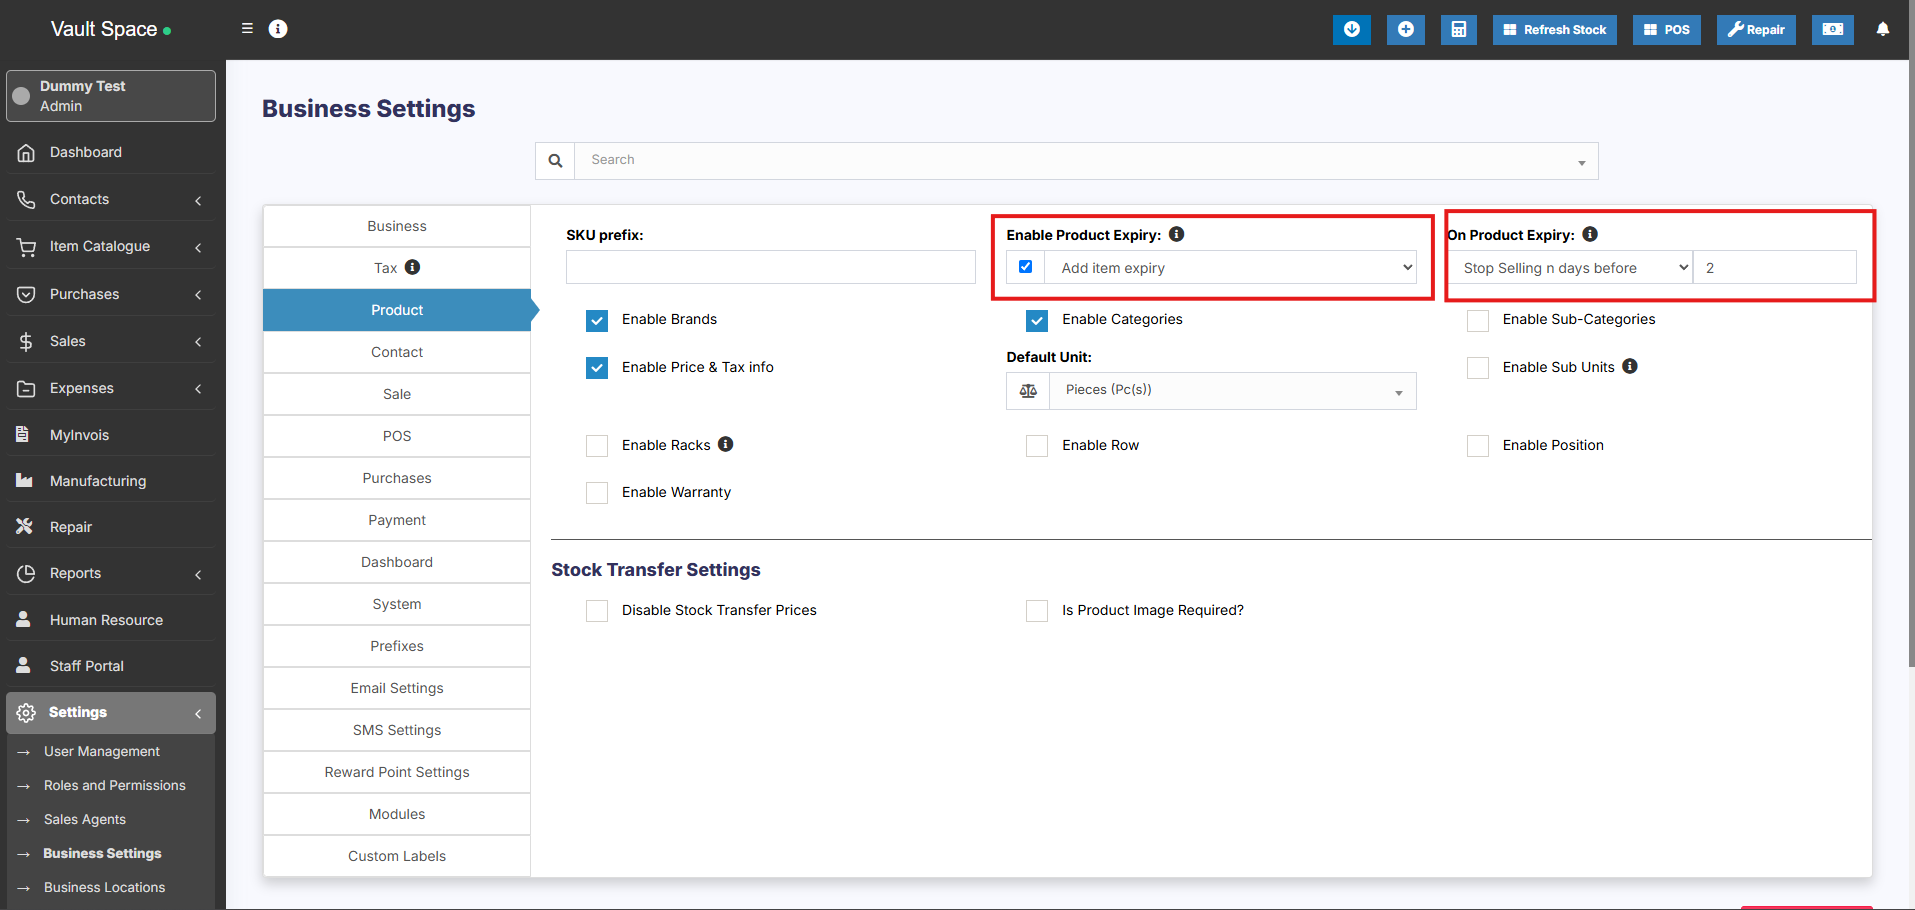](https://docs.senangurus.com/uploads/images/gallery/2025-10/Zc9image.png)
- **“Add Item expiry”** => Choose this option if you want to directly add the expiry of the item to the purchase screen.
- **“Add manufacturing date & Expiry date”** => Choose this option if you want to add the manufacturing date of the item and the expiry period. Based on the manufacturing date and expiry period it will auto-calculate the expiry date. And this expiry date can be edited. You will have to add expiry period for the product in the “Add or Edit Product” screen. And the manufacturing date in the “Add Purchase” screen.
3. “**On Product Expiry**” => With this option you can set what the system should do when a product expired.
- **“Keep Selling”** => Choose this option if you want the application to keep selling the product even after expiry.
- **“Stop Selling n days before”** => Choose this option to stop selling the item n days before the expiry. You will have to specify the value of n (which is the number of days before to stop selling)
4. “**Stock Accounting Method**” => This feature is used to set the way the product should be sold.
- **FIFO (First In First Out)** => In this the old stock should be sold first.
- **LIFO (Last In First Out)** => In this the most recent purchase stock should be sold.
For an Example:
1. Purchase 20 pcs of product A on 20 March 2018. Expiry date 10 April 2018
2. Purchase 20 pcs of the same product A on 23 March 2018. Expiry date 8 April 2018
3. Today I sold 22 pcs.
If the “Stock Accounting Method” is FIFO => Then the Product purchased on 20 March 2018 will be deduced with 20 pcs and after that product purchase on 23 March 2018 will be deduced with 2 pcs.
So in stock, we will have products from 23 March 2018 with 18 pcs.
If the “Stock Accounting Method” is LIFO => The opposite of the above will happen.
**NOTE:** You must set the required accounting method before selling the item for that accounting method to be used.
### Stock Expiry Report:
1. Go to Reports => Stock Expiry Reports.
2. Here you can filter stock “Category”, Brands, “Stock expiry date”
3. **Click on “Edit” to modify the stock left and expiry period.**
4. **If stock left is decreased the unit purchase price is adjusted accordingly.**
### Stock Expiry Alert:
– You can view stock expiry alert in Homepage bottom section. Here it shows a list of products expiring soon.
– You can set the number of days before which the expiry alter should be shown in the Homepage from “**Settings -> Business Settings -> Dashboard Section**” View Stock Expiry Alert For input field.
### Displaying product expiry date in the invoice
1. Make sure the product expiry feature is enabled as mentioned above.
2. Go to invoice layout and enable “Show Product expiry”
3. If the product expiry date is added when adding Purchase or Opening stock then when making sales it will display the product expiry dropdown. Select the expiry date which you want to sell. Then in the print invoice, it will show the expiry date.
# Lot number
*(Not available in SenangUrus-Enterprise)*
#### [What is Lot Number?](https://en.wikipedia.org/wiki/Lot_number)
### Enabling Lot Number
To **enable Lot Number tracking** in the system, follow the steps below:
1. Go to **Settings → Business Settings → Purchases**
2. Check the **Enable Lot Number** checkbox
3. Click **Update Settings** to save the changes
[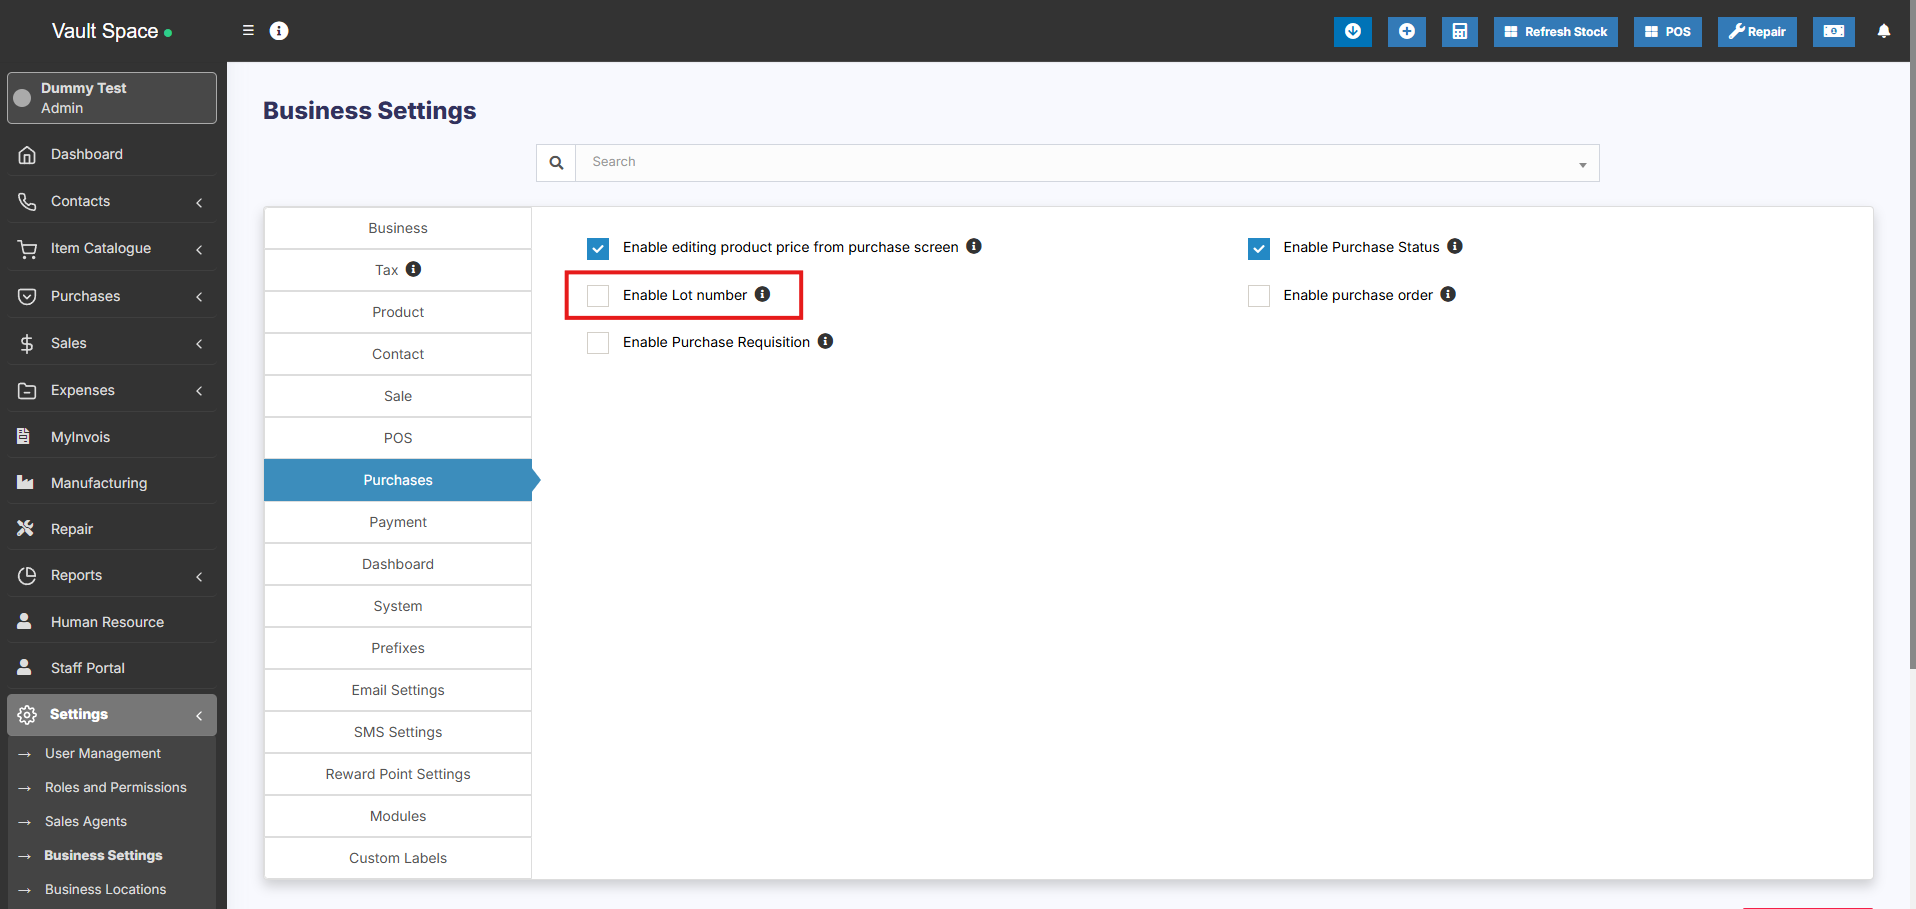](https://docs.senangurus.com/uploads/images/gallery/2025-10/JlTimage.png)
Once enabled, you’ll be able to assign **Lot Numbers** during both purchases and opening stock entries.
### Two Methods to Add Lot Numbers
#### Method 1: Adding Lot Number from Purchases
- When adding a **Purchase Entry**, the system will display a **Lot Number** field for each product.
- Enter the **Lot Number** manually during stock entry.
#### Method 2: Adding Lot Number from Opening Stock
- When adding **Opening Stock**, a **Lot Number** field will also be displayed for each item.
- Fill in the appropriate **Lot Number** for accurate tracking.
### Selling products from specific Lot
Refer to the [POS selling documentation](https://docs.senangurus.com/books/senangurus-business/page/pos-screen) Lot number description.
### Displaying product lot number in the invoice
1. Make sure the lot number feature is enabled as mentioned above.
2. Go to invoice layout and enable “Show lot number”
3. If the lot number is added when adding Purchase or Opening stock then when making sales it will display the lot number & product expiry dropdown. Select the lot number which you want to sell. Then in the print invoice, it will show the lot number.
# Selling Price Groups (Sell in different prices: wholesale/retail or for different prices for different locations)
With [SenangUrus Business](https://www.senangurus.com/) we aim to make it “One in All” POS/Stock Management Application.
*Selling price groups allow you to add different prices for a product.*
1. Sell at different prices: wholesale/retail
2. Different prices for different locations.
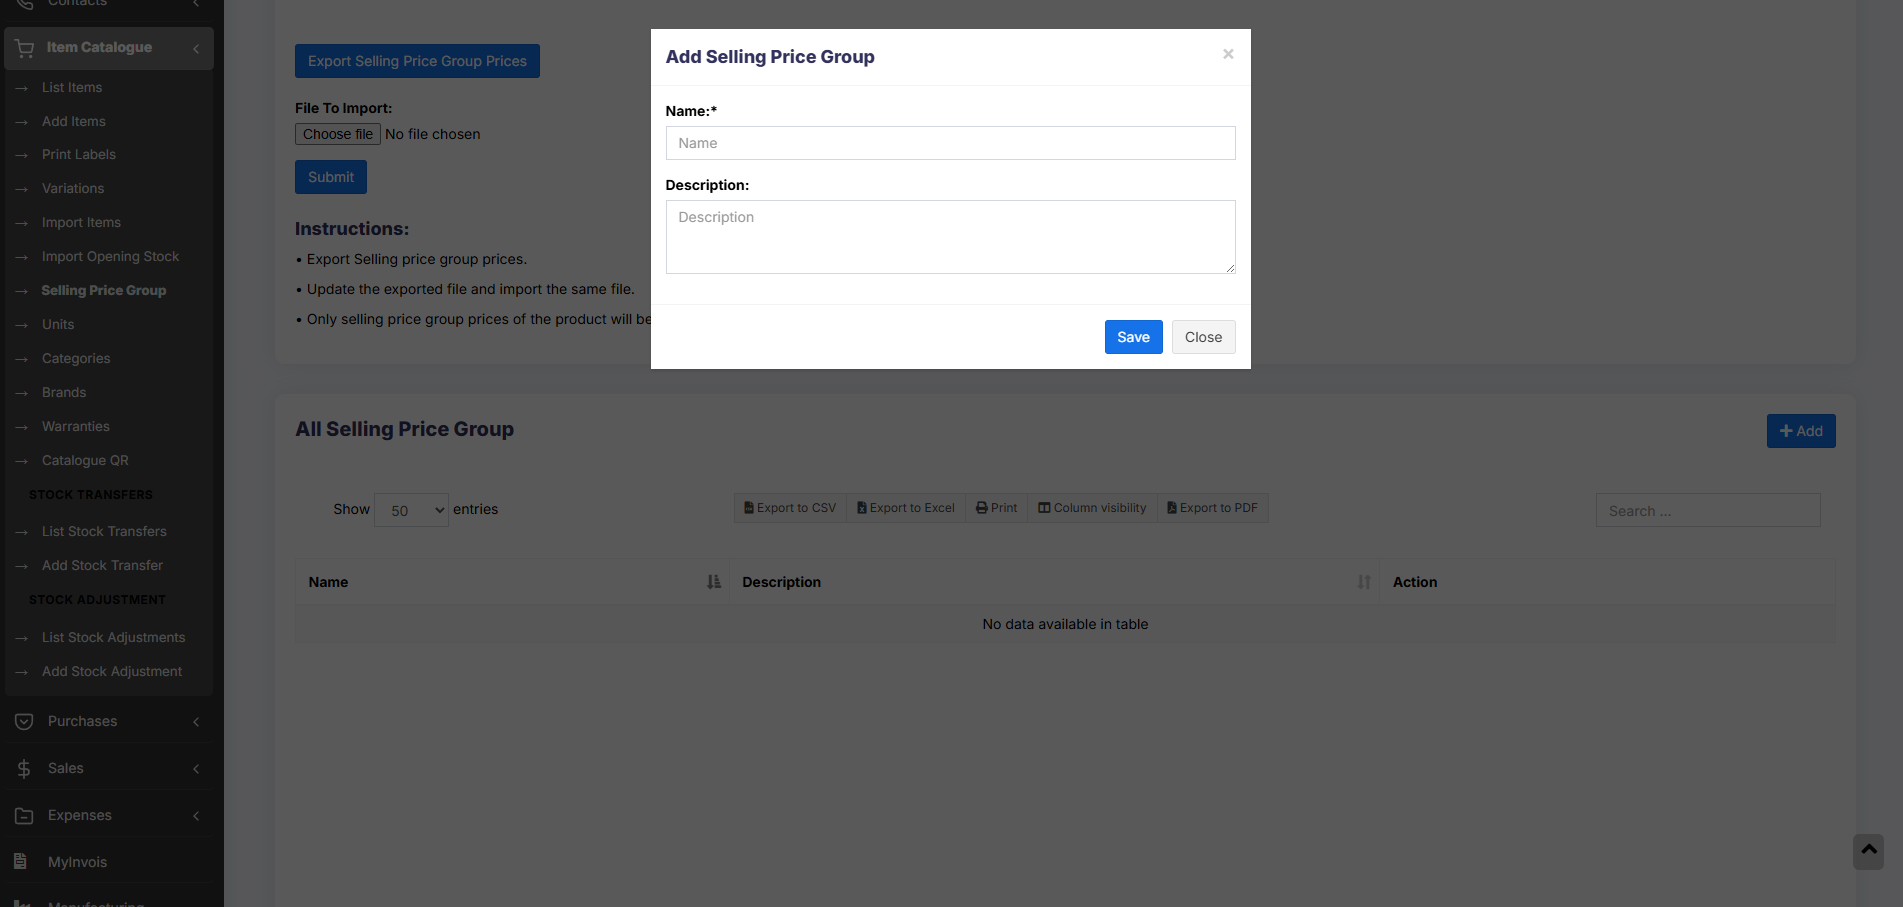
### Adding Selling Price Groups:
1. Go to **Selling Price Group**
2. Click on “Add” button to add a new price group. For example Retail price or Wholesale price or Bulk Purchase price or Location 1 price etc. as per your wish.
3. You can view a list of selling prices in “Selling Price Group” screen.
[](https://docs.senangurus.com/uploads/images/gallery/2025-10/Tdhimage.png)
### Adding Selling Price as either Fixed or Percentage:
The selling price can be given as a whole number (fixed) or in percentage.
**Fixed**: The value given will be the selling price for that group.
**Percentage:** The value given will be taken as a percentage, and that percentage of the actual selling price will be taken as the selling price for that group.
[](https://ultimatefosters.com/wp-content/uploads/2018/09/sellingprice.png)
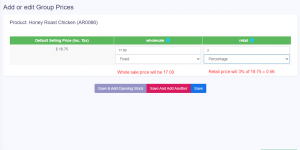
### Adding price for different price groups:
[](https://docs.senangurus.com/uploads/images/gallery/2025-10/sellingprice.png)
1. In Add/Edit product screen in the bottom, you will find the button “Save & Add Selling-price-group price”. Click on that button. **Note**: this button will not be visible if there are no selling price groups.
2. In the next screen, you will see the list of the product name (if variable product then all variations), the default price & selling price groups price. Enter the prices for it.
3. Click on Save.
### Exporting & Importing selling price group:
1. Go to **Products -> Update Price**.
2. First, download the Excel file by clicking on the “Export Product Prices” button. There will be a separate column for group price.
3. In the downloaded file change the price for the selling price group of the products.
1. Only selling price group prices of the product will be updated, not the SKU or name.
2. Any blank price will be skipped.
4. Then import the file.
### Selling at a particular price group:
1. Go to POS.
2. In the top, you will see the list of selling price groups. Select the one as per your requirement.
Note: This will not be visible if there are no selling price groups or if a user is assigned only one particular price group only.
3. Select the price group & the selling prices for the product will be as per the price group.
### Assigning a user to a particular price group:
- Sometime you may want to assign a particular or few selected price group to a user. In that case, create a role with the desired permission & price group assigned.
- You must assign at least one price group for a role if that role has permission to sell.
### Assigning a customer to a particular price group:
- Customers can’t be directly assigned to the selling price group.
- You must assign the price group to the customer group that has the customer.
### Assigning a price group to a Business Location
- Helps selling same product at a different price in different business location.
- Go to Add/Edit Business Location and select the
### FAQ?
#### 1. How to hide the Selling Price Group in POS window to all cashiers
In add/edit roles you can set which all selling price groups will be visible to that role. So in the cashier role, you can uncheck/remove permission for all other selling price groups except the one you want to show or use for the cashier.
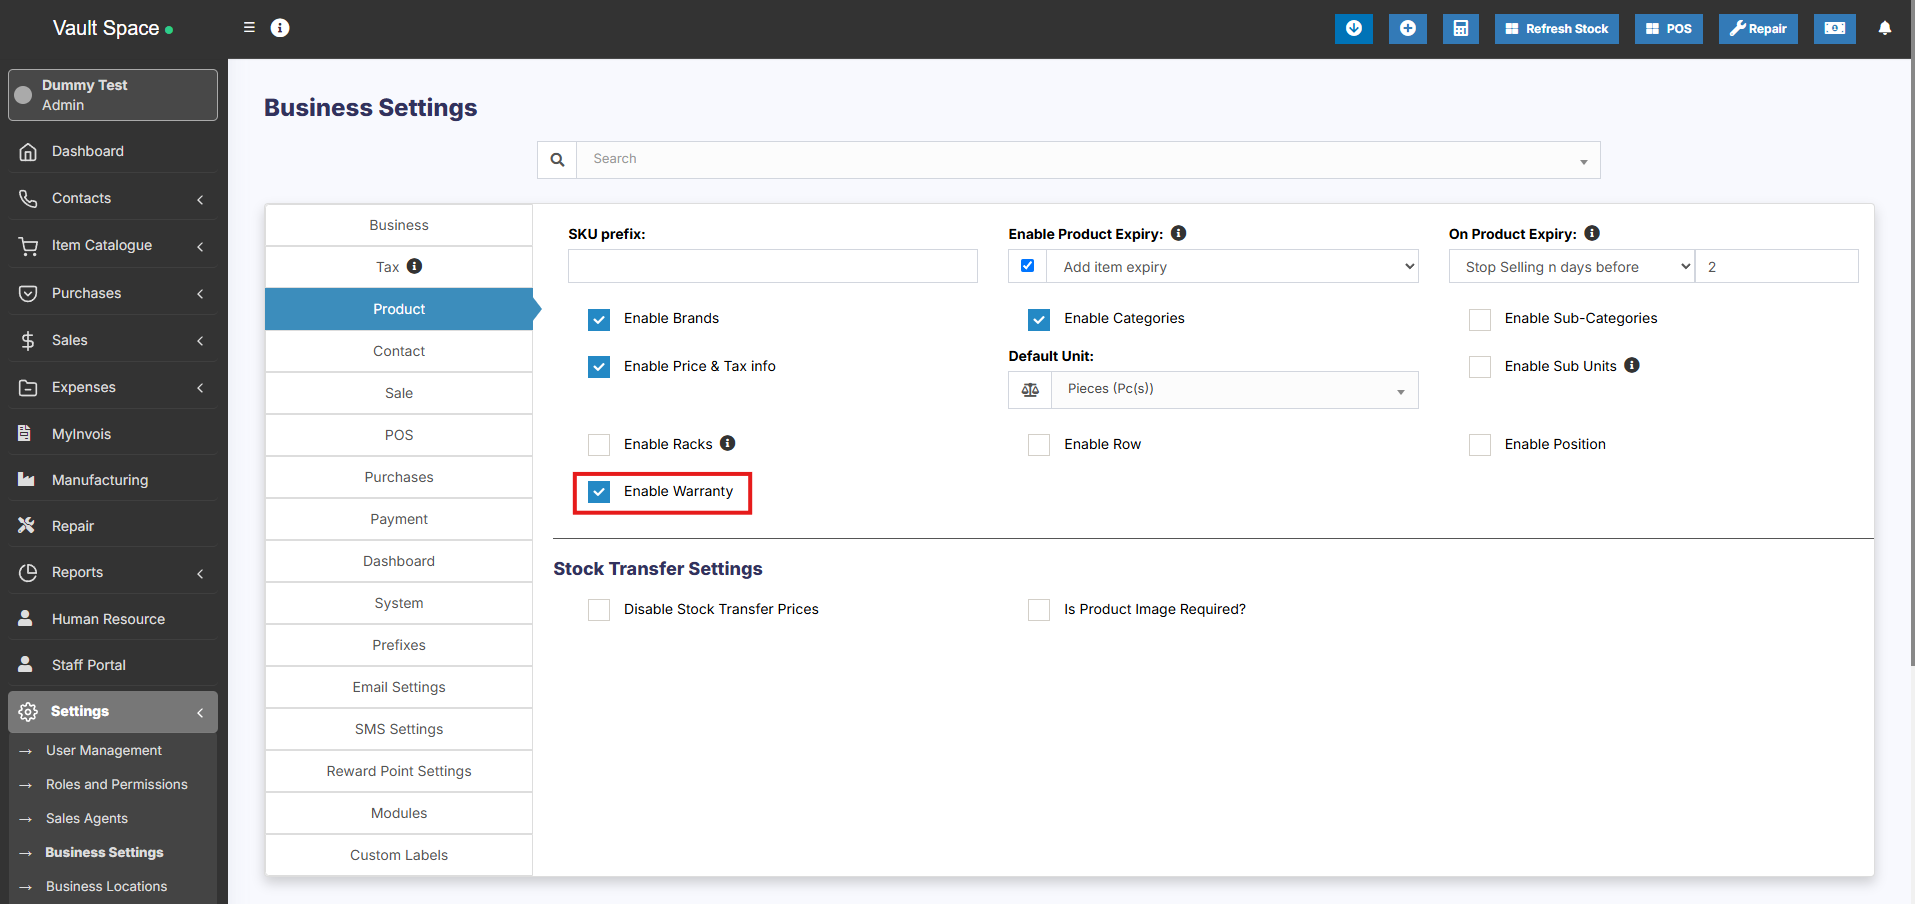
# Product Warranty
### Enabling Warranty:
To enable warranty in products go to **Settings -> Business Settings -> Products -> Enable Warranty**
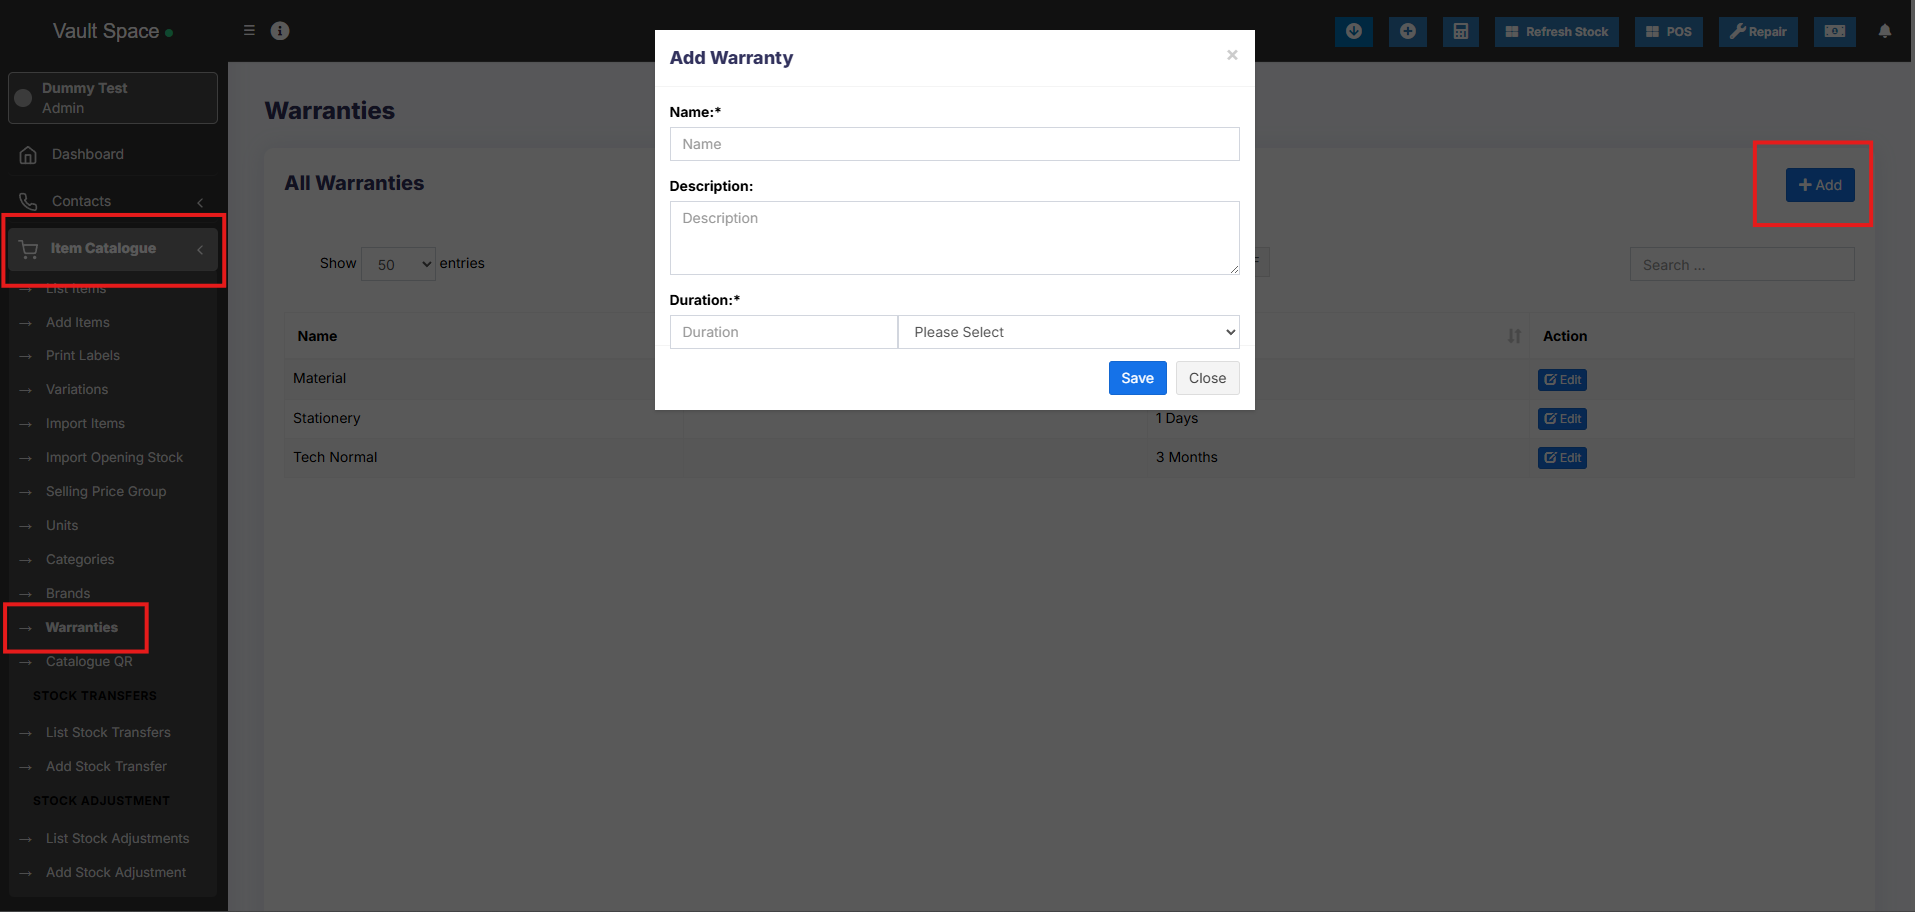
### Using Warranty
1. **Adding Warranty:** Add warranty types by going to **Products -> Warranty**.
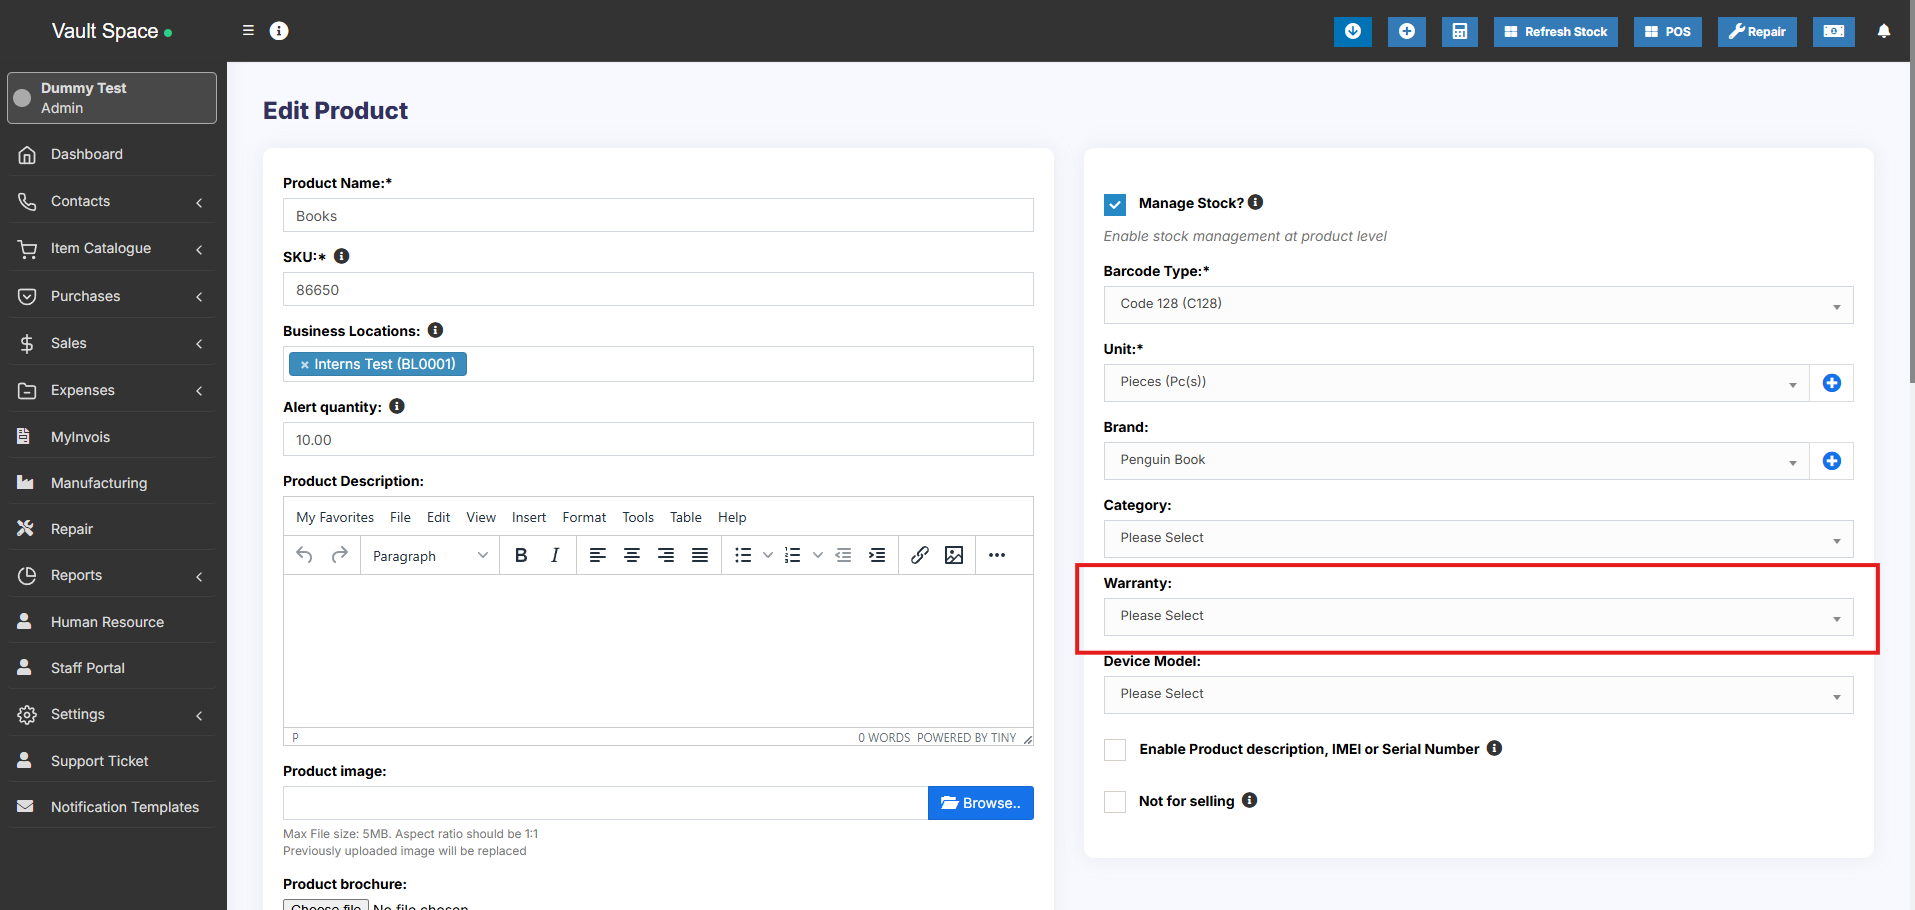
2. **Assigning warranty for products:** Go to Add/Edit product and select the warranty that is applicable for the product.
3. **Sell with warranty:** Any products which has warranty assigned when sold will use the transaction date as start of warranty. You can display warranty in receipts by enabling it from Invoice layout.
[](https://docs.senangurus.com/uploads/images/gallery/2025-10/eGrimage.png)
[](https://docs.senangurus.com/uploads/images/gallery/2025-10/6hMimage.png)
[](https://docs.senangurus.com/uploads/images/gallery/2025-10/XZbimage.png)
# Printing Labels
SenangUrus Business comes with an inbuilt feature to print customized labels for products.
You can go to print label screen from multiple places:
- From Products Sidebar menu *Products -> Print Labels.*
- Go to *Products -> View Products* and click on *Actions -> Labels.* This will add the selected product to print label list.
- Go to *Purchases -> List Purchases* and click on *Actions -> Labels.* This will add the products from the selected purchase to print label list.
## Printing Labels
1. Once you’re in print label screen, add the products for which you want to print labels by entering the name or barcode/sku id.
2. Adjust the quantity of each product’s label (*No. of labels*).
3. Select the information you want to display in labels by checking/unchecking the options under “*Information to show in labels*” heading.
4. Select the *Barcode Setting* according to your sticker. We have included some commonly used settings.
You can add new setting from *Settings -> Barcode Settings* menu.
5. Click on Preview to view the labels.
6. If everything looks good you can click on Print button to print it.
***Note:** You must set the Margins to ‘default’ in browser print window.*
7. If some information is getting half displayed because of sticker size, then it is advised to hide them or better to use a 20 Labels Per sheet settings.
## Error: Unsupported SKU id for the selected barcode type
This error means the SKU provided by you when creating the product doesn’t satisfy the encoding as per barcode type.
The solution can be edit the product and change the barcode type as “**Code 128**” save & try printing the label again.
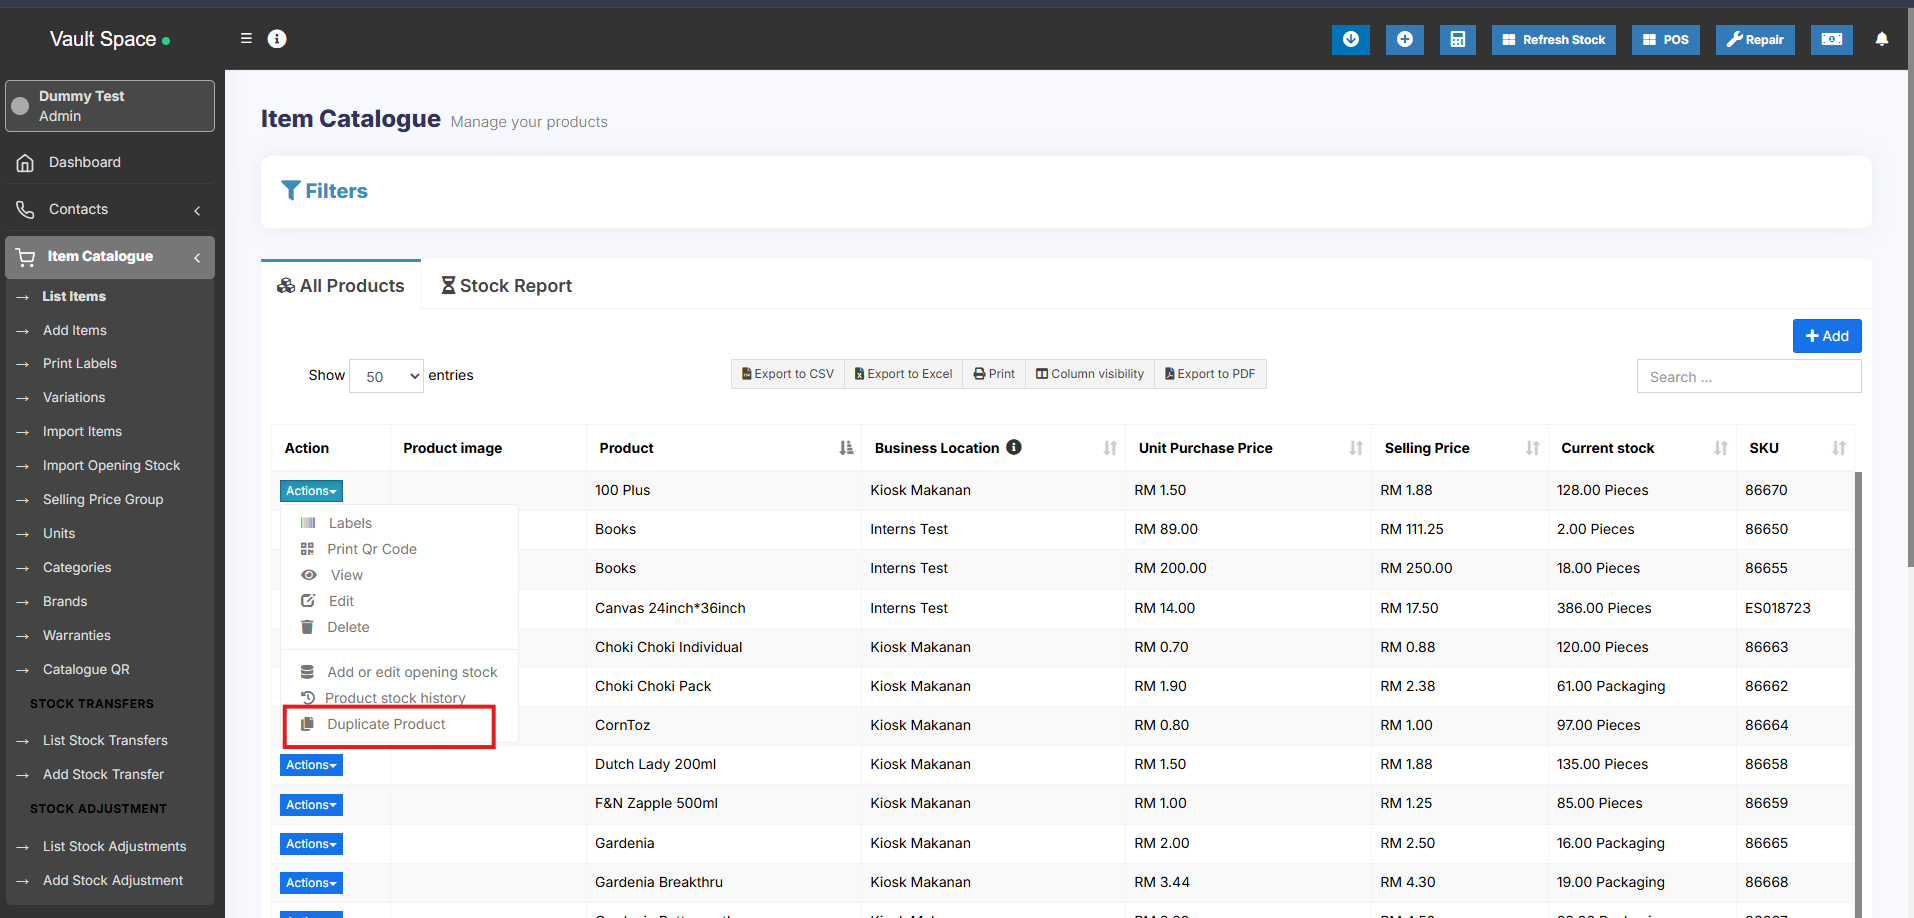
# Duplicate Product
Duplicate Products helps you to easily create a new product with the same data as another product, this helps you save repetitive entering of data and ultimately saves time by making the product entry process faster.
### Steps to Add a Duplicate Product
1. Go to **Products → List Products**
2. Click on the **Actions** dropdown button next to the product you want to duplicate
3. Select the **Duplicate Product** option
4. A **duplicate product** will be created with the same details, which you can then modify as needed
[](https://docs.senangurus.com/uploads/images/gallery/2025-10/FGAimage.png)
# Correcting product stock mis-match or incorrect stock in different reports
Mismatch between sold and purchased quantity
Mismatch in stock shows in Stock-Report and sales screen. Sales screen accepts products greater or less than as in stock reports.
This rarely happens because of some unknown reasons or if you try to manually update the stock in the database.
### Solution 1:
You must have the role of admin for this to work.
**Step 1:** Go to this URL *www.your-pos-website.com/reports/product-stock-details* **Step 2:** **IMPORTANT**: Select the business location and press search button. It will show the list of products for which there is a mismatch.
**Step 3:** **IMPORTANT**: Click on **Fix** button for each product.
Refer to the screenshot below
### Solution 2:
If the solution 1 didn’t work, follow this Solution 2.
**Step 1:** Go to List Products screen, click the **Actions** button of that particular product.
**Step 2:** Select the ‘**Product Stock History**‘ option. It will direct to **Product Stock History screen.**
**Step 3:** In the **Product Stock History,** select the particular location where the mismatch error occurs and the particular variation of the product (only if it is a variable product).
**Step 4:** This will automatically fix the mismatch issue for that product in that location.
# Bulk Edit Products
Bulk edit helps you to edit multiple products at once and saves your time.
To edit multiple products follow the steps:
1. Go to Products -> List Products
2. Select the products you want to edit by clicking on the checkbox present in each product row.
3. Scroll down you will find the **Bulk Edit** option, click on it and you can edit the selected products.
4. Also, in the bulk edit screen you can add any other products to edit them.
### How to Enable Bulk Edit Option
The **Bulk Edit** feature is disabled by default and needs to be enabled from the backend configuration.
Follow these steps to enable it:
1. Open the file: config/constants.php
2. Locate the following line: ‘enable\_product\_bulk\_edit’ => false,
3. Change it to: ‘enable\_product\_bulk\_edit’ => true,
4. Save the file.
Once enabled, the **Bulk Edit** option will be available in the **Product List** screen, allowing you to update multiple products at once.
# Rack, Row & Position of product
# Opening Stock
### To add opening stock:
1. Go to List Products
2. Actions > Add or Edit Opening Stock
[](https://docs.senangurus.com/uploads/images/gallery/2025-10/IPRimage.png)
### Editing opening stock (or) Making opening stock 0:
NOTE: If you have already added an opening stock and have to edit it, follow the steps below.
1. Click the ‘+’ symbol.
2. A new row will be created
3. Add the new amount there
To make the opening stock to ‘0’, add a negative value in step 3
E.g.) If the existing opening stock is 10, add -10 to make the stock quantity to 0 or if you add a negative amount (-4) then the amount will be 6.
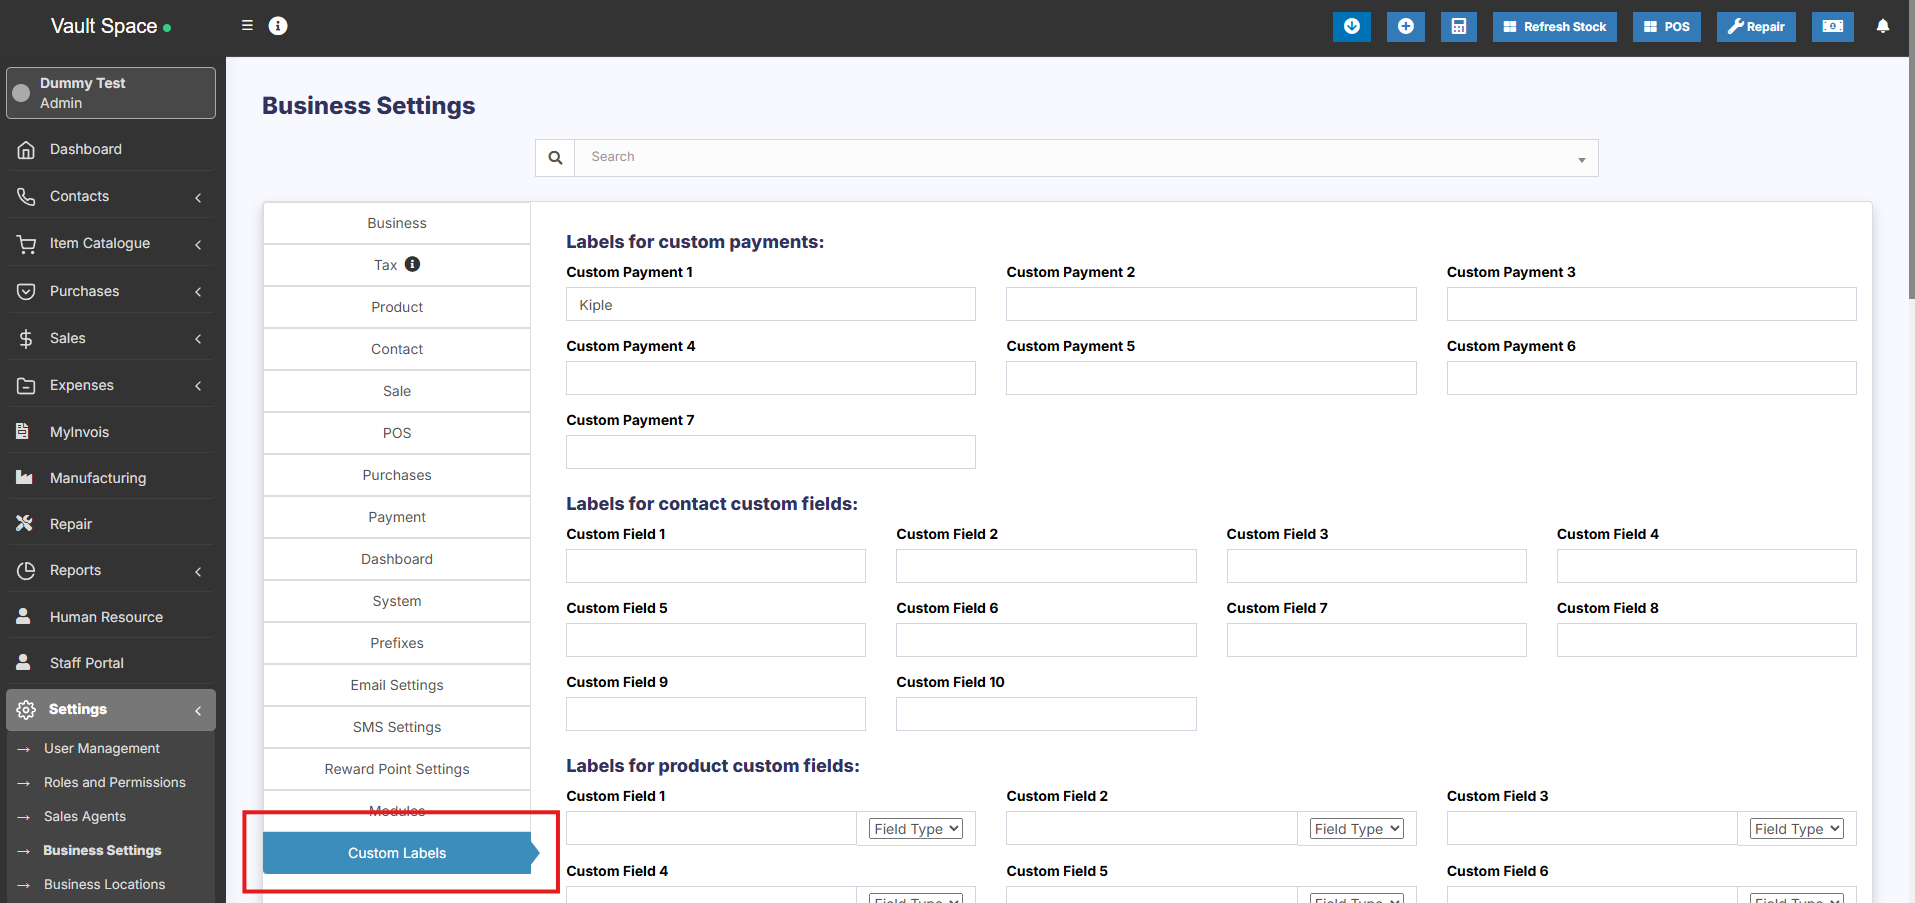
# Custom Labels for Products
### Custom Labels for Products:
20 custom fields can be added for the product, these custom fields can be used while adding a new product.
Custom fields can be anything related to the product like brand code, product code etc.
To add this **Go to Settings > Business Settings > Custom labels**
Provide the custom label name here.
[](https://docs.senangurus.com/uploads/images/gallery/2025-10/zHHimage.png)
### Field Type for labels:
The data type can be specified for each custom field. Select text, date picker or dropdown types.
For dropdown add a line break after each option.
[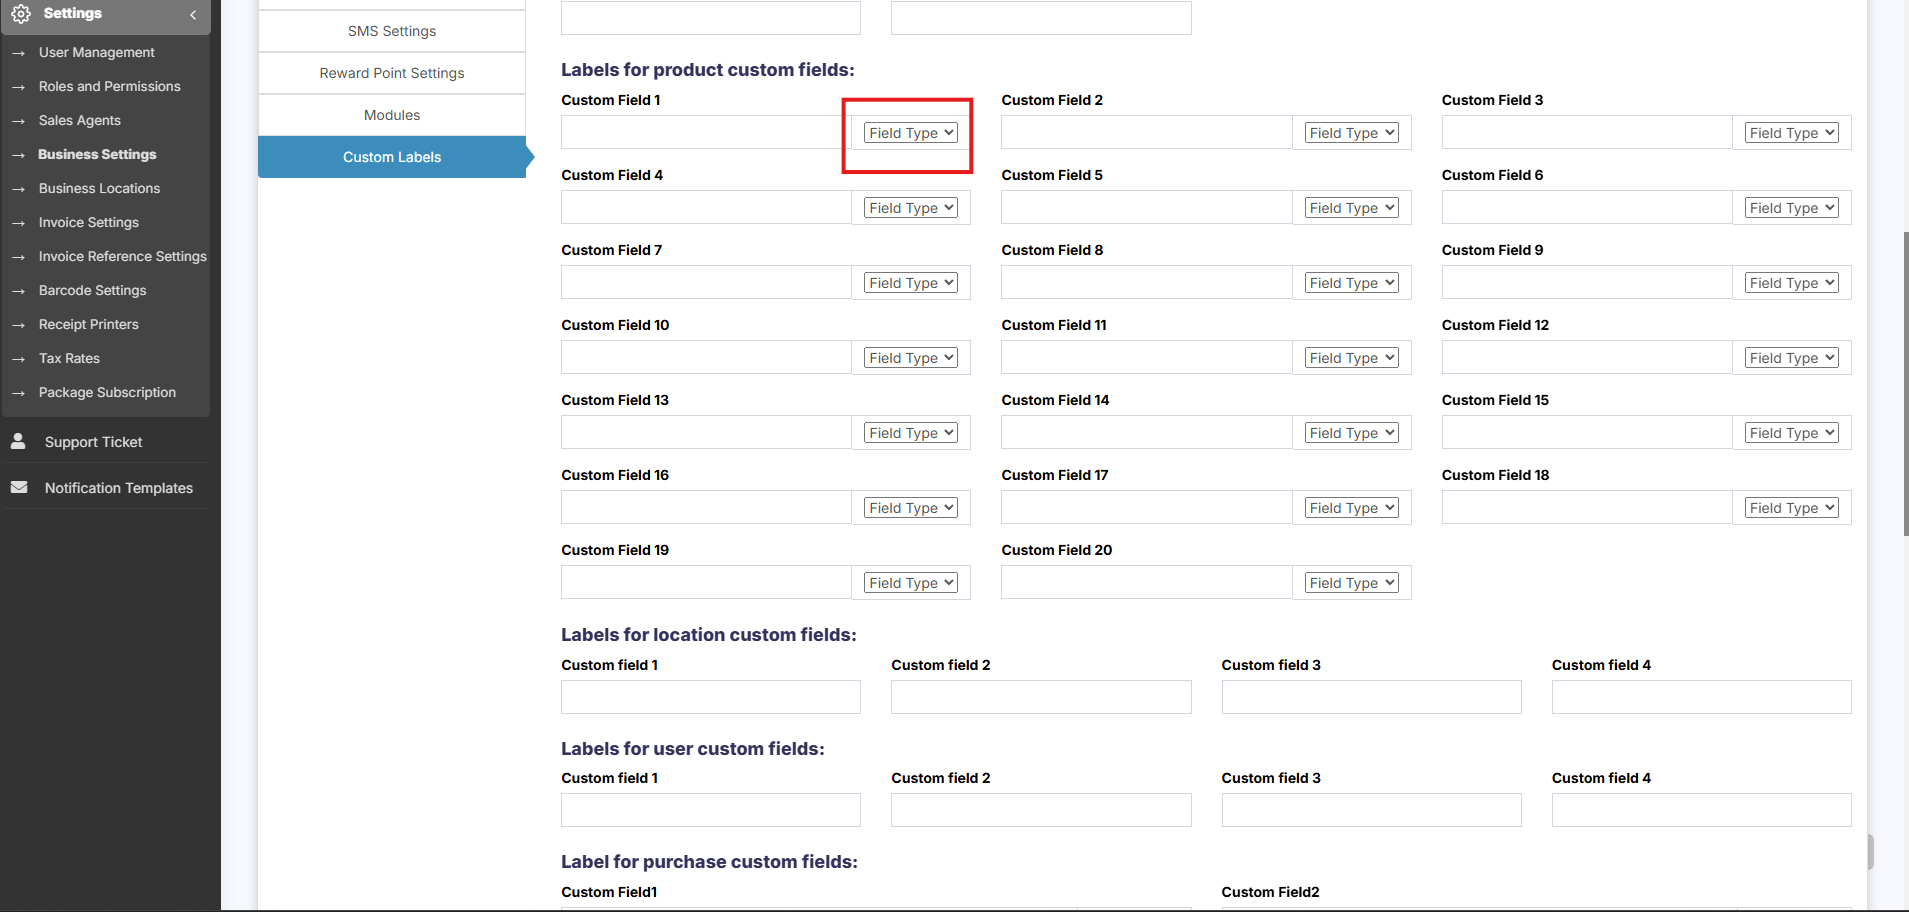](https://docs.senangurus.com/uploads/images/gallery/2025-10/1BBimage.png)
# Bulk Price Update
The **Bulk Price Update** feature allows you to update the prices of multiple products at once using an Excel file.
### Steps to Update Product Prices in Bulk
1. Go to **Products → Update Price**
2. Click to **Download the Excel File**
- The file will contain:
- **Product Names**
- **SKUs**
- **Current Selling Prices**
- **Selling Group Prices** (if any)
3. Open the Excel file and **update the prices** for the required products
4. Save the file and **upload it back** into the system
5. Click **Submit** to apply the changes
**Do not change** the product names, SKUs, or any of the **column headers** in the Excel file.
Any modification to these fields may result in errors or skipped entries during the update process.