# Others
# Graph/Chart not displaying
Graph/Chart doesn’t work as expected when you don’t follow the installation guide properly. To make sure it works you should install it using the installation guide.
**NOTE:** not following the installation process will have many other additional other problem, so we always recommend to follow it.
If you have followed the installation guide and then also it is giving this problem then follow the below-given solution.
**Alternate Solution:**
Open the .**env** file which is present inside the pos codebase. In the .env file, you will find “**APP\_URL**“, set the correct value of the url in here.
For example, if the POS URL is http://pos.ultimatefosters.com then **APP\_URL=http://pos.ultimatefosters.com**
# Increasing/Decreasing upload documents & images size limit
- To change the document size limit open config/constants.php
- You will find to variables
- ‘image\_size\_limit’ => ‘500000’, //in Bytes
- ‘document\_size\_limit’ => ‘1000000’, //in Bytes,
- Change the value of the above to change the size limit.
- Size must be provided in Bytes.
- Bytes to MB converter (https://convertlive.com/u/convert/bytes/to/megabytes)
# Logo or Image not Getting displayed
If you’re using **UltimatePOS version 2.11.4** do this: https://ultimatefosters.com/ultimate-pos/update-guide-updating-ultimate-pos/#NOTE\_If\_you8217re\_updating\_from\_V2113\_to\_V2114\_or\_higher\_then\_do\_these\_additional\_steps
In **UltimatePOS version 2.11.2** we implemented an easy way to fix images issue.
1. Login in UltimatePOS with **Administrator account (or** superadmin **account)**
2. Go to **<pos\_directory>/public** directory via FTP or cPanel and delete “**storage**” directory if present. This may or may not be present.
**PS**: don’t delete <pos\_directory>/storage.
3. Run **www.yourwebsite.com/install/fix-image** and it will fix the image issue. If it displays some error the check the error information as given below.
If you’re using a **lower version then 2.11.2** then follow the below steps or update your version.
1. This can happen if the “**symbolic link**” is not created successfully during installation steps.
2. Go to **<pos\_directory>/public** and delete “**storage**” directory if present. This may or may not be present.
**PS**: don’t delete <pos\_directory>/storage.
3. If you’re using in localhost then open your command prompt (cmd) or if in hosting server then use shell access to login via terminals. Contact your hosting provider if you need details on accessing via terminal.
4. Go to pos directory:
**cd <pos\_directory>**
5. in the pos directory run the below command:
**php artisan storage:link**
6. If it shows success then check your application, it should show the images now.
If it shows some **error** like:
- **Undefined command “php”** then add php to your environment variable or check your server documentation on running php via command line.
- symblink**() Permission denied**: Change permission of public directory as mentioned in the installation doc.
- symlink**() has been disabled**: Contact your hosting provider to enable it.
# White Labeling & Rebranding SenangUrus Business
A white label product is a product or service produced by one company (the producer) that other companies (the marketers) rebrand to make it appear as if they had made it.
Ultimate POS allows you to white label the product with your company name and resell it as per purchase license rules.
To white label the application:
During installation, it asks for Application name & Application title. Simply use your company name or your branded product name as the name of the application. Also, give a meaning title to it.
– Now the name you entered will be displayed in Landing Page & also in the footer of the application.
– You can also change the application name after installation. Simply open `.env` file present in the root folder of the application and change the `APP_NAME` & `APP_TITLE` value.
# Tips & Tricks for using SenangUrus Business effectively.
### **Improving Browser based Print (Receipts or other)**
- In chrome/firefox before printing, it shows a preview dialogue. The preview dialogue left side has some setting.
- Enable Background style
- Try setting the margin as default.
- Set correct page size (mostly A4)
- Enable/Disable **header & footer to show/hide the page URL.**
-
### **Create Shortcuts for web application**
- - Are you tired of opening browser and the opening your website? If yes we have a solution.
- Open SenangUrus Business in chrome.
- Click the wrench icon (3 dots) in the right corner of the screen.
- Scroll down to Tools and select “Create Application Shortcuts” or “Add To Desktop”
- From the dialogue box, choose whether you want the shortcut to appear on your Desktop, in your Start menu or pinned to your Taskbar.
- Click create and your shortcut will appear in the desktop.
### **Website to Desktop apps in One-Click**
- You can use this online tool to convert website to Desktop App – [Website-to-Desktop](https://ultimatefosters.com/recommends/website-to-desktop/ "Website-to-Desktop")
- This tool is just a wrapper for browser
- We haven’t tested SenangUrus Business 100% with this tool, but you can give it a try.
### **Browser Full-Screen mode or distraction-free mode**
- - Whenever you’re in “Full Screen” mode and use a browser-based printing option it gets exit from Full Screen. This also happens if you navigate to another page in full screen.
- But if you have enabled “Full Screen” by pressing “F11” it will not get exit during navigation and also during browser-based printing.
- Using SenangUrus Business POS sales screen in “Full screen” by pressing “F11” gives an ultimate experience.
### **Barcode Scanner Trick**
- Many barcode scanners send an “End of Line” or “CR/LF” ( the ‘Carriage Return’ and the ‘Line Feed’) characters after each scan. This will result in some issue with SenangUrus Business. Well, it’s not an issue with SenangUrus or the scanner. This feature is useful in some cases. But you should disable it while using SenangUrus.
- Some noted behaviors are, in POS screen invoice gets automatically submitted after scanning, automatically page gets redirected after scanning.
- To disable it simply follow the instruction provided by your manufacturer. ALL branded manufacturer have instruction available to “Disable Carriage return & Line Feed”. Google it.
- For example: In this link, you will find simple instructions for Honeywell scanners (“RESOLUTION” present at bottom of page) (https://honeywellaidc.force.com/supportppr/s/article/How-to-remove-the-Enter-after-each-scan)
Do you have a particular Trick to improve user experience? Share with us [here](https://ultimatefosters.com/support/)
Bookmark this link, as we will keep updating it.
# Decimal Precision for Currency & Quantity
Some countries like Bahrain, Kuwait, Tunisia, Oman, etc has 3 decimal currencies. So with this feature, you can adjust the decimal significant figures for currency & quantity.
The default precision is 2 for currency & quantity if you want to change it follow the below steps:
Go to Settings -> Business Settings. Here you can enter the required decimal precision for quantity and currency.
[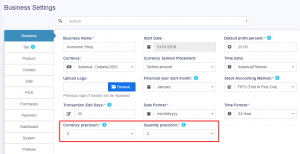](https://ultimatefosters.com/wp-content/uploads/2019/04/decimalprecision.png)
If you are using version 4.7.7 or below, follow the below steps to change the decimal precision.
1. Go to **config/constants.php**
2. Change **currency\_precision** value to change the precision for currency. The maximum is 4.
3. Change **quantity\_precision** value to change the precision for quantity. The maximum is 4.
# Adding Favicon, Login & Registration page background image
## Adding Favicon
To change the Favicon.ico image go to **/public** folder and replace the **favicon.ico** file present there.
Clear cache of your browser and it will start to show the new image you added.
## Changing Logo in Login & Registration page
Replace the image **pos\\public\\img\\logo-small.png**
Keep the new image name as “**logo-small.png**”
## Changing Background Colour in Login Page
How to change the blue background in the login page?
To change the blue background in the login page, check the css file and change the line as mentioned below.
Step 1: Login to your server and open the codebase files for UltimatePOS.
Step 2: Go to pos\\resources\\views\\layouts\\partials\\extracss\_auth.blade.php and edit line no 15. Add the required color code here.
## Setting Background Image in Login/Registration and Pricing Page
You can change the default blue background in the **Login Page**, **Registration Page**, and **Pricing Page** by updating the style file.
Step 1: Go to pos\\resources\\views\\layouts\\partials\\extracss\_auth.blade.php
Step 2: Inside this file, you will find the code for both **background image** and **background color**.
Step 3:
To apply your choice:
- **For Background Image** → Un-comment the line of code for the background image.
- **For Background Color** → Un-comment the line of code for the background color.
## Changing Application Name in Landing page
To change the application name in the landing page, follow the steps given below
**Step 1:** Open .env file present in your codebase.
**Step 2:** Search for **APP\_NAME**.
**Step 3:** Change the value for the **APP\_NAME** =”examplePOS” as required.
## How can I display the login page instead of the landing page? (Making login page as the landing page)
If you want to redirect the landing page of your POS system to login page page, you can modify the route in the **pos/routes/web.php** file to call the login blade instead of the welcome blade.
This will display the login page instead of the default welcome page when the POS system is accessed.
To change the route and call the login blade, follow these steps:
1. Open the **routes/web.php** file in your code editor.
2. Search for the route that specifies the view for the welcome blade file.
3. Replace the view name with the name of the login blade file.
4. Save the changes to the routes/web.php file.
For more information on using blade templates in Laravel, refer to the Laravel documentation at [https://laravel.com/docs/10.x/blade](https://laravel.com/docs/10.x/blade).
If you need to pass data to the view, you can refer to this guide at [https://www.geeksforgeeks.org/different-ways-for-passing-data-to-view-in-laravel/](https://www.geeksforgeeks.org/different-ways-for-passing-data-to-view-in-laravel/).
For more information on file paths in UltimatePOS, refer to this documentation at [https://ultimatefosters.com/docs/ultimatepos/technical/different-files-path/](https://ultimatefosters.com/docs/ultimatepos/technical/different-files-path/).
# Export Feature
## Export Feature in UltimatePOS
Ultimate POS allows you to export your data into either Excel, CSV, or pdf files. You can export your sale, purchase, products, categories, all your reports, etc.
On the top of every data table, you can find export buttons as shown in the image below.
[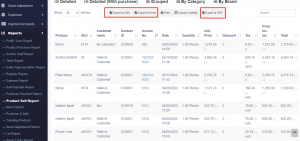](https://ultimatefosters.com/wp-content/uploads/2022/04/Exportfile.png)
## Removing columns from the data table
If you want to remove the action column or any other column while exporting the data, use the column visibility feature. Select the columns that are to be removed and then click export.
[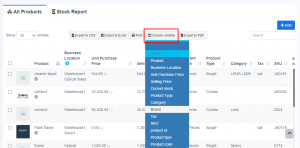](https://ultimatefosters.com/wp-content/uploads/2022/04/columnvisibility.png)
# Login Session Time
## **Increasing the login session time:**
Follow the file path below to increase the login session time of your SenangUrus Business.
config/session.php
# Issue: Product not shown on view
Sometimes, you may encounter an issue where the “List Products > View” function does not work.
This problem may arise from the permission restrictions for the uploads folder in the code base.
1. Log in to your server and find the pos/public/uploads folder. Then, change the permission to ‘777’.
2. Save the file and try to view the product again.
If you still have the issue, open a ticket in support and post the issue.
# Solution for Sell Delete Not Working Issue
## Error: Deleting Sale Not Working, shows “Something Went Wrong Please Try again Later”
#### Issue:
Sometimes, when attempting to delete a sale, the system may display the following error: **“Something went wrong. Please try again later.”**
This usually occurs due to a database configuration issue.
### Solution:
Follow the steps below to diagnose and fix the issue:
#### Step 1: Check the Error Log
Navigate to your application’s log file located at: **pos/storage/logs/laravel.log**
#### Step 2: Identify the Error
If the log shows the following error: **General error: Prepared statement needs to be re-prepared**
#### Step 3: Update Database Configuration
Open the database configuration file located at:
`pos/config/database.php`
Find the MySQL configuration block and ensure it includes the following option:
‘mysql’ => \[
‘driver’ => ‘mysql’,
‘url’ => env(‘DATABASE\_URL’),
‘host’ => env(‘DB\_HOST’, ‘127.0.0.1’),
‘port’ => env(‘DB\_PORT’, ‘3306’),
‘database’ => env(‘DB\_DATABASE’, ‘forge’),
‘username’ => env(‘DB\_USERNAME’, ‘forge’),
‘password’ => env(‘DB\_PASSWORD’, ”),
‘unix\_socket’ => env(‘DB\_SOCKET’, ”),
‘charset’ => ‘utf8mb4’,
‘collation’ => ‘utf8mb4\_unicode\_ci’,
‘prefix’ => ”,
‘prefix\_indexes’ => true,
‘strict’ => false,
‘engine’ => null,
‘options’ => extension\_loaded(‘pdo\_mysql’) ? array\_filter(\[
PDO::MYSQL\_ATTR\_SSL\_CA => env(‘MYSQL\_ATTR\_SSL\_CA’),
\\PDO::ATTR\_EMULATE\_PREPARES => true, // Add this line
\]) : \[\],
\],
**Important:** Make sure the line `\PDO::ATTR_EMULATE_PREPARES => true` is included under the `options` array. This setting helps prevent the “re-prepared” error by enabling emulation of prepared statements.
#### Step 4: Save Changes
After updating the configuration save the file.
# Adding/Modifying Currency in ultimatepos
With UltimatePOS we have tried to include many currencies inbuilt in the system. But we have missed some of them, sorry for that!!
No worries, still you can add any new currency into the system.
1. To add new currency open the database table which is used for UltimatePOS. Go to table currency
2. Click on “Insert” new row option.
3. Fill your currency details as below and save it.
- country
- currency
- code
- symbol
- thousand\_seperator
- decimal\_seperator
Great, Your currency is added now.